2021 ALFA ROMEO GIULIA door lock
[x] Cancel search: door lockPage 171 of 284
169
(Continued)
Supplemental Side Air Bags
Supplemental Seat-Mounted Side Air Bags
(SABs)
This vehicle is equipped with Supplemental
Seat-Mounted Side Air Bags (SABs).
Supplemental Seat-Mounted Side Air Bags
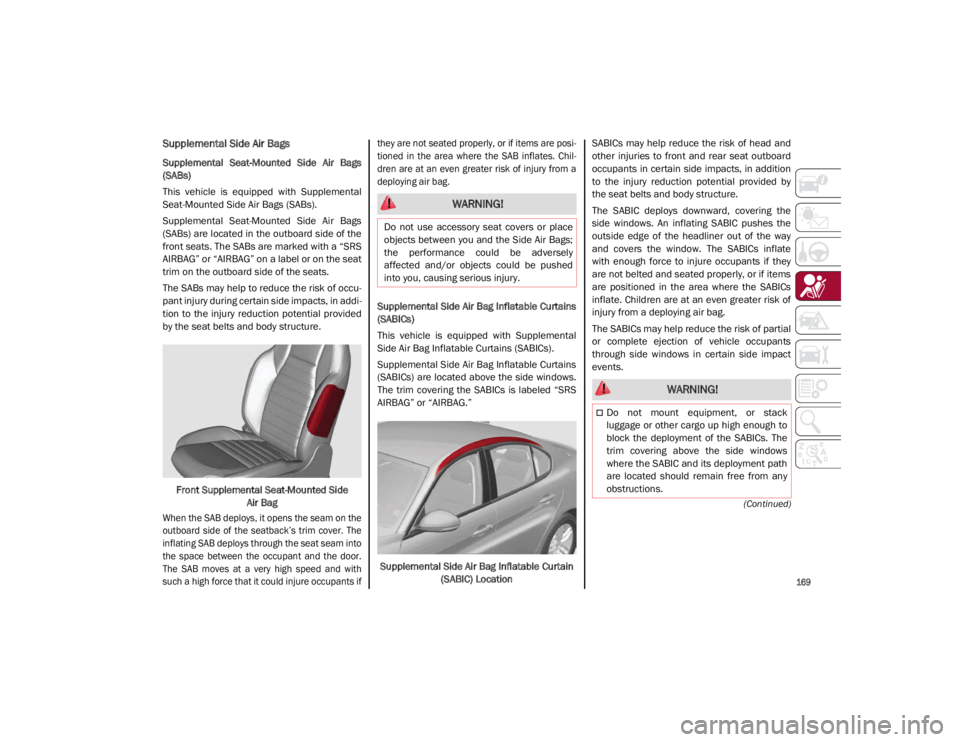
(SABs) are located in the outboard side of the
front seats. The SABs are marked with a “SRS
AIRBAG” or “AIRBAG” on a label or on the seat
trim on the outboard side of the seats.
The SABs may help to reduce the risk of occu-
pant injury during certain side impacts, in addi-
tion to the injury reduction potential provided
by the seat belts and body structure.
Front Supplemental Seat-Mounted Side Air Bag
When the SAB deploys, it opens the seam on the
outboard side of the seatback’s trim cover. The
inflating SAB deploys through the seat seam into
the space between the occupant and the door.
The SAB moves at a very high speed and with
such a high force that it could injure occupants if they are not seated properly, or if items are posi
-
tioned in the area where the SAB inflates. Chil -
dren are at an even greater risk of injury from a
deploying air bag.
Supplemental Side Air Bag Inflatable Curtains
(SABICs)
This vehicle is equipped with Supplemental
Side Air Bag Inflatable Curtains (SABICs).
Supplemental Side Air Bag Inflatable Curtains
(SABICs) are located above the side windows.
The trim covering the SABICs is labeled “SRS
AIRBAG” or “AIRBAG.”
Supplemental Side Air Bag Inflatable Curtain (SABIC) Location SABICs may help reduce the risk of head and
other injuries to front and rear seat outboard
occupants in certain side impacts, in addition
to the injury reduction potential provided by
the seat belts and body structure.
The SABIC deploys downward, covering the
side windows. An inflating SABIC pushes the
outside edge of the headliner out of the way
and covers the window. The SABICs inflate
with enough force to injure occupants if they
are not belted and seated properly, or if items
are positioned in the area where the SABICs
inflate. Children are at an even greater risk of
injury from a deploying air bag.
The SABICs may help reduce the risk of partial
or complete ejection of vehicle occupants
through side windows in certain side impact
events.
WARNING!
Do not use accessory seat covers or place
objects between you and the Side Air Bags;
the performance could be adversely
affected and/or objects could be pushed
into you, causing serious injury.
WARNING!
Do not mount equipment, or stack
luggage or other cargo up high enough to
block the deployment of the SABICs. The
trim covering above the side windows
where the SABIC and its deployment path
are located should remain free from any
obstructions.
21_GA_OM_EN_USC_t.book Page 169
Page 174 of 284

SAFETY
172
Enhanced Accident Response System
In the event of an impact, if the communica-
tion network remains intact, and the power
remains intact, depending on the nature of the
event, the Occupant Restraint Controller (ORC)
will determine whether to have the Enhanced
Accident Response System perform the
following functions:
Cut off fuel to the engine (if equipped)
Cut off battery power to the electric motor (if
equipped)
Flash hazard lights as long as the battery
has power
Turn on the interior lights, which remain on
as long as the battery has power or for
15 minutes from the intervention of the
Enhanced Accident Response System
Unlock the power door locks
Your vehicle may also be designed to perform
any of these other functions in response to the
Enhanced Accident Response System:
Turn off the Fuel Filter Heater, Turn off the
HVAC Blower Motor, Close the HVAC Circula -
tion Door
Cut off battery power to the:
• Engine
• Electric Motor (if equipped)
• Electric power steering
• Brake booster
• Electric park brake
• Automatic transmission gear selector
• Horn
• Front wiper
• Headlamp washer pump
NOTE:
After an accident, remember to cycle the ignition
to the OFF position and remove the key from the
ignition switch to avoid draining the battery.
Carefully check the vehicle for fuel leaks in the
engine compartment and on the ground near the
engine compartment and fuel tank before reset -
ting the system and starting the engine. If there
are no fuel leaks or damage to the vehicle elec -
trical devices (e.g. headlights) after an accident,
reset the system by following the procedure
described below. If you have any doubt, contact
an authorized dealer.
Enhanced Accident Response System
Reset Procedure
After the event occurs, when the system is active,
a message regarding fuel cutoff is displayed.
Turn the ignition switch from ignition ACC or ON/
RUN to ignition OFF. Carefully check the vehicle
for fuel leaks in the engine compartment and on
the ground near the engine compartment and
fuel tank before resetting the system and
starting the engine.
Depending on the nature of the event the left
and right turn signal lights, located in the
instrument panel, may both be blinking and
will continue to blink. In order to move your
vehicle to the side of the road, you must follow
the system reset procedure.
21_GA_OM_EN_USC_t.book Page 172
Page 190 of 284

SAFETY
188
(Continued)
Periodic Safety Checks You Should Make
Outside The Vehicle
Tires
Examine tires for excessive tread wear and
uneven wear patterns. Check for stones, nails,
glass, or other objects lodged in the tread or
sidewall. Inspect the tread for cuts and cracks.
Inspect sidewalls for cuts, cracks, and bulges.
Check the wheel nuts for tightness. Check the
tires (including spare) for proper cold inflation
pressure.
Lights
Have someone observe the operation of brake
lights and exterior lights while you work the
controls. Check turn signal and high beam
indicator lights on the instrument panel.
Door Latches
Check for proper closing, latching, and locking.
Fluid Leaks
Check area under the vehicle after overnight
parking for fuel, coolant, oil, or other fluid
leaks. Also, if gasoline fumes are detected or if
fuel or brake fluid leaks are suspected the
cause should be located and corrected imme-
diately.
ALWAYS REMOVE THE EXISTING FLOOR
MAT FROM THE VEHICLE before
installing any other floor mat. NEVER
install or stack an additional floor mat on
top of an existing floor mat.
ONLY install floor mats designed to fit your
vehicle. NEVER install a floor mat that
cannot be properly attached and secured
to your vehicle. If a floor mat needs to be
replaced, only use a FCA approved floor
mat for the specific make, model, and
year of your vehicle.
ONLY use the driver’s side floor mat on the
driver’s side floor area. To check for inter -
ference, with the vehicle properly parked
with the engine off, fully depress the
accelerator, the brake, and the clutch
pedal (if present) to check for interfer -
ence. If your floor mat interferes with the
operation of any pedal, or is not secure to
the floor, remove the floor mat from the
vehicle and place the floor mat in your
trunk.
ONLY use the passenger’s side floor mat
on the passenger’s side floor area.
WARNING! (Continued)
ALWAYS make sure objects cannot fall or
slide into the driver’s side floor area when
the vehicle is moving. Objects can become
trapped under accelerator, brake, or
clutch pedals and could cause a loss of
vehicle control.
NEVER place any objects under the floor
mat (e.g., towels, keys, etc.). These
objects could change the position of the
floor mat and may cause interference with
the accelerator, brake, or clutch pedals.
If the vehicle carpet has been removed
and re-installed, always properly attach
carpet to the floor and check the floor mat
fasteners are secure to the vehicle carpet.
Fully depress each pedal to check for
interference with the accelerator, brake,
or clutch pedals then re-install the floor
mats.
It is recommended to only use mild soap
and water to clean your floor mats. After
cleaning, always check your floor mat has
been properly installed and is secured to
your vehicle using the floor mat fasteners
by lightly pulling mat.
WARNING! (Continued)
21_GA_OM_EN_USC_t.book Page 188
Page 220 of 284

SERVICING AND MAINTENANCE
218
Replace The Cabin Air Cleaner
For the correct servicing intervals
Ú
page 204. For cabin air cleaner replace -
ment, contact an authorized dealer.
Lubricating Moving Parts Of The Bodywork
Ensure that the locks and bodywork junction
points, including components such as the seat
guides, door hinges (and rollers), trunk and hood
are periodically lubricated with lithium-based
grease to ensure correct, silent operation and to
protect them from rust and wear.
Thoroughly clean the components, eliminating
every trace of dirt and dust. After lubricating,
eliminate excess oil and grease. Also pay
particular attention to the hood closing
devices, to ensure correct operation. During
operations on the hood, to be carried out with
the engine cold, also remember to check,
clean and lubricate the locking, release and
safety devices. Lubricate the external lock barrels twice a
year. Apply a small amount of high-quality
lubricant directly into the lock barrel.
If necessary, contact an authorized dealer as
soon as possible.
Windshield Wiper
Periodically clean the windshield and rear
window and rubber profile of the windshield
wiper blades, using a sponge or a soft cloth
and a non-abrasive detergent. This eliminates
the salt or impurities accumulated when
driving.
Prolonged operation of the windshield window
wipers with dry glass may cause the deteriora
-
tion of the blades, in addition to abrasion of
the surface of the glass. To eliminate the impu -
rities on the dry glass, always operate the
windshield washers.
In the event of very low outdoor temperatures,
below 0°F (-17.8°C) , ensure that the move -
ment of the rubber part in contact with the
glass is not obstructed. Use a suitable deicing
product to release it if required.
Avoid using the windshield wipers to remove
frost or ice.
Also avoid contact of the rubber profile of the
blades with petroleum derivatives such as
engine oil, gas, etc.
NOTE:
The life of the windshield wiper blades varies
according to the usage frequency. In any case,
it is advised to replace the blades approxi
-
mately once a year. When the blades are worn,
noise, marks on the glass or streaks of water
may be noticed. In the presence of these
conditions, clean the windshield wiper blades
or, if necessary, replace them.
Raising The Windshield Wiper Blades
(“Service Position” Function)
The “service position” function allows the
driver to replace the windshield wiper blades
more easily. It is also recommended to acti -
vate this function when it is snowing and to
make it easier to remove any dirt deposits in
the area where the blades are normally posi -
tioned, when washing.
Activation Of The Function
To activate this function, disable the wind -
shield wiper before setting the ignition device
to OFF.
This function can only be activated within two
minutes of placing the ignition in OFF.
WARNING!
Use only refrigerants and compressor lubricants
approved by FCA US LLC for your air conditioning
system. Some unapproved refrigerants are
flammable and can explode, injuring you. Other
unapproved refrigerants or lubricants can cause
the system to fail, requiring costly repairs. Refer
to Warranty Information Book, located in your
owner’s information kit, for further warranty
information.
WARNING!
Driving with worn windshield wiper blades
is a serious hazard, because visibility is
reduced in bad weather conditions.
21_GA_OM_EN_USC_t.book Page 218
Page 228 of 284

SERVICING AND MAINTENANCE
226
FUNCTIONFUSEAMPERAGE
Front power window (driver side)F3325
Front power window (passenger side) F3425
Supply for Information and Entertainment system, Climate Control system, Alarm,
Power door mirror folding, EOBD system, USB port F36
15
Safe Lock device (driver side door unlock – if equipped), Doors unlock, Central lock F3820
Windshield washer pump F4320
Rear left power window F4725
Rear right power window F4825
Heater rear window coil F9415
21_GA_OM_EN_USC_t.book Page 226
Page 253 of 284
251
If the battery is not disconnected from the
electrical system, check its state of charge
every 30 days.
Clean and protect the painted parts using
protective wax.
Clean and protect the shiny metal parts
using special compounds available
commercially.
Sprinkle talcum powder on the windshield
wiper rubber blades, and lift them off the
glass.
Cover the vehicle with a fabric or perforated
plastic sheet, paying particular care not to
damage the painted surface by dragging
any dust that may have accumulated on it.
Do not use compact plastic sheets, as they
do not allow humidity to evaporate from the
surface of the vehicle.
Inflate tires to +7.25 psi (+0.5 bar) above
the standard prescribed pressure and
check it periodically.
Do not drain the engine cooling system.
Any time the vehicle is left inactive for two
weeks or more, operate the air conditioning
system with engine idling for at least five
minutes, setting external air and with fan
set to maximum speed. This operation will
ensure appropriate lubrication for the
system, thus minimizing the possibility of
damage to the compressor when the
system is operated again.
NOTE:
After placing the ignition in STOP and having
closed the driver side door, wait at least one
minute before disconnecting the electrical
supply from the battery. When reconnecting
the electrical supply to the battery, make sure
that the ignition is in the STOP position and the
driver side door is closed. Manual Trunk Opening Device
Proceed as follows if the battery needs to be
disconnected:
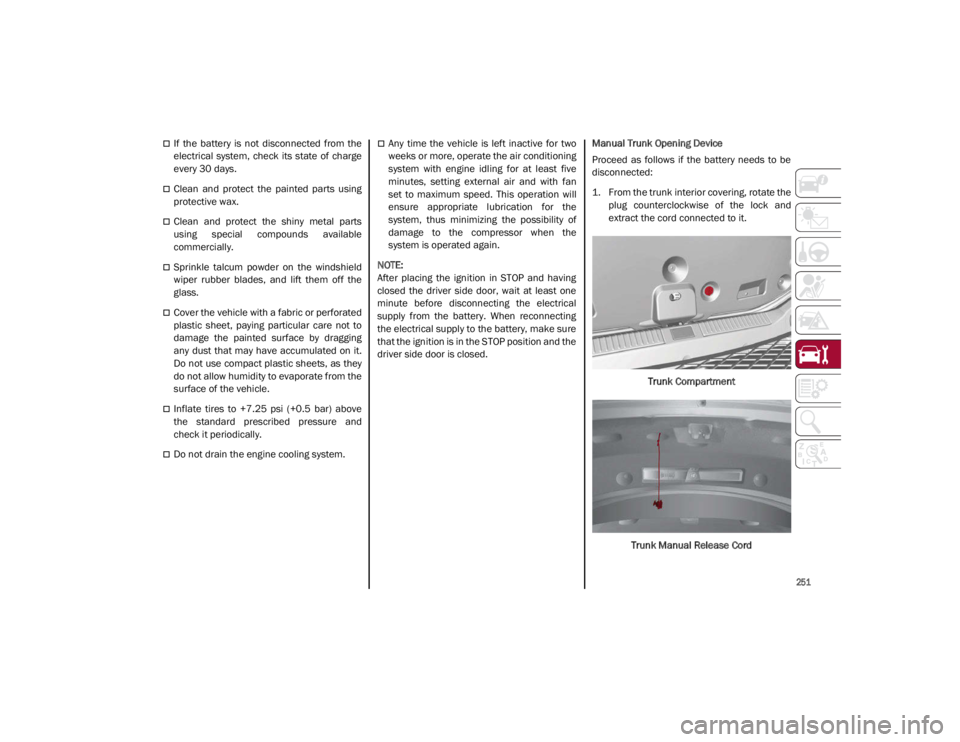
1. From the trunk interior covering, rotate the
plug counterclockwise of the lock and
extract the cord connected to it.
Trunk Compartment
Trunk Manual Release Cord
21_GA_OM_EN_USC_t.book Page 251
Page 254 of 284

SERVICING AND MAINTENANCE
252
2. Make sure the free end of the cordremains outside the trunk when closing
the trunk lid.
Manual Release Cord Shown With Trunk Closed
3. The trunk can now be opened manually by pulling the cord.
4. After releasing the trunk, rewind the strap around the plug, put it back into its
housing and turn it clockwise.BODYWORK
Protection Against Atmospheric Agents
The vehicle is equipped with the best available
technological solutions to protect the body -
work against corrosion.
These include:
Painting products and systems which give
the vehicle resistance to corrosion and
abrasion.
Use of galvanized (or pre-treated) steel
sheets, with high resistance to corrosion.
Spraying of plastic parts, with a protective
function in the more exposed points: under
door, inner wing, edges, etc.
Use of “open” boxed sections to prevent
condensation and pockets of moisture
which could favor the formation of rust
inside.
Use of special films to protect against abra -
sion in exposed areas (e.g. rear wing, doors,
etc.).
Corrosion Warranty
Your vehicle is covered by Corrosion Warranty
against perforation due to rust of any original
element of the structure or bodywork. For the
general terms of this warranty, refer to the
Warranty Booklet.
Preserving The Bodywork
Paint
Touch up abrasions and scratches immedi -
ately to prevent the formation of rust.
Maintenance of paintwork consists of washing
the car: the frequency depends on the condi -
tions and environment where the car is used.
For example, it is advisable to wash the vehicle
more often in areas with high levels of atmo -
spheric pollution or salted roads.
Some parts of the vehicle may be covered with
a matte paint which, in order to be maintained
intact, requires special care.
To correctly wash the vehicle, follow these
instructions:
If high pressure jets or cleaners are used to
wash the vehicle, keep a distance of at least
15 inches (40 cm) from the bodywork to
avoid damage or alteration. Build up of
water could cause damage to the vehicle in
the long term.
To make it easier to remove any dirt deposits in
the area where the blades are normally located it
is recommended to position the windshield
wipers vertically (service position).
Wash the bodywork using a low pressure jet
of water if possible.
Wipe a sponge with a slightly soapy solution over
the bodywork, frequently rinsing the sponge.
Rinse well with water and dry with a leather
chamois.
CAUTION!
The Manual Trunk Opening Device allows
the trunk to be opened without a key, even
if the vehicle is locked. Do not use this
Device unless the vehicle is parked in a
secure area.
21_GA_OM_EN_USC_t.book Page 252
Page 276 of 284

274
INDEX
INDEX
WARRANTY INFORMATION .................. 272
A
Accessories Purchased By The Owner.......... 3
Active Blind Spot Assist .............................147
Active Safety Systems ................................ 141
Active Torque Vectoring (ATV) System ......142
Adaptive Cruise Control (ACC)
(Cruise Control) ..........................................105 Off ........................................................... 109
On............................................................109
Additives, Fuel ............................................ 264
Adjust Forward.............................................. 29, 32
Rearward ........................................... 29, 32
Air Bag......................................................... 166 Air Bag Operation ...................................168Air Bag Warning Light ............................165
Driver Knee Air Bag................................ 168Enhanced Accident Response .....172, 203
Event Data Recorder (EDR) ...................203
Front Air Bag...........................................166
If Deployment Occurs ............................171
Knee Impact Bolsters ............................168
Maintaining Your Air Bag System.......... 174
Maintenance ..........................................174
Redundant Air Bag Warning Light.........166
Side Air Bags ..........................................169
Transporting Pets...................................187
Air Bag Light ......................................165, 187
Air Pressure Tires ........................................................241 Alarm
Security Alarm.......................................... 21
Alfa Active Suspension (AAS) .................... 102
Alfa DNA System .......................................... 99
Anti-Lock Braking (ABS) System ............... 141
Anti-Lock Warning Light............................... 75
Automatic Door Locks ................................. 26
Automatic Headlights .................................. 42
Automatic Temperature Control (ATC)........ 49
Automatic Transmission .............................. 92
Auxiliary Driving Systems .......................... 144
B
Back-Up Camera ........................................ 134
Battery ................................................. 78, 215 Charging System Light ............................ 78
Battery Recharging .................................... 215
Belts, Seat .................................................. 187
Blind Spot Monitoring ................................ 145
Bodywork (Cleaning And Maintenance) ... 252
B-Pillar Location ......................................... 237
Brake System Warning Light .....................................73, 74
Brakes ........................................................ 258 Brake Fluid Level ................................... 214
Bulbs, Light ................................................ 188
C
Camera, Rear ............................................. 134
Carbon Monoxide Warning ........................ 189
Cargo Tie-Downs .......................................... 64
Certification Label...................................... 136
Chart, Tire Sizing ........................................ 234 Check Engine Light
(Malfunction Indicator Light) .......................85
Checking Levels................................ 211, 212
Checking Your Vehicle For Safety............. 187
Checks, Safety ........................................... 187
Child Restraint ........................................... 174
Child Restraints
Booster Seats ........................................ 177
Child Seat Installation........................... 185
How To Stow An unused ALR Seat Belt .................................... 182
Infant And Child Restraints................... 176
LATCH Positions .................................... 179
Lower Anchors And Tethers For Children ............................................. 179
Older Children And Child Restraints .... 176
Seating Positions................................... 178
Using The Top Tether Anchorage ......... 186
Clean Air Gasoline ..................................... 263
Cleaning Wheels ................................................... 246
Climate Control ...................................... 48, 54
Contract, Service ....................................... 271
Cruise Control (Speed Control) ................. 105
Customer Assistance ................................ 270
D
Daytime Running Lights ...............................42
Deck Lid Power Release.......................................... 63
Defroster, Windshield ............................... 187
Dimmer Switch Headlight ..................................................46
21_GA_OM_EN_USC_t.book Page 274