Page 65 of 88

Periodic maintenance an d a djustment
7-23
7
EAU23098
Checkin g an d lu bricatin g the
ca bles
The operation of all control cables and
the condition of the cables should be
checked before each ride, and the ca-
bles and cable ends should be lubri-
cated if necessary. If a cable is
damaged or does not move smoothly,
have a Yamaha dealer check or re-
place it. WARNING! Dama ge to the
outer housin g of cab les may result
in internal rustin g an d cause inter-
ference with cab le movement. Re-
place dama ged cab les as soon as
possi ble to prevent unsafe con di-
tions.
[EWA10712] EAU23115
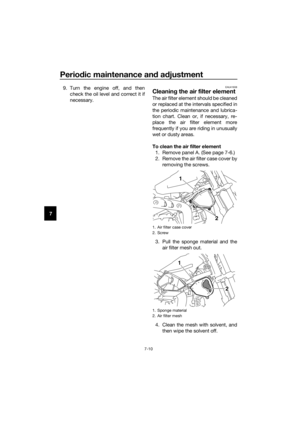
Checkin
g an d lu bricatin g the
throttle grip an d ca ble
The operation of the throttle grip
should be checked before each ride. In
addition, the cable should be lubricat-
ed by a Yamaha dealer at the intervals
specified in the periodic maintenance
chart.
The throttle cable is equipped with a
rubber cover. Make sure that the cover
is securely installed. Even though the
cover is installed correctly, it does not
completely protect the cable from wa-
ter entry. Therefore, use care not to
pour water directly onto the cover or
cable when washing the vehicle. If the
cable or cover becomes dirty, wipe
clean with a moist cloth.
Recommen ded lu bricant:
Yamaha cable lubricant or other
suitable cable lubricant
UB5185E0.book Page 23 Monday, June 17, 2019 9:04 AM
Page 66 of 88
Periodic maintenance an d a djustment
7-24
7
EAU43623
Checkin g an d lu bricatin g the
b rake lever
The operation of the brake lever should
be checked before each ride, and the
lever pivot should be lubricated if nec-
essary.
EAU23185
Checkin g an d lu bricatin g the
b rake pe dal
The operation of the brake pedal
should be checked before each ride,
and the pedal pivot should be lubricat-
ed if necessary.
Recommen ded lu bricant:
Lithium-soap-based greaseRecommen ded lu bricant:
Lithium-soap-based grease
UB5185E0.book Page 24 Monday, June 17, 2019 9:04 AM
Page 67 of 88
Periodic maintenance an d a djustment
7-25
7
EAU23203
Checkin g an d lu bricatin g the
si destan d
The operation of the sidestand should
be checked before each ride, and the
sidestand pivot and metal-to-metal
contact surfaces should be lubricated
if necessary.
WARNING
EWA10732
If the si destan d d oes not move up
an d d own smoothly, have a Yamaha
d ealer check or repair it. Otherwise,
the si destan d coul d contact the
g roun d an d d istract the operator, re-
sultin g in a possi ble loss of control.
EAUM2701
Lu bricatin g the swin garm piv-
ots
The swingarm pivots must be lubricat-
ed at the intervals specified in the peri-
odic maintenance and lubrication
chart.
Recommen ded lu bricant:
Lithium-soap-based grease
Recommen ded lu bricant:
Molybdenum disulfide grease
UB5185E0.book Page 25 Monday, June 17, 2019 9:04 AM
Page 68 of 88

Periodic maintenance an d a djustment
7-26
7
EAU23273
Checkin g the front fork
The condition and operation of the
front fork must be checked as follows
at the intervals specified in the periodic
maintenance and lubrication chart.
To check the con dition
Check the inner tubes for scratches,
damage and excessive oil leakage.
To check the operation 1. Place the vehicle on a level surfa- ce and hold it in an upright posi-
tion. WARNING! To avoi d injury,
securely support the vehicle so
there is no dan ger of it fallin g
over.
[EWA10752]
2. While applying the front brake, push down hard on the handle-
bars several times to check if the
front fork compresses and re-
bounds smoothly.
NOTICE
ECA10591
If any d amage is foun d or the front
fork does not operate smoothly,
have a Yamaha dealer check or re-
pair it.
EAU23285
Checkin g the steerin g
Worn or loose steering bearings may
cause danger. Therefore, the operation
of the steering must be checked as fol-
lows at the intervals specified in the
periodic maintenance and lubrication
chart.
1. Raise the front wheel off the ground. (See page 7-29.)
WARNING! To avoi d injury, se-
curely support the vehicle so
there is no dan ger of it fallin g
over.
[EWA10752]
2. Hold the lower ends of the front fork legs and try to move them for-
ward and backward. If any free
play can be felt, have a Yamaha
dealer check or repair the steer-
ing.
UB5185E0.book Page 26 Monday, June 17, 2019 9:04 AM
Page 69 of 88

Periodic maintenance an d a djustment
7-27
7
EAU23292
Checkin g the wheel b earings
The front and rear wheel bearings must
be checked at the intervals specified in
the periodic maintenance and lubrica-
tion chart. If there is play in the wheel
hub or if the wheel does not turn
smoothly, have a Yamaha dealer
check the wheel bearings.
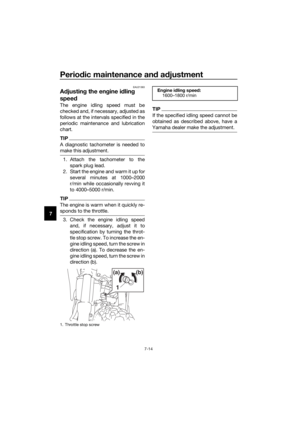
EAU23397
Battery
The battery is located behind panel B.
(See page 7-6.)
This model is equipped with a VRLA
(Valve Regulated Lead Acid) battery.
There is no need to check the electro-
lyte or to add distilled water. However,
the battery coupler needs to be
checked and, if necessary, securely
fastened.
WARNING
EWA10761
Electrolyte is poisonous an d
d an gerous since it contains sul-
furic aci d, which causes severe
b urns. Avoi d any contact with
skin, eyes or clothin g an d al-
ways shiel d your eyes when
workin g near b atteries. In case
of contact, ad minister the fol-
lowin g FIRST AID.
EXTERNAL: Flush with plenty of water.
INTERNAL: Drink lar ge quan-
tities of water or milk an d im-
me diately call a physician.
EYES: Flush with water for 15 minutes and seek prompt
me dical attention.
1. Battery coupler
2. Battery band
3. Battery
2
3
1
UB5185E0.book Page 27 Monday, June 17, 2019 9:04 AM
Page 70 of 88

Periodic maintenance an d a djustment
7-28
7
Batteries pro duce explosive hy-
d ro gen gas. Therefore, keep
sparks, flames, ci garettes, etc.,
away from the battery an d pro-
vi de sufficient ventilation when
char gin g it in an enclose d
space.
KEEP THIS AND ALL BATTER-
IES OUT OF THE REACH OF
CHILDREN.
To char ge the battery
Have a Yamaha dealer charge the bat-
tery as soon as possible if it seems to
have discharged. Keep in mind that the
battery tends to discharge more quick-
ly if the vehicle is equipped with op-
tional electrical accessories.
NOTICE
ECA16522
To char ge a VRLA (Valve Re gulate d
Lea d Aci d) battery, a special (con-
stant-volta ge) battery char ger is re-
quire d. Using a conventional battery
char ger will dama ge the b attery.
To store the battery
1. If the model will not be used for more than one month, remove the
battery, fully charge it, and then
place it in a cool, dry place.
NOTICE: When removin g the
b attery, be sure the key is
turne d to “OFF” before discon-
nectin g the coupler.
[ECA16323]
2. If the battery will be stored for
more than two months, check it at
least once a month and fully char-
ge it if necessary. 3. Fully charge the battery before
installation. NOTICE: When in-
stallin g the b attery, be sure the
key is turned to “OFF” before
connectin g the coupler.
[ECA16931]
NOTICE
ECA16531
Always keep the b attery charged .
Storin g a d ischar ged battery can
cause permanent b attery damag e.
UB5185E0.book Page 28 Monday, June 17, 2019 9:04 AM
Page 71 of 88

If the fuse is blown, replace it as fol-
lows.
1. Turn the ke")
Periodic maintenance an d a djustment
7-29
7
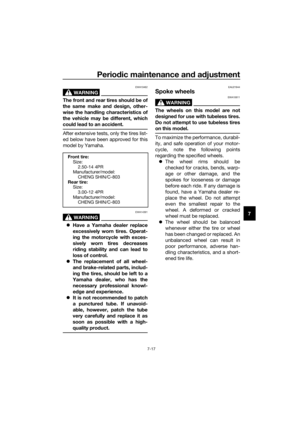
EAU50432
Replacin g the fuse
The fuse is located inside the battery
coupler. (See page 7-27.)
If the fuse is blown, replace it as fol-
lows.
1. Turn the key to “OFF” and turn off all electrical circuits.
2. Disconnect the battery coupler.
3. Remove the blown fuse, and then install a new fuse of the specified
amperage. WARNING! Do not
use a fuse of a hi gher ampera ge
ratin g than recommen ded to
avoi d causin g extensive dam-
a g e to the electrical system an d
possi bly a fire.
[EWA15132]
4. Connect the battery coupler.
5. Turn the key to “ON”.
6. If the fuse immediately blows
again, have a Yamaha dealer
check the electrical system.
EAU24351
Supportin g the motorcycle
Since this model is not equipped with a
centerstand, follow these precautions
when removing the front and rear
wheel or performing other mainte-
nance requiring the motorcycle to
stand upright. Check that the motorcy-
cle is in a stable and level position be-
fore starting any maintenance. A
strong wooden box can be placed un-
der the engine for added stability.
To service the front wheel
1. Stabilize the rear of the motorcy- cle by using a motorcycle stand
or, if an additional motorcycle
stand is not available, by placing a
jack under the frame in front of the
rear wheel.
2. Raise the front wheel off the ground by using a motorcycle
stand.
To service the rear wheel
Raise the rear wheel off the ground by
using a motorcycle stand or, if a motor-
cycle stand is not available, by placing
a jack either under each side of the
frame in front of the rear wheel or under
each side of the swingarm.
1. Battery coupler
2. Fuse
3. Spare fuse
Specified fuse:
10.0 A
1 3
2
UB5185E0.book Page 29 Monday, June 17, 2019 9:04 AM
Page 72 of 88

Periodic maintenance an d a djustment
7-30
7
EAU24361
Front wheel
EAU56491
To remove the front wheel
WARNING
EWA10822
To avoi d injury, securely support the
vehicle so there is no d anger of it
fallin g over.
1. Slide the rubber cover back at the
brake lever.
2. Loosen the locknut, and then turn the brake lever free play adjusting
bolt fully in direction (a).
3. Loosen the axle nut. 4. Lift the front wheel off the ground
according to the procedure in the
previous section “Supporting the
motorcycle”.
5. Remove the axle nut and washer.
6. Pull the wheel axle out.
7. Remove the brake shoe assembly from the wheel hub by pulling it
out.
8. Remove the wheel.
To install the front wheel 1. Install the brake shoe assembly into the wheel hub.
2. Lift the wheel up between the fork legs.
TIP
Make sure that the slot in the brake
shoe plate fits over the retainer on the
fork leg.
1. Rubber cover
2. Brake lever free play adjusting bolt
3. Locknut
1. Axle nut
2. Washer
(a)
3
21
(a)
1. Wheel axle
1. Brake shoe assembly
1
UB5185E0.book Page 30 Monday, June 17, 2019 9:04 AM