Page 17 of 108

Special features
3-2
1
234
5
6
7
8
9
10
11
12
new cruising speed by pushing the
“SET–” side of the setting switch. If you
do not set a new cruising speed, when
you return the throttle grip, the vehicle
will decelerate to the previously set
cruising speed.
Deactivating the cruise control sys-
tem
Perform one of the following operations
to cancel the set cruising speed. The
“SET” indicator light will go off.
Turn the throttle grip past the
closed position in the deceleration
direction.
Apply the front or rear brake.
Disengage the clutch. Push the power switch to turn off the
cruise control system. The “ ” indica-
tor light and the “SET” indicator light will
go off.
TIPTraveling speed decreases as soon as
the cruise control system is deactivat-ed; unless the throttle grip is turned.
Using the resume function
Push the “RES+” side of the cruise con-
trol setting switch to reactivate the
cruise control system. The traveling
speed will return to the previously set
cruising speed. The “SET” indicator
light will come on.
WARNING
EWA16351
It is dangerous to use the resume
function when the previously set
cruising speed is too high for cur-rent conditions.TIPPushing the power switch while the
system is operating will turn the system
off completely and erase the previously
set cruising speed. You will not be able to use the resume function until a new
cruising speed has been set.
Automatic deactivation of the cruisecontrol systemThe cruise control system for this mod-
el is electronically controlled and is
linked with the other control systems.
The cruise control system will automat-
ically become deactivated under the
following conditions:
The cruise control system is not
able to maintain the set cruising
speed.
Wheel slip or wheel spin is detect-
ed. (If the traction control system
has not been turned off, the trac-
tion control system will work.)
The start/engine stop switch is set
to the “ ” position.
The engine stalls.
The sidestand is lowered.
When traveling with a set cruising
speed, if the cruise control system is
deactivated under the above condi-
tions, the “ ” indicator light will go off
and the “SET” indicator light will flash
for 4 seconds, and then go off.
1. Deceleration direction
1
B67-9-E4.book 2 ページ 2019年7月19日 金曜日 午後4時23分
Page 18 of 108

Special features
3-3
1
23
4
5
6
7
8
9
10
11
12 When not traveling with a set cruising
speed, if the start/engine stop switch is
set to the “ ” position, the engine
stalls, or the sidestand is lowered, then
the “ ” indicator light will go off (the
“SET” indicator light will not flash).
If the cruise control system is automati-
cally deactivated, please stop and con-
firm that your vehicle is in good
operating condition.
Before using the cruise control system
again, activate it using the power
switch.
TIPIn some cases, the cruise control sys-
tem may not be able to maintain the set
cruising speed when the vehicle is trav-
eling uphill or downhill.
When the vehicle is traveling up-
hill, the actual traveling speed may
become lower than the set cruising
speed. If this occurs, accelerate to
the desired traveling speed using
the throttle.
When the vehicle is traveling
downhill, the actual traveling
speed may become higher than
the set cruising speed. If this oc- curs, the setting switch cannot be
used to adjust the set cruising
speed. To reduce the traveling
speed, apply the brakes. When the
brakes are applied, the cruise con-
trol system will become deactivat-
ed.
EAU74053
D-mode (drive mode)D-mode is an electronically-controlled
engine performance system. Select
mode 1 for the most aggressive throttle
response, mode 2 for standard throttle
grip/engine response, and use mode 3
for rainy days or whenever less engine
power is desirable.
WARNING
EWA18440
Do not change the drive mode whilethe vehicle is moving.
With the throttle grip closed, push the
“MODE” switch to change the drive
mode.1. Drive mode switch “MODE”
STOPM
ODERUNSTA R T
1
B67-9-E4.book 3 ページ 2019年7月19日 金曜日 午後4時23分
Page 19 of 108
.
The current drive mode is savedwhen the vehicle is turned off.
EAU73914")
Special features
3-4
1
234
5
6
7
8
9
10
11
12
TIP
The current drive mode is shown in
the drive mode display (page
4-11).
The current drive mode is savedwhen the vehicle is turned off.
EAU73914
Traction control systemThe traction control system (TCS)
helps maintain traction when accelerat-
ing on slippery surfaces, such as un-
paved or wet roads. If sensors detect
that the rear wheel is starting to slip (un-
controlled spinning), the traction control
system assists by regulating engine
power as needed until traction is re-
stored.
WARNING
EWA15433
The traction control system is not a
substitute for riding appropriately
for the conditions. Traction control
cannot prevent loss of traction due
to excessive speed when entering
turns, when accelerating hard at a
sharp lean angle, or while braking,
and cannot prevent front wheel slip-
ping. As with any vehicle, approach
surfaces that may be slippery with
caution and avoid especially slip-pery surfaces. With the throttle closed, push this
switch down to change from TCS “1” or
“2” to “3”. Push up to change from TCS
“3” or “2” to “1”.
With the vehicle stopped, push this
switch up for two seconds to turn the
system off. Push down to turn the sys-
tem on.
TIPThe current TCS setting is shown in theTCS display (page 4-11).1. Traction control system switch “TCS”
R
ESSE T
PAS
S
TCS
SELECT
1
B67-9-E4.book 4 ページ 2019年7月19日 金曜日 午後4時23分
Page 20 of 108

Special features
3-5
1
23
4
5
6
7
8
9
10
11
12 The “ ” indicator light flashes when
traction control has engaged. You may
notice slight changes in engine and ex-
haust sounds when the system has en-
gaged.
In certain conditions, the traction con-
trol system may be automatically dis-
abled. Should this happen, both the
“ ” indicator light and the “ ” warn-
ing light will come on.
The TCS display (page 4-11) indicates
the current TCS setting. There are four
settings.
TCS “OFF”
TCS “OFF” turns the traction control system off.
TCS “1”
TCS “1” minimizes traction control sys-
tem assist. Select this mode for sporty
riding.
TCS “2”
TCS “2” provides a moderate level of
traction control assist. Select this mode
for standard street riding.
TCS “3”
TCS “3” maximizes traction control as-
sist; wheel spin is most strongly con-
trolled. Select this mode for rain,
slippery road conditions, and whenever
maximum traction control is desirable.
TIP
Traction control can be turned on
or off only when the vehicle is
stopped.
When the key is turned to “ON”,
traction control is turned on and
set to TCS “1”, “2” or “3” (whichev-
er was last selected).
Turn the traction control system off
to help free the rear wheel if the ve-
hicle gets stuck in mud, sand, or
other soft surfaces.
NOTICE
ECA16801
Use only the specified tires. (See
page 7-17.) Using different sized
tires will prevent the traction control
system from controlling tire rotationaccurately.
Resetting the traction control sys-
tem
The traction control system will auto-
matically disable when:
the front wheel or rear wheel
comes off the ground while riding.
excessive rear wheel spin is de-
tected while riding.
either wheel is rotated with the key
turned to “ON” (such as when per-
forming maintenance).
If the traction control system is dis-
abled, both the “ ” indicator light and
the “ ” warning light will come on.
Should this occur, try resetting the sys-
tem as follows. 1. Stop the vehicle and turn the key to “OFF”.
1. Engine trouble warning light “ ”
2. Traction control system indicator light “”
12
B67-9-E4.book 5 ページ 2019年7月19日 金曜日 午後4時23分
Page 21 of 108

Special features
3-6
1
234
5
6
7
8
9
10
11
12
2. Wait a few seconds and then turn
the key back to “ON”.
3. The “ ” indicator light should turn off and the system be enabled.
TIPIf the “ ” indicator light remains on af-
ter resetting, the vehicle may still be rid-
den; however, have a Yamaha dealercheck the vehicle as soon as possible.
4. Have a Yamaha dealer check the vehicle and turn off the “ ” warn-
ing light.
EAU79481
Quick shift systemThe quick shift system allows for
full-throttle, clutch lever-less upshifts.
When the shift switch detects motion in
the shift pedal, engine power and drive
torque are momentarily adjusted to al-
low the upshift to occur.TIPThe quick shift system operates when
traveling at least 20 km/h (12 mi/h) with
an engine speed of 2000 r/min or high-
er, and only when accelerating. It does
not operate when the clutch lever ispulled.NOTICE
ECA26260
To prevent drivetrain damage, al-
ways use the clutch lever to shift
when riding at slow speed, when
downshifting, or if the quick shiftsystem is off.
B67-9-E4.book 6 ページ 2019年7月19日 金曜日 午後4時23分
Page 22 of 108

4-1
1
2
34
5
6
7
8
9
10
11
12
Instrument and control functions
EAU10979
Immobilizer systemThis vehicle is equipped with an immo-
bilizer system to help prevent theft by
re-registering codes in the standard
keys. This system consists of the fol-
lowing:
a code re-registering key
two standard keys
a transponder (in each key)
an immobilizer unit (on the vehicle)
an ECU (on the vehicle)
a system indicator light (page 4-7)
About the keys
The key with the red bow is used to reg-
ister codes in each standard key. Store the code re-registering key in a safe
place. When necessary, take the vehi-
cle along with all three keys to a
Yamaha dealer to have them re-regis-
tered.
Do not use the key with the red bow for
driving. It should only be used for
re-registering the standard keys. Al-
ways use a standard key for driving.
TIP
Keep the standard keys as well as
keys of other immobilizer systems
away from the code re-registering
key.
Keep other immobilizer system
keys away from the main switch as
they may cause signal interfer-ence.
NOTICE
ECA11823
DO NOT LOSE THE CODE RE-REG-
ISTERING KEY! CONTACT YOUR
DEALER IMMEDIATELY IF IT IS
LOST! If the code re-registering key
is lost, the existing standard keys
can still be used to start the vehicle.
However, registering a new stan-
dard key is impossible. If all keyshave been lost or damaged, the en-
tire immobilizer system must be re-
placed. Therefore, handle the keys
carefully.
Do not submerse in water.
Do not expose to high tempera-
tures.
Do not place near magnets.
Do not place near items that
transmit electrical signals.
Do not handle roughly.
Do not grind or alter.
Do not disassemble.
Do not put two keys of any im-
mobilizer system on the samekey ring.
1. Code re-registering key (red bow)
2. Standard keys (black bow)
B67-9-E4.book 1 ページ 2019年7月19日 金曜日 午後4時23分
Page 23 of 108

Instrument and control functions
4-2
1
2
345
6
7
8
9
10
11
12
EAU10474
Main switch/steering lockThe main switch/steering lock controls
the ignition and lighting systems, and is
used to lock the steering. The various
positions are described below.TIPBe sure to use the standard key (black
bow) for regular use of the vehicle. To
minimize the risk of losing the code
re-registering key (red bow), keep it in a
safe place and only use it for codere-registering.
EAU74111
ON
All electrical circuits are supplied with
power. The meter lighting, taillight, li- cense plate light and auxiliary light
come on, and the engine can be start-
ed. The key cannot be removed.
TIPThe headlights come on automatically
when the engine is started and stay on
until the key is turned to “OFF”, even ifthe engine stalls.
EAU10662
OFF
All electrical systems are off. The key
can be removed.
WARNING
EWA10062
Never turn the key to “OFF” or
“LOCK” while the vehicle is moving.
Otherwise the electrical systems will
be switched off, which may result inloss of control or an accident.
EAU1068B
LOCK
The steering is locked and all electrical
systems are off. The key can be re-
moved.
To lock the steering
1. Turn the handlebars all the way to
the left.
2. With the key in the “OFF” position, push the key in and turn it to
“LOCK”.
3. Remove the key.TIPIf the steering will not lock, try turningthe handlebars back to the right slightly.
P
ON
OFF
LOCK
1. Push.
2. Turn.12
B67-9-E4.book 2 ページ 2019年7月19日 金曜日 午後4時23分
Page 24 of 108

The hazard lights can")
Instrument and control functions
4-3
1
2
34
5
6
7
8
9
10
11
12 To unlock the steering
From the “LOCK” position, push the
key in and turn it to “OFF”.
EAU65680
(Parking)
The hazard lights can be turned on, but
all other electrical systems are off. The
key can be removed.
The steering must be locked before the
key can be turned to “ ”.NOTICE
ECA22330
Using the hazard lights for an ex-
tended length of time may cause thebattery to discharge.
EAU66055
Handlebar switchesLeft Right
EAU73922
Dimmer/Pass switch “ / /PASS”
Set this switch to “ ” for the high
beam and to “ ” for the low beam.
To flash the high beam, push the pass
side “PASS” of the switch while the
headlights are on low beam.TIPWhen the switch is set to low beam,
only the left headlight bulb comes on.
When the switch is set to high beam,both headlights come on.
1. Push.
2. Turn.12
1. Select switch “SELECT”
2. Traction control system switch “TCS”
3. Cruise control switches
4. Horn switch “ ”
5. Turn signal switch “ / ”
6. Dimmer/Pass switch “ / /PASS”
R
ESSE T
PAS
S
TCS
SELECT
1
6
5
4
2
3
1. Stop/Run/Start switch “ / / ”
2. Drive mode switch “MODE”
3. Hazard switch “ ”
STOPMODERUNSTA R T
3
2
1
B67-9-E4.book 3 ページ 2019年7月19日 金曜日 午後4時23分
 1
1 2
2 3
3 4
4 5
5 6
6 7
7 8
8 9
9 10
10 11
11 12
12 13
13 14
14 15
15 16
16 17
17 18
18 19
19 20
20 21
21 22
22 23
23 24
24 25
25 26
26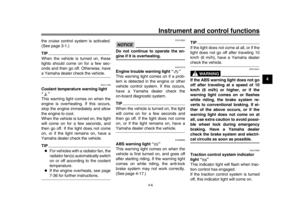 27
27 28
28 29
29 30
30 31
31 32
32 33
33 34
34 35
35 36
36 37
37 38
38 39
39 40
40 41
41 42
42 43
43 44
44 45
45 46
46 47
47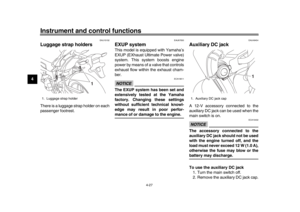 48
48 49
49 50
50 51
51 52
52 53
53 54
54 55
55 56
56 57
57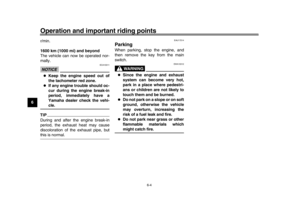 58
58 59
59 60
60 61
61 62
62 63
63 64
64 65
65 66
66 67
67 68
68 69
69 70
70 71
71 72
72 73
73 74
74 75
75 76
76 77
77 78
78 79
79 80
80 81
81 82
82 83
83 84
84 85
85 86
86 87
87 88
88 89
89 90
90 91
91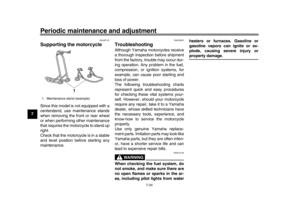 92
92 93
93 94
94 95
95 96
96 97
97 98
98 99
99 100
100 101
101 102
102 103
103 104
104 105
105 106
106 107
107