Page 81 of 100
Periodic maintenance an d a djustment
6-33
6
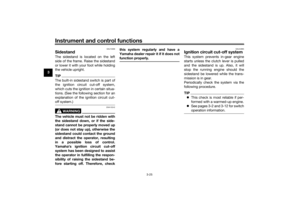
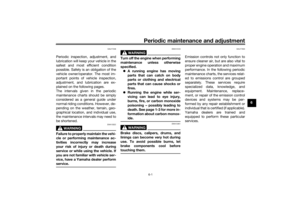
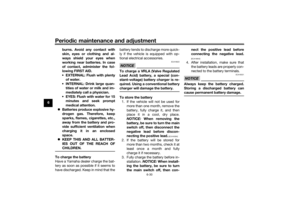
2. Disconnect the headlight coupler,
and then remove the headlight
bulb cover.
3. Unhook the headlight bulb holder, then remove the burnt-out bulb. 4. Place a new headlight bulb into
position, then secure it with the
bulb holder.
5. Install the headlight bulb cover, then connect the coupler.
TIPWhen installing the headlight bulb cov-
er, make sure the arrow mark faces up-
wards.
6. Install the headlight unit as shown,and then install the washer and
bolt on each side.
7. Have a Yamaha dealer adjust the headlight beam if necessary.
1. Bolt and washer
1. Headlight coupler
2. Headlight bulb cover
112
1. Headlight bulb holder
2. Headlight bulb
1
2
1. Arrow mark
1
UB4CE1E0.book Page 33 Friday, August 3, 2018 10:57 AM
Page 82 of 100
Periodic maintenance an d a djustment
6-34
6
EAU83660
Replacin g an auxiliary li ght
b ul bThis model is equipped with two auxil-
iary lights. If an auxiliary light bulb
burns out, replace it as follows.
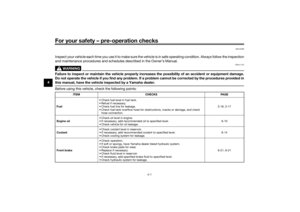
1. Remove the headlight unit. (See page 6-32.)
2. Remove the auxiliary light bulb socket (together with the bulb) by
turning it counterclockwise.
3. Remove the burnt-out bulb by pulling it out of the socket. 4. Insert a new bulb into the socket.
5. Install the socket (together with
the bulb) by turning it clockwise.
6. Install the headlight unit.
EAU70540
Brake/tail li ghtThis model is equipped with an LED-
type brake/tail light.
If the brake/tail light does not come on,
have a Yamaha dealer check it.
1. Auxiliary light bulb socket
1
1. Auxiliary light bulb
1
UB4CE1E0.book Page 34 Friday, August 3, 2018 10:57 AM
Page 83 of 100
Periodic maintenance an d a djustment
6-35
6
EAU24205
Replacin g a turn sig nal light
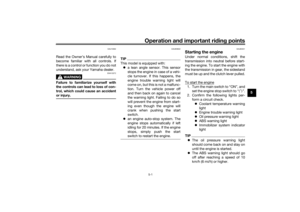
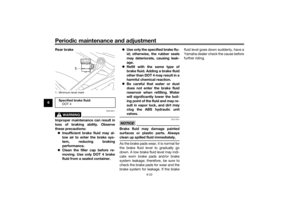
b ul b1. Remove the turn signal light lens
by removing the screw.
2. Remove the burnt-out bulb by pushing it in and turning it coun-
terclockwise. 3. Insert a new bulb into the socket,
push it in, and then turn it clock-
wise until it stops.
4. Install the lens by installing the screw. NOTICE: Do not over-
ti g hten the screw, otherwise the
lens may break.
[ECA11192] EAU59890
Replacin
g the license plate
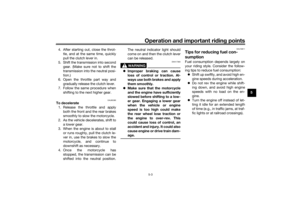
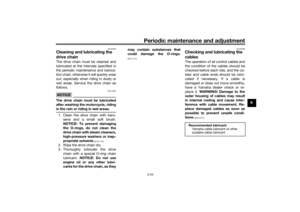
lig ht bul b1. Remove the license plate light unit
by removing the nuts, washers
and collars, and then remove the
license plate light bulb socket (to-
gether with the bulb) by pulling it
out.
2. Remove the burnt-out bulb by pulling it out.
1. Turn signal light lens
2. Screw
1
2
1. Turn signal light bulb
1
1. License plate light unit
2. Collar
3. Washer
4. Nut
5. License plate light bulb socket
1
22
53
4
3
4
UB4CE1E0.book Page 35 Friday, August 3, 2018 10:57 AM
Page 84 of 100
 by pushing it in, and then
install the license plate light unit by
ins")
Periodic maintenance an d a djustment
6-36
6 3. Insert a new bulb into the socket.
4. Install the socket (together with
the bulb) by pushing it in, and then
install the license plate light unit by
installing the collars, washers and
nuts.
EAU67131
Supportin g the motorcycleSince this model is not equipped with a
centerstand, use maintenance stands
when removing the front or rear wheel
or when performing other maintenance
that requires the motorcycle to stand
up right.
Check that the motorcycle is in a stable
and level position before starting any
maintenance.
EAU25872
Trou bleshootin gAlthough Yamaha motorcycles receive
a thorough inspection before shipment
from the factory, trouble may occur
during operation. Any problem in the
fuel, compression, or ignition systems,
for example, can cause poor starting
and loss of power.
The following troubleshooting charts
represent quick and easy procedures
for checking these vital systems your-
self. However, should your motorcycle
require any repair, take it to a Yamaha
dealer, whose skilled technicians have
the necessary tools, experience, and
know-how to service the motorcycle
properly.
Use only genuine Yamaha replace-
ment parts. Imitation parts may look
like Yamaha parts, but they are often
inferior, have a shorter service life and
can lead to expensive repair bills.
WARNING
EWA15142
When checkin g the fuel system, do
not smoke, an d make sure there are
no open flames or sparks in the ar-
ea, inclu din g pilot li ghts from water
1. License plate light bulb
1
1. Maintenance stand (example)
1
UB4CE1E0.book Page 36 Friday, August 3, 2018 10:57 AM
Page 85 of 100
Periodic maintenance an d a djustment
6-37
6
heaters or furnaces. Gasoline or
g
asoline vapors can i gnite or ex-
plo de, causin g severe injury or prop-
erty damag e.
UB4CE1E0.book Page 37 Friday, August 3, 2018 10:57 AM
Page 86 of 100

Periodic maintenance an d a djustment
6-38
6
EAU42365
Trou bleshootin g chartsStartin g pro blems or poor en gine performance
Check the fuel level in
the fuel tank.1. Fuel
There is enough fuel.
There is no fuel.
Check the battery.
Supply fuel.
The engine does not start.
Check the battery.
Remove the spark plugs
and check the electrodes.3. Ignition
Wipe off with a dry cloth and correct the
spark plug gaps, or replace the spark plugs.
Have a Yamaha dealer check the vehicle.
Operate the electric starter.4. Compression
There is compression.
There is no compression.
The engine does not start.
Have a Yamaha dealer check the vehicle.Have a Yamaha dealer check the vehicle.
The engine does not start.
Check the compression.
Operate the electric starter.2. Battery
The engine turns over
quickly.
The engine turns over
slowly.
The engine does not start.
Check the ignition.
The battery is good.Check the battery lead connections,
and have a Yamaha dealer charge
the battery if necessary.
DryWet
Operate the electric starter.
UB4CE1E0.book Page 38 Friday, August 3, 2018 10:57 AM
Page 87 of 100

Periodic maintenance an d a djustment
6-39
6
En
gine overheatin g
WARNING
EWA10401
Do not remove the ra diator cap when the en gine an d ra diator are hot. Scal din g hot flui d an d steam may be
b lown out un der pressure, which coul d cause serious injury. Be sure to wait until the en gine has coole d.
After removin g the ra diator cap retainin g b olt, place a thick ra g, like a towel, over the ra diator cap, an d then
slowly rotate the cap counterclockwise to the detent to allow any resi dual pressure to escape. When the hiss-
in g soun d has stoppe d, press down on the cap while turnin g it counterclockwise, an d then remove the cap.TIPIf coolant is not available, tap water can be temporarily used instead, provided that it is changed to the recommended cool-
ant as soon as possible.
Wait until the
engine has cooled.
Check the coolant level in the
reservoir and radiator.
The coolant level
is OK.The coolant level is low.
Check the cooling system
for leakage.
Have a Yamaha dealer checkand repair the cooling system.Add coolant. (See TIP.)
Start the engine. If the engine overheats again,
have a
Yamaha dealer check
and repair the cooling system.
There is
leakage.
There is
no leakage.
UB4CE1E0.book Page 39 Friday, August 3, 2018 10:57 AM
Page 88 of 100

Motorcycle care and stora ge
7-1
7
EAU37834
Matte color cautionNOTICE
ECA15193
Some mo dels are equipped with
matte colore d finishe d parts. Be
sure to consult a Yamaha d ealer for
a d vice on what prod ucts to use be-
fore cleanin g the vehicle. Usin g a
b rush, harsh chemical prod ucts or
cleanin g compoun ds when cleanin g
these parts will scratch or damag e
their surface. Wax also shoul d not
b e applied to any matte colore d fin-
ishe d parts.
EAU83443
CareFrequent, thorough cleaning of the ve-
hicle will not only enhance its appear-
ance but also will improve its general
performance and extend the useful life
of many components. Washing, clean-
ing, and polishing will also give you a
chance to inspect the condition of the
vehicle more frequently. Be sure to
wash the vehicle after riding in the rain
or near the sea, because salt is corro-
sive to metals.TIP The roads of heavy snowfall areas
may be sprayed with salt as a de-
icing method. This salt can stay on
the roads well into spring, so be
sure to wash the underside and
chassis parts after riding in such
areas.
Genuine Yamaha care and main-
tenance products are sold under
the YAMALUBE brand in many
markets worldwide.
See your Yamaha dealer for addi-
tional cleaning tips.
NOTICE
ECA26280
Improper cleanin g can cause cos-
metic an d mechanical damag e. Do
not use: high-pressure washers or
steam-jet cleaners. Excessive
water pressure may cause wa-
ter seepa ge an d d eterioration of
wheel bearin gs, brakes, trans-
mission seals an d electrical d e-
vices. Avoi d hi gh-pressure
d eter gent applications such as
those availa ble in coin-operate d
car washers.
harsh chemicals, inclu din g
stron g aci dic wheel cleaners,
especially on spoke or ma gne-
sium wheels.
harsh chemicals, ab rasive
cleanin g compoun ds, or wax on
matte-finishe d parts. Brushes
can scratch an d damag e the
matte-finish, use soft spon ge or
towel only.
towels, spon ges, or brushes
contaminated with abrasive
cleanin g prod ucts or stron g
UB4CE1E0.book Page 1 Friday, August 3, 2018 10:57 AM