2020 VOLKSWAGEN TRANSPORTER mirror
[x] Cancel search: mirrorPage 115 of 486

Protection from the sun
a:n Introduction
This chapter contains information on the following subjects:
Sun visors . . . . . . . . . . . . . . . . . . . . . . . . . . . . . 115
Sun blind for the rear side windows 115
Windscreens made of heat-insulating glass . . 116
Sun visors
J
ltf·OOSl
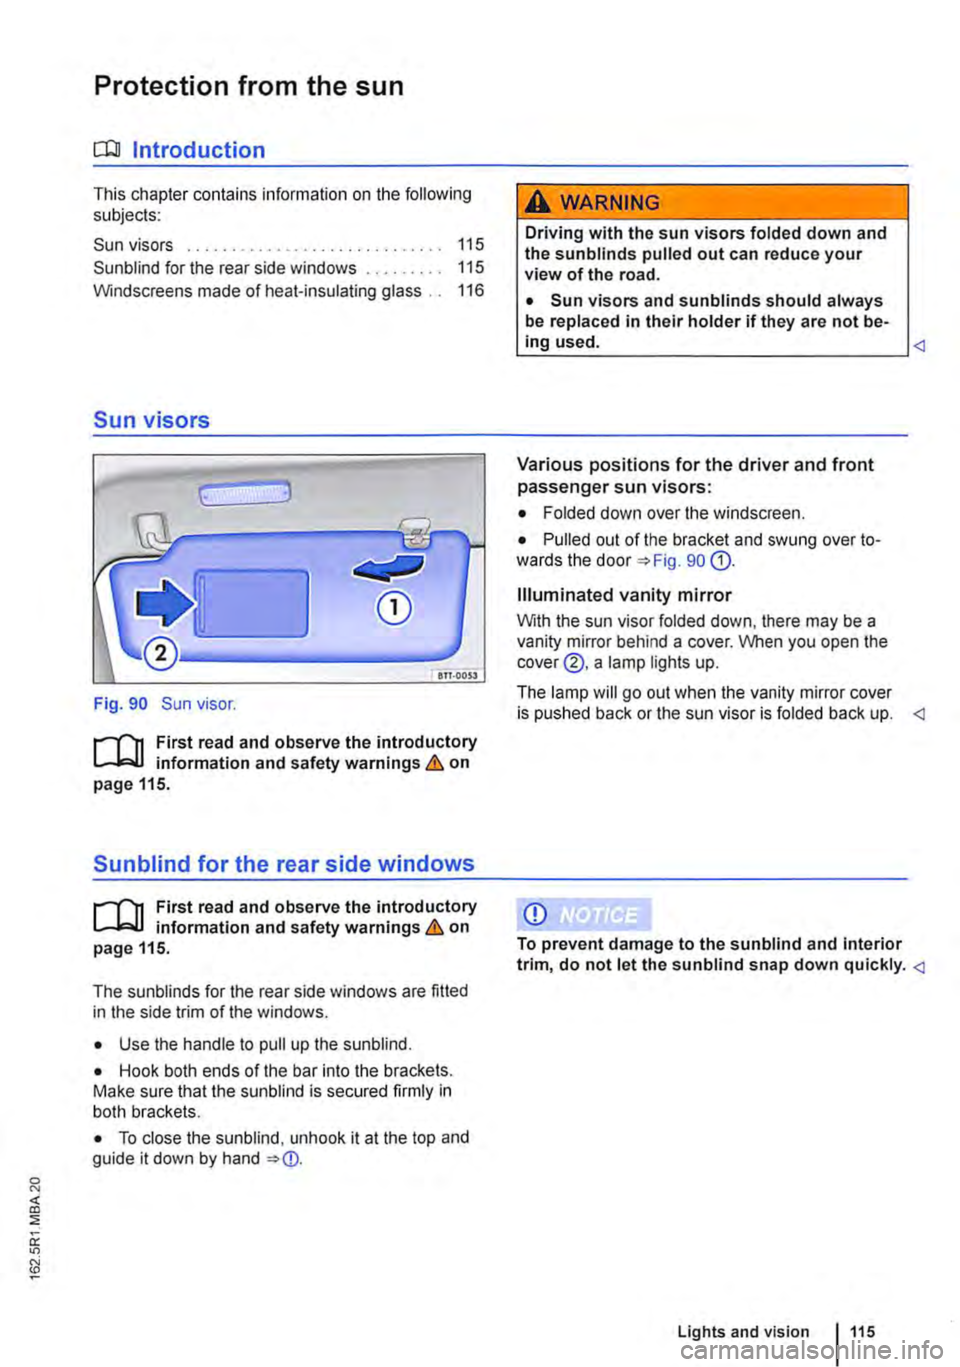
Fig. 90 Sun visor.
t"'l1 First read and observe the introductory L-bll information and safety warnings Lh on page 115.
Sunblind for the rear side windows
t"'l1 First read and observe the introductory L-blJ information and safety warnings Lh on page 115.
The sunblinds for the rear side windows are fitted in the side trim of the windows.
• Use the handle to pull up the sunblind.
• Hook both ends of the bar into the brackets. Make sure that the sun blind is secured firmly in both brackets.
• To close the sunblind, unhook it at the top and guide it down by hand => (]).
A WARNING
Driving with the sun visors folded down and the sun blinds pulled out can reduce your view of the road.
• Sun visors and sun blinds should always be replaced in their holder if they are not be-ing used.
Various positions for the driver and front passenger sun visors:
• Folded down over the windscreen.
• Pulled out of the bracket and swung over to-wards the door 90 Q).
Illuminated vanity mirror
With the sun visor folded down. there may be a vanity mirror behind a cover. When you open the cover@, a lamp lights up.
The lamp will go out when the vanity mirror cover is pushed back or the sun visor is folded back up.
CD
To prevent damage to the sun blind and interior trim, do not let the sunblind snap down quickly.
Lights and vision 115
Page 119 of 486

Service position for the front wipers
Fig. 94 Wiper blades in service position.
r--('n First read and observe the introductory L-J,::.IJ information and safety warnings & on page 116.
The wiper arms can be lifted off the windscreen when in the service position 94. Carry out the following steps to move the wipers to the serv-ice position:
Rain sensor
CD
®
Fig. 95 Next to the steering wheel: adjusting rain sensor® in wiper lever.
r--('n First read and observe the introductory L-J,::.U information and safety warnings & on page 116.
When the rain sensor is activated, it automatically controls the frequency of the wiper intervals, de-pending on the amount of rain &. The sensitivity of the rain sensor can be adjusted manually. Man-ual wipe 117.
• The bonnet must be closed 350.
• Switch the ignition on and then off again.
• Briefly press down the wiper lever 92 @).
Place the wiper arms back onto the windscreen before driving away. Briefly press the wiper lever down to bring the wiper arms back to the original position.
Lifting the front wipers
• Move the wiper arms to the service position be-fore lifting
• When lifting the wiper arm hold it only by the wiper blade mounting.
CD
• In order to prevent damage to the bonnet and the wiper arms, the wiper arms should only be lifted when in the service position.
• Always return the wiper arms to the wind-screen before starting your journey.
Push the lever to the desired position 95:
@ Deactivates the rain sensor.
CD Rain sensor is active -automatic wipe when necessary.
® Adjusting the sensitivity of the rain sensor:
-Switch to the right-high sensitivity.
-Switch to the left -low sensitivity.
Lights and vision 119
Page 121 of 486

Recommended windscreen washer fluid
• For warm weather: summer windscreen wash G 052 184 A 1. Dilution 1:100 (1 part concen-trate, 100 parts water) in the washer fluid reservoir.
• All-year washer fluid G 052 164 A2. Dilution in winter to -18°C (0°F) approx. 1 :2 (1 part concen-trate, 2 parts water), otherwise dilute one part con-centrate to four parts water (1 :4) in the washer fluid reservoir.
Capacities
The capacity of the washer fluid reservoir is ap-proximately 3. 7 litres or approximately 5.0 litres in vehicles with a headlight washer system.
A WARNING
Never mix coolant additive or other unsuita-ble additives into the windscreen washer flu-id. An oily film may otherwise be left on the windscreen or rear window which will restrict the field of vision.
Mirrors
o:n Introduction
This chapter contains information on the following subjects:
Interior mirror .............. . 122
Exterior mirrors ............ . . .... 123
For safety reasons it is important that the driver po-sitions the exterior and interior mirrors correctly be-fore starting a journey '* &.
You can use the exterior mirrors and the interior mirror to observe traffic behind you and adjust driv-ing style accordingly. Looking in the exterior mir-rors and the interior mirror does not allow the driver to see the entre side and rear area of the vehicle. The area that cannot be seen is known as the blind spot. There may be objects and other road users in the blind spot.
Additional information and warnings:
• Exterior views '* page 5
• Changing gear '*page 260
• Braking, stopping and parking '*page 269
A WARNING (Continued)
• Use clean, clear water (not distilled water) with a washer fluid recommended by Volks-wagen Commercial Vehicles.
• A suitable anti-freeze agent should be added to the windscreen washer fluid If nec-essary.
CD
• Never mix other cleaning agents with the cleaning agents recommended by Volkswagen Commercial Vehicles. This can cause the ingre-dients to separate and block the windscreen washer jets.
• When refilling or changing service fluids, please ensure that the correct fluids are added through the correct openings. Incorrect service fluids can cause serious functional problems and engine damage.
Adjusting the exterior and interior mirrors while driving may cause the driver to become distracted. This can lead to accidents and se-rious Injuries.
• Exterior and interior mirrors should only be adjusted when the vehicle is stationary.
• When parking, changing lane, or perform-ing an overtaking or turning manoeuvre, al-ways pay careful attention to the area around the vehicle as objects and other road users may be located In the blind spot.
• Always ensure that the mirrors are posi-tioned correctly and that the rear view Is not restricted by ice, snow, condensation or any other objects.
A WARNING
Automatic anti-dazzle mirrors contain an electrolyte fluid which could leak If the mirror is broken.
• The leaking electrolyte fluid can cause lrri-tation to the skin, eyes and respiratory or-gans, especially In people who suffer from
Lights and vision 121
Page 122 of 486

A WARNING (Continued)
asthma or similar illnesses. Immediately en-sure that there is a sufficient supply of fresh air and get out of the vehicle. If this is not possible, open all of the windows and doors.
• If the electrolyte fluid gets into the eyes or onto the skin, immediately wash the area with plenty of water for at least 15 minutes and consult a doctor.
• If the electrolyte fluid gets onto shoes or clothing, wash immediately with plenty of wa-ter for at least 15 minutes. Clean shoes and clothes thoroughly before wearing them again.
Interior mirror
A WARNING (Continued)
• If the electrolyte fluid is swallowed, imme-diately rinse the mouth with plenty of water for at least 15 minutes. Do not induce vomit-ing unless instructed to do so by a doctor. Seek medical assistance immediately.
CD
If the glass of an automatic anti-dazzle mirror is broken, electrolyte fluid can leak from the mir-ror. This fluid corrodes plastic surfaces. Re-move the fluid as soon as possible, e.g. using a wet sponge.
BSG-0101.
Fig. 99 On the windscreen: manual anti-dazzle in-terior mirror.
1"'111 First read and observe the introductory L-lo::JJ information and safety warnings & on page 121.
The driver must adjust the interior mirror so that they can see clearly through the rear window.
1221 Before the journey
The driver's rear view may be restricted or com-pletely obscured by objects such as a sun blind on the rear window, items of clothing stowed on the luggage compartment cover, or a rear window that is covered in ice, snow or dirt.
Automatic anti-dazzle interior mirror
When the ignition is switched on, the interior mirror will darken automatically according to the amount of light it receives.
Key to Fig. 98:
G) Sensor for detemnining light incidence from the rear.
® Sensor for detemnining light incidence from the front.
If the light on the sensors is hindered or interrup-ted, e.g. by a sunblind, the automatic anti-dazzle interior mirror will not function or will not function correctly.
The automatic anti-dazzle function is deactivated when the reverse gear is selected. .,..
Page 123 of 486

Do not attach external navigation devices to the windscreen or near interior automatic anti-dazzle
Manual anti-dazzle interior mirror
• Basic position: the lever on the lower part of the mirror is pointing towards the windscreen.
• Pull the lever to the back to select the anti-daz-zle function 99.
Exterior mirrors
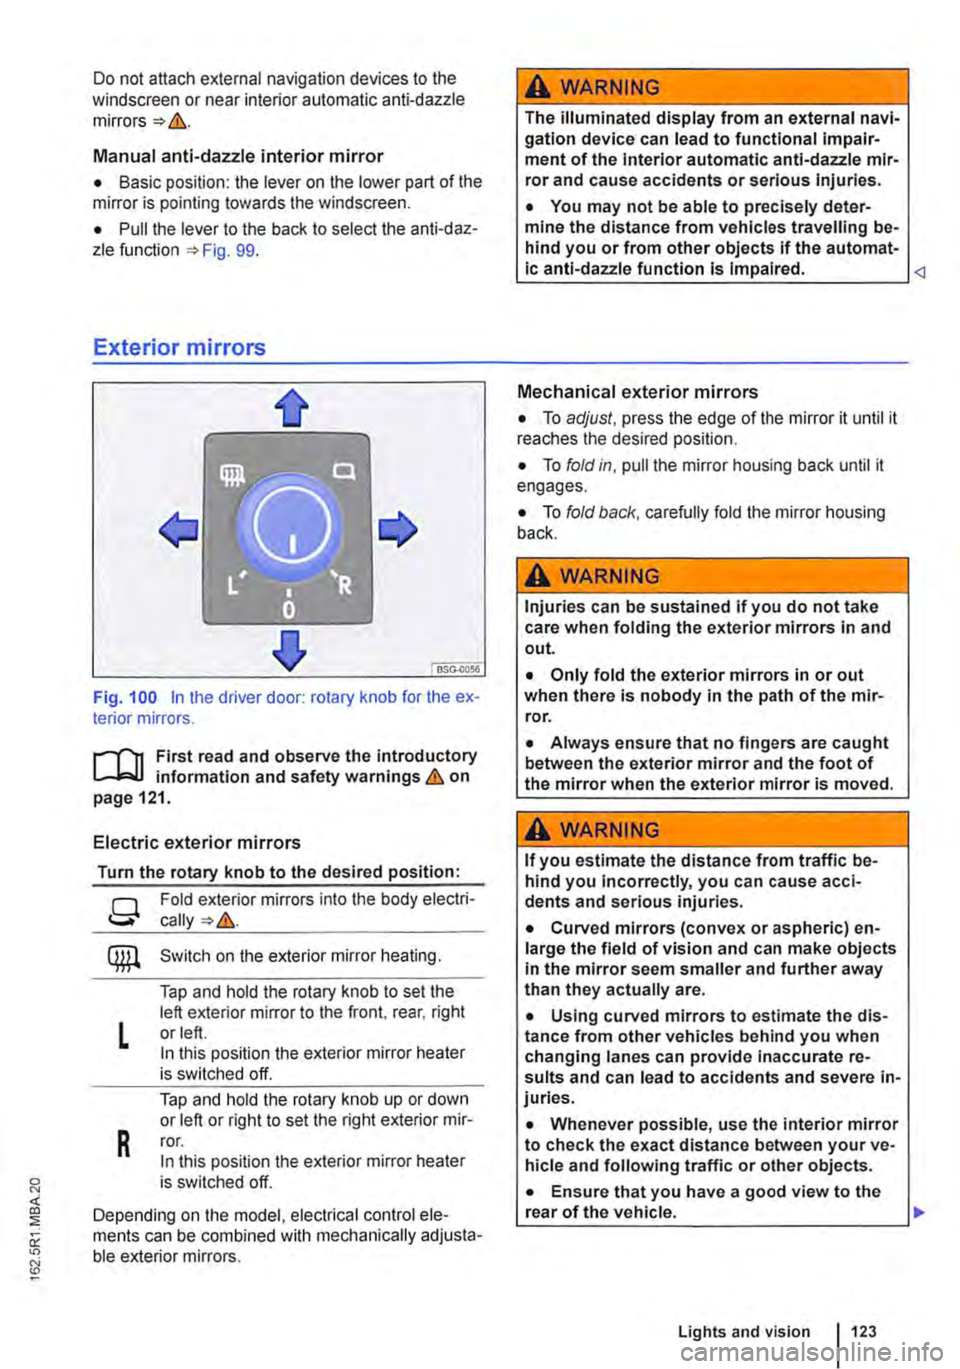
Fig. 100 in the driver door: rotary knob for the ex-terior mirrors.
First read and observe the introductory L..-Jr:.U information and safety warnings & on page 121.
Electric exterior mirrors
Turn the rotary knob to the desired position:
g
L
R
Fold exterior mirrors into the body electri-
Switch on the exterior mirror heating.
Tap and hold the rotary knob to set the left exterior mirror to the front, rear, right or left. In this position the exterior mirror heater is switched off.
Tap and hold the rotary knob up or down or left or right to set the right exterior mir-ror. In this position the exterior mirror heater is switched off.
Depending on the model, electrical control ele-ments can be combined with mechanically adjusta-ble exterior mirrors.
A WARNING
The illuminated display from an external navi-gation device can lead to functional impair-ment of the Interior automatic anti-dazzle mir-ror and cause accidents or serious injuries.
• You may not be able to precisely deter-mine the distance from vehicles travelling be-hind you or from other objects if the automat-ic anti-dazzle function is Impaired.
• To adjust, press the edge of the mirror it until it reaches the desired position.
• To fold in, pull the mirror housing back until it engages.
• To fold back, carefully fold the mirror housing back.
A WARNING
Injuries can be sustained if you do not take care when folding the exterior mirrors in and out.
• Only fold the exterior mirrors in or out when there is nobody in the path of the mir-ror.
• Always ensure that no fingers are caught between the exterior mirror and the foot of the mirror when the exterior mirror is moved.
A WARNING
If you estimate the distance from traffic be-hind you Incorrectly, you can cause acci-dents and serious injuries.
• Curved mirrors (convex or aspheric) en-large the field of vision and can make objects in the mirror seem smaller and further away than they actually are.
• Using curved mirrors to estimate the dis-tance from other vehicles behind you when changing lanes can provide inaccurate re-sults and can lead to accidents and severe in-juries.
• Whenever possible, use the interior mirror to check the exact distance between your ve-hicle and following traffic or other objects.
• Ensure that you have a good view to the rear of the vehicle. .,..
Lights and vision 123
Page 124 of 486

• Do not fold electrically folding exterior mir-rors In or out manually as this can damage the electric motor.
r:lil:-. The exteriormirror heating should be switch-W ed off when 11 IS no longer needed. Fuel is otherwise wasted.
1241 Before the JOurney
m In the event of a fault, the electric exterior W mirrors can be adjusted by hand by pressing on the outer edge of the mirror.
m The vehicle aerials are located in the exterior W mirrors. If any metallic chrome plates, such as chrome mirror caps, are retrofitted to the exteri-or mirrors, you may experience problems with the radio, mobile telephone and navigation services or they may lose the ability to send and receive sig-nals completely.
Page 142 of 486

Never connect the trailer lights directly to the elec-trical system of your vehicle. If you are uncertain whether the trailer has been connected correctly, please contact a qualified workshop. Volkswagen Commercial Vehicles recommends using a Volks-wagen Commercial Vehicles dealership for this purpose.
Exterior mirrors
If you are unable to see the traffic behind the trailer in the vehicle's standard exterior mirrors, additional exterior mirrors should be fitted in accordance with any country-specific regulations. Before setting off, adjust the mirrors so that you have a sufficient view of the rear.
Maximum power consumption of the trailer
Electrical consumers Maximum output
All brake lights 84 watts
Turn signal per side 42 watts
All side lights 100 watts
All tail lights 42 watts
Rear fog light 42 watts
Never exceed the specified values.
A wARNING
If the towing bracket is unsuitable or is in cor-rectly fitted, the trailer can become detached from the vehicle and cause serious Injury.
Fitting the removable ball coupling
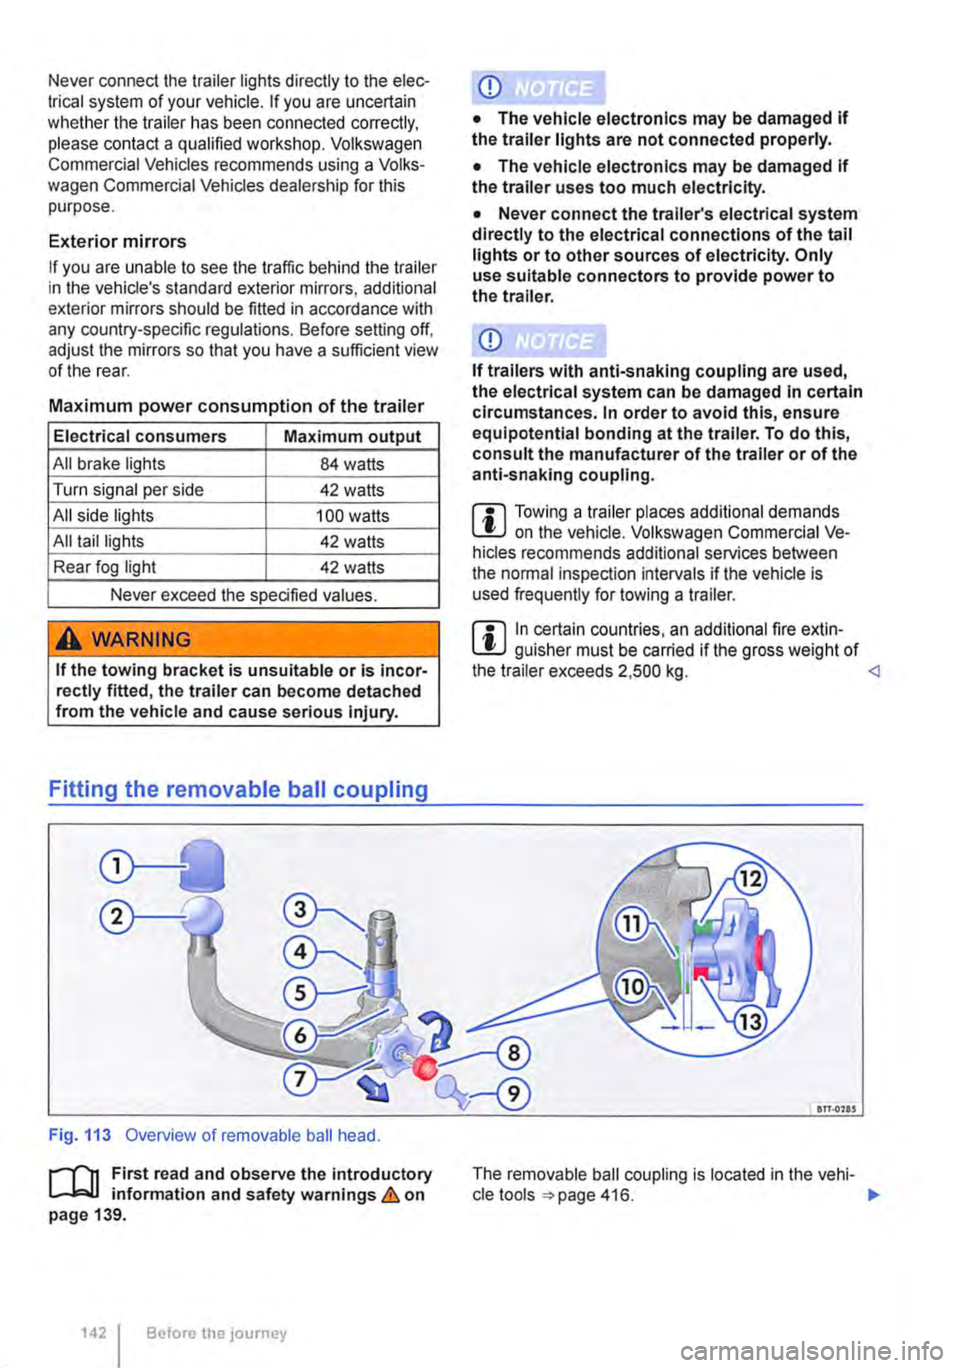
Fig. 113 Overview of removable ball head.
r-f1t First read and observe the introductory L-J,::,JJ information and safety warnings & on page 139.
1421 Before the journey
• The vehicle electronics may be damaged If the trailer uses too much electricity.
• Never connect the trailer's electrical system directly to the electrical connections of the tail lights or to other sources of electricity. Only use suitable connectors to provide power to the trailer.
m Towing a trailer places additional demands L!J on the vehicle. Volkswagen Commercial Ve-hicles recommends additional services between the normal inspection intervals if the vehicle is used frequently for towing a trailer.
m In certain countries, an additional fire extin-L!J guisher must be carried if the gross weight of the trailer exceeds 2,500 kg. <1
an.ons
The removable ball coupling is located in the vehi-cle tools 416. ..,.
Page 171 of 486

Calling up the main menu
• Press button on the remote control unit or the MENU button on the screen.
• Use the arr(w keyJ (8 G on the remote control unit or lvoL + ... ) VOL-.. on the screen to choose the desired setting.
unit or the PLAY>tl button on the screen to confirm your selection.
• Press the @m button on the remote control unit or the jMENUJ button on the screen to leave the main menu.
Changing image settings
In this menu, you can change the settings for con-trast, brightness, sharpness, colour and tint.
• Open the main menu.
• Use the arr(w keys) (8 G on the remote control unit or jvoL + ... ) VOL-.. on the screen to choose the desired picture setting.
• Use the arr(w keys) (8 G on the remote control unit or lvoL + ... ) voL-.. on the screen to choose the menu item whose settings are to be changed.
• Use the arr(w keys) (8 G on the remote control unit or lvOL + ... ) VOL-.. on the screen to make the desired setting.
unit or the PLAY•u button on the screen to save the setting.
Changing function settings
The following settings can be made in this menu:
Screen mode
Mirror mode
V-Fiip
Illumination
Adjust picture ratio (16:9 or 4:3)
Create a mirror image of the picture being shown.
Turn the picture being shown 180°.
Set the screen bright-ness
Settings on the DVD player
r--("'n First read and observe the introductory L.-J.:.I.I information and safety warnings & on page 165.
• Open the main menu.
• Use the arr(w keys) (8 G on the remote control unit or lvoL + ... ) VOL-.. on the screen to choose Function settings.
• Use the arr(w keyJ (8 G on the remote control unit or lvoL + ... ) VOL-.. on the screen to choose the menu item whose settings are to be changed.
• Use the arr(w keys) (8 G on the remote control unit or lvoL + ... ] VOL-.. on the screen to make the desired setting.
unit or the PLAY>tl button on the screen to save the setting.
Changing the language
The language can be changed in this menu: Ger-man and English are the available languages.
• Open the main menu.
• Use the arr(w keys) (8 G on the remote control unit or lvoL + ... ) voL-.. on the screen to choose the Language choice setting.
• Use the arr(w keys) (8 G on the remote control unit or lvoL + ... ) VOL-.. on the screen to select the desired language.
• Press the SET button on the remote control unit or the setting.
Calling up the main menu
• Press the !SETUP) button on the remote control unit.
• Use the arrow buttons (8 G to choose the de-sired setting. .,.
Practical equipment 1171