Page 137 of 421

Turn signal control lever
57L21128
A WARNING
To avoid possible injury, do not operate controls by reaching through the steering wheel.
Turn signal operation
With the ignition switch in "ON" position. move the lever upward or downward to activate the right or left turn signals.
Normal turn signal
68PM00234
Move the lever all the way upward or downward to signal. When the turn is completed, the signal will cancel and the lever will return to its normal position.
BEFORE DRIVING
Lane change signal
68PM00235
Move the lever partially upward or downward to turn right or left and hold the lever in the moved position. The turn signal and its indicator fiash while the lever is held at the moved position. The turn signal and its indicator fiash 3 times even if you returned the lever immediately after the activation.
NOTE: The turn signal and its indicator can be set whether they flash 3 times after the turn signal lever is returned via the information display. Refer to "Information display" in this section.
2-66
Page 138 of 421
BEFORE DRIVING
NOTE: You can customize the setting for the num-Hazard warning switch ber of flashing times of the turn signal and its indicator (1 to 4 times). Ask a SUZUKI deafer for the customization.
2-67
78RB02058
Push the hazard warning switch to activate the hazard warning lights. All turn signal lights and both turn signal indicators will flash simultaneously. To turn off the lights, push the switch again. Use the hazard warning lights to warn other drivers of possible risk of traffic hazard when you park your vehicle in case of emergency.
Windshield wiper and washer
lever
650611
A WARNING
To avoid possible injury, do not operate controls by reaching through the steering wheel.
Page 139 of 421

Wiper and washer operation
When the ignition switch is in "ON" position, you can use the wiper/washer lever.
When the wipers are under heavy load such as covered by snow, the breaker will be activated and the wipers will stop operating to protect the wiper motor from overheating. If the wiper stops during operation, do the following methods.
1) Stop the vehicle in a safe place, and turn the engine off. 2) Move the wiper lever and switch to "OFF" position. 3) Remove obstacles such as snow on the wipers. 4) After a while, when the temperature of the wiper motor becomes low enough, the breaker will be reset automatically and the wipers will be able to use.
If you cannot use the wipers after a while, there may be another problem. Ask a SUZUKI dealer to have the wipers inspected.
Windshield wipers
MIST
OFF
INT
LO
HI
78RB02059
To turn the windshield wipers on, move the lever down to one of the three operating positions. In "INT" position, the wipers operate intermittently. The "INT" position is very convenient for driving in mist or light rain. In "LO" position, the wipers operate at a steady low speed. In "HI" position, the wipers operate at a steady high speed. To turn off the wipers, move the lever back to "OFF" position.
Move the lever up and hold it to "MIST" position, the windshield wipers will turn on continuously at low speed.
BEFORE DRIVING
Windshield washer
78RB02060
To spray windshield washer fluid, pull the lever toward you. The windshield wipers will automatically turn on at low speed if they are not already on and your vehicle is equipped with "INT" position.
.A, WARNING
To prevent windshield icing in cold weather, turn on the defroster to heat the windshield before and during windshield washer use. Do not use radiator antifreeze in the windshield washer reservoir. It can severely impair visibility when sprayed on the windshield, and can also damage your vehicle's paint.
2-68
Page 140 of 421

BEFORE DRIVING
NOTICE
To help prevent damage to the windshield wiper and washer system components, you should take the following precautions: Do not continue to hold in the lever when there is no windshield washer fluid being sprayed or the washer motor can be damaged. • Do not attempt to remove dirt from a dry windshield with the wipers or you can damage the windshield and the wiper blades. Always wet the windshield with washer fluid before operating the wipers. Clear ice or packed snow from the wiper blades before using the wipers. Check the washer fluid level regularly. Check it often when the weather is bad. Fill a reservoir to 3/4 level with washer fluid for its expansion, if temperature falls low enough to freeze the fluid.
2-69
Rear window wiper/washer switch
Washer
Wiper
""'
78RB02061
To turn the rear wiper on. twist the rear wiper switch on the end of the lever forward to "ON" position. To turn the rear wiper off, twist the switch reaiward to "OFF'" position.
With the rear wiper in "OFF"" position, twist the switch reaiward and hold it there to spray window washer fluid.
With the rear wiper in "ON"" position, turn the switch foiward and hold it there to spray window washer fluid.
NOTICE
Clear ice or snow from the rear winw dow and rear wiper blade before using the rear wiper. Accumulated ice or snow could prevent the wiper blade from moving, causing damage to the wiper motor.
Page 141 of 421
Tilt steering lock lever
(1) LOCK (2) UNLOCK
The lock lever is located under the steering column. To adjust the steering wheel height:
1) Push down the lock lever to unlock the steering column. 2) Adjust the steering wheel to the desired height and lock the steering column by pulling up the lock lever. 3) Try moving the steering wheel up and down to check that it is securely locked in position.
A. WARNING
Never attempt to adjust the steering wheel while the vehicle is moving or you could lose control of the vehicle.
BEFORE DRIVING
Horn
~
78RB02063
Press the horn button of the steering wheel to sound the horn. The horn will sound with the ignition switch in any position.
2-70
Page 142 of 421

BEFORE DRIVING
Heated rear window switch/
heated outside rearview
mirror switch (if equipped)
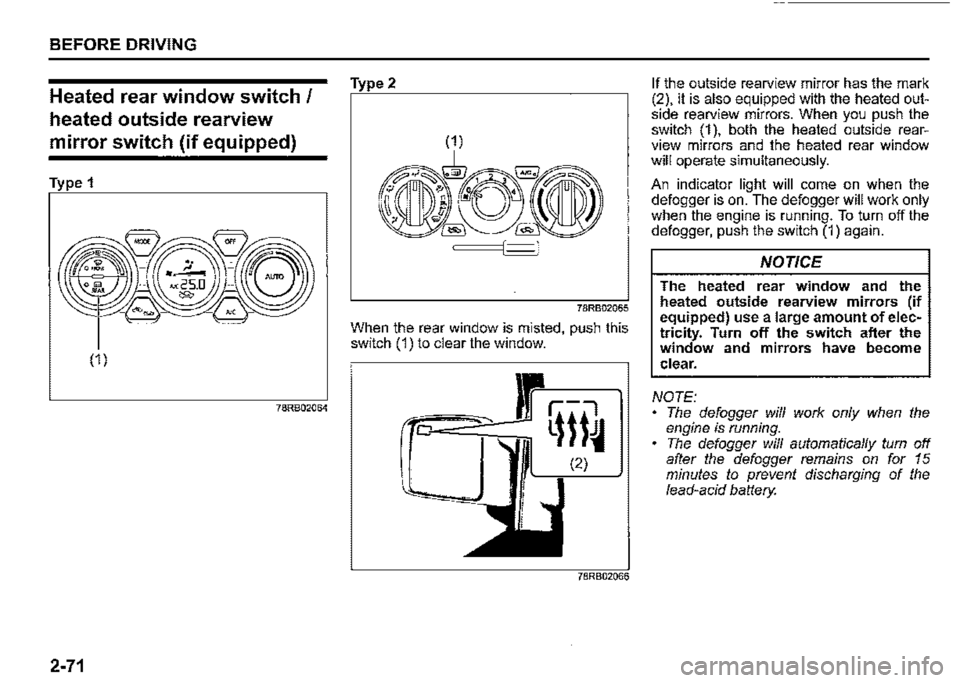
Type 1
(1)
78RB02064
2-71
Type2
78RB02065
When the rear window is misted, push this switch (1) to clear the window.
If the outside rearview mirror has the mark (2), it is also equipped with the heated outside rearview mirrors. When you push the switch (1 ), both the heated outside rearview mirrors and the heated rear window will operate simultaneously.
An indicator light will come on when the defogger is on. The defogger will work only when the engine is running. To turn off the defogger, push the switch (1) again.
NOTICE
The heated rear window and the heated outside rearview mirrors (if equipped) use a large amount of electricity. Turn off the switch after the window and mirrors have become clear.
NOTE: The defogger will work only when the engine is running. The defogger will automatically turn off after the defogger remains on for 15 minutes to prevent discharging of the lead-acid battery.
Page 143 of 421

Vehicle loading
Your vehicle is designed for specific weight capacities. The weight capacities of your vehicle are indicated by the Gross Vehicle Weight Rating (GVWR) and the Permissible maximum Axle Weight (PAW, front and rear). The GVWR and PAW (front and_ rear) are listed in "SPECIFICATIONS" section.
GVWR -Maximum permissible overall weight of the fully loaded vehicle (including all the occupants, accessories and cargo plus the trailer nose weight if towing a trailer). PAW (front and rear) -Maximum permissible weight on an individual axle.
Actual weight of the loaded vehicle and actual loads at the front and rear axles can only be determined by weighing the vehicle. Compare these weights to the GVWR and PAW (front and rear). If the g_ross vehicle weight or the load on either axle exceeds these ratings, you must remove enough weight to bring the load down to the rated capacity.
A_ WARNING
Never overload your vehicle. The gross vehicle weight (sum of the weights of the vehicle, all the occupants, accessories, cargo p~us trailer nose weight if towing a trailer) must never exceed the Gross Vehicle Weight Rating (GVWR). In addition, never distribute a load so that the weight on either the front or rear axle exceeds the Permissible maximum Axle Weight (PAW).
A_ WARNING
Always distribute cargo evenly. To avoid personal injury or damage to
your vehicle, always_ se~ure carg'? to prevent it from sh1ftmg 1f the vehicle moves suddenly. Place heavier objects on the floor and as far _forward in the cargo area as possible. Never pile cargo higher than the top of the seat backs.
BEFORE DRIVING
Trailer towing
Observe any country-specific regulations when towing a trailer and using a tow bar.
60A185
Your vehicle is primarily designed for transporting passengers and luggage. Towing a trailer can adversely affect vehicle handling, durability and fuel economy. Nevertheless, if suitably equipped, your vehicle can be used to tow a trailer which does not exceed the towing capacity specified below:
2-72
Page 144 of 421

BEFORE DRIVING
Maximum towing capacity (gross trailer weight; trailer with integrated drawbar, and cargo)
Braked trailer: 1300 kg (2866 lbs) Unbraked trailer: 350 kg (772 lbs)
To load your vehicle and trailer properly, you must know how to measure gross trailer weight and trailer nose weight.
78RB02083
(1) Gross trailer weight Gross trailer weight is the weight of the trailer with integrated drawbar plus all the cargo in it. You can measure gross trailer weight by putting the fully loaded trailer on a vehicle scale.
2-73
(2) Permissible nose weight Nose weight is the downward force applied on the towing hitch ball by the trailer coupler, with the trailer fully loaded and the coupler at its normal towing height. This weight can also be measured using a bathroom scale.
The maximum towing capacity listed above(1300kg) is only applicable up to 1 000m above sea level. In high altitude regions above 1 000m, combined weight of the maximum towing capacity (gross trailer weight) and permissible gross vehicle weight (GVWR) must be reduced by 10% for every extra 1 000m.
A WARNING
For vehicles equipped with the dual sensor brake support, if your vehicle is used to tow a trailer, press the dual sensor brake support OFF switch to turn off the dual sensor brake support. If not, accidents related to the system being turned on may occur.
A CAUTION
When towing by your vehicle equipped with automatic transmission on a long steep uphill, try to take some rest on the way at a safe place to prevent overheat or damage of the engine or transmission.
NOTICE
Trailer towing puts additional stress on the engine, transmission and brakes of your vehicle. Never tow a trailer during the first 1000 km (600 miles) of vehicle operation.