Page 4 of 216

2
.
.
Instrument panel 7
W arning and indicator lamps 8
I
ndic ators
18
Lighting dimmer
2
2
Trip computer
2
2
Date and time setting
2
3
Instruments and controls
4
K
ey
25
Remote control
2
5
Front doors
2
8
Sliding side door(s)
2
8
Operation in the event of a battery failure
2
9
Tailgate
29
Side-hinged rear doors
3
0
Rear roof flap
3
2
Central locking
3
3
Alarm
34
Rear windows
3
5
Electric windows
3
5Steering wheel adjustment
3
7
Mirrors
37
Surveillance mirror
3
8
Front seats
3
8
Individual passenger seat
4
0
Multi-Flex bench seat
4
0
Rear bench seat
4
2
Rear seats (5 seats) 4 3
Rear seats (7 seats) 4 6
Crew cab
5
0
Seat modularity and configurations
5
2
Front fittings
5
4
Seating area fittings
5
5
Zenith
56
Fragrance diffuser
5
7
Courtesy lamps
5
9
Rear fittings (5 seats)
6
0
Rear fittings (7 seats)
6
1
Load space layout
6
4
Heating/Manual air conditioning
6
6
Dual-zone automatic air conditioning
6
7
Recommendations for ventilation
and air conditioning
6
9
Demisting and defrosting
7
0Lighting control stalk
7
1
Automatic illumination of headlamps
7
2
LED daytime running lamps
7
2
Guide-me-home lighting
7
2
Cornering lighting
7
3
Direction indicators
7
3
Headlamp beam
7
3
Wiper control stalk 7 3
General safety recommendations
7
6
Hazard warning lamps
7
7
Horn
77
Emergency or assistance call
7
7
Anti-lock braking system (ABS/EBFD)
7
9
Emergency braking assistance (EBA)
7
9
Anti-slip regulation (ASR) and electronic
stability control (ESC)
7
9
Grip control
8
0
Seat belts
8
2
Airbags
85
Child seats
8
9
Deactivating the passenger's front airbag
9
0
Reactivating the passenger's front airbag
9
1
Recommended child seats
9
4
Locations for child seats secured using
a seat belt
9
5
ISOFIX mountings and child seats
9
8
Instructions for child seats
1
01
Child lock
1
02
Over view
Instruments
Access Ease of use and comfort
Safety
Lighting and visibility
Eco-driving
Contents
Page 6 of 216
4
Instruments and controls1.Lighting and direction indicator control
stalk.
2. Instrument panel with display.
3. Wiper/screenwash/trip computer control
stalk.
4. Ignition.
5. Audio system controls.
6. Driver's front airbag/horn.
7. Steering wheel height and reach
adjustment.
8. Cruise control/speed limiter controls.
9. Control panel: parking sensors, headlamp
beam adjustment, ESC, Stop & Start,
alarm (depending on country of sale).
10. Bonnet release.
11. Electric door mirror adjustment controls.
12 . Front window controls.
13. Switch panel: hazard warning lamps,
central locking, child lock (depending on
ve r s i o n).
14 . Cigarette lighter.
15. Heating/ventilation controls.
16. Electronic gearbox or Grip control
control.
17. Touch screen.
18. USB port (with electronic gearbox).
19. USB port (with manual gearbox).
Over view
Page 39 of 216
37
Steering wheel adjustment
F While at a standstill, unlock the steering wheel by pulling the control.
F
A
djust the height and reach of the steering
wheel, then lock it by pushing down on the
control.
Mirrors
Adjusting the manual door
mirrors Adjusting the electric door
mirrors
F Move the control to the right or to the left to
select the corresponding mirror.
F
M
ove the control in any of the four directions
to adjust.
F
R
eturn the control to the central position.
Electric folding/unfolding
The mirrors can be folded or unfolded
electrically from the inside, with the vehicle
parked and the ignition on:
F
P
lace the control in the central position.
F
T
urn the control downwards.
F
M
ove the adjustment lever in any of the four
directions to adjust it.
When the vehicle is parked, the door mirrors
can be folded in manually.
They do not have automatic defrosting.
3
Ease of use and comfort
Page 40 of 216

38
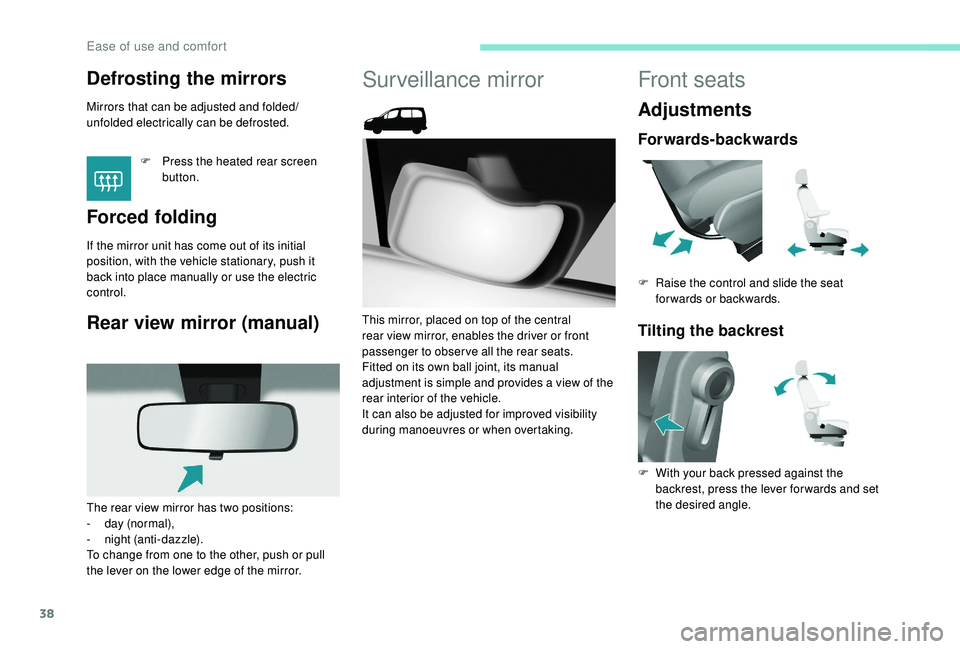
Defrosting the mirrors
Mirrors that can be adjusted and folded/
unfolded electrically can be defrosted.F
P
ress the heated rear screen
button.
Forced folding
If the mirror unit has come out of its initial
position, with the vehicle stationary, push it
back into place manually or use the electric
control.
Rear view mirror (manual)
Surveillance mirror
This mirror, placed on top of the central
rear view mirror, enables the driver or front
passenger to observe all the rear seats.
Fitted on its own ball joint, its manual
adjustment is simple and provides a view of the
rear interior of the vehicle.
It can also be adjusted for improved visibility
during manoeuvres or when overtaking.
The rear view mirror has two positions:
-
d
ay (normal),
-
n
ight (anti-dazzle).
To change from one to the other, push or pull
the lever on the lower edge of the mirror.
Front seats
Adjustments
Forwards-backwards
F Raise the control and slide the seat forwards or backwards.
Tilting the backrest
F With your back pressed against the backrest, press the lever for wards and set
the desired angle.
Ease of use and comfort
Page 72 of 216

70
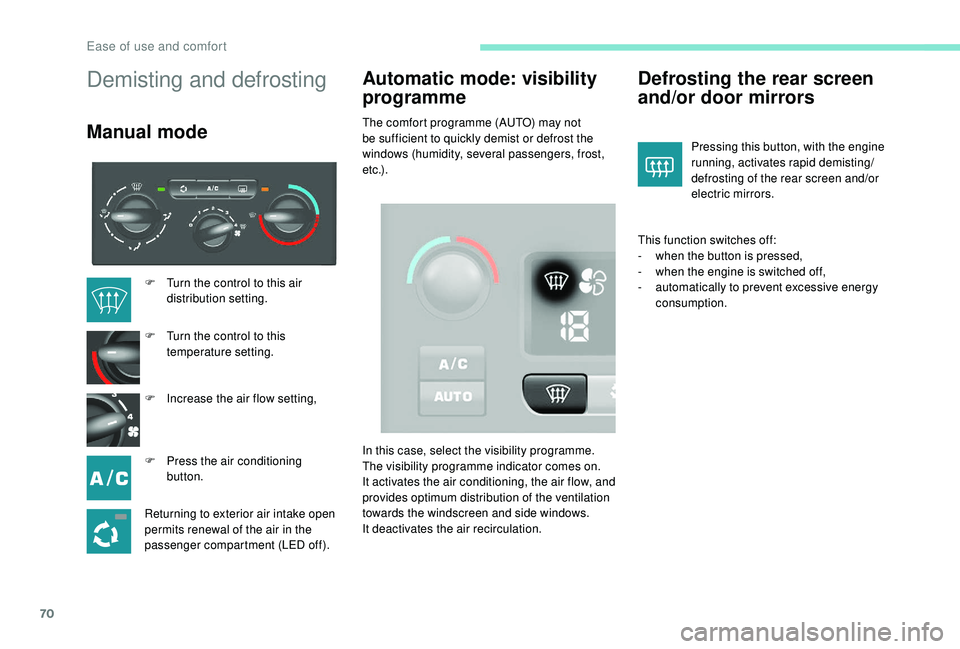
Demisting and defrosting
Manual modeAutomatic mode: visibility
programmeThe comfort programme (AUTO) may not
be sufficient to quickly demist or defrost the
windows (humidity, several passengers, frost,
e t c .) .
Defrosting the rear screen
and/or door mirrors
Pressing this button, with the engine
running, activates rapid demisting/
defrosting of the rear screen and/or
electric mirrors.
This function switches off:
-
w
hen the button is pressed,
-
w
hen the engine is switched off,
-
a
utomatically to prevent excessive energy
consumption.
F
T
urn the control to this air
distribution setting.
F
T
urn the control to this
temperature setting.
F
I
ncrease the air flow setting,
F
P
ress the air conditioning
button.
Returning to exterior air intake open
permits renewal of the air in the
passenger compartment (LED off). In this case, select the visibility programme.
The visibility programme indicator comes on.
It activates the air conditioning, the air flow, and
provides optimum distribution of the ventilation
towards the windscreen and side windows.
It deactivates the air recirculation.
Ease of use and comfort
Page 74 of 216

72
Automatic illumination of
headlamps
The sidelamps and dipped beam headlamps
switch on automatically if the light is poor or
during operation of the windscreen wipers.
They switch off again as soon as the ambient
light becomes bright enough or the windscreen
wipers stop.
This function is not compatible with daytime
running lamps.In fog or snow, the sunshine sensor may
detect sufficient light.
As a result, the lighting will not come on
automatically. If necessary, you must
switch on the dipped beam headlamps
manually.
Do not cover the sunshine sensor located
on the windscreen behind the rear view
mirror. It is used for automatic illumination
of the headlamps and for the automatic
rain sensitive wipers.
Activation
F Turn the ring to the AUTO position. The activation of the
function is accompanied by a
message on the screen.
Deactivation
F Turn the ring for wards or rear wards. The deactivation of the function is accompanied
by a message on the screen.
The function is switched off temporarily off
when the manual lighting control stalk is used.
In the event of a malfunction of
the sunshine sensor , the lamps
come on, accompanied by the
illumination of the Ser vice warning
lamp, an audible signal and a
message on the screen.
Contact a PEUGEOT dealer or a qualified
workshop.
LED daytime running lamps
On starting the vehicle, in daylight the daytime
running lamps come on automatically.
If the sidelamps, dipped or main headlamps
are switched on manually or automatically, the
daytime running lamps switch off.
Programming
For countries where exterior lighting by day is
not a legal requirement, you can activate or
deactivate the function via the configuration
menu.
Guide-me-home lighting
Keeping the dipped beam headlamps on
temporarily after switching the ignition off makes
the driver's exit easier when the light is poor.
Manual operation
F With the ignition off, "flash" the headlamps
within one minute after switching off the
ignition.
Manual guide-me-home lighting goes off
automatically after a certain period of time.
Automatic operation
F This function is activated via the vehicle configuration menu.
For more information on the Audio and
Telematics , refer to the corresponding
section.
Lighting and visibility
Page 157 of 216
155
Dashboard fuses
Tilt the cover to access the fuses.Fuses
F Amps
A Allocation
1 15Rear wiper
2 –
30 Free
Central locking
3 5Airbags
4 10Air conditioning, diagnostic socket, rear view mirror control,
headlamp beam.
5 30Electric windows
6 30Locks
7 5Rear courtesy lamp, front map reading lamps, ceiling lamp.
8 20
Audio system, display screen, under-inflation detection, alarm and siren
930Front and rear 12 V socket
10 15Centre console
11 15Low current anti-theft
12 15Rain and sunshine sensor, airbags.
13 5Instrument panel
14 15Parking sensors, automatic air conditioning controls, Hands-
free kit
15 30Locks
16 -Free
17 40Rear screen/rear view mirrors defrosting.
8
In the event of a breakdown
Page 158 of 216
156
Passenger compartment fuses
FusesF Amps
A Allocation
1 -Free
2 20Heated seats
3 -Free
4 15Folding rear view
mirror relays
5 15Refrigeration
equipment socket
relay
Towing/towbar/converter/
coachbuilder/platform cab
fuses
The designations given are only indicative, as
this additional box relates to other information
which depends on the converter/coachbuilder,
for which the handbook cannot provide
technical support.
Fuses F Amps AAllocation
1 15Free
2 15Ignition relay, optional generator
3 1512
V trailer power supply
4 15Continuous power supply for converters/coachbuilders
5 40Hazard warning lamps
In the event of a breakdown