Page 48 of 216
46
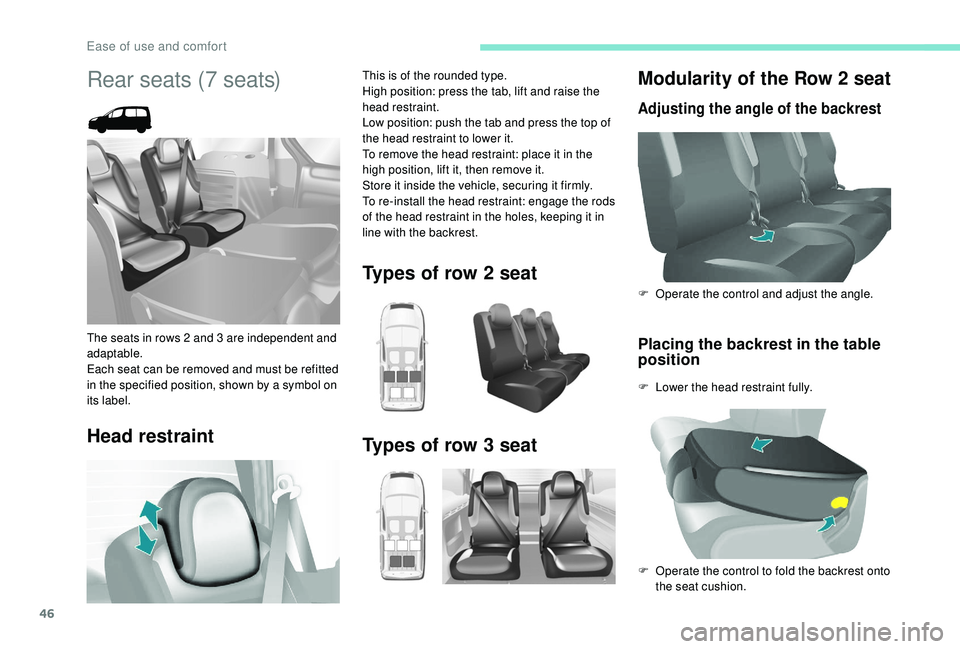
Modularity of the Row 2 seat
Adjusting the angle of the backrest
Placing the backrest in the table
position
F Lower the head restraint fully. F
O
perate the control and adjust the angle.
F
O
perate the control to fold the backrest onto
the seat cushion.
Rear seats (7 seats)
The seats in rows 2 and 3 are independent and
adaptable.
Each seat can be removed and must be refitted
in the specified position, shown by a symbol on
its label.
Head restraint
This is of the rounded type.
High position: press the tab, lift and raise the
head restraint.
Low position: push the tab and press the top of
the head restraint to lower it.
To remove the head restraint: place it in the
high position, lift it, then remove it.
Store it inside the vehicle, securing it firmly.
To re-install the head restraint: engage the rods
of the head restraint in the holes, keeping it in
line with the backrest.
Types of row 2 seat
Types of row 3 seat
Ease of use and comfort
Page 51 of 216
49
Ensure that the centre seat belt is stowed
correctly in its housing in the headlining.
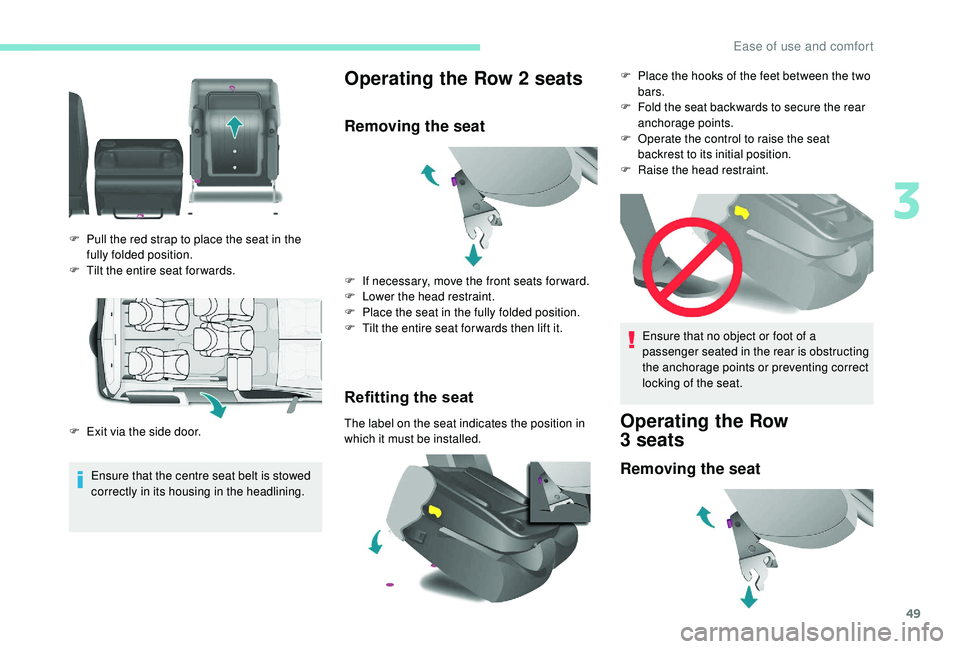
Operating the Row 2 seats
Removing the seat
Refitting the seat
The label on the seat indicates the position in
which it must be installed.
F
P
ull the red strap to place the seat in the
fully folded position.
F
T
ilt the entire seat for wards.
F
E
xit via the side door. F
I
f necessary, move the front seats for ward.
F
L
ower the head restraint.
F
P
lace the seat in the fully folded position.
F
T
ilt the entire seat for wards then lift it.
Ensure that no object or foot of a
passenger seated in the rear is obstructing
the anchorage points or preventing correct
locking of the seat.Operating the Row
3 seats
Removing the seat
F Place the hooks of the feet between the two
bars.
F
F
old the seat backwards to secure the rear
anchorage points.
F
O
perate the control to raise the seat
backrest to its initial position.
F
Ra
ise the head restraint.
3
Ease of use and comfort
Page 52 of 216
50
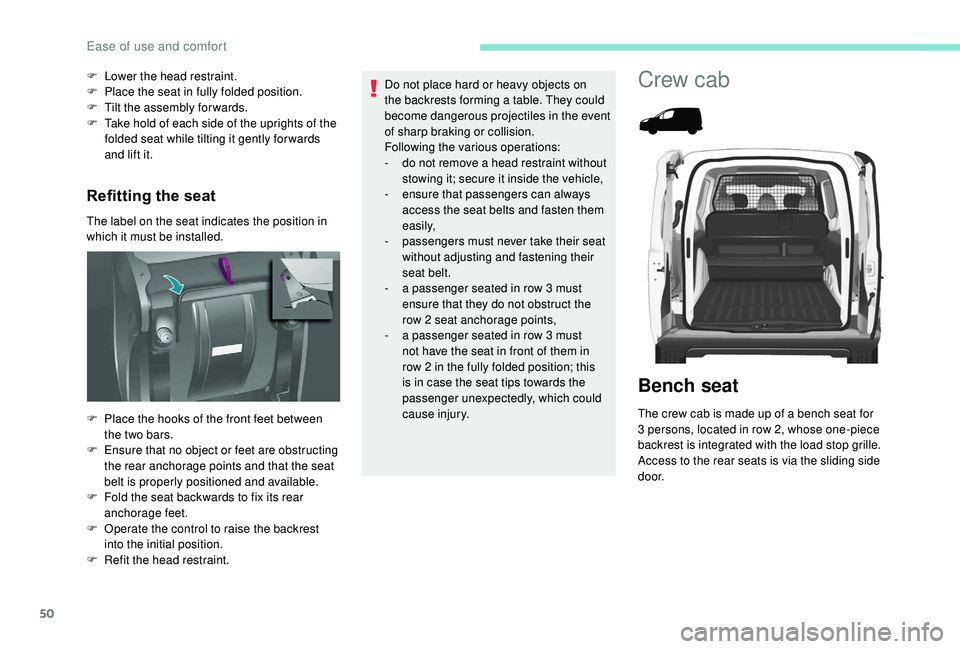
Refitting the seat
The label on the seat indicates the position in
which it must be installed. F
L
ower the head restraint.
F
P
lace the seat in fully folded position.
F
T
ilt the assembly forwards.
F
T
ake hold of each side of the uprights of the
folded seat while tilting it gently for wards
and lift it.
F
P
lace the hooks of the front feet between
the two bars.
F
E
nsure that no object or feet are obstructing
the rear anchorage points and that the seat
belt is properly positioned and available.
F
F
old the seat backwards to fix its rear
anchorage feet.
F
O
perate the control to raise the backrest
into the initial position.
F
R
efit the head restraint. Do not place hard or heavy objects on
the backrests forming a table. They could
become dangerous projectiles in the event
of sharp braking or collision.
Following the various operations:
-
d
o not remove a head restraint without
stowing it; secure it inside the vehicle,
-
e
nsure that passengers can always
access the seat belts and fasten them
easily,
-
p
assengers must never take their seat
without adjusting and fastening their
seat belt.
-
a p
assenger seated in row 3 must
ensure that they do not obstruct the
row 2 seat anchorage points,
-
a p
assenger seated in row 3 must
not have the seat in front of them in
row 2 in the fully folded position; this
is in case the seat tips towards the
passenger unexpectedly, which could
cause injury.
Crew cab
Bench seat
The crew cab is made up of a bench seat for
3 persons, located in row 2, whose one-piece
backrest is integrated with the load stop grille.
Access to the rear seats is via the sliding side
d o o r.
Ease of use and comfort
Page 53 of 216
51
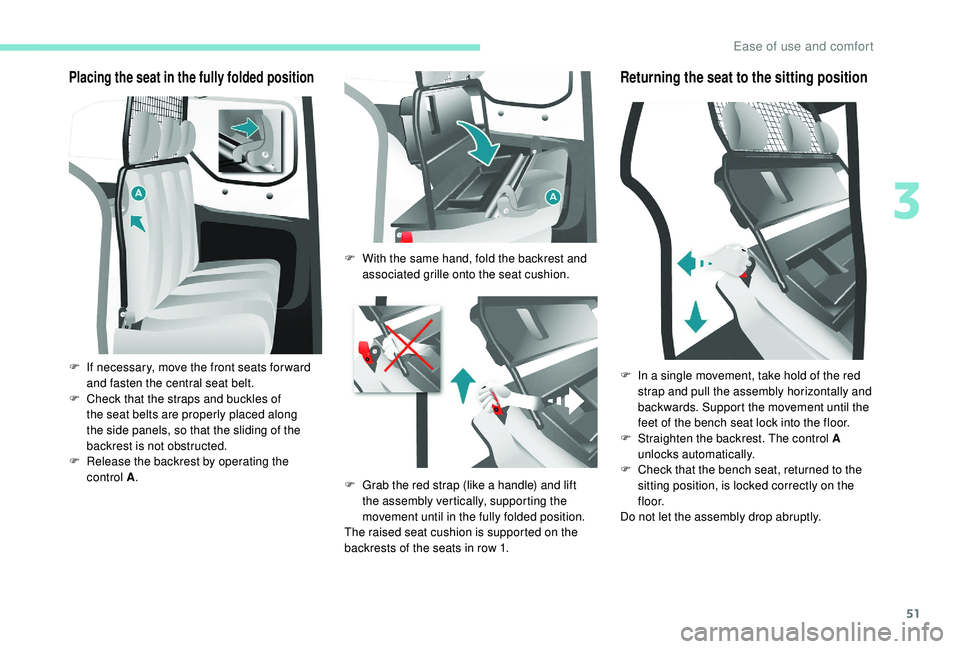
Placing the seat in the fully folded position
F If necessary, move the front seats for ward and fasten the central seat belt.
F
C
heck that the straps and buckles of
the seat belts are properly placed along
the side panels, so that the sliding of the
backrest is not obstructed.
F
R
elease the backrest by operating the
control
A. F
W
ith the same hand, fold the backrest and
associated grille onto the seat cushion.
F
G
rab the red strap (like a handle) and lift
the assembly vertically, supporting the
movement until in the fully folded position.
The raised seat cushion is supported on the
backrests of the seats in row 1.
Returning the seat to the sitting position
F In a single movement, take hold of the red strap and pull the assembly horizontally and
backwards. Support the movement until the
feet of the bench seat lock into the floor.
F
S
traighten the backrest. The control A
unlocks automatically.
F
C
heck that the bench seat, returned to the
sitting position, is locked correctly on the
f l o o r.
Do not let the assembly drop abruptly.
3
Ease of use and comfort
Page 54 of 216
52
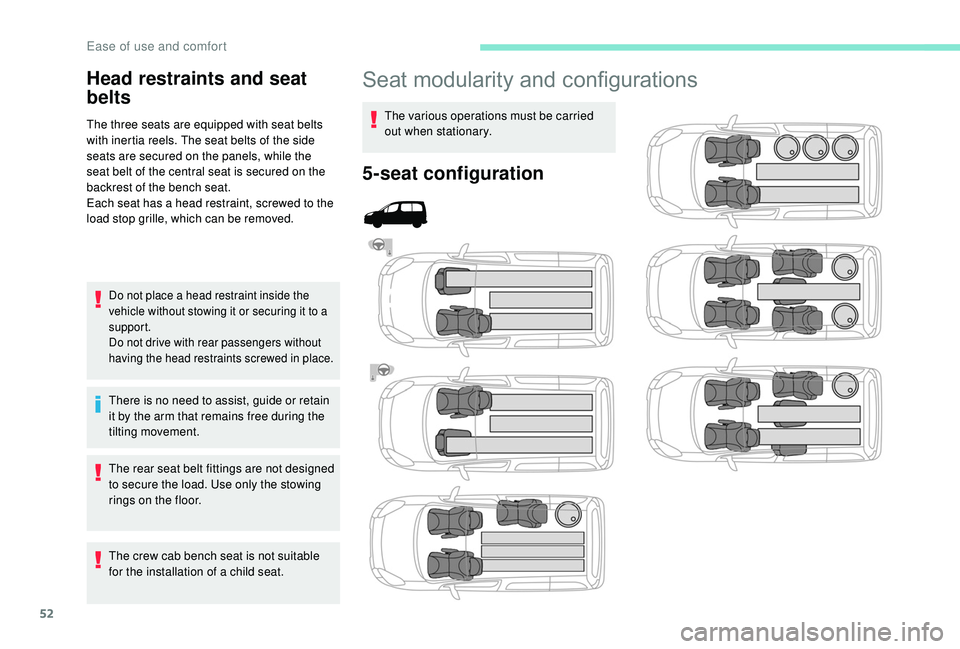
Seat modularity and configurations
The various operations must be carried
out when stationary.
5-seat configuration
Head restraints and seat
belts
The three seats are equipped with seat belts
with inertia reels. The seat belts of the side
seats are secured on the panels, while the
seat belt of the central seat is secured on the
backrest of the bench seat.
Each seat has a head restraint, screwed to the
load stop grille, which can be removed.
Do not place a head restraint inside the
vehicle without stowing it or securing it to a
support.
Do not drive with rear passengers without
having the head restraints screwed in place.
There is no need to assist, guide or retain
it by the arm that remains free during the
tilting movement.
The rear seat belt fittings are not designed
to secure the load. Use only the stowing
rings on the floor.
The crew cab bench seat is not suitable
for the installation of a child seat.
Ease of use and comfort
Page 57 of 216
55
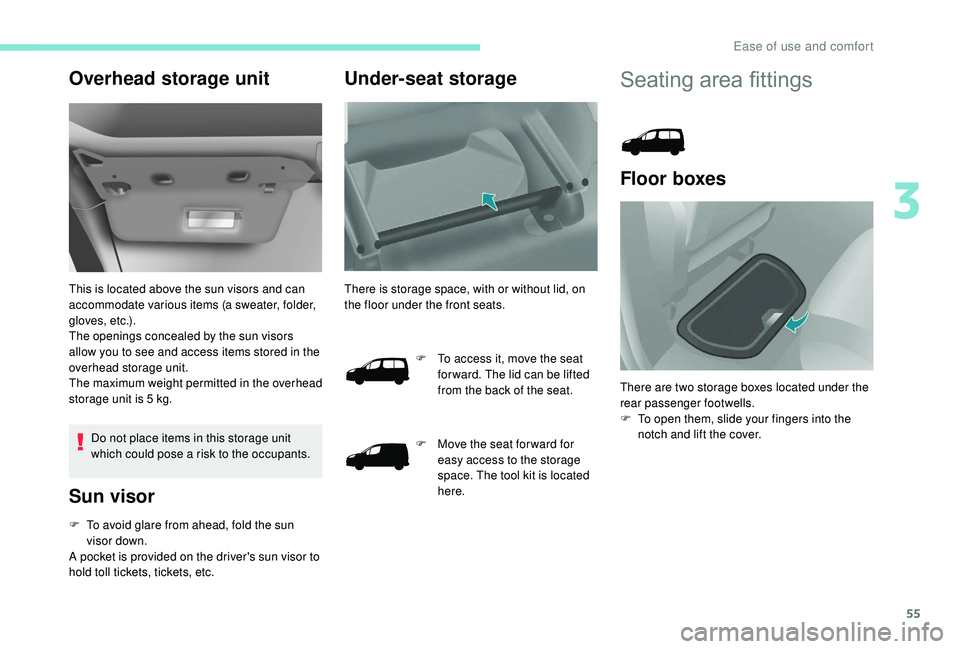
Overhead storage unit
This is located above the sun visors and can
accommodate various items (a sweater, folder,
gloves, etc.).
The openings concealed by the sun visors
allow you to see and access items stored in the
overhead storage unit.
The maximum weight permitted in the overhead
storage unit is 5 kg.
Do not place items in this storage unit
which could pose a risk to the occupants.
Sun visor
F To avoid glare from ahead, fold the sun visor down.
A pocket is provided on the driver's sun visor to
hold toll tickets, tickets, etc.
Under-seat storage
There is storage space, with or without lid, on
the floor under the front seats.
F
T
o access it, move the seat
for ward. The lid can be lifted
from the back of the seat.
F
M
ove the seat for ward for
easy access to the storage
space. The tool kit is located
here.
Seating area fittings
Floor boxes
There are two storage boxes located under the
rear passenger footwells.
F
T
o open them, slide your fingers into the
notch and lift the cover.
3
Ease of use and comfort
Page 59 of 216
57
Courtesy lamp
For more information on the Courtesy
lamps, refer to the corresponding section.
Rear box
This roof box can be accessed from the rear
seats and from the boot.
Open carefully to prevent any objects
stored in this interior roof box from falling
out.
The maximum authorised load is 10
kg.
It operates in the same way as the front
courtesy lamp.
F
F
rom the rear seats, slide the flaps to open
the box.
F
F
rom the vehicle boot, place your thumb on
the recess then pull the handle to open.
Air vents
A 3 -position control allows you to adjust the air
flow through the vents.
The air vents are also fitted with a fragrance
diffuser.
Fragrance diffuser
The fragrance diffuser diffuses a fragrance
in the passenger compartment from the roof
console vents.
3
Ease of use and comfort
Page 62 of 216
60
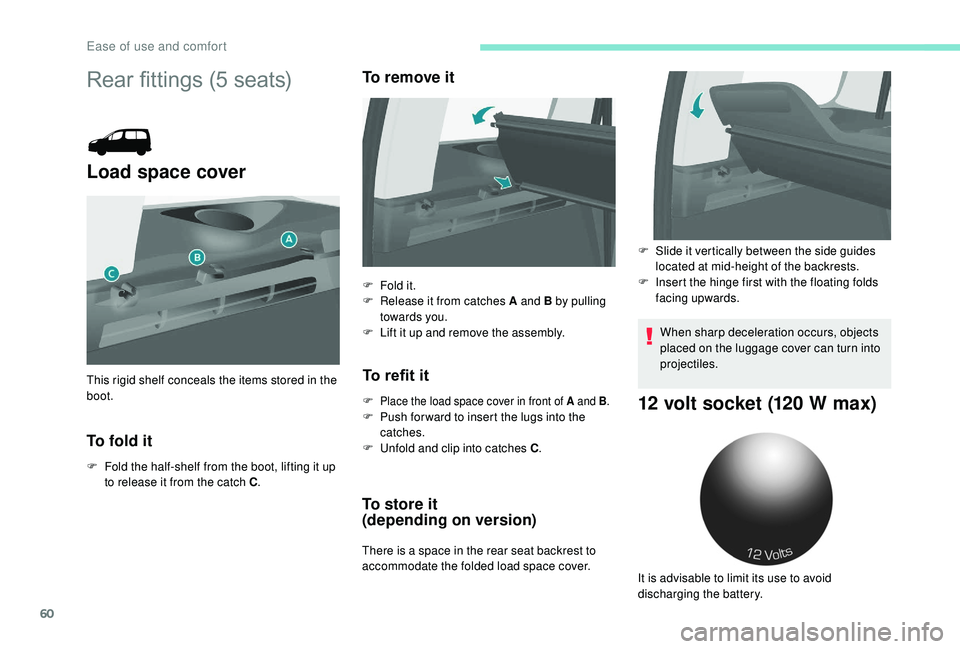
Rear fittings (5 seats)
Load space cover
To fold it
F Fold the half-shelf from the boot, lifting it up to release it from the catch C .
To remove it
To refit it
F Place the load space cover in front of A and B .F Push for ward to insert the lugs into the
catches.
F
U
nfold and clip into catches C .
To store it
(depending on version)
There is a space in the rear seat backrest to
accommodate the folded load space cover.
This rigid shelf conceals the items stored in the
boot.
F
F
old it.
F
R
elease it from catches A and B by pulling
towards you.
F
L
ift it up and remove the assembly.
When sharp deceleration occurs, objects
placed on the luggage cover can turn into
projectiles.
12 volt socket (120 W max)
F Slide it vertically between the side guides
located at mid-height of the backrests.
F
I
nsert the hinge first with the floating folds
facing upwards.
It is advisable to limit its use to avoid
discharging the battery.
Ease of use and comfort