2020 PEUGEOT 5008 ESP
[x] Cancel search: ESPPage 219 of 308
217
In the event of a breakdown
8Accessing the tools
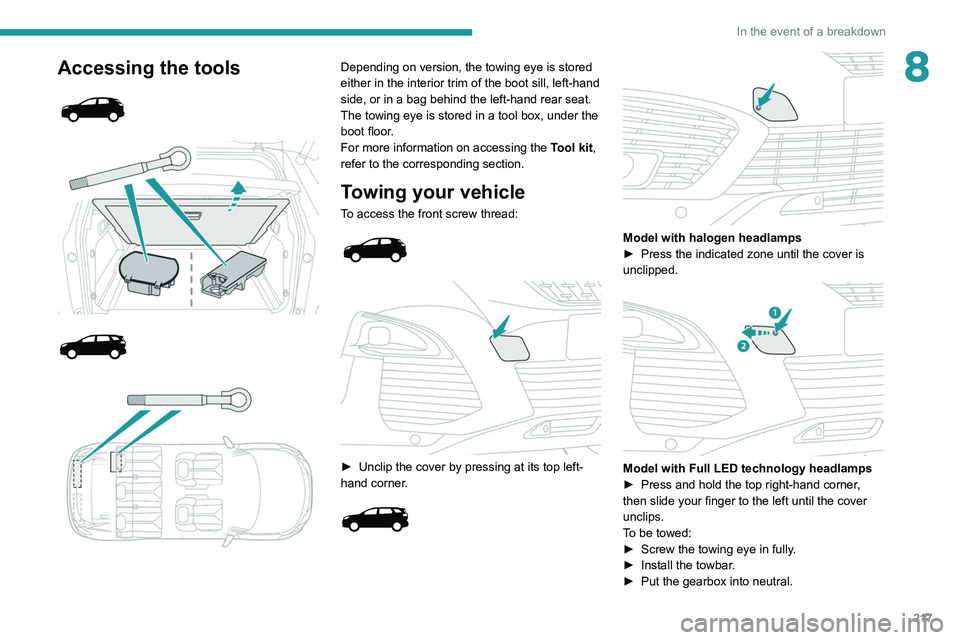
Depending on version, the towing eye is stored
either in the interior trim of the boot sill, left-hand
side, or in a bag behind the left-hand rear seat.
The towing eye is stored in a tool box, under the
boot floor.
For more information on accessing the Tool kit,
refer to the corresponding section.
Towing your vehicle
To access the front screw thread:
► Unclip the cover by pressing at its top left-
hand corner .
Model with halogen headlamps
► Press the indicated zone until the cover is
unclipped.
Model with Full LED technology headlamps
► Press and hold the top right-hand corner ,
then slide your finger to the left until the cover
unclips.
To be towed:
►
Screw the towing eye in fully
.
►
Install the towbar
.
►
Put the gearbox into neutral.
Page 221 of 308

219
Technical data
9Engine technical data and
towed loads
Engines
The engine characteristics are given in the
vehicle's registration document, as well as in
sales brochures.
The maximum power corresponds to the value type-approved on a test bed, under
conditions defined in European legislation
(Directive 1999/99/EC).
For more information, contact a PEUGEOT
dealer or a qualified workshop.
Weights and towed loads
The weights and towed loads relating to
the vehicle are indicated on the registration
document, as well as in sales brochures.
These values are also indicated on the
manufacturer's plate or label.
For more information, contact a PEUGEOT
dealer or a qualified workshop.
The GTW (Gross Train Weight) values and the
towable loads listed are valid for a maximum
altitude of 1,000
metres. The towable load must
be reduced by steps of 10% for each additional
1,000 metres.
The maximum authorised nose weight
corresponds to the weight permitted on the
towball.
When exterior temperatures are high, the
vehicle performance may be limited in
order to protect the engine. When the exterior
temperature is higher than 37°C, reduce the
towed weight.
Towing even with a lightly loaded vehicle can adversely affect its road holding.
Braking distances are increased when towing
a trailer.
When using a vehicle to tow, never exceed
a speed of 62 mph (100
km/h) (observe the
local legislation in force).
Page 232 of 308

230
Bluetooth® audio system
"Telephone": Call, Directory
management, Telephone management,
Hang up.
"Trip computer".
"Maintenance": Diagnosis, Warning log,
etc.
"Connections": Manage connections,
search for devices.
"Personalisation-configuration ": Define
the vehicle parameters, Choice of
language, Display configuration, Choice of units,
Date and time adjustment.
Press the "MENU" button.
Move from one menu to another.
Enter a menu.
Radio
Selecting a station
Press the SOURCE button repeatedly
and select the radio.
Press this button to select a waveband
(FM / AM / DAB).
Press one of the buttons for an automatic
search for radio stations.
Press one of the buttons to carry out a
manual search up / down for radio
frequencies.
Press this button to display the list of
stations received locally.
To update this list, press for more than two
seconds. The sound is cut while updating.
RDS
The external environment (hills, buildings, tunnels, basement car parks,
etc.) may block reception, including in RDS
mode. This is a normal effect of the way in
which radio waves are transmitted and does
not indicate any failure of the audio
equipment.
If RDS is not available, the RDS symbol
appears struck out in the screen.
The RDS, if activated, enables you to continue listening to the same station by
automatic retuning to alternative frequencies.
However, in certain conditions, coverage of
an RDS station may not be assured
throughout the entire country as radio stations
do not cover 100% of the territory. This
explains the loss of reception of the station
during a journey.
Short procedure
In "Radio" mode, press the OK button to activate
or deactivate RDS directly.
Long procedure
Press the MENU button.
Select "Audio functions ".
Press OK.
Select the "FM waveband preferences"
function.
Press OK.
Select "Frequency tracking (RDS)".
Press OK, RDS is displayed on the
screen.
Play TA messages
The TA (Traffic Announcement) function
gives priority to TA alert messages. To
operate, this function needs good reception of
a radio station that carries this type of
message. When a traffic report is transmitted,
the current audio source (Radio, CD, etc.) is
interrupted automatically to play the TA
message. Normal play of the media
previously playing is resumed at the end of
the message.
Take care when increasing the volume while listening to TA messages. The
volume may prove too high on return to the
original audio source.
Press the TA button to activate or
deactivate traffic messages.
Receiving INFO messages
The INFO function gives priority to TA alert messages. To be active, this
function needs good reception of a radio
station that transmits this type of message.
When a message is transmitted, the current
audio source (Radio, CD, USB, etc.) is
interrupted automatically to receive the INFO
message. Normal play of the media
previously playing is resumed at the end of
the message.
Make a long press on this button to
display the list of categories.
Select or deselect categories.
Activate or deactivate the reception of the corresponding messages.
Display TEXT INFOS
Radio text is information transmitted by
the radio station related to the station's
current programme or song.
When the radio station is displayed in the
screen, press OK to display the
contextual menu.
Select "RadioText (TXT) display" and
confirm OK to save.
Page 233 of 308
231
Bluetooth® audio system
10Press the TA button to activate or
deactivate traffic messages.
Receiving INFO messages
The INFO function gives priority to TA alert messages. To be active, this
function needs good reception of a radio
station that transmits this type of message.
When a message is transmitted, the current
audio source (Radio, CD, USB, etc.) is
interrupted automatically to receive the INFO
message. Normal play of the media
previously playing is resumed at the end of
the message.
Make a long press on this button to
display the list of categories.
Select or deselect categories.
Activate or deactivate the reception of the corresponding messages.
Display TEXT INFOS
Radio text is information transmitted by
the radio station related to the station's
current programme or song.
When the radio station is displayed in the
screen, press OK to display the
contextual menu.
Select "RadioText (TXT) display" and
confirm OK to save.
DAB (Digital Audio
Broadcasting) radio
Terrestrial Digital Radio
Depending on version
If the current DAB radio station is not
available on FM, "DAB FM" is struck out.
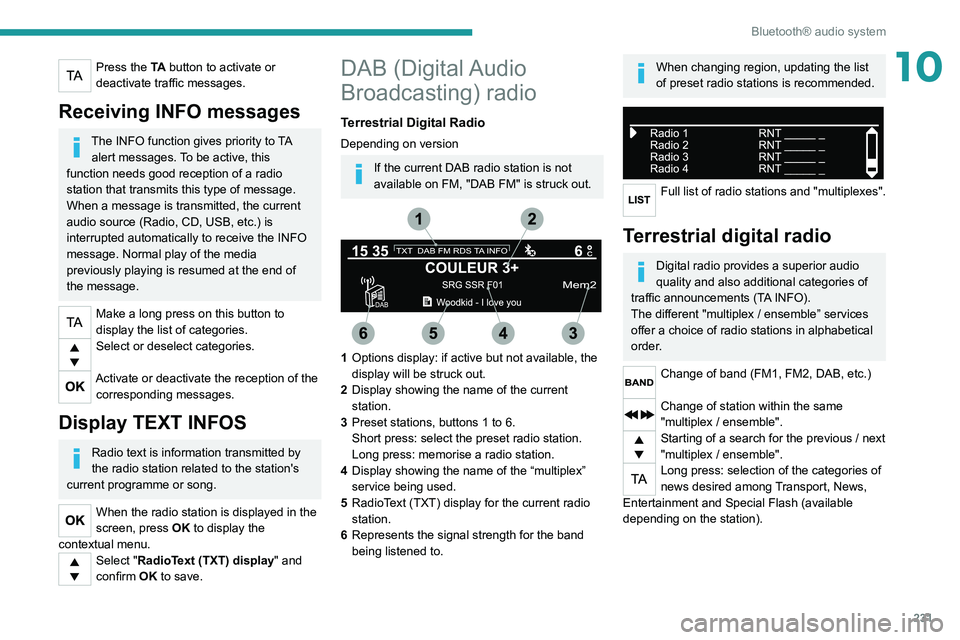
1 Options display: if active but not available, the
display will be struck out.
2 Display showing the name of the current
station.
3 Preset stations, buttons 1 to 6.
Short press: select the preset radio station.
Long press: memorise a radio station.
4 Display showing the name of the “multiplex”
service being used.
5 RadioText (TXT) display for the current radio
station.
6 Represents the signal strength for the band
being listened to.
When changing region, updating the list
of preset radio stations is recommended.
Full list of radio stations and "multiplexes".
Terrestrial digital radio
Digital radio provides a superior audio
quality and also additional categories of
traffic announcements (TA INFO).
The different "multiplex / ensemble” services
offer a choice of radio stations in alphabetical
order.
Change of band (FM1, FM2, DAB, etc.)
Change of station within the same
"multiplex / ensemble".
Starting of a search for the previous / next
"multiplex / ensemble".
Long press: selection of the categories of
news desired among Transport, News,
Entertainment and Special Flash (available
depending on the station).
Page 234 of 308
232
Bluetooth® audio system
When the radio station is displayed in the
screen , press "OK" to display the
contextual menu.
(Frequency search (RDS), DAB
/ FM auto
tracking, RadioText (TXT) display, Information
on the station, etc.)
DAB / FM station tracking
"DAB" does not have 100% coverage of
the country.
When the digital signal is weak, "DAB
/ FM
auto tracking" allows you to continue
listening to the same station, by automatically
switching to the corresponding analogue FM
station (if it exists).
When the "DAB
/ FM auto tracking" is active,
the DAB station will be selected automatically.
Press the MENU button.
Select "Multimedia" and confirm.
Select "DAB / FM auto tracking" and
confirm.
If "DAB / FM auto tracking" tracking is
enabled, there is a lag of a few seconds
when the system switches to the analogue
FM station sometimes with a change in
volume.
If the "DAB" station you are listening to is
not available on FM (" DAB/FM" option
struck out), or if "DAB
/ FM auto tracking" is
not on, the sound will be cut when the digital
signal is too weak.
Media
USB port
Insert the USB memory stick into the USB
port or connect the USB device to the
USB port using a suitable cable (not supplied).
The system changes automatically to "USB"
source.
To protect the system, do not use a USB hub.
Any additional devices connected to the system must comply with the standard
applicable to the product and/or the standard
IEC 60950-1.
The system builds playlists (in temporary
memory); this operation can take from a
few seconds to several minutes at the first
connection.
Reduce the number of non-music files and the
number of folders to reduce the waiting time.
Playlists are updated every time a new USB
memory stick is connected.
When the USB port is used, the portable
device charges automatically.
Play mode
The play modes available are:
– Normal : the tracks are played in order,
depending on the classification of the selected
files.
–
Random
: the tracks in an album or folder are
played in a random order.
–
Random on all media : all of the tracks saved
in the media are played in random order
.
–
Repeat
: the tracks played are only those from
the current album or folder.
Press this button to display the contextual
menu for the Media function.
Press this button to select the chosen
play mode.
Press this button to confirm.
The choice made is displayed at the top of the
screen.
Choosing a track to play
Press one of these buttons to go to the
previous / next track.
Press one of these buttons to go to the
previous / next folder.
File classification
Make a long press on this button to
display the different classifications.
Select by "Folder" / " Artist" / "Genre" /
"Playlist".
Depending on availability and type of device
used.
Press OK to select the desired
classification, then press OK again to
confirm.
Playing files
Make a short press on this button to
display the chosen classification.
Navigate in the list using the left / right
and up / down buttons.
Confirm the selection by pressing OK.
Press one of these buttons to go to the
previous / next track in the list.
Press and hold one of these buttons for fast
forward or rewind.
Press one of these buttons to go to the
previous / next "Folder" / " Artist" /
"Genre" / "Playlist"* in the list.
Input AUX socket (AUX)
Depending on equipmentConnect a portable device (MP3 player,
etc.) to the auxiliary jack socket using an
audio cable (not supplied).
Any additional devices connected to the system must comply with the standard
* Depending on availability and the type of device used.
Page 238 of 308
236
Bluetooth® audio system
connect / disconnect the telephone (hands-free
kit and streaming).
– "Delete connection": to delete the pairing.
When you delete a pairing in the system,
remember to delete it from your
telephone as well.
Press OK to confirm.
Receiving a call
An incoming call is announced by a ring and a
superimposed display in the screen.
Select the "YES" tab in the screen using
the buttons.
Confirm with OK.
Press this button at the steering mounted
controls to accept the call.
Making a call
In the "Telephone" menu.
Select "Call".
Select "Dial".
Or
Select "Directory ".
Or
Select "Calls list".
Confirm with OK.
Press this button for more than two
seconds for access to your directory, then
navigate using the thumb wheel.
Ending a call
In the "Telephone" menu.
Select "End call".
Confirm with OK to end the call.
During a call, press one of these buttons
for more than two seconds.
The system accesses the telephone's contacts directory, depending on its
compatibility, and while it is connected via
Bluetooth.
With certain telephones connected by
Bluetooth you can send a contact to the
directory of the audio system.
Contacts imported in this way are saved in a
permanent directory visible to all, whatever
the telephone connected.
The menu for the directory is not accessible if
it is empty.
Managing calls
During a call, press OK to display the
contextual menu.
End call
In the contextual menu, select "Hang up"
to end the call.
Confirm with OK.
Microphone off
(so that the caller cannot hear)In the contextual menu:
–
select "
Micro OFF " to switch off the
microphone.
–
deselect "
Micro OFF" to switch the
microphone on.
Confirm with OK.
Telephone mode
In the contextual menu:
–
select "
Telephone mode " to transfer the
call to the telephone (for example, to leave the
vehicle while continuing a conversation).
–
deselect "
Telephone mode" to transfer the
call to the vehicle.
Confirm with OK.
If the contact has been cut off, when you
reconnect on returning to the vehicle,
the Bluetooth connection will be restored
automatically and sound returned to the
system (depending on the compatibility of the
telephone).
In some cases, the Telephone mode must be
activated from the telephone.
Interactive voice response
From the contextual menu, select "DTMF
tones" and confirm to use the digital
keypad to navigate in the interactive voice
response menu.
Confirm with OK.
Consultation call
From the contextual menu, select
"Switch" and validate to return to a call
left on hold.
Confirm with OK.
Directory
To access the directory, press and hold SRC/TEL.
Select "Directory" to see the list of
contacts.
Confirm with OK.
To modify the contacts saved in the system, press MENU then select
"Telephone" and confirm.
Select "Directory management " and confirm.
You can:
– "Consult an entry",
– "Delete an entry",
– "Delete all entries".
The system accesses the telephone's contacts directory, depending on its
Page 239 of 308
237
Bluetooth® audio system
10Interactive voice response
From the contextual menu, select "DTMF
tones" and confirm to use the digital
keypad to navigate in the interactive voice
response menu.
Confirm with OK.
Consultation call
From the contextual menu, select
"Switch" and validate to return to a call
left on hold.
Confirm with OK.
Directory
To access the directory, press and hold SRC/TEL.
Select "Directory" to see the list of
contacts.
Confirm with OK.
To modify the contacts saved in the system, press MENU then select
"Telephone" and confirm.
Select "Directory management " and confirm.
You can:
–
"Consult an entry",
–
"Delete an entry",
–
"Delete all entries".
The system accesses the telephone's contacts directory, depending on its
compatibility, and while it is connected via
Bluetooth.
With certain telephones connected by
Bluetooth you can send a contact to the
directory of the audio system.
Contacts imported in this way are saved in a
permanent directory visible to all, whatever the
telephone connected.
The menu for the directory is not accessible if it
is empty.
Voice recognition
This function allows you to use your
smartphone's voice recognition via the system.
To start voice recognition, depending on the type
of steering mounted controls:
Make a long press on the end of the lighting
control stalk.
OR
Press this button.
Voice recognition requires the use of a
compatible smartphone first connected to
the vehicle by Bluetooth.
Frequently asked
questions
The following information groups together the answers to the most frequently asked questions
concerning your audio system. With the engine off, the audio system
switches off after a few minutes of use.
When the engine is switched off, the audio
system operating time depends on the state of
charge of the battery.
The switch-off is normal: the audio system
switches to economy mode and switches off to
avoid discharging the vehicle's battery.
►
Start the vehicle’
s engine to increase the
charge of the battery.
The message "the audio system is
overheated" is displayed onscreen.
To protect the installation if the ambient
temperature is too high, the audio system
switches to an automatic thermal protection
mode, in which the volume may be decreased or
the CD player stopped.
►
Switch the audio system off for a few minutes
to allow the system to cool.
Radio
There is a difference in sound quality
between the different audio sources (radio,
CD, etc.).
For optimal listening quality, the audio settings
(Volume, Bass, Treble, Ambience and Loudness)
can be adjusted to different audio sources,
resulting in audible differences when switching
between sources (radio, CD, etc.).
►
Check that the audio settings (V
olume, Bass,
Treble, Ambience and Loudness) are appropriate
to the sources being listened to. We recommend
setting the audio functions (Bass, Treble, Fr-Re
Page 242 of 308
240
PEUGEOT Connect Radio
PEUGEOT Connect
Radio
Multimedia audio system -
Applications - Bluetooth
®
telephone
The functions and settings described
vary according to the vehicle version and
configuration.
For safety reasons and because they
require sustained attention by the driver,
the following operations must be carried out
with the vehicle stationary and the ignition
on:
–
Pairing the smartphone with the system in
Bluetooth mode.
–
Using the smartphone.
–
Connection to the CarPlay®, MirrorLinkTM
or Android Auto applications (certain
applications interrupt their display while the
vehicle is moving).
–
Changing the system settings and
configuration.
The system is protected in such a way that it will only operate in the vehicle.
The Energy Economy Mode message is
displayed when the system is about to enter
the corresponding mode.
The system’s Open Source Software (OSS) source codes are available at the
following addresses:
https://www.groupe-psa.com/fr/oss/
https://www.groupe-psa.com/en/oss/
First steps
With the engine running, a press mutes
the sound.
With the ignition off, a press turns the system on.
Increase or decrease the volume using
the wheel or the "plus" or "minus" buttons
(depending on the equipment).
Use the buttons on either side of or below the
touch screen for access to the menus, then
press the virtual buttons in the touch screen.
Depending on the model, use the "Source" or
"Menu" buttons on the left of the touch screen
for access to the menus, then press the virtual
buttons in the touch screen.
At all times it is possible to display the rolling
menus by pressing the screen briefly with three
fingers.
All of the touch areas of the screen are white.
For pages with multiple tabs at the bottom of the
screen, it is possible to switch between pages
either by tapping the tab for the desired page, or
by using a finger, sliding the pages to the left or
to the right.
Press in the grey zone to go back up a level or
to confirm.
Press the back arrow to go back a level or
confirm.
The touch screen is of the "capacitive" type.
To clean the screen, use a soft, non-abrasive
cloth (e.g. spectacles cloth) with no additional
product.
Do not use sharp objects on the screen.
Do not touch the screen with wet hands.
Certain information is displayed permanently in
the upper bar of the touch screen:
–
Air conditioning status information (depending
on version), and direct access to the
corresponding menu.
–
Radio Media and
Telephone menu status
information.
–
Privacy status information.
–
Access to the touch screen and digital
instrument panel settings.
Audio source selection (depending on
equipment):