2020 PEUGEOT 5008 battery location
[x] Cancel search: battery locationPage 11 of 308

9
Instruments
1Head-up digital display
This digital instrument panel can be customised.
Depending on the display mode selected, certain
information is hidden or presented differently.
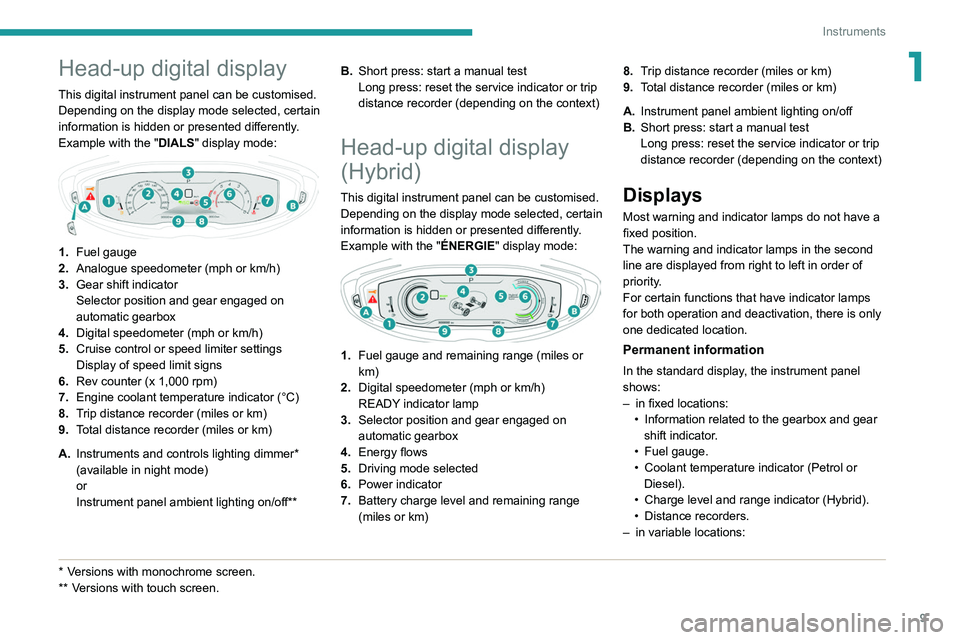
Example with the "DIALS"
display mode:
1.Fuel gauge
2. Analogue speedometer (mph or km/h)
3. Gear shift indicator
Selector position and gear engaged on
automatic gearbox
4. Digital speedometer (mph or km/h)
5. Cruise control or speed limiter settings
Display of speed limit signs
6. Rev counter (x 1,000 rpm)
7. Engine coolant temperature indicator (°C)
8. Trip distance recorder (miles or km)
9. Total distance recorder (miles or km)
A. Instruments and controls lighting dimmer*
(available in night mode)
or
Instrument panel ambient lighting on/off**
* Versions with monochrome screen.
**
V ersions with touch screen. B.
Short press: start a manual test
Long press: reset the service indicator or trip
distance recorder (depending on the context)
Head-up digital display
(Hybrid)
This digital instrument panel can be customised.
Depending on the display mode selected, certain
information is hidden or presented differently.
Example with the " ÉNERGIE"
display mode:
1.Fuel gauge and remaining range (miles or
km)
2. Digital speedometer (mph or km/h)
READY indicator lamp
3. Selector position and gear engaged on
automatic gearbox
4. Energy flows
5. Driving mode selected
6. Power indicator
7. Battery charge level and remaining range
(miles or km) 8.
Trip distance recorder (miles or km)
9. Total distance recorder (miles or km)
A. Instrument panel ambient lighting on/off
B. Short press: start a manual test
Long press: reset the service indicator or trip
distance recorder (depending on the context)
Displays
Most warning and indicator lamps do not have a
fixed position.
The warning and indicator lamps in the second
line are displayed from right to left in order of
priority.
For certain functions that have indicator lamps
for both operation and deactivation, there is only
one dedicated location.
Permanent information
In the standard display, the instrument panel
shows:
–
in fixed locations:
•
Information related to the gearbox and gear
shift indicator
.
•
Fuel gauge.
•
Coolant temperature indicator (Petrol or
Diesel).
•
Charge level and range indicator (Hybrid).
•
Distance recorders.
–
in variable locations:
Page 181 of 308

179
Practical information
7► Insert a finger into the notch in the upper part
of the screen.
►
Pull towards you to unclip the unit.
Repeat these operations for the other screen.
Energy economy mode
This system manages the duration of use of
certain functions, in order to conserve a sufficient
level of charge in the battery with the ignition off.
After switching off the engine, you can still
use functions such as the audio and telematic
system, the wipers and the dipped beam
headlamps or courtesy lamps, for a combined
duration of approximately 40 minutes.
Selecting the mode
A confirmation message is displayed when
energy economy mode is entered, and the active
functions are placed on standby.
If a telephone call is in progress at the
time, it will be maintained for around 10
minutes via the audio system’s hands-free
system.
Exiting the mode
These functions are automatically reactivated the
next time the vehicle is used.
To restore the use of these functions
immediately, start the engine and let it run:
–
For less than 10 minutes, to use the
equipment for approximately 5 minutes.
– For more than 10 minutes, to use the
equipment for approximately 30 minutes.
Let the engine run for the specified duration to
ensure that the battery charge is sufficient.
T
o recharge the battery, avoid repeatedly or
continuously restarting the engine.
A flat battery prevents the engine from starting.
For more information on the 12
V battery,
refer to the corresponding section.
Load reduction mode
This system manages the use of certain
functions according to the level of charge
remaining in the battery.
When the vehicle is being driven, the load
reduction function temporarily deactivates certain
functions, such as the air conditioning and the
heated rear screen.
The deactivated functions are reactivated
automatically as soon as conditions permit.
Bonnet
Stop & Start
Before doing anything under the bonnet,
you must switch off the ignition to avoid any
risk of injury resulting from an automatic
change to START mode.
Hybrid vehicles
Before any work is carried out under the
bonnet, it is essential to switch off the ignition
and check that the READY indicator lamp is
off in the instrument panel - risk of serious
injury!
The location of the interior bonnet release lever prevents the bonnet being
opened when the left-hand front door is
closed.
When the engine is hot, handle the
exterior safety catch and the bonnet stay
with care (risk of burns), using the protected
area.
When the bonnet is open, take care not to
damage the safety catch.
Do not open the bonnet under very windy
conditions.
Cooling of the engine when stopped
The engine cooling fan may start after
the engine has been switched off.
Page 182 of 308

180
Practical information
8.Engine oil filler cap
9. Engine oil dipstick
10. Priming pump*
11 . Degassing screw*
The Diesel fuel system operates under
very high pressure.
All work on this circuit must be carried out
only by a PEUGEOT dealer or a qualified
workshop.
Checking levels
Check all of the following levels regularly in
accordance with the manufacturer's service
schedule. Top them up if required, unless
otherwise indicated.
If a level drops significantly, have the
corresponding system checked by a PEUGEOT
dealer or a qualified workshop.
The fluids must comply with the manufacturer's requirements and with
the vehicle's engine.
Take care when working under the bonnet, as certain areas of the engine
may be extremely hot (risk of burns) and the
cooling fan could start at any time (even with
the ignition off).
* Depending on engine.
Take care with objects or clothing that
could be caught in the blades of the fan!
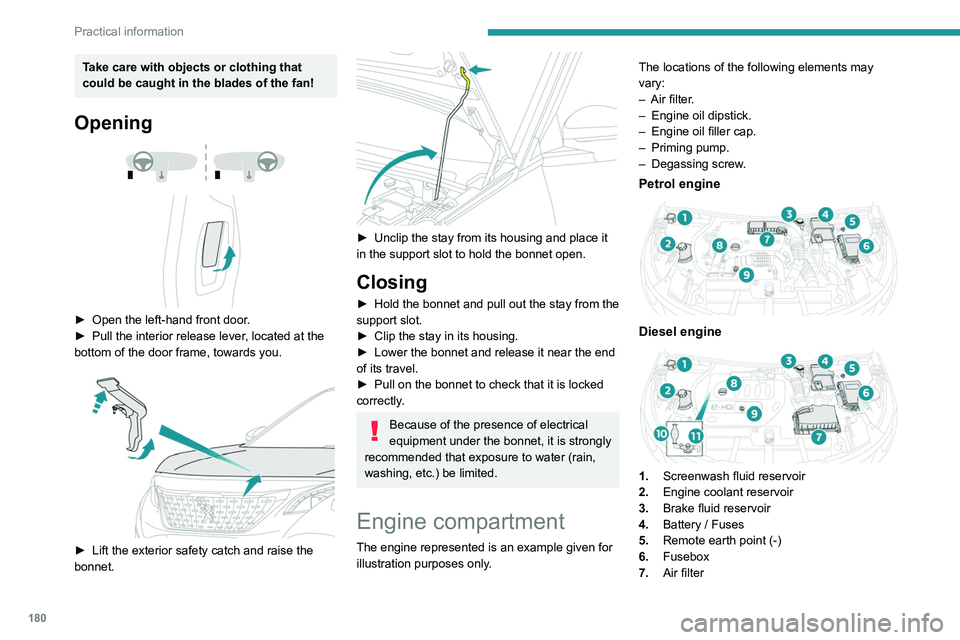
Opening
► Open the left-hand front door .
► Pull the interior release lever , located at the
bottom of the door frame, towards you.
► Lift the exterior safety catch and raise the
bonnet.
► Unclip the stay from its housing and place it
in the support slot to hold the bonnet open.
Closing
► Hold the bonnet and pull out the stay from the
support slot.
►
Clip the stay in its housing.
►
Lower the bonnet and release it near the end
of its travel.
►
Pull on the bonnet to check that it is locked
correctly
.
Because of the presence of electrical
equipment under the bonnet, it is strongly
recommended that exposure to water (rain,
washing, etc.) be limited.
Engine compartment
The engine represented is an example given for
illustration purposes only. The locations of the following elements may
vary:
–
Air filter
.
–
Engine oil dipstick.
–
Engine oil filler cap.
–
Priming pump.
–
Degassing screw
.
Petrol engine
Diesel engine
1.
Screenwash fluid reservoir
2. Engine coolant reservoir
3. Brake fluid reservoir
4. Battery / Fuses
5. Remote earth point (-)
6. Fusebox
7. Air filter
Page 184 of 308

182
Practical information
For more information on the Indicators and in
particular the AdBlue range indicators, refer to
the corresponding section.
To avoid the vehicle being immobilised in
accordance with regulations, you must top up the
AdBlue tank.
For more information on AdBlue
® (BlueHDi),
and in particular the supply of AdBlue, refer to
the corresponding section.
Checks
Unless otherwise indicated, check these
components in accordance with the
manufacturer's service schedule and according
to your engine.
Otherwise, have them checked by a PEUGEOT
dealer or a qualified workshop.
Only use products recommended by
PEUGEOT or products of equivalent
quality and specification.
In order to optimise the operation of
components as important as those in the
braking system, PEUGEOT selects and offers
very specific products.
12 V battery
The battery does not require any maintenance.
However, check regularly that the terminals
are correctly tightened (versions without quick
(or available from your PEUGEOT dealer and
qualified workshops).
Use of non-recommended oil may invalidate
the contractual warranty in the event of
engine failure.
Topping up the engine oil level
For the location of the engine oil filler cap, please
refer to the corresponding under-bonnet engine
compartment illustration.
►
Add oil in small quantities, avoiding any spills
on engine components (risk of fire).
►
W
ait a few minutes before checking the level
again using the dipstick.
►
T
op up the level if necessary.
►
After checking the level, carefully screw the
oil filler cap back on
and replace the dipstick in
its tube.
Within 30 minutes of adding oil, the oil
level indication in the instrument panel
when the ignition is switched on is not valid.
Brake fluid
The level of this fluid should be close to the "MAX" mark. If not, check the brake
pad wear.
To know how often the brake fluid should be
replaced, refer to the manufacturer's servicing
schedule.
Clean the cap before removing it to refill.
Use only DOT4 brake fluid from a sealed
container.
Engine coolant
It is normal to top up this fluid between
two services.
The check and top-up must only be done with
the engine cold.
A low level presents a risk of serious damage to
the engine.
The level of this fluid should be close to the
"MAX" mark but should never exceed it.
If the level is close to or below the " MIN” mark, it
is essential to top up.
When the engine is hot, the temperature of this
fluid is regulated by the fan.
As the cooling system is pressurised, wait at
least one hour after switching off the engine
before carrying out any work.
In order to avoid the risk of scalding if you need
to top up in an emergency, wrap a cloth around
the cap and unscrew the cap by two turns to
allow the pressure to drop.
Once the pressure has dropped, remove the cap
and top up to the required level.
Screenwash fluid
Top up to the required level when necessary.
Capacity of the tank:
–
5.3 litres for "very cold climate" versions.
– 2.2 litres for other versions.
Fluid specification
The fluid must be topped up with a ready-to-use
mixture.
In winter (temperatures below zero), a liquid
containing an agent to prevent freezing must
be used which is appropriate for the prevailing
conditions, in order to protect the elements of the
system (pump, tank, ducts, jets, etc.).
Filling with pure water is prohibited under
all circumstances (risk of freezing,
limestone deposits, etc.).
Diesel fuel additive (Diesel
with particle filter)
On reaching the minimum level in the
particle filter additive tank, this warning
lamp comes on fixed, accompanied by an
audible warning and a message warning that the
additive level is too low.
Topping up
This additive must be topped up without delay by
a PEUGEOT dealer or a qualified workshop.
AdBlue® (BlueHDi)
An alert is triggered when the reserve level is
reached.