2020 NISSAN 370Z ECO mode
[x] Cancel search: ECO modePage 190 of 455
4-22Center display, heater, air conditioner, audio, phone and voice recognition systems
.When the ignition switch is placed in
the OFF position and then placed back
in the ON position.
Language select mode
To change the language of the warning
text displayed on the mirror display, push
and hold the *switch
for approxi-
mately 6 to 11 seconds when the shift
lever is in the R (Reverse) position. When
the language select screen is displayed,
push the *switch
repeatedly until the
preferred language is displayed.
If the switch is not pushed for approxi-
mately 5 seconds, the language select
mode will automatically return to the
normal mode.
REARVIEW MONITOR SYSTEM LIM-
ITATIONS
WARNING
Listed below are the system limita-
tions for RearView Monitor. Failure to
operate the vehicle in accordance
with these system limitations could
result in serious injury or death.
. The system cannot completely
eliminate blind spots and may
not show every object. .
Underneath the bumper and the
corner areas of the bumper can-
not be viewed on the RearView
Monitor because of its monitoring
range limitation. The system will
not show small objects below the
bumper, and may not show ob-
jects close to the bumper or on
the ground.
. Objects viewed in the RearView
Monitor differ from actual dis-
tance because a wide-angle lens
is used.
. Objects in the RearView Monitor
will appear visually opposite
compared to when viewed in the
rear view and outside mirrors.
. Use the displayed lines as a re-
ference. The lines are highly af-
fected by the number of
occupants, fuel level, vehicle po-
sition, road conditions and road
grade.
. Make sure that the trunk lid or
rear hatch is securely closed
when backing up.
. Do not put anything on the rear
view camera. The rear view cam-
era is installed above the license
plate. .
When washing the vehicle with
high-pressure water, be sure not
to spray it around the camera.
Otherwise, water may enter the
camera unit causing water con-
densation on the lens, a malfunc-
tion, fire or an electric shock.
. Do not strike the camera. It is a
precision instrument. Otherwise,
it may malfunction or cause da-
mage resulting in a fire or an
electric shock.
The following are operating limitations
and do not represent a system malfunc-
tion:
. When the temperature is extremely
high or low, the screen may not clearly
display objects.
. When strong light is directly coming
on the camera, objects may not be
displayed clearly.
. Vertical lines may be seen in objects
on the screen. This is due to strong
reflected light from the bumper.
. The screen may flicker under fluores-
cent light.
. The colors of objects on the RearView
Monitor may differ somewhat from
the actual color of objects.
Page 194 of 455

4-26Center display, heater, air conditioner, audio, phone and voice recognition systems
SAA1897
1. Visually check that the parking spaceis safe before parking your vehicle.
2. The rear view of the vehicle is dis- played on the screen
when the shift
lever is moved to the R (Reverse)
position.
SAA1898
3. Slowly back up the vehicle adjusting the steering wheel so that the pre-
dictive course lines
enter the park-
ing space.
4. Maneuver the steering wheel to make the vehicle width guide lines
parallel
to the parking spacewhile referring
to the predictive course lines. 5. When the vehicle is parked in the
space completely, move the shift lever
to the P (Park) position (Automatic
Transmission models) or in an appro-
priate gear (Manual Transmission
models) and apply the parking brake.
DIFFERENCE BETWEEN PREDICTIVE
AND ACTUAL DISTANCES
The displayed guide lines and their loca-
tions on the ground are for approximate
reference only. Objects on uphill or down-
hill surfaces or projecting objects will be
actually located at distances different
from those displayed in the monitor
relative to the guide lines (refer to illustra-
tions). When in doubt, turn around and
view the objects as you are backing up, or
park and exit the vehicle to view the
positioning of objects behind the vehicle.
Page 199 of 455
SAA2288
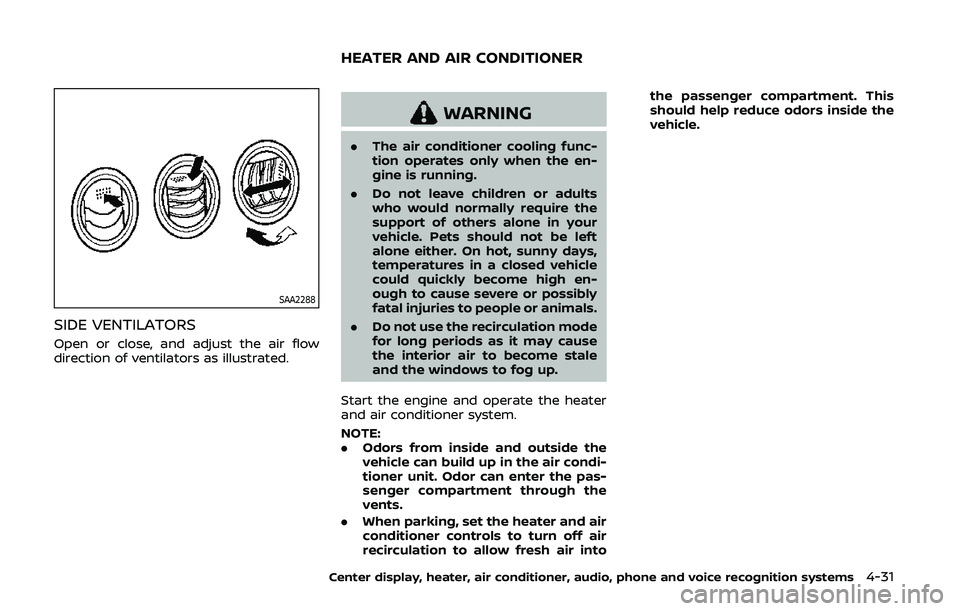
SIDE VENTILATORS
Open or close, and adjust the air flow
direction of ventilators as illustrated.
WARNING
.The air conditioner cooling func-
tion operates only when the en-
gine is running.
. Do not leave children or adults
who would normally require the
support of others alone in your
vehicle. Pets should not be left
alone either. On hot, sunny days,
temperatures in a closed vehicle
could quickly become high en-
ough to cause severe or possibly
fatal injuries to people or animals.
. Do not use the recirculation mode
for long periods as it may cause
the interior air to become stale
and the windows to fog up.
Start the engine and operate the heater
and air conditioner system.
NOTE:
. Odors from inside and outside the
vehicle can build up in the air condi-
tioner unit. Odor can enter the pas-
senger compartment through the
vents.
. When parking, set the heater and air
conditioner controls to turn off air
recirculation to allow fresh air into the passenger compartment. This
should help reduce odors inside the
vehicle.
Center display, heater, air conditioner, audio, phone and voice recognition systems4-31
HEATER AND AIR CONDITIONER
Page 200 of 455
4-32Center display, heater, air conditioner, audio, phone and voice recognition systems
SAA2493
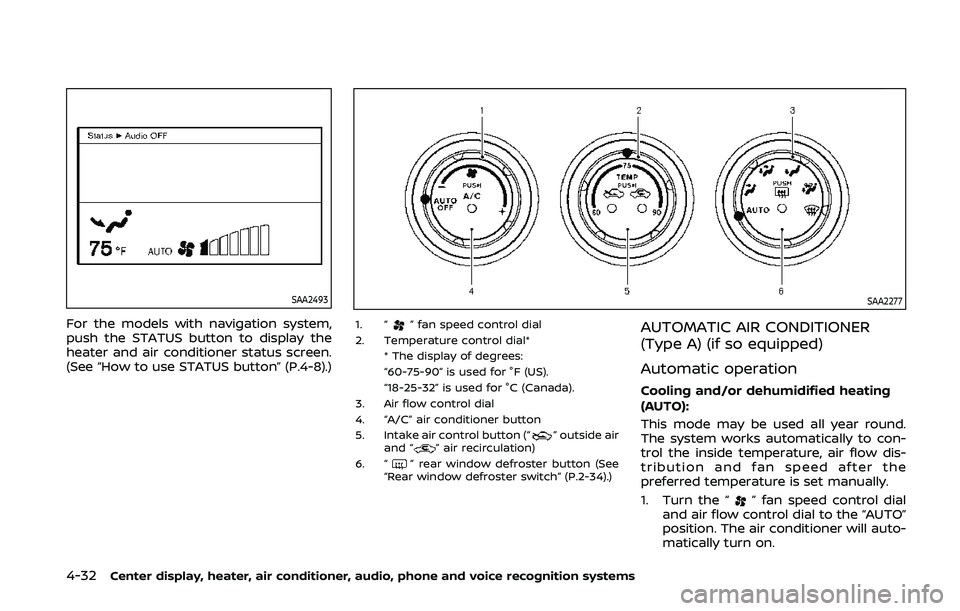
For the models with navigation system,
push the STATUS button to display the
heater and air conditioner status screen.
(See “How to use STATUS button” (P.4-8).)
SAA2277
1. “” fan speed control dial
2. Temperature control dial* * The display of degrees:
“60-75-90” is used for °F (US).
“18-25-32” is used for °C (Canada).
3. Air flow control dial
4. “A/C” air conditioner button
5. Intake air control button (“
” outside air
and “” air recirculation)
6. “” rear window defroster button (See
“Rear window defroster switch” (P.2-34).)
AUTOMATIC AIR CONDITIONER
(Type A) (if so equipped)
Automatic operation
Cooling and/or dehumidified heating
(AUTO):
This mode may be used all year round.
The system works automatically to con-
trol the inside temperature, air flow dis-
tribution and fan speed after the
preferred temperature is set manually.
1. Turn the “
” fan speed control dial
and air flow control dial to the “AUTO”
position. The air conditioner will auto-
matically turn on.
Page 201 of 455

2. Turn the temperature control dial toset the desired temperature.
. The temperature of the passenger
compartment will be maintained
automatically. Air flow distribution
and fan speed are also controlled
automatically.
A visible mist may be seen coming from
the ventilators in hot, humid conditions as
the air is cooled rapidly. This does not
indicate a malfunction.
Dehumidified defrosting or defogging:
1. Turn the “
” fan speed control dial
to the desired position.
2. Turn the air flow control dial to the “
” position.
3. Turn the temperature control dial to set the desired temperature.
.To quickly remove ice from theoutside of the windows, turn the
“
” fan speed control dial to the
maximum position.
.As soon as possible after the wind- shield is clean, turn the air flow
control dial to the “AUTO” position
to return to the auto mode.
.When the air flow control dial isturned to the “”or“” position,
the air conditioner will automati-
cally be turned on at outside tem-
peratures above 23°F (−5°C) to defog the windshield, and the air
recirculation mode will automati-
cally be turned off.
Outside air is drawn into the pas-
senger compartment to improve
the defogging performance.
Manual operation
Fan speed control:
Turn the “
” fan speed control dial
clockwise (+) or counterclockwise (−) to
manually control the fan speed.
Turn the dial to the “AUTO” position to
return to automatic control of the fan
speed.
Temperature control:
Turn the temperature control dial to set
the desired temperature.
. The temperature can be set within the
following range.
— For U.S.: 60 to 90°F (16 to 32°C)
— For Canada: 64 to 90°F (18 to 32°C)
Air intake control:
. Push the “
” air intake control
button to recirculate interior air inside
the vehicle. The indicator light on the
“
” side will illuminate.
The air recirculation mode cannot be
activated when the air conditioner is
in the front defrosting mode “
”. .
Push the “
” air intake control
button to draw outside air into the
passenger compartment. The indica-
tor light on the “
” side will illumi-
nate.
. To switch to the automatic control
mode, push the “
” air intake
control button for approximately 2
seconds. The indicator lights (both air
recirculation and outside air circula-
tion sides) will flash twice, and then
the air intake will be controlled auto-
matically.
Air flow control:
Turning the air flow control dial selects
the air outlet to:
: Air flows from center and side venti- lators.
: Air flows from center and side venti-lators and foot outlets.
: Air flows mainly from foot outlets.
: Air flows from defroster and footoutlets.
: Air flows mainly from defroster out-lets.
Center display, heater, air conditioner, audio, phone and voice recognition systems4-33
Page 202 of 455
4-34Center display, heater, air conditioner, audio, phone and voice recognition systems
To turn the system off
Turn the “” fan speed control dial to
the “OFF” position.
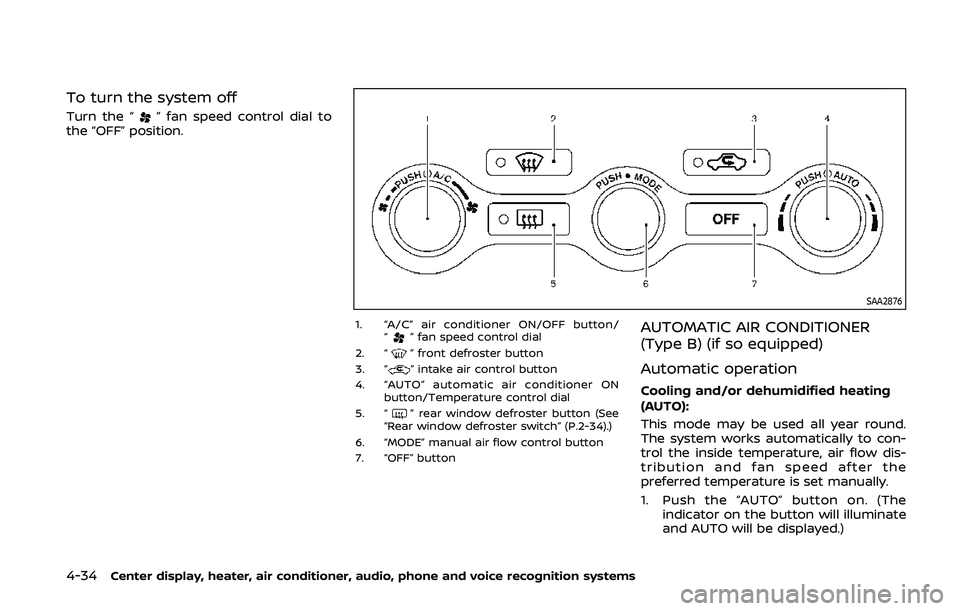
SAA2876
1. “A/C” air conditioner ON/OFF button/
“” fan speed control dial
2. “” front defroster button
3. “” intake air control button
4. “AUTO” automatic air conditioner ON button/Temperature control dial
5. “
” rear window defroster button (See
“Rear window defroster switch” (P.2-34).)
6. “MODE” manual air flow control button
7. “OFF” button
AUTOMATIC AIR CONDITIONER
(Type B) (if so equipped)
Automatic operation
Cooling and/or dehumidified heating
(AUTO):
This mode may be used all year round.
The system works automatically to con-
trol the inside temperature, air flow dis-
tribution and fan speed after the
preferred temperature is set manually.
1. Push the “AUTO” button on. (The indicator on the button will illuminate
and AUTO will be displayed.)
Page 203 of 455
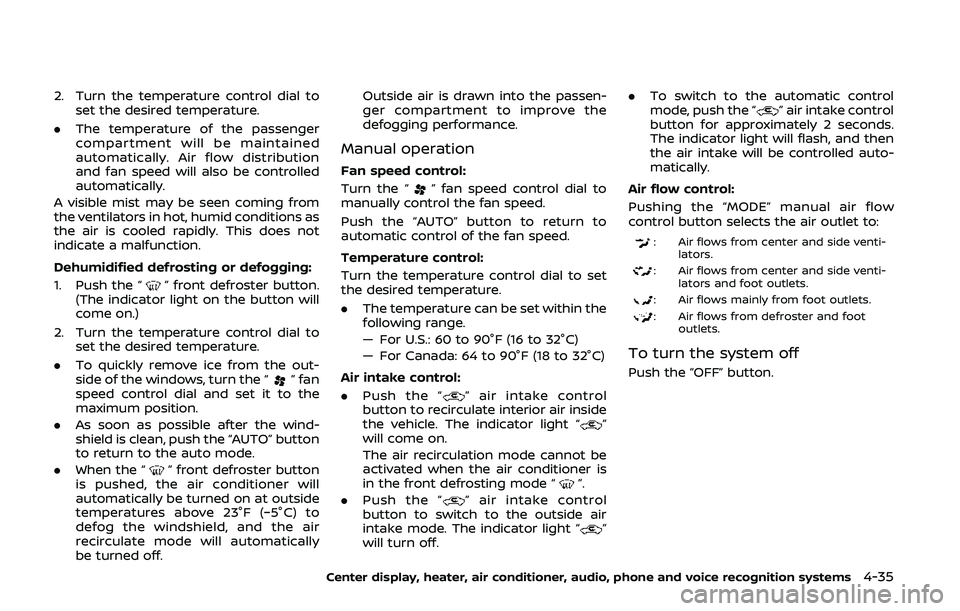
2. Turn the temperature control dial toset the desired temperature.
. The temperature of the passenger
compartment will be maintained
automatically. Air flow distribution
and fan speed will also be controlled
automatically.
A visible mist may be seen coming from
the ventilators in hot, humid conditions as
the air is cooled rapidly. This does not
indicate a malfunction.
Dehumidified defrosting or defogging:
1. Push the “
” front defroster button.
(The indicator light on the button will
come on.)
2. Turn the temperature control dial to set the desired temperature.
. To quickly remove ice from the out-
side of the windows, turn the “
” fan
speed control dial and set it to the
maximum position.
. As soon as possible after the wind-
shield is clean, push the “AUTO” button
to return to the auto mode.
. When the “
” front defroster button
is pushed, the air conditioner will
automatically be turned on at outside
temperatures above 23°F (−5°C) to
defog the windshield, and the air
recirculate mode will automatically
be turned off. Outside air is drawn into the passen-
ger compartment to improve the
defogging performance.
Manual operation
Fan speed control:
Turn the “
” fan speed control dial to
manually control the fan speed.
Push the “AUTO” button to return to
automatic control of the fan speed.
Temperature control:
Turn the temperature control dial to set
the desired temperature.
. The temperature can be set within the
following range.
— For U.S.: 60 to 90°F (16 to 32°C)
— For Canada: 64 to 90°F (18 to 32°C)
Air intake control:
. Push the “
” air intake control
button to recirculate interior air inside
the vehicle. The indicator light “
”
will come on.
The air recirculation mode cannot be
activated when the air conditioner is
in the front defrosting mode “
”.
. Push the “
” air intake control
button to switch to the outside air
intake mode. The indicator light “
”
will turn off. .
To switch to the automatic control
mode, push the “
” air intake control
button for approximately 2 seconds.
The indicator light will flash, and then
the air intake will be controlled auto-
matically.
Air flow control:
Pushing the “MODE” manual air flow
control button selects the air outlet to:
: Air flows from center and side venti- lators.
: Air flows from center and side venti-lators and foot outlets.
: Air flows mainly from foot outlets.
: Air flows from defroster and footoutlets.
To turn the system off
Push the “OFF” button.
Center display, heater, air conditioner, audio, phone and voice recognition systems4-35
Page 206 of 455
4-38Center display, heater, air conditioner, audio, phone and voice recognition systems
signals will tend to fade and/or drift.
Static and flutter: During signal interfer-
ence from buildings, large hills or due to
antenna position, usually in conjunction
with increased distance from the station
transmitter, static or flutter can be heard.
This can be reduced by lowering the
treble setting to reduce the treble re-
sponse.
Multipath reception: Because of the re-
flective characteristics of FM signals, di-
rect and reflected signals reach the
receiver at the same time. The signals
may cancel each other, resulting in mo-
mentary flutter or loss of sound.
AM radio reception:
AM signals, because of their low fre-
quency, can bend around objects and
skip along the ground. In addition, the
signals can be bounced off the iono-
sphere and bent back to earth. Because
of these characteristics. AM signals are
also subject to interference as they travel
from transmitter to receiver.
Fading: Occurs while the vehicle is pas-
sing through freeway underpasses or in
areas with many tall buildings. It can also
occur for several seconds during iono-
spheric turbulence even in areas where
no obstacles exist.
Static: Caused by thunderstorms, electri-cal power lines, electric signs and even
traffic lights.
Satellite radio reception (if so
equipped):
When the satellite radio is used for the
first time or the battery has been re-
placed, the satellite radio may not work
properly. This is not a malfunction. Wait
more than 10 minutes with the satellite
radio ON and the vehicle outside of any
metal or large building for the satellite
radio to receive all of the necessary data.
The satellite radio mode requires an
active SiriusXM® Satellite Radio subscrip-
tion. The satellite radio is not available in
Alaska, Hawaii and Guam.
The satellite radio performance may be
affected if cargo carried on the roof
blocks the satellite radio signal.
If possible, do not put cargo near the
satellite antenna.
A build up of ice on the satellite radio
antenna can affect satellite radio perfor-
mance. Remove the ice to restore satellite
radio reception.
SAA0480
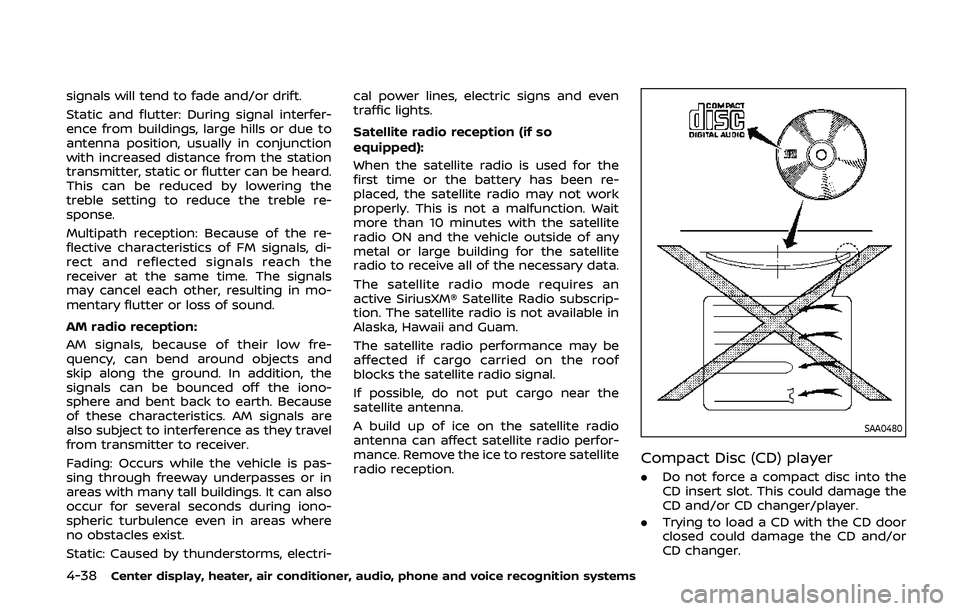
Compact Disc (CD) player
. Do not force a compact disc into the
CD insert slot. This could damage the
CD and/or CD changer/player.
. Trying to load a CD with the CD door
closed could damage the CD and/or
CD changer.