2020 NISSAN 370Z ECO mode
[x] Cancel search: ECO modePage 220 of 455
4-52Center display, heater, air conditioner, audio, phone and voice recognition systems
NOTE:
.The CD player accepts normal audio
CDs or CDs containing MP3/WMA
files.
. The audio unit will automatically
detect if a CD containing MP3/WMA
files is inserted, and “MP3CD” will be
indicated.
. An error notification message will be
displayed when inserting an incom-
patible disc type (e.g. DVD), or if the
player cannot read the CD. Eject the
disc and insert another disc.
List view:
While the track is being played, push
either the ENTER button or the back
button to display the available tracks in
a listed view mode. To select a track from
the list, or a track to start listening to, turn
the TUNE/MENU knob then push the
ENTER button.
Quick search:
In the list view mode, a quick search can
be performed to find a track from the list.
Push the A-Z button, turn the TUNE/
MENU knob to the first alphabetic letter
of the song title and then push the ENTER
button. When found, a list of the available
songs will be displayed. Select, and push
the ENTER button to play the preferred
track.CD button:
When the CD button is pushed while the
audio system is off and a CD is loaded, the
audio system will turn on and a CD will
start playing automatically. If another
audio source is already playing, it will
automatically turn off and the CD will
start playing.
Fast Forward/Rewind but-
tons:
Push and hold the
orbutton to
fast forward or rewind through the track.
When the button is released, the track will
play at normal playing speed.
Track up/down:
Pushing the
orbutton once, the
track will skip forward to the next track or
backward to the beginning of the current
track. Push the
orbutton more
than once to skip through the tracks.
Folder browsing:
If the recorded media contains folders
with music files, pushing the
orbutton will play in sequence the tracks of
each folder.
To select a preferred folder:
1. Push the ENTER button or the back button and a list of tracks in the
current folder is displayed. 2. Push the back button.
3. Turn the TUNE/MENU knob for the
preferred folder.
4. Push the ENTER button to access the folder. Push the ENTER button again
to start playing the first track or turn
the TUNE/MENU knob, and push the
ENTER button to select another track.
If the current selected folder contains sub
folders, push the ENTER button, a new
screen with a list of sub folders will be
displayed. Turn the TUNE/MENU knob for
the sub folder then push the ENTER
button to select. Select the root folder
item when songs are recorded addition-
ally in the root folder.
To return to the previous folder screen,
push back button.
RPT button:
Push the RPT button and the current
track will be played continuously.
RDM button:
Push the RDM button and all the tracks
will be played in a random order.
DISP button:
While a CD with recorded music informa-
tion tags (CD-text/ID3-text tags) is being
Page 221 of 455
played, the title of the played track is
displayed. If the title information is not
provided then “Track” is displayed.
When the DISP button is pushed repeat-
edly, further information about the track
can be displayed along with the track title
as follows:
CD:
Track time?Album ?Artist ?Track
time
CD with MP3/WMA:
Track time ?Album ?Artist ?Folder
name ?Track time
Track details:
Pushing and holding the DISP button will
turn the display into a detailed overview
and after a few seconds it returns to the
main display.
button:
When the SCAN button is pushed while a
CD is being played, the first 10 seconds of
all the tracks will be played.
When the SCAN button is pushed again,
the CD will return to normal play from the
track which is playing.
CD eject button:
When the CD eject button is pushed while
a CD is loaded, the CD will be ejected.
When the CD eject button is pushed twice,
the CD will be ejected further, and the CD
can be removed with ease.
When the ignition switch is in the “OFF” or
“LOCK” position it is possible to eject the
CD currently being played. However the
audio unit will not be activated.
If a CD is ejected by pushing the CD eject
button, and it is not taken out from the
loading slot within 8 seconds, the CD will
automatically be reloaded to the slot to
protect the CD.
JVH0920X
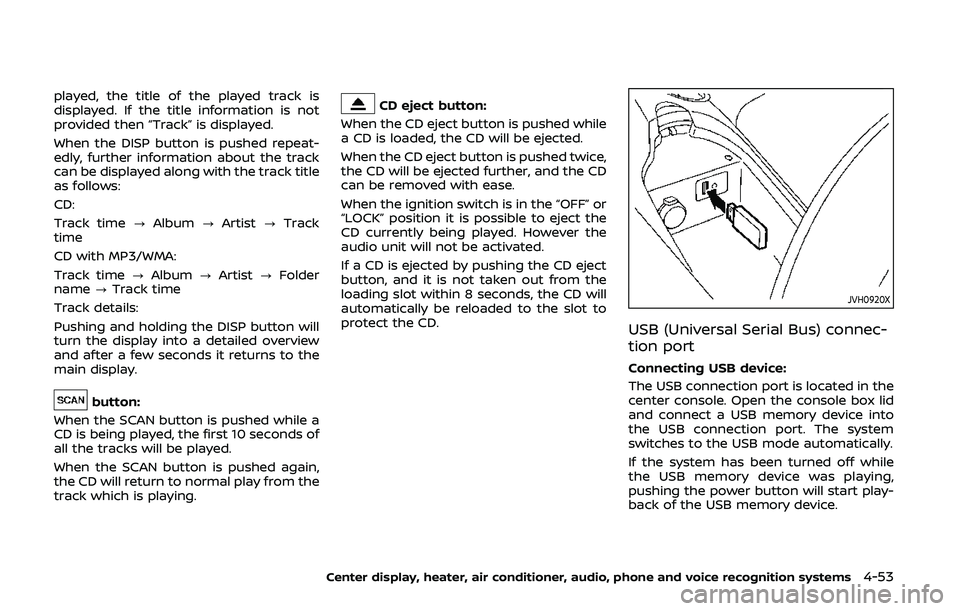
USB (Universal Serial Bus) connec-
tion port
Connecting USB device:
The USB connection port is located in the
center console. Open the console box lid
and connect a USB memory device into
the USB connection port. The system
switches to the USB mode automatically.
If the system has been turned off while
the USB memory device was playing,
pushing the power button will start play-
back of the USB memory device.
Center display, heater, air conditioner, audio, phone and voice recognition systems4-53
Page 223 of 455
JVH0921X
iPod® player operation
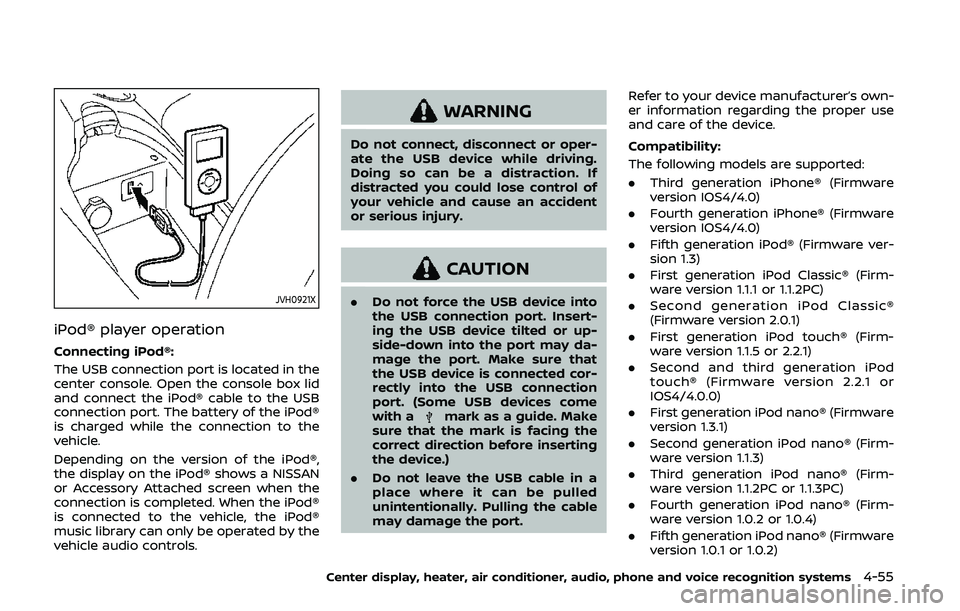
Connecting iPod®:
The USB connection port is located in the
center console. Open the console box lid
and connect the iPod® cable to the USB
connection port. The battery of the iPod®
is charged while the connection to the
vehicle.
Depending on the version of the iPod®,
the display on the iPod® shows a NISSAN
or Accessory Attached screen when the
connection is completed. When the iPod®
is connected to the vehicle, the iPod®
music library can only be operated by the
vehicle audio controls.
WARNING
Do not connect, disconnect or oper-
ate the USB device while driving.
Doing so can be a distraction. If
distracted you could lose control of
your vehicle and cause an accident
or serious injury.
CAUTION
.Do not force the USB device into
the USB connection port. Insert-
ing the USB device tilted or up-
side-down into the port may da-
mage the port. Make sure that
the USB device is connected cor-
rectly into the USB connection
port. (Some USB devices come
with a
mark as a guide. Make
sure that the mark is facing the
correct direction before inserting
the device.)
. Do not leave the USB cable in a
place where it can be pulled
unintentionally. Pulling the cable
may damage the port. Refer to your device manufacturer’s own-
er information regarding the proper use
and care of the device.
Compatibility:
The following models are supported:
. Third generation iPhone® (Firmware
version IOS4/4.0)
. Fourth generation iPhone® (Firmware
version IOS4/4.0)
. Fifth generation iPod® (Firmware ver-
sion 1.3)
. First generation iPod Classic® (Firm-
ware version 1.1.1 or 1.1.2PC)
. Second generation iPod Classic®
(Firmware version 2.0.1)
. First generation iPod touch® (Firm-
ware version 1.1.5 or 2.2.1)
. Second and third generation iPod
touch® (Firmware version 2.2.1 or
IOS4/4.0.0)
. First generation iPod nano® (Firmware
version 1.3.1)
. Second generation iPod nano® (Firm-
ware version 1.1.3)
. Third generation iPod nano® (Firm-
ware version 1.1.2PC or 1.1.3PC)
. Fourth generation iPod nano® (Firm-
ware version 1.0.2 or 1.0.4)
. Fifth generation iPod nano® (Firmware
version 1.0.1 or 1.0.2)
Center display, heater, air conditioner, audio, phone and voice recognition systems4-55
Page 226 of 455
4-58Center display, heater, air conditioner, audio, phone and voice recognition systems
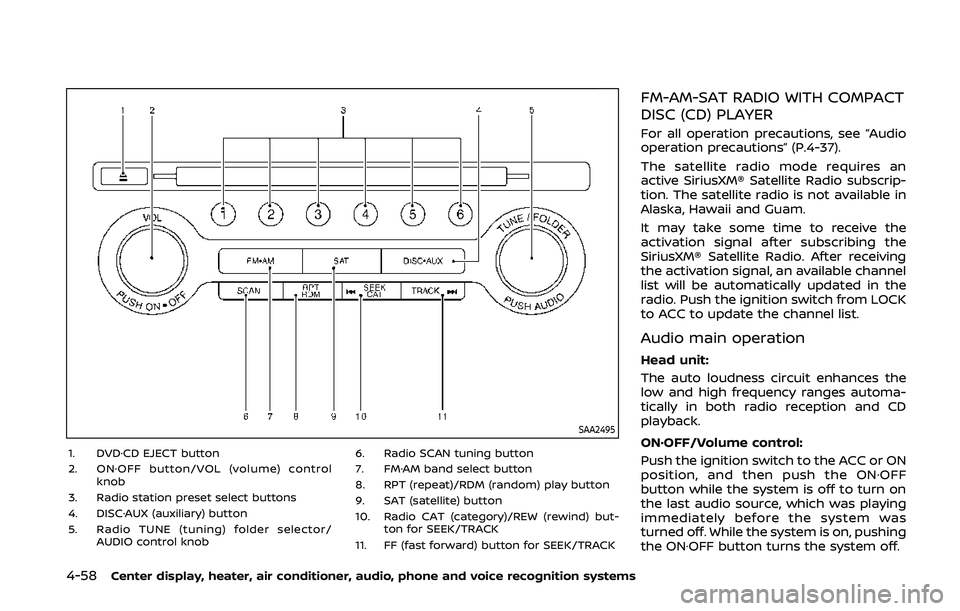
SAA2495
1. DVD·CD EJECT button
2. ON·OFF button/VOL (volume) controlknob
3. Radio station preset select buttons
4. DISC·AUX (auxiliary) button
5. Radio TUNE (tuning) folder selector/ AUDIO control knob 6. Radio SCAN tuning button
7. FM·AM band select button
8. RPT (repeat)/RDM (random) play button
9. SAT (satellite) button
10. Radio CAT (category)/REW (rewind) but- ton for SEEK/TRACK
11. FF (fast forward) button for SEEK/TRACK
FM-AM-SAT RADIO WITH COMPACT
DISC (CD) PLAYER
For all operation precautions, see “Audio
operation precautions” (P.4-37).
The satellite radio mode requires an
active SiriusXM® Satellite Radio subscrip-
tion. The satellite radio is not available in
Alaska, Hawaii and Guam.
It may take some time to receive the
activation signal after subscribing the
SiriusXM® Satellite Radio. After receiving
the activation signal, an available channel
list will be automatically updated in the
radio. Push the ignition switch from LOCK
to ACC to update the channel list.
Audio main operation
Head unit:
The auto loudness circuit enhances the
low and high frequency ranges automa-
tically in both radio reception and CD
playback.
ON·OFF/Volume control:
Push the ignition switch to the ACC or ON
position, and then push the ON·OFF
button while the system is off to turn on
the last audio source, which was playing
immediately before the system was
turned off. While the system is on, pushing
the ON·OFF button turns the system off.
Page 229 of 455

PLAY:
When the DISC·AUX (CD play) button is
pushed with the system off and the CD
loaded, the system will turn on and the
CD will start to play.
When the DISC·AUX button is pushed with
the CD loaded and the radio playing, the
radio will automatically be turned off and
the CD will start to play.
Menu:
When the “Menu” key on the display is
selected while the CD is being played, the
menu screen will be displayed. The fol-
lowing menu options are available.
. Folder List (for CD with compressed
audio files)
Displays the folder list.
. Track List
Displays the track list.
. Play Mode
Select a play mode from the following
items.
— Normal
— 1 Folder Repeat (for CD with com-
pressed audio files)
— 1 Track Repeat
— 1 Disc Random
— 1 Folder Random (for CD with com- pressed audio files)Next/Previous Track and
Fast Forward/Rewind:
When the
orbutton is pushed for
more than 1.5 seconds while the CD is
being played, the CD will play while fast
forwarding or rewinding. When the but-
ton is released, the CD will return to
normal play speed.
When the
orbutton is pushed for
less than 1.5 seconds while the CD is being
played, the next track or the beginning of
the current track on the CD will be played.
When the rewind button is pushed for less
than 1.5 seconds within 3 seconds after
the current track starts playing, the pre-
vious track will be played. Push the button
several times to skip through the tracks.
REPEAT (RPT), RANDOM (RDM):
When the RPT button is pushed while the
CD is played, the play pattern can be
changed as follows:
(CD)
(CD with compressed audio files)
CD EJECT:
When the CD EJECT button is pushed with
the CD loaded, the CD will be ejected.
If the CD comes out and is not removed,
it will be pulled back into the slot to
protect it.
DVD (Digital Versatile Disc) PLAYER
OPERATION (models with naviga-
tion system)
Precautions
Start the engine when using the DVD
entertainment system.
Movies will not be shown on the front
display while the vehicle is in any drive
position to reduce driver distraction.
Audio is available when a movie is played.
To view movies in the front display, stop
the vehicle in a safe location, move the
shift lever to the P (Park) position and
apply the parking brake.
Center display, heater, air conditioner, audio, phone and voice recognition systems4-61
Page 230 of 455
4-62Center display, heater, air conditioner, audio, phone and voice recognition systems
WARNING
.The driver must not attempt to
operate the DVD system or wear
the headphones while the vehicle
is in motion so that full attention
may be given to vehicle opera-
tion.
. Do not attempt to modify the
system to display a movie on the
front screen while the vehicle is
being driven. Doing so may dis-
tract the driver and may cause a
collision and serious personal in-
jury or death.
CAUTION
.Only operate the DVD while the
vehicle engine is running. Operat-
ing the DVD for extended periods
of time with the engine OFF can
discharge the vehicle battery.
. Do not allow the system to get
wet. Excessive moisture such as
spilled liquids may cause the
system to malfunction. .
While playing VIDEO-CD media,
this DVD player does not guaran-
tee complete functionality of all
VIDEO-CD formats.
Display settings
To adjust the front display mode, push
the SETTING button while the DVD is
being played, select the “Others” key and
then select the “Display” key.
To adjust the display ON/OFF, brightness,
tint, color and contrast, select the “Display
Adjustment” key and then select each key.
Then you can adjust each item using the
multi-function controller. After changes
have been made push the BACK button
to save the setting.
SAA2497
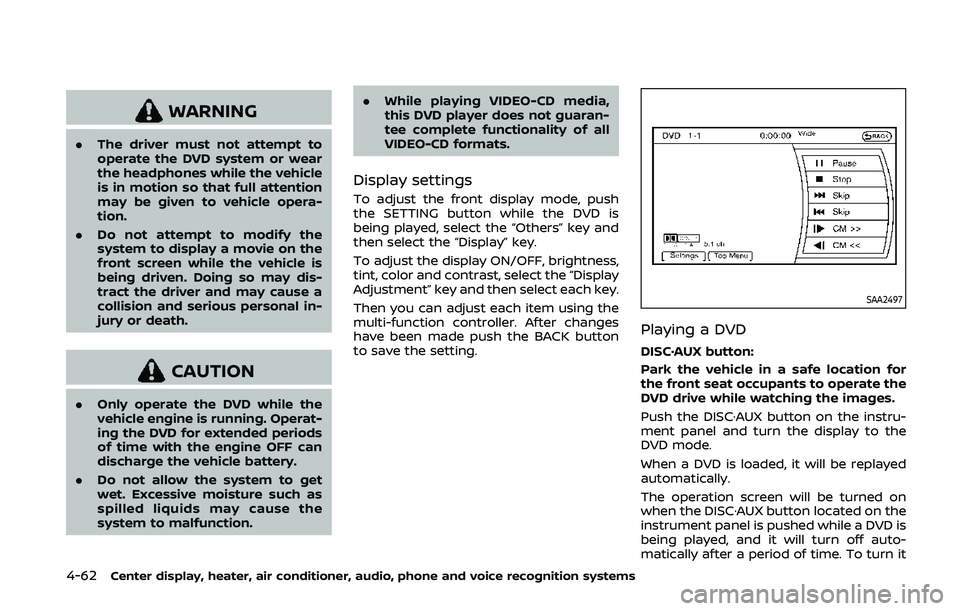
Playing a DVD
DISC·AUX button:
Park the vehicle in a safe location for
the front seat occupants to operate the
DVD drive while watching the images.
Push the DISC·AUX button on the instru-
ment panel and turn the display to the
DVD mode.
When a DVD is loaded, it will be replayed
automatically.
The operation screen will be turned on
when the DISC·AUX button located on the
instrument panel is pushed while a DVD is
being played, and it will turn off auto-
matically after a period of time. To turn it
Page 232 of 455
4-64Center display, heater, air conditioner, audio, phone and voice recognition systems
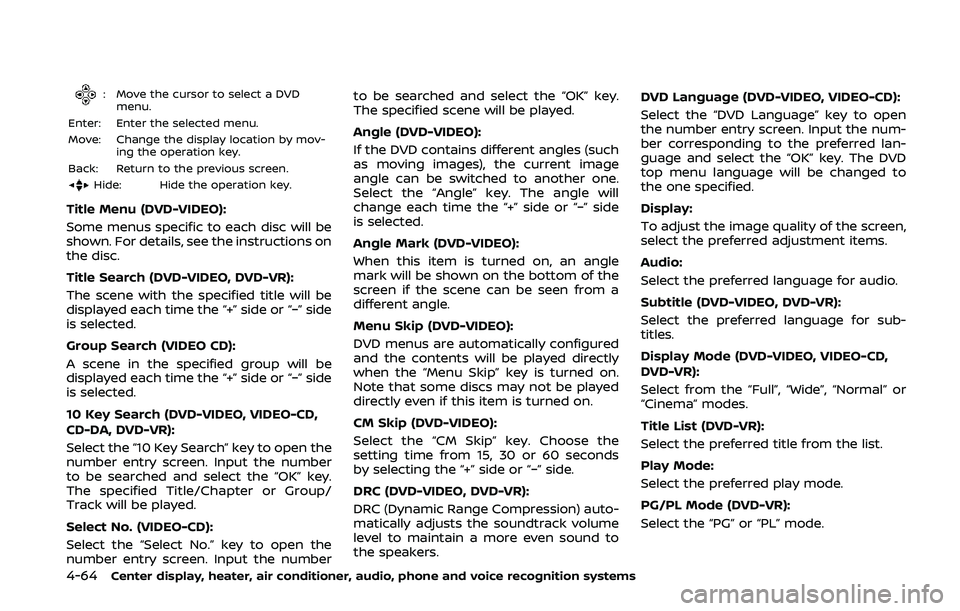
: Move the cursor to select a DVDmenu.
Enter: Enter the selected menu.
Move: Change the display location by mov- ing the operation key.
Back: Return to the previous screen.
Hide: Hide the operation key.
Title Menu (DVD-VIDEO):
Some menus specific to each disc will be
shown. For details, see the instructions on
the disc.
Title Search (DVD-VIDEO, DVD-VR):
The scene with the specified title will be
displayed each time the “+” side or “−” side
is selected.
Group Search (VIDEO CD):
A scene in the specified group will be
displayed each time the “+” side or “−” side
is selected.
10 Key Search (DVD-VIDEO, VIDEO-CD,
CD-DA, DVD-VR):
Select the “10 Key Search” key to open the
number entry screen. Input the number
to be searched and select the “OK” key.
The specified Title/Chapter or Group/
Track will be played.
Select No. (VIDEO-CD):
Select the “Select No.” key to open the
number entry screen. Input the number to be searched and select the “OK” key.
The specified scene will be played.
Angle (DVD-VIDEO):
If the DVD contains different angles (such
as moving images), the current image
angle can be switched to another one.
Select the “Angle” key. The angle will
change each time the “+” side or “−” side
is selected.
Angle Mark (DVD-VIDEO):
When this item is turned on, an angle
mark will be shown on the bottom of the
screen if the scene can be seen from a
different angle.
Menu Skip (DVD-VIDEO):
DVD menus are automatically configured
and the contents will be played directly
when the “Menu Skip” key is turned on.
Note that some discs may not be played
directly even if this item is turned on.
CM Skip (DVD-VIDEO):
Select the “CM Skip” key. Choose the
setting time from 15, 30 or 60 seconds
by selecting the “+” side or “−” side.
DRC (DVD-VIDEO, DVD-VR):
DRC (Dynamic Range Compression) auto-
matically adjusts the soundtrack volume
level to maintain a more even sound to
the speakers. DVD Language (DVD-VIDEO, VIDEO-CD):
Select the “DVD Language” key to open
the number entry screen. Input the num-
ber corresponding to the preferred lan-
guage and select the “OK” key. The DVD
top menu language will be changed to
the one specified.
Display:
To adjust the image quality of the screen,
select the preferred adjustment items.
Audio:
Select the preferred language for audio.
Subtitle (DVD-VIDEO, DVD-VR):
Select the preferred language for sub-
titles.
Display Mode (DVD-VIDEO, VIDEO-CD,
DVD-VR):
Select from the “Full”, “Wide”, “Normal” or
“Cinema” modes.
Title List (DVD-VR):
Select the preferred title from the list.
Play Mode:
Select the preferred play mode.
PG/PL Mode (DVD-VR):
Select the “PG” or “PL” mode.
Page 233 of 455
USB (Universal Serial Bus) CON-
NECTION PORT (models with navi-
gation system)
Audio main operation
WARNING
Do not connect, disconnect or oper-
ate the USB device while driving.
Doing so can be a distraction. If
distracted you could lose control of
your vehicle and cause an accident
or serious injury.
CAUTION
.Do not force the USB device into
the USB connection port. Insert-
ing the USB device tilted or up-
side-down into the port may da-
mage the port. Make sure that
the USB device is connected cor-
rectly into the USB connection
port.
. Do not grab the USB connection
port cover (if so equipped) when
pulling the USB device out of the
port. This could damage the port and the cover.
. Do not leave the USB cable in a
place where it can be pulled
unintentionally. Pulling the cable
may damage the port.
Refer to your device manufacturer’s own-
er information regarding the proper use
and care of the device.
SAA2499
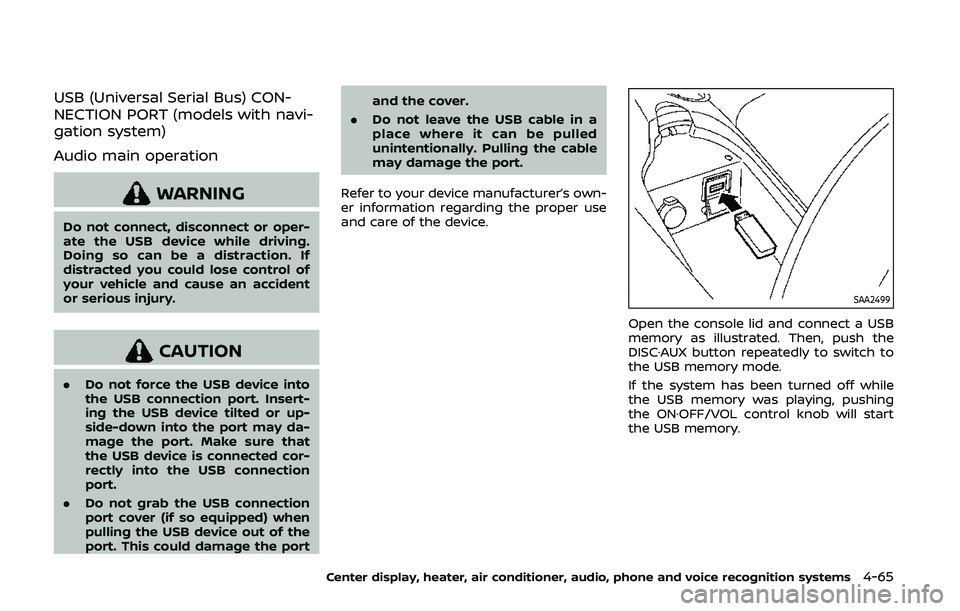
Open the console lid and connect a USB
memory as illustrated. Then, push the
DISC·AUX button repeatedly to switch to
the USB memory mode.
If the system has been turned off while
the USB memory was playing, pushing
the ON·OFF/VOL control knob will start
the USB memory.
Center display, heater, air conditioner, audio, phone and voice recognition systems4-65