2020 NISSAN 370Z ECO mode
[x] Cancel search: ECO modePage 207 of 455

.During cold weather or rainy days, the
player may malfunction due to the
humidity. If this occurs, remove the CD
and dehumidify or ventilate the player
completely.
. The player may skip while driving on
rough roads.
. The CD player sometimes cannot
function when the passenger com-
partment temperature is extremely
high. Decrease the temperature be-
fore use.
. Only use high quality 4.7 in (12 cm)
round discs that have the “COMPACT
disc DIGITAL AUDIO” logo on the disc
or packaging.
. Do not expose the CD to direct sun-
light.
. CDs that are of poor quality, dirty,
scratched, covered with fingerprints,
or that have pin holes may not work
properly.
. The following CDs may not work
properly:
— Copy control compact discs (CCCD)
— Recordable compact discs (CD-R)
— Rewritable compact discs (CD-RW)
. Do not use the following CDs as they
may cause the CD player to malfunc-
tion. — 3.1 in (8 cm) discs
— CDs that are not round
— CDs with a paper label
— CDs that are warped, scratched, or
have abnormal edges
. This audio system can only play pre-
recorded CDs. It has no capabilities to
record or burn CDs.
. If the CD cannot be played, one of the
following messages will be displayed.
CHECK DISC:
— Confirm that the CD is inserted
correctly (the label side is facing
up, etc.).
— Confirm that the CD is not bent or warped and it is free of scratches.
PUSH EJECT:
This is an error due to the tempera-
ture inside the player is too high.
Remove the CD by pushing the EJECT
button, and after a short time reinsert
the CD. The CD can be played when
the temperature of the player returns
to normal.
UNPLAYABLE:
The file is unplayable in this audio
system (only MP3 or WMA CD).
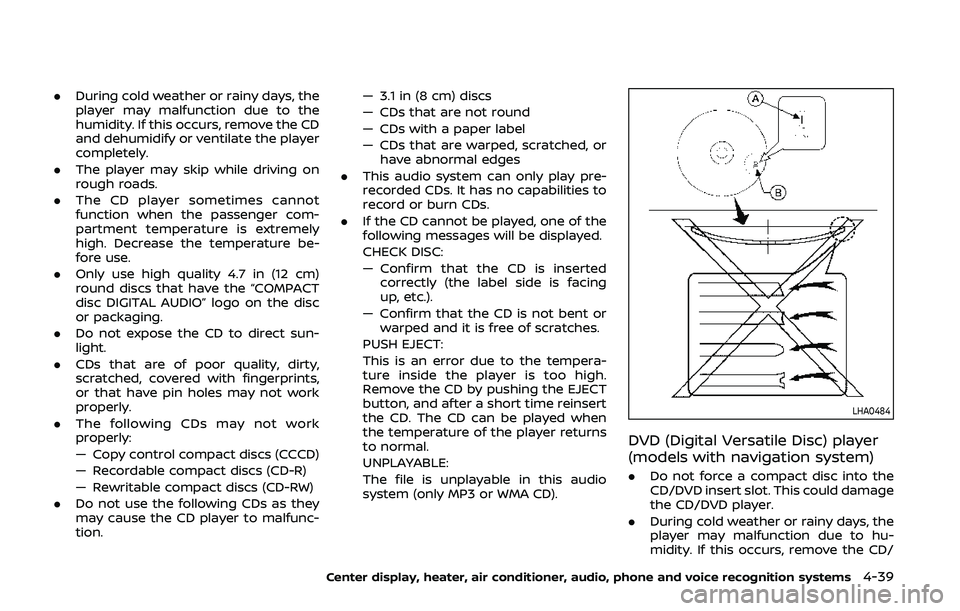
LHA0484
DVD (Digital Versatile Disc) player
(models with navigation system)
. Do not force a compact disc into the
CD/DVD insert slot. This could damage
the CD/DVD player.
. During cold weather or rainy days, the
player may malfunction due to hu-
midity. If this occurs, remove the CD/
Center display, heater, air conditioner, audio, phone and voice recognition systems4-39
Page 210 of 455

4-42Center display, heater, air conditioner, audio, phone and voice recognition systems
trademarks of Apple Inc., registered in the
U.S. and other countries. Lightning is a
trademark of Apple Inc.
.Improperly plugging in the iPod® may
cause a checkmark to be displayed on
and off (flickering). Always make sure
that the iPod® is connected properly.
. An iPod nano® (1st Generation) may
remain in fast forward or rewind mode
if it is connected during a seek opera-
tion. In this case, please manually
reset the iPod®.
. An iPod nano® (2nd Generation) will
continue to fast-forward or rewind if it
is disconnected during a seek opera-
tion.
. An incorrect song title may appear
when the Play Mode is changed while
using an iPod nano® (2nd Generation)
. Audiobooks may not play in the same
order as they appear on an iPod®.
. Large video files cause slow responses
in an iPod®. The vehicle center display
may momentarily black out, but will
soon recover.
. If an iPod® automatically selects large
video files while in the shuffle mode,
the vehicle center display may mo-
mentarily black out, but will soon
recover.Compressed Audio Files (MP3/
WMA/AAC) (if so equipped)
Explanation of terms:
.MP3 — MP3 is short for Moving Pic-
tures Experts Group Audio Layer 3.
MP3 is the most well known com-
pressed digital audio file format. This
format allows for near “CD quality”
sound, but at a fraction of the size of
normal audio files. MP3 conversion of
an audio track can reduce the file size
by approximately a 10:1 ratio (Sam-
pling: 44.1 kHz, Bit rate: 128 kbps) with
virtually no perceptible loss in quality.
The compression reduces certain
parts of sound that seem inaudible
to most people.
. WMA — Windows Media Audio (WMA) is
a compressed audio format created
by Microsoft as an alternative to MP3.
The WMA codec offers greater file
compression than the MP3 codec,
enabling storage of more digital audio
tracks in the same amount of space
when compared to MP3s at the same
level of quality.
This product is protected by certain
intellectual property rights of Micro-
soft Corporation and third parties. Use
or distribution of such technology
outside of this product is prohibited
without a license from Microsoft or an authorized Microsoft subsidiary and
third parties.
. AAC/M4A — Advanced Audio Coding
(AAC) is a lossy audio compression
format. Audio files that have been
encoded with AAC are generally smal-
ler in size and deliver a higher quality
of sound than MP3.
. Bit rate — Bit rate denotes the number
of bits per second used by a digital
music file. The size and quality of a
compressed digital audio file is deter-
mined by the bit rate used when
encoding the file.
. Sampling frequency — Sampling fre-
quency is the rate at which the
samples of a signal are converted
from analog to digital (A/D conver-
sion) per second.
. Multisession — Multisession is one of
the methods for writing data to med-
ia. Writing data once to the media is
called a single session, and writing
more than once is called a multises-
sion.
. ID3/WMA Tag — The ID3/WMA tag is
the part of the encoded MP3 or WMA
file that contains information about
the digital music file such as song title,
artist, album title, encoding bit rate,
track time duration, etc. ID3 tag in-
formation is displayed on the Album/
Page 212 of 455

4-44Center display, heater, air conditioner, audio, phone and voice recognition systems
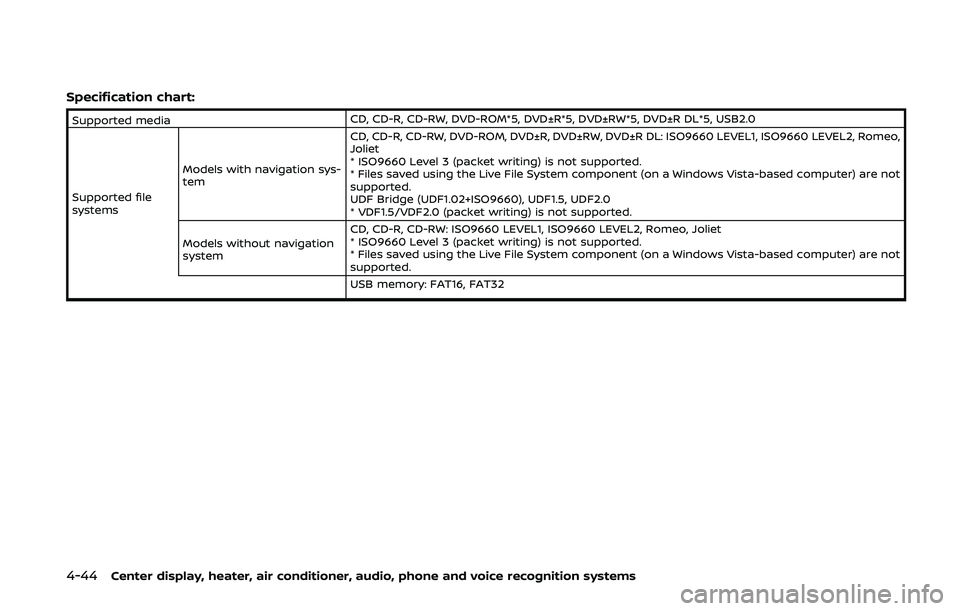
Specification chart:
Supported mediaCD, CD-R, CD-RW, DVD-ROM*5, DVD±R*5, DVD±RW*5, DVD±R DL*5, USB2.0
Supported file
systems Models with navigation sys-
tem CD, CD-R, CD-RW, DVD-ROM, DVD±R, DVD±RW, DVD±R DL: ISO9660 LEVEL1, ISO9660 LEVEL2, Romeo,
Joliet
* ISO9660 Level 3 (packet writing) is not supported.
* Files saved using the Live File System component (on a Windows Vista-based computer) are not
supported.
UDF Bridge (UDF1.02+ISO9660), UDF1.5, UDF2.0
* VDF1.5/VDF2.0 (packet writing) is not supported.
Models without navigation
system CD, CD-R, CD-RW: ISO9660 LEVEL1, ISO9660 LEVEL2, Romeo, Joliet
* ISO9660 Level 3 (packet writing) is not supported.
* Files saved using the Live File System component (on a Windows Vista-based computer) are not
supported.
USB memory: FAT16, FAT32
Page 213 of 455

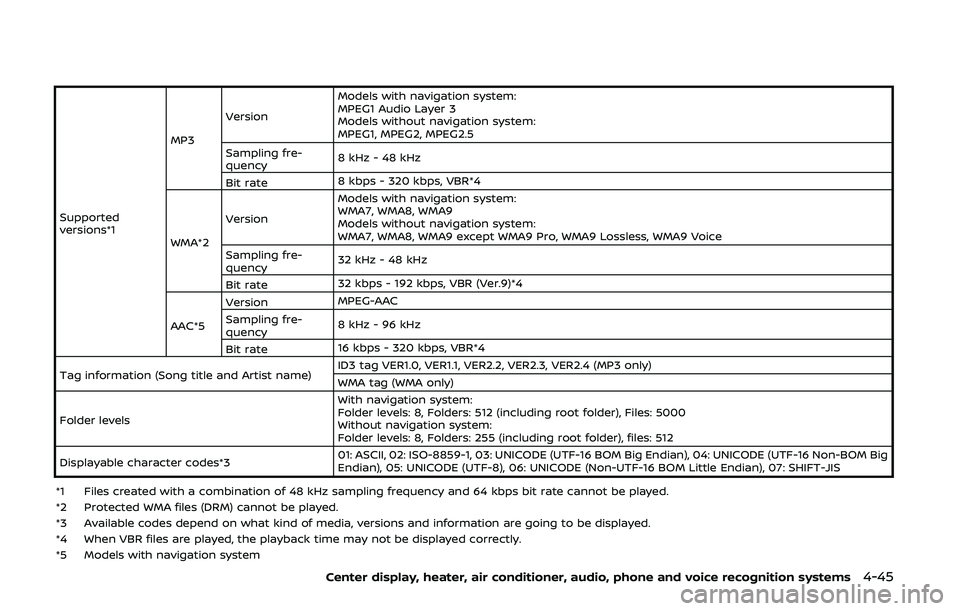
Supported
versions*1MP3
Version
Models with navigation system:
MPEG1 Audio Layer 3
Models without navigation system:
MPEG1, MPEG2, MPEG2.5
Sampling fre-
quency 8 kHz - 48 kHz
Bit rate 8 kbps - 320 kbps, VBR*4
WMA*2 Version
Models with navigation system:
WMA7, WMA8, WMA9
Models without navigation system:
WMA7, WMA8, WMA9 except WMA9 Pro, WMA9 Lossless, WMA9 Voice
Sampling fre-
quency 32 kHz - 48 kHz
Bit rate 32 kbps - 192 kbps, VBR (Ver.9)*4
AAC*5 Version
MPEG-AAC
Sampling fre-
quency 8 kHz - 96 kHz
Bit rate 16 kbps - 320 kbps, VBR*4
Tag information (Song title and Artist name) ID3 tag VER1.0, VER1.1, VER2.2, VER2.3, VER2.4 (MP3 only)
WMA tag (WMA only)
Folder levels With navigation system:
Folder levels: 8, Folders: 512 (including root folder), Files: 5000
Without navigation system:
Folder levels: 8, Folders: 255 (including root folder), files: 512
Displayable character codes*3 01: ASCII, 02: ISO-8859-1, 03: UNICODE (UTF-16 BOM Big Endian), 04: UNICODE (UTF-16 Non-BOM Big
Endian), 05: UNICODE (UTF-8), 06: UNICODE (Non-UTF-16 BOM Little Endian), 07: SHIFT-JIS
*1 Files created with a combination of 48 kHz sampling frequency and 64 kbps bit rate cannot be played.
*2 Protected WMA files (DRM) cannot be played.
*3 Available codes depend on what kind of media, versions and information are going to be displayed.
*4 When VBR files are played, the playback time may not be displayed correctly.
*5 Models with navigation system
Center display, heater, air conditioner, audio, phone and voice recognition systems4-45
Page 215 of 455

Compressed Video Files (models
with navigation system)
Explanation of terms:
.DivX® - DivX® refers to the DivX® codec
owned by DivX, Inc. used for a lossy
compression of video based on MPEG-
4.
. AVI - AVI stands for Audio Video
Interleave. It is a standard file format
originated by Microsoft Corporation. A
“.divx” encoded file can be saved into
the “.avi” file format for playback on
this system if it meets the require-
ments stated in the table in this
section. However, not all the “.avi” files
are playable on this system since
different encodings can be used than
the DivX® codec.
. ASF - ASF stands for Advanced Sys-
tems Format. It is a file format owned
by Microsoft Corporation. Note: Only “.
asf” files that meet the requirements
stated in the table in this section can
be played.
. Bit rate — Bit rate denotes the number
of bits per second used by a digital
video file. The size and quality of a
compressed digital audio file is deter-
mined by the bit rate used when
encoding the file. Requirement for Supporting Video Playback:Media CD, CD-R, CD-RW, DVD, DVD±R, DVD±RW, DVD±RW DL, USB 2.0 Memory
File Systems CD,
CD-R,
CD-RW,
DVD,
DVD±R,
DVD±RW,
DVD±RW DL ISO9660 LEVEL1, ISO9660 LEVEL2, Romeo, Joliet, UDF Bridge
(UDF1.02+ISO9660), UDF1.5, UDF2.0
- ISO9660 Level 3 (packet writing) is not supported.
- Files saved using the Live File System component (on a
Windows Vista-based computer) are not supported.
- VDF1.5/VDF2.0 (packet writing) is not supported.
USB Memory FAT16, FAT32
File Types .divx, .avi Video Codecs DivX3, DivX4, DivX5, DivX6
Audio Codecs MP3, MPEG2.5 Audio Layer3, Dolby
Digital, LPCM
.asf Video Codec ISO-MPEG4
Audio Codec G.726
Bit Rates .divx, .avi Maximum Average 4Mbps
Maximum Peak 8Mbps
Resolution .divx, .avi Minimum 32 × 32
Maximum 720 × 480
.asf Minimum 32 × 32
Maximum 720 × 576
Center display, heater, air conditioner, audio, phone and voice recognition systems4-47
Page 216 of 455

4-48Center display, heater, air conditioner, audio, phone and voice recognition systems
Bluetooth® Audio player (models
with navigation system)
Bluetooth® is a trademark
owned by Bluetooth SIG, Inc.
and licensed to Clarion Co.,
Ltd.
.Some Bluetooth® audio devices may
not be recognized by the in-vehicle
audio system.
. It is necessary to set up the wireless
connection between a compatible
Bluetooth® audio device and the in-
vehicle Bluetooth® module before
using the Bluetooth® audio player.
. Operating procedure of the Blue-
tooth® audio player will vary depend-
ing on the device. Make sure it is
understood how to operate an audio
device before using it with this system.
. The Bluetooth® audio player may be
stopped under the following condi-
tions:
— Receiving a hands-free call.
— Checking the connection to the
hands-free phone.
. Do not place a Bluetooth® audio
device in an area surrounded by metal
or far away from the in-vehicle Blue-
tooth® module to prevent tone quality
degradation and wireless connection
disruption. .
While an audio device is connected
through a Bluetooth® wireless con-
nection, the battery power of the
device may discharge quicker than
usual.
. This system supports the Bluetooth®
Audio Distribution Profile (A2DP,
AVRCP).
. Wireless LAN (Wi-Fi) and the Blue-
tooth® functions share the same fre-
quency band (2.4 GHz). Using the
Bluetooth® and the wireless LAN func-
tions at the same time may slow down
or disconnect the communication and
cause undesired noise. It is recom-
mended that you turn off the wireless
LAN (Wi-Fi) when using the Bluetooth®
functions.
Page 217 of 455

JVH0923X
1. CD eject button
2. FM·AM button
3. RPT (repeat) button
4. RDM (random play) button
5. Radio memory buttons
6. A-Z button
7. USB button8. SCAN button
9. CD button
10. Power button/VOL (volume) control knob
11. Rewind button
12. Fast Forward button
13. DISP (display) button
14. SETUP button15. Back button
16. TUNE/MENU knob/ENTER button
17. AUX button
FM-AM RADIO WITH COMPACT DISC
(CD) PLAYER
Audio main operation
The audio system operates when the
ignition switch is in the “ACC” or “ON”
position.
POWER ON/OFF:
To turn on the audio system, push the
Power button.
.
The system will turn on in the mode
which was used immediately before
the system was turned off.
. If there is no CD loaded, the radio will
be turned on.
To turn off the audio system, push the
Power button.
Volume control:
To control the volume, turn the VOL
control knob.
Turn the VOL control knob clockwise to
make the sound louder.
Turn the VOL control knob counterclock-
wise to make the sound quieter.
Center display, heater, air conditioner, audio, phone and voice recognition systems4-49
Page 218 of 455

4-50Center display, heater, air conditioner, audio, phone and voice recognition systems
SETUP button:
To configure Audio, Clock, Language or
Scroll direction settings, perform the
following procedure:
1. Push the SETUP button.
2. Push the ENTER button.
3. Turn the TUNE/MENU knob clockwiseor counterclockwise, the display will
appear in the following order:
Audio �œClock �œLanguage �œScroll
Direction
After the desired levels have been set,
push either the back button repeatedly,
the SETUP button, or wait for 8 seconds
without pushing any buttons to exit the
menu screen.
Audio adjustments:
Push the SETUP button to enter the setup
menu screen then select Audio by using
TUNE/MENU knob.
Each time the ENTER button is pushed,
the mode will change as follows:
Bass ?Treble ?Fade ?Balance ?AUX
VOL ?SPD VOL ?Audio (setup menu
screen)
Turn the TUNE/MENU knob clockwise or
counterclockwise to adjust the following
items and push the ENTER button to
confirm. Bass control:
Use this control to enhance or attenuate
bass response sound.
Treble control:
Use this control to enhance or attenuate
the treble.
Fade control:
Use this control to adjust the balance of
the volume between the front and rear (if
so equipped) speakers.
Balance control:
Use this control to adjust the balance of
the volume between the left and right
speakers.
AUX VOL (Auxiliary volume) control:
Use this control to adjust the volume
output from the auxiliary source.
SPD VOL (Speed volume) control:
This mode controls the volume output
from the speakers automatically in rela-
tion to vehicle speed.
Adjusting the setting to 0 (zero) turns off
the speed volume feature.
Clock setting:
Push the SETUP button to enter the setup
menu screen then select Clock.
Turn the TUNE/MENU knob, the mode will
change as follows:Set Time
�œON/OFF �œClock Format �œ
Set time
Set Time:
Select Set Time then adjust the clock as
follows:
1. The hour display will start flashing. Turn the TUNE/MENU knob to adjust
the hour and push the ENTER button.
2. The minute display will start flashing. Turn the TUNE/MENU knob to adjust
the minute and push the ENTER
button to finish the clock adjustment.
ON/OFF:
Set the clock display between on or off
when the audio unit is turned off. If set in
the ON position, the clock will be dis-
played when the audio unit is turned off
either by pushing the power button or
when the ignition switch is placed in the
“OFF” position.
Clock Format:
Switch the clock display between 24-hour
mode and 12-hour clock mode.
Language setting:
Push the SETUP button to enter the setup
menu screen then select Language.
Select the appropriate language and
push the ENTER button. Upon completion,
the screen will automatically adapt the