2020 NISSAN 370Z ECO mode
[x] Cancel search: ECO modePage 129 of 455
a place where temperatures
exceed 140°F (60°C).
— Do not change or modify the Intelligent Key.
— Do not use a magnet key holder.
— Do not place the Intelligent Key near an electric appliance
such as a television set, per-
sonal computer or cellular
phone.
— Do not allow the Intelligent Key to come into contact with
water or salt water, and do
not wash it in a washing
machine. This could affect
the system function.
. If an Intelligent Key is lost or
stolen, NISSAN recommends
erasing the ID code of that Intel-
ligent Key. This will prevent the
Intelligent Key from unauthorized
use to unlock the vehicle. For
information regarding the eras-
ing procedure, it is recommended
you visit a NISSAN dealer.
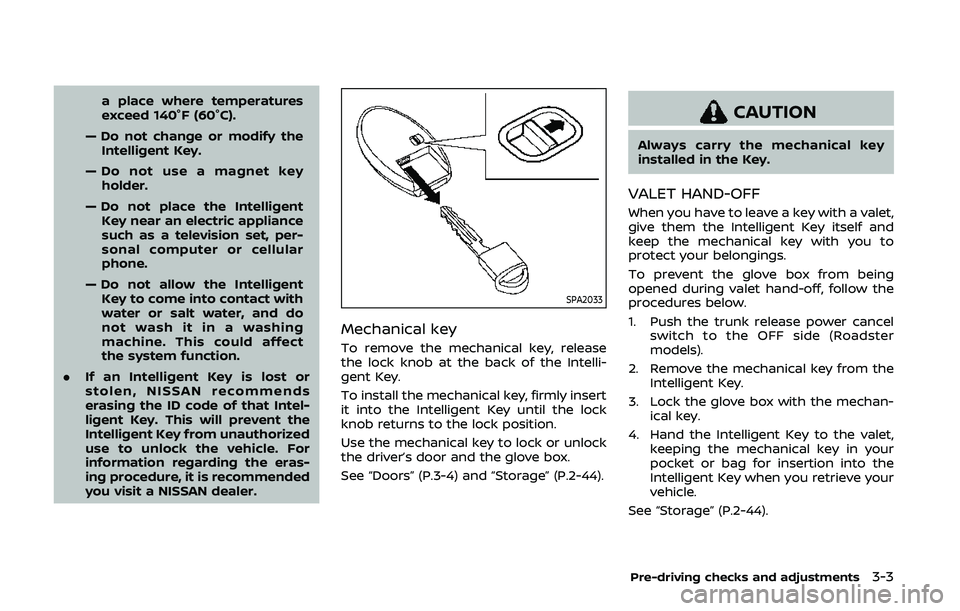
SPA2033
Mechanical key
To remove the mechanical key, release
the lock knob at the back of the Intelli-
gent Key.
To install the mechanical key, firmly insert
it into the Intelligent Key until the lock
knob returns to the lock position.
Use the mechanical key to lock or unlock
the driver’s door and the glove box.
See “Doors” (P.3-4) and “Storage” (P.2-44).
CAUTION
Always carry the mechanical key
installed in the Key.
VALET HAND-OFF
When you have to leave a key with a valet,
give them the Intelligent Key itself and
keep the mechanical key with you to
protect your belongings.
To prevent the glove box from being
opened during valet hand-off, follow the
procedures below.
1. Push the trunk release power cancel
switch to the OFF side (Roadster
models).
2. Remove the mechanical key from the Intelligent Key.
3. Lock the glove box with the mechan- ical key.
4. Hand the Intelligent Key to the valet, keeping the mechanical key in your
pocket or bag for insertion into the
Intelligent Key when you retrieve your
vehicle.
See “Storage” (P.2-44).
Pre-driving checks and adjustments3-3
Page 134 of 455
3-8Pre-driving checks and adjustments
charged or strong radio waves are pre-
sent near the operating location, the
Intelligent Key system’s operating range
becomes narrower, and the Intelligent
Key may not function properly.
The operating range is within 31.50 in (80
cm) from each request switch
.
If the Intelligent Key is too close to the
door glass, handle or rear bumper the
request switches may not function.
When the Intelligent Key is within the
operating range, it is possible for anyone
who does not carry the Intelligent Key to
push the request switch to lock/unlock
the doors including the rear hatch/trunk
lid.
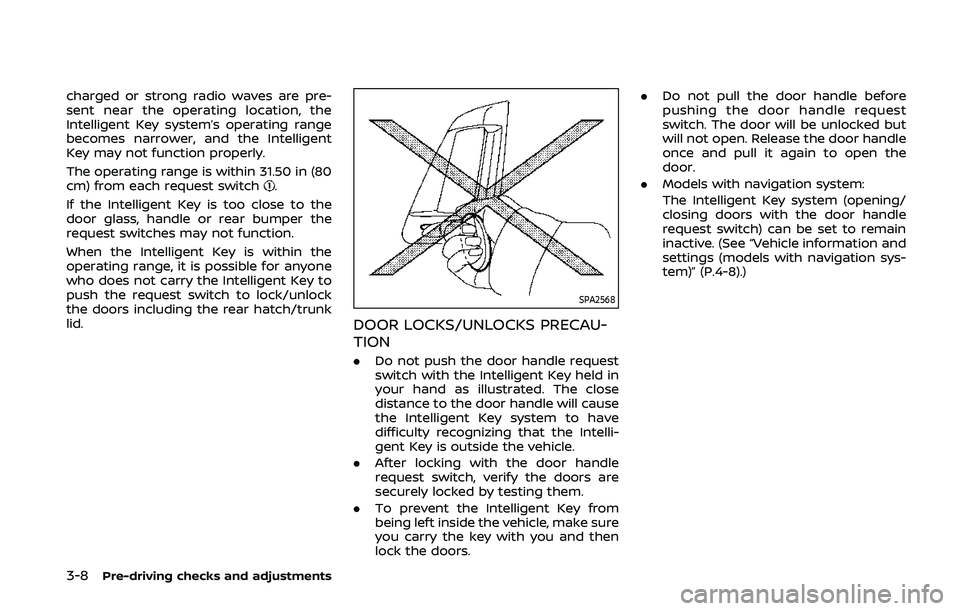
SPA2568
DOOR LOCKS/UNLOCKS PRECAU-
TION
. Do not push the door handle request
switch with the Intelligent Key held in
your hand as illustrated. The close
distance to the door handle will cause
the Intelligent Key system to have
difficulty recognizing that the Intelli-
gent Key is outside the vehicle.
. After locking with the door handle
request switch, verify the doors are
securely locked by testing them.
. To prevent the Intelligent Key from
being left inside the vehicle, make sure
you carry the key with you and then
lock the doors. .
Do not pull the door handle before
pushing the door handle request
switch. The door will be unlocked but
will not open. Release the door handle
once and pull it again to open the
door.
. Models with navigation system:
The Intelligent Key system (opening/
closing doors with the door handle
request switch) can be set to remain
inactive. (See “Vehicle information and
settings (models with navigation sys-
tem)” (P.4-8).)
Page 138 of 455
3-12Pre-driving checks and adjustments
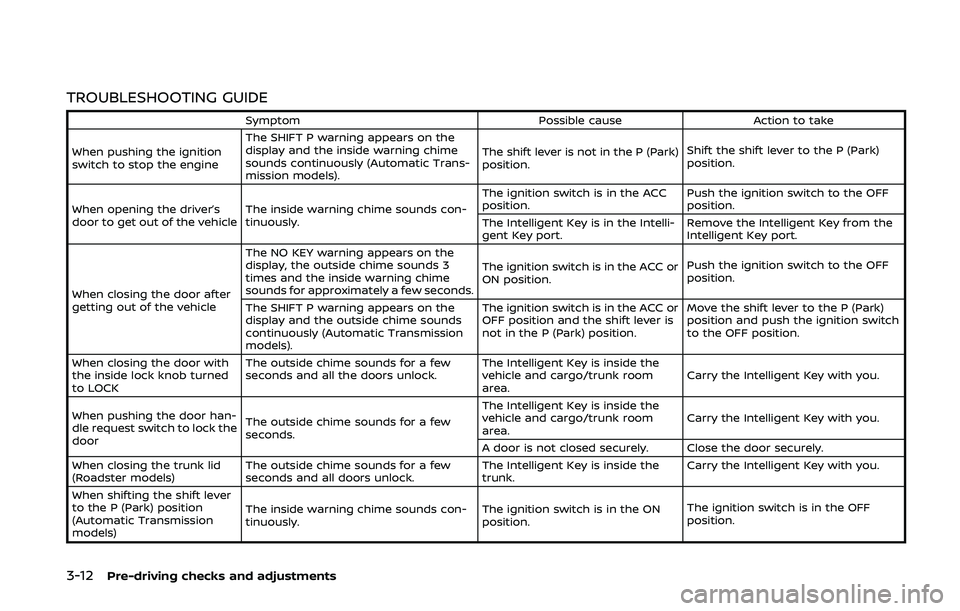
TROUBLESHOOTING GUIDE
SymptomPossible causeAction to take
When pushing the ignition
switch to stop the engine The SHIFT P warning appears on the
display and the inside warning chime
sounds continuously (Automatic Trans-
mission models).
The shift lever is not in the P (Park)
position.
Shift the shift lever to the P (Park)
position.
When opening the driver’s
door to get out of the vehicle The inside warning chime sounds con-
tinuously. The ignition switch is in the ACC
position.
Push the ignition switch to the OFF
position.
The Intelligent Key is in the Intelli-
gent Key port. Remove the Intelligent Key from the
Intelligent Key port.
When closing the door after
getting out of the vehicle The NO KEY warning appears on the
display, the outside chime sounds 3
times and the inside warning chime
sounds for approximately a few seconds.
The ignition switch is in the ACC or
ON position.
Push the ignition switch to the OFF
position.
The SHIFT P warning appears on the
display and the outside chime sounds
continuously (Automatic Transmission
models). The ignition switch is in the ACC or
OFF position and the shift lever is
not in the P (Park) position.
Move the shift lever to the P (Park)
position and push the ignition switch
to the OFF position.
When closing the door with
the inside lock knob turned
to LOCK The outside chime sounds for a few
seconds and all the doors unlock.
The Intelligent Key is inside the
vehicle and cargo/trunk room
area.Carry the Intelligent Key with you.
When pushing the door han-
dle request switch to lock the
door The outside chime sounds for a few
seconds. The Intelligent Key is inside the
vehicle and cargo/trunk room
area.
Carry the Intelligent Key with you.
A door is not closed securely. Close the door securely.
When closing the trunk lid
(Roadster models) The outside chime sounds for a few
seconds and all doors unlock. The Intelligent Key is inside the
trunk.Carry the Intelligent Key with you.
When shifting the shift lever
to the P (Park) position
(Automatic Transmission
models) The inside warning chime sounds con-
tinuously.
The ignition switch is in the ON
position.The ignition switch is in the OFF
position.
Page 140 of 455

3-14Pre-driving checks and adjustments
Locking doors, rear hatch/trunk lid
and fuel-filler door
1. Push the ignition switch to the OFFposition and make sure you carry the
Intelligent Key with you.*
2. Close all the doors and the rear hatch/ trunk lid.
3. Push the LOCK
buttonon the
Intelligent Key.
4. All the doors, the rear hatch/trunk lid and fuel-filler door will lock.
5. The hazard indicator flashes twice and the horn chirps once.
*: Doors and the rear hatch/trunk lid will
lock with the Intelligent Key while the
ignition switch is in the ACC or ON
position.
Unlocking doors, rear hatch/trunk
lid and fuel-filler door
1. Push the UNLOCKbuttonon
the Intelligent Key once.
2. The hazard indicator flashes once. The driver’s door and fuel-filler door will
unlock.
3. Push the UNLOCK
button on the
Intelligent Key again within 60 sec-
onds.
4. The hazard indicator flashes once again. All the doors and the rear hatch/trunk lid will unlock.
All doors and the rear hatch/trunk lid will
be locked automatically unless one of the
following operations is performed within 1
minute after pushing the UNLOCK
button on the Intelligent Key while the
doors are locked. If during this 1-minute
time period, the UNLOCK
button on
the Intelligent Key is pushed, all doors and
the rear hatch/trunk lid will be locked
automatically after another 1 minute.
. Opening any door
. Pushing the ignition switch
. Inserting the Intelligent Key into the
Intelligent Key port
Opening windows
The UNLOCKbutton operation also
allows you to open a window that is
equipped with the automatic open/close
function. (See “Power windows” (P.2-48).)
To open the window, push the UNLOCK
buttonon the Intelligent Key for
about 3 seconds after the door is un-
locked.
To stop opening, release the UNLOCK
button.
Window cannot be closed using the
Intelligent Key.
Using panic alarm
If you are near your vehicle and feel
threatened, you may activate the alarm
to call attention as follows:
1. Push the PANIC
buttonon the
Intelligent Key for more than 1 sec-
ond.
2. The theft warning alarm and head- lights will stay on for 25 seconds.
3. The panic alarm stops when:
.It has run for 25 seconds, or.Any of the buttons on the Intelligent Key are pushed. (Note: PANIC but-
ton should be pushed for more
than 1 second.)
Setting hazard indicator and horn
mode
This vehicle is set in hazard indicator and
horn mode when you first receive the
vehicle.
In hazard indicator and horn mode, when
the LOCK
buttonis pushed, the
hazard indicator flashes twice and the
horn chirps once. When the UNLOCK
buttonis pushed, the hazard indicator
flashes once.
If horns are not necessary, the system
can be switched to the hazard indicator
mode.
Page 142 of 455
3-16Pre-driving checks and adjustments
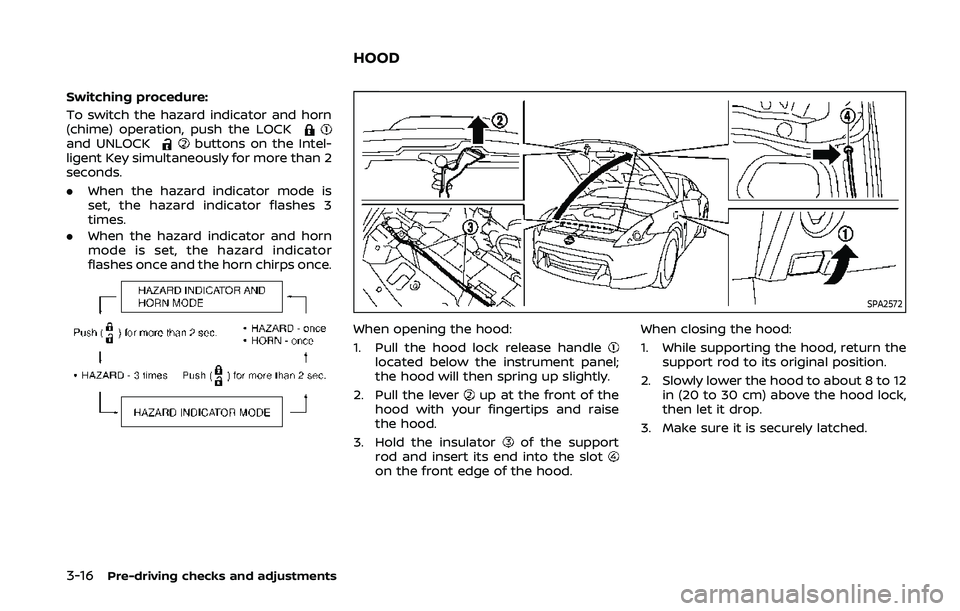
Switching procedure:
To switch the hazard indicator and horn
(chime) operation, push the LOCK
and UNLOCKbuttons on the Intel-
ligent Key simultaneously for more than 2
seconds.
. When the hazard indicator mode is
set, the hazard indicator flashes 3
times.
. When the hazard indicator and horn
mode is set, the hazard indicator
flashes once and the horn chirps once.
SPA2572
When opening the hood:
1. Pull the hood lock release handle
located below the instrument panel;
the hood will then spring up slightly.
2. Pull the lever
up at the front of the
hood with your fingertips and raise
the hood.
3. Hold the insulator
of the support
rod and insert its end into the slot
on the front edge of the hood. When closing the hood:
1. While supporting the hood, return the
support rod to its original position.
2. Slowly lower the hood to about 8 to 12 in (20 to 30 cm) above the hood lock,
then let it drop.
3. Make sure it is securely latched.
HOOD
Page 145 of 455
SPA2580
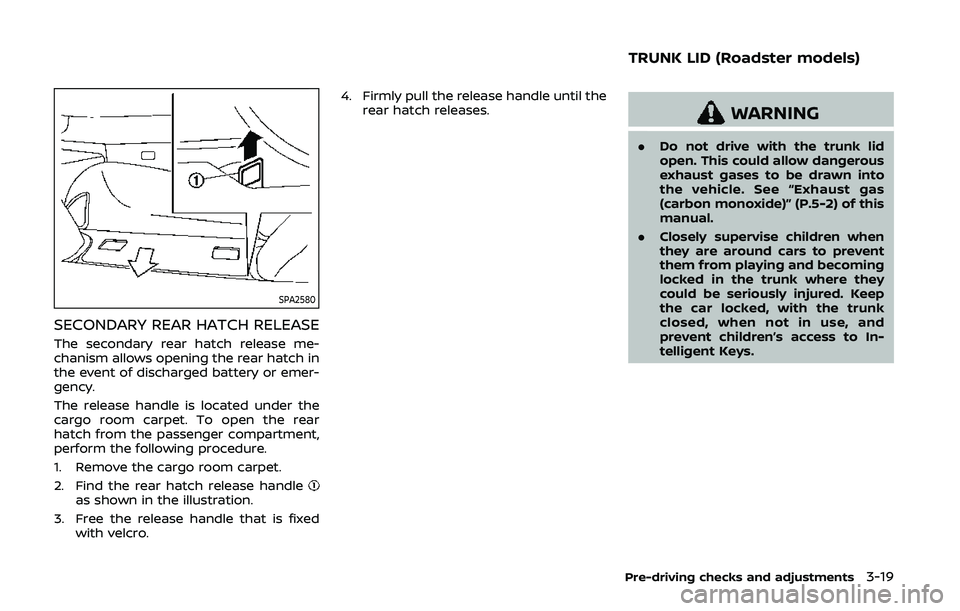
SECONDARY REAR HATCH RELEASE
The secondary rear hatch release me-
chanism allows opening the rear hatch in
the event of discharged battery or emer-
gency.
The release handle is located under the
cargo room carpet. To open the rear
hatch from the passenger compartment,
perform the following procedure.
1. Remove the cargo room carpet.
2. Find the rear hatch release handle
as shown in the illustration.
3. Free the release handle that is fixed with velcro. 4. Firmly pull the release handle until the
rear hatch releases.
WARNING
.Do not drive with the trunk lid
open. This could allow dangerous
exhaust gases to be drawn into
the vehicle. See “Exhaust gas
(carbon monoxide)” (P.5-2) of this
manual.
. Closely supervise children when
they are around cars to prevent
them from playing and becoming
locked in the trunk where they
could be seriously injured. Keep
the car locked, with the trunk
closed, when not in use, and
prevent children’s access to In-
telligent Keys.
Pre-driving checks and adjustments3-19
TRUNK LID (Roadster models)
Page 154 of 455

3-28Pre-driving checks and adjustments
TROUBLESHOOTING GUIDE
If the soft top stops halfway during operation or does not operate normally, follow the procedures shown in the following table. If the
procedures in the following table do not solve the symptom, have your vehicle inspected immediately. It is recommended to visit a
NISSAN dealer for this service.
SymptomBeepPossible cause Possible solution
The OPEN side of the soft top oper-
ating switch is pushed, but the soft
top does not operate. Sounds twice
The OPEN side of the soft top operating
switch is pushed while the soft top is fully
open, or the CLOSE side of the soft top
operating switch is pushed while the soft
top is fully closed. Push the CLOSE side of the soft top operating
switch when the soft top is fully open. Push
the OPEN side of the soft top operating switch
when the soft top is fully closed.
Sounds twice The shift lever is in the R (Reverse) position. Shift the shift lever to the P (Park) or N
(Neutral) position (automatic transmission
models only), or shift the shift lever to the N
(Neutral) position (manual transmission mod-
els only), and then operate the soft top.
Sounds twice The trunk lid is opened. Fully close the trunk lid.
Does not sound The battery voltage is low.
Start the engine again and operate the soft
top.
Does not sound The operation stops to protect the system. Wait for approximately 5 minutes.
The soft top stops halfway during
operation. Sounds twice
Objects are trapped in the moving structure
of the soft top. Check that an object is not trapped inside the
rear parcel shelf, side flap and soft top. After
the check, place the ignition switch in the OFF
position, start the engine again and then
operate the soft top.
Sounds twice The battery voltage is low. Start the engine again and operate the soft
top.
When the vehicle is being driven, the
beep sounds. Sounds con-
tinuously The soft top is partially opened. Immediately park the vehicle in a safe location
and fully open or fully close the soft top.
Page 169 of 455

4 Center display, heater, air conditioner,audio, phone and voice recognition sys-
tems
Safety note ........................................................................\
................ 4-3
Center multi-function control panel
(models with navigation system) .................................... 4-4
How to use multi-function controller .................... 4-4
How to use touch screen ................................................ 4-5
Menu options ........................................................................\
.... 4-7
How to select menus on the screen ...................... 4-7
Vehicle information and settings (models with
navigation system) ...................................................................... 4-8 How to use STATUS button .......................................... 4-8
How to use brightness control and display
ON/OFF button ........................................................................\
4-8
How to use INFO button .................................................. 4-8
How to use SETTING button ...................................... 4-11
RearView monitor (mirror display type) .................. 4-17 RearView Monitor system operation .................. 4-18
How to read displayed lines ....................................... 4-18
Difference between predictive and
actual distances ................................................................... 4-19
Display settings (Type A) (if so equipped) ....... 4-21
Display settings (Type B) (if so equipped) ....... 4-21
RearView Monitor system limitations ................. 4-22
System maintenance ....................................................... 4-23 RearView Monitor (center display type) (if
so equipped) ........................................................................\
......... 4-24
RearView Monitor system operation ................ 4-24
How to read displayed lines .................................... 4-25
How to park with predictive course lines ...... 4-25
Difference between predictive and
actual distances ................................................................ 4-26
Adjusting the screen ...................................................... 4-28
Predictive course line settings ............................... 4-28
RearView Monitor system limitations .............. 4-29
System maintenance .................................................... 4-30
Ventilators ........................................................................\
.............. 4-30 Center ventilators ............................................................ 4-30
Side ventilators .................................................................. 4-31
Heater and air conditioner ................................................ 4-31 Automatic air conditioner (Type A) (if
so equipped) ........................................................................\
. 4-32
Automatic air conditioner (Type B) (if
so equipped) ........................................................................\
. 4-34
Operating tips ..................................................................... 4-36
In-cabin microfilter .......................................................... 4-36
Servicing air conditioner ............................................. 4-36