2020 NISSAN 370Z ECO mode
[x] Cancel search: ECO modePage 88 of 455

2-20Instruments and controls
JVI0351X
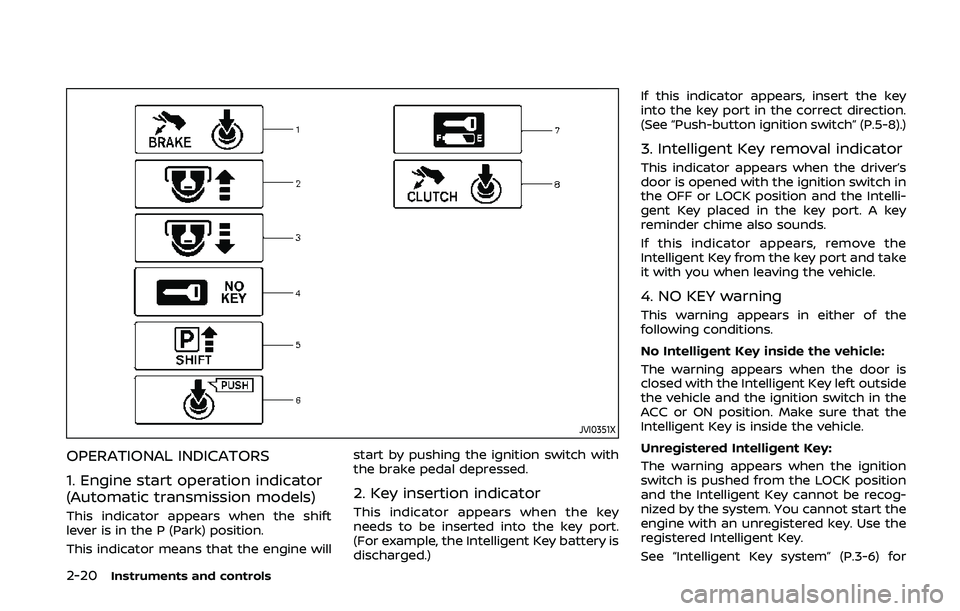
OPERATIONAL INDICATORS
1. Engine start operation indicator
(Automatic transmission models)
This indicator appears when the shift
lever is in the P (Park) position.
This indicator means that the engine willstart by pushing the ignition switch with
the brake pedal depressed.
2. Key insertion indicator
This indicator appears when the key
needs to be inserted into the key port.
(For example, the Intelligent Key battery is
discharged.)If this indicator appears, insert the key
into the key port in the correct direction.
(See “Push-button ignition switch” (P.5-8).)
3. Intelligent Key removal indicator
This indicator appears when the driver’s
door is opened with the ignition switch in
the OFF or LOCK position and the Intelli-
gent Key placed in the key port. A key
reminder chime also sounds.
If this indicator appears, remove the
Intelligent Key from the key port and take
it with you when leaving the vehicle.
4. NO KEY warning
This warning appears in either of the
following conditions.
No Intelligent Key inside the vehicle:
The warning appears when the door is
closed with the Intelligent Key left outside
the vehicle and the ignition switch in the
ACC or ON position. Make sure that the
Intelligent Key is inside the vehicle.
Unregistered Intelligent Key:
The warning appears when the ignition
switch is pushed from the LOCK position
and the Intelligent Key cannot be recog-
nized by the system. You cannot start the
engine with an unregistered key. Use the
registered Intelligent Key.
See “Intelligent Key system” (P.3-6) for
Page 91 of 455

COLD tire pressure shown on the recom-
mended COLD tire pressure shown on the
Tire and Loading Information label. (See
“Tire Pressure Monitoring System (TPMS)”
(P.5-3) and “Tire Pressure Monitoring Sys-
tem (TPMS)” (P.6-3).
7. “TIMER” indicator
This indicator appears when the set
“TIMER” indicator activates. You can set
the time for up to 6 hours. (See “Trip
computer” (P.2-25).)
8. Low outside temperature warn-
ing
This warning appears if the outside tem-
perature is below 37°F (3°C). The warning
can be set not to be displayed. (See “Trip
computer” (P.2-25).)
9. SynchroRev Match mode (S-
MODE) warning
This warning appears if a system mal-
function occurs. When the warning ap-
pears, the S-MODE function will not
operate, but the manual transmission will
operate normally and driving can be
continued. Have the system checked. It
is recommended you visit a NISSAN dealer
for this service.
10. Extended storage fuse warning
This warning may appear if the extended
storage fuse switch is not pushed in
(switched on). When this warning ap-
pears, push in (switch on) the extended
storage fuse switch to turn off the warn-
ing. For more information, see “Extended
storage fuse switch” (P.8-19).
Instruments and controls2-23
Page 94 of 455

2-26Instruments and controls
SIC3674
WAC0051X
ENTER switch
NEXT switch
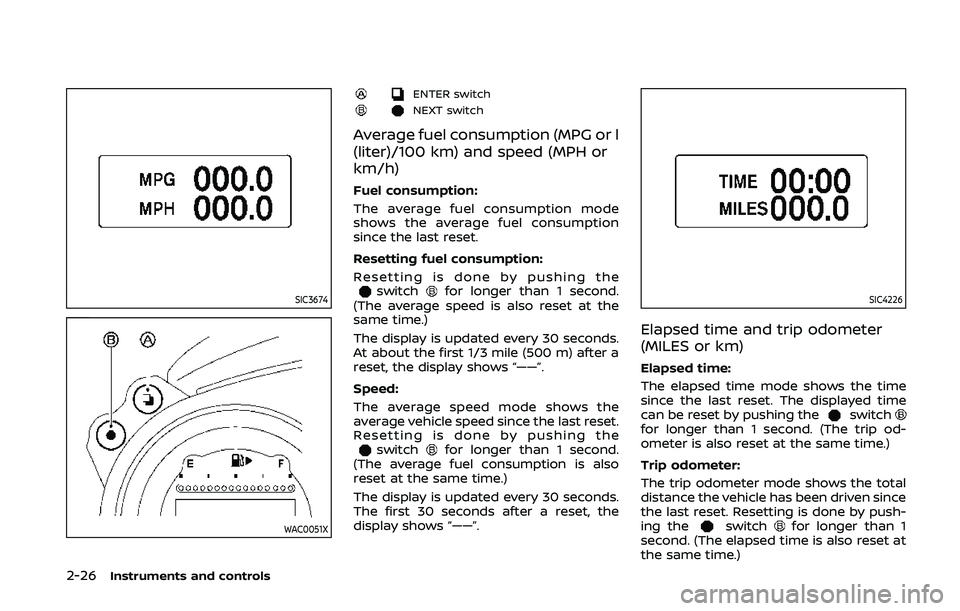
Average fuel consumption (MPG or l
(liter)/100 km) and speed (MPH or
km/h)
Fuel consumption:
The average fuel consumption mode
shows the average fuel consumption
since the last reset.
Resetting fuel consumption:
Resetting is done by pushing the
switchfor longer than 1 second.
(The average speed is also reset at the
same time.)
The display is updated every 30 seconds.
At about the first 1/3 mile (500 m) after a
reset, the display shows “——”.
Speed:
The average speed mode shows the
average vehicle speed since the last reset.
Resetting is done by pushing the
switchfor longer than 1 second.
(The average fuel consumption is also
reset at the same time.)
The display is updated every 30 seconds.
The first 30 seconds after a reset, the
display shows “——”.
SIC4226
Elapsed time and trip odometer
(MILES or km)
Elapsed time:
The elapsed time mode shows the time
since the last reset. The displayed time
can be reset by pushing the
switchfor longer than 1 second. (The trip od-
ometer is also reset at the same time.)
Trip odometer:
The trip odometer mode shows the total
distance the vehicle has been driven since
the last reset. Resetting is done by push-
ing the
switchfor longer than 1
second. (The elapsed time is also reset at
the same time.)
Page 95 of 455

SIC3676
Distance to empty (MILES or km)
The distance to empty (dte) mode pro-
vides you with an estimation of the
distance that can be driven before refuel-
ing. The dte is constantly being calcu-
lated, based on the amount of fuel in the
fuel tank and the actual fuel consump-
tion.
The display is updated every 30 seconds.
The dte mode includes a low range
warning feature. If the fuel level is low,
the warning is displayed on the screen.
When the fuel level drops even lower, the
dte display will change to “——”..
If the amount of fuel added is small,
the display just before the ignition
switch is pushed to the OFF position
may continue to be displayed.
. When driving uphill or rounding
curves, the fuel in the tank shifts,
which may momentarily change the
display.
SIC4037
Outside air temperature (°F or °C)
The outside air temperature is displayed
in °F or °C in the range of −22 to 131°F (−30
to 55°C).
The outside air temperature mode in-
cludes a low temperature warning fea-
ture. If the outside air temperature is
below 37°F (3°C), the warning “ICY” is
displayed on the screen.
The outside temperature sensor is lo-
cated in front of the radiator. The sensor
may be affected by road or engine heat,
wind directions and other driving condi-
tions. The display may differ from the
actual outside temperature or the tem-
perature displayed on various signs or
Instruments and controls2-27
Page 96 of 455

2-28Instruments and controls
billboards.
JVI1447X
Clock
Clock can be adjusted in this mode.
Adjusting the time:
To adjust the time, perform the following
procedure.
1. Push the
switchfor a short time.
The hours display will start to flash.
Keep pushing the
switchto
adjust the hours.
2. Push the
switchfor a short time.
The minutes display will start to flash.
Keep pushing the
switchto
adjust the minutes. 3. Push the
switchfor a short time
to complete the clock adjustment.
Resetting the time:
Push the
switchfor more than 1
second to reset the time.
Page 99 of 455

cannot prevent it, nor can it prevent the
theft of interior or exterior vehicle com-
ponents in all situations. Always secure
your vehicle even if parking for a brief
period. Never leave your Intelligent Key(s)
in the vehicle, and always lock it when
unattended. Be aware of your surround-
ings, and park in secure, well-lit areas
whenever possible.
Many devices offering additional protec-
tion, such as component locks, identifica-
tion markers, and tracking systems, are
available at auto supply stores and speci-
alty shops. Your NISSAN dealer may also
offer such equipment. Check with your
insurance company to see if you may be
eligible for discounts for various theft
protection features.
SIC2045
How to arm the vehicle security
system
1. Close all windows.The system can be armed even if the
windows are open.
2. Push the ignition switch to the OFF position.
3. Remove the Intelligent Key from the vehicle.
4. Close all doors, hood and rear hatch/ trunk. Lock all doors and trunk (Road-
ster models). The doors can be locked
with the Intelligent Key, door handle
request switch or power door lock
switch. 5. Confirm that the security indicator
light comes on. The security indicator
light stays on for about 30 seconds.
The vehicle security system is now
pre-armed. After about 30 seconds
the vehicle security system automati-
cally shifts into the armed phase. The
security light begins to flash once
every approximately 3 seconds. If,
during this 30-second pre-arm time
period, the door is unlocked, or the
ignition switch is pushed to ACC or
ON, the system will not arm.
Even when the driver and/or passen-
gers are in the vehicle, the system will
activate with all doors, hood and rear
hatch locked with the ignition switch in
the LOCK position. When pushing the
ignition switch to the ACC or ON posi-
tion, the system will be released.
Vehicle security system activation
The vehicle security system will give the
following alarm:
. The headlights blink and the horn
sounds intermittently.
. The alarm automatically turns off
after approximately 1 minute. How-
ever, the alarm reactivates if the
vehicle is tampered with again.
The alarm is activated by:
Instruments and controls2-31
Page 102 of 455

2-34Instruments and controls
JVI1012X
The windshield wiper and washer oper-
ates when the ignition switch is in the ON
position.
Push the lever down to operate the wiper
at the following speed:
Intermittent — intermittent operation can
be adjusted by turning the knob toward
(Slower) or(Faster).
When the speed sensing wiper interval
function (for models with navigation sys-
tem) is turned on, the intermittent opera-
tion speed varies in accordance with the
vehicle speed. (For example, when the
vehicle speed is high, the intermittent
operation speed will be faster.)
Models with navigation system:
Note that the function is set to disabled as the factory default setting. To turn this
function on and off, see “How to use
SETTING button” (P.4-11).
Low — continuous low speed operationHigh — continuous high speed operation
Push the lever upto have one sweep
operation of the wiper.
Pull the lever toward you
to operate the
washer. Then the wiper will also operate
several times.
Wiper drip wipe system:
The wiper will also operate once about 3
seconds after the washer and wiper are
operated. This operation is to wipe
washer fluid that has dripped on the
windshield.
SIC3980Type A (if so equipped)
SIC3979Type B (if so equipped)
REAR WINDOW DEFROSTER SWITCH
Page 103 of 455

To defog/defrost the rear window glass
and outside mirrors, start the engine and
push the switch
on. The indicator lightwill come on. Push the switch again to
turn the defroster off.
It will automatically turn off in approxi-
mately 15 minutes.
CAUTION
. When cleaning the inner side of
the rear window, be careful not to
scratch or damage the rear win-
dow defroster.
. Do not use the rear window
defroster switch while the soft
top is being operated or fully
opened. The heat may damage
the top material and/or compo-
nents (for Roadster models).
XENON HEADLIGHTS
WARNING
HIGH VOLTAGE
. When xenon headlights are on,
they produce a high voltage. To
prevent an electric shock, never
attempt to modify or disassem-
ble. Always have your xenon
headlights replaced by a certified
service technician.
. Xenon headlights provide consid-
erably more light than conven-
tional headlights. If they are not
correctly aimed, they might tem-
porarily blind an oncoming driver
or the driver ahead of you and
cause a serious accident. If head-
lights are not aimed correctly, it is
recommended you immediately
take your vehicle to a NISSAN
dealer and have the headlights
adjusted correctly.
When the xenon headlight is initially
turned on, its brightness or color varies
slightly. However, the color and bright-
ness will soon stabilize. .
The life of xenon headlights will be
shortened by frequent on-off opera-
tion. It is generally desirable not to
turn off the headlights for short
intervals (for example, when the
vehicle stops at a traffic signal).
. If the xenon headlight bulb is close
to burning out, the brightness will
drastically decrease, the light will
start blinking, or the color of the
light will become reddish. If one or
more of the above signs appear, it is
recommended you visit a NISSAN
dealer.
Instruments and controls2-35
HEADLIGHT AND TURN SIGNAL SWITCH