2020 MERCEDES-BENZ SLC ROADSTER tow
[x] Cancel search: towPage 258 of 310

Using
theTIREFIT kit X
Do not remov eanyforeign objectswhich
have penet rated thetire, e.g.screws or
nails.
X Remove thetire sealant bottle,the accom -
panying TIREFITstic ker and thetire inflat ion
compr essorfromthestowage wellunder-
neat hthe trun kfloor (Ypage 253).
X Aff ixpart 0043ofthe TIREF ITstic ker tothe
inst rumen tclust erwithin thedriver' sfield of
vision .
X Aff ixpart 0044ofthe TIREF ITstic ker near the
valve onthe wheel withthedefect ivetire. X
Remove fillerhose 0084and plug 0087from the
bott omsect ionofthe tire inflat ioncompr es-
sor housing.
X Slide theyellow fillerhose connectorinto
the mount ingonyellow cap0083oftire seal-
ant bott le0043 until theplug engages.
X With thesealing ringsinfron t,slide yellow
cap 0083oftire sealant bottle0043 intot he
mount ingoftire inflat ioncompr essor0044.
The capmust engage inboth hooks . X
Remove thecap from valve 006Bonthe faulty
tire.
X Sc rew filler hose 006Contothe valve.
X Ins ert plug 0087intot he cigaret telighter
sock et(Y page 230)orintoa1 2Vp ower
sock etinyour vehicle (Ypage 230).
X Turn theSmart Keytoposition 0047
(Y page 118)inthe ignit ionlock .
X Press onand offswitc h0085 onthe tire infla-
tion compr essortoON.
The tireinflat ioncompr essorisswitc hedon.
The tireisinflat ed.
First ,tire sealant ispumped intot he tire.
The pressure maybriefly risetoapprox-
imately 500kPa(5.0 bar/7 3psi).
Do not switch offthe tirei nflat ioncom-
pr essor during this phase.
X Let the tire inflat ioncompr essorrunfora
maximum often minut es.The tireshould
then have attained apressure ofat least
200 kPa(2.0 bar/29 psi).
If at ire pressure of200 kPa(2.0 bar/2 9psi)is
achieved afteramaximum often minut es,see
(Y page 257).
If at ire pressure of200 kPa(2.0 bar/29 psi)is
not achieved afteramaximum often minut es,
see (Ypage 257).
If tire sealant hasescaped, cleanitoff affec ted
areas asquickly aspossible. Itis prefer ableto
use clean water.
If your clothes aresoiled withtiresealant ,
have them cleaned withperch loroet hylene ata
dry cleaner assoon aspossible. 256
Flat
tireBr eakd ownassist ance
Page 259 of 310

Tire
pres sure notreac hed If
at ire pre ssu reof200 kPa(2.0 bar/29 psi)
ha sb eena chieved after ten minutes:
X Swi tch offthe tire inflation comp ressor .
X Unsc rewthefillerh osef romt hevalve ofthe
fa ulty tire .
Note thattire sea lant ma yescap ew heny ou
uns crew thefillerh ose.
X Ver yslowly drive forwa rds orrev ers e
ap pro xim ately30 ft(10 m).
X Pu mp upthe tire again.
After amaxim um often minutes,the tire
pre ssu remu stbe atleas t2 00 kPa (2.0 bar/
29 psi). G
WA
RNING
If the required tire pressu reisnot reached
afte rthe spe cified time ,the tire istoo badly
da mag ed.The tiresealant cannot repairt he
tire inthis insta nce. Dama gedtiresand a
tire pressu rethat istoo low can signifi cantl y
imp airt he vehi cle'sbra king anddriving
cha racte ristics. Thereisar isko facci dent.
Do not continu edriving .Contact aqualifi ed
spe cialist wo rksho p.
Tire press urereac hed G
WARNI
NG
At ire tempo rarilys ealedw itht ire sea lant
imp airs the vehi cle'sdri ving characte ristics
and isnot suita blef or driving athig her
spe eds.The re isar isko fana ccident.
Ada ptyour driving styleacco rdingly and
dri ve care fully.D on otexcee dthe maxi mum
per mis siblespe edfor atire sea ledw itht ire
sea lant.
The maxi mum permis siblespe edfor atire
sea ledw itht ire sea lant is50 mph (80km/h ).
The upper partof the TIREFIT sticke rmustb e
affi xed tothe instru ment cluster inthe driver' s
fie ldof vis ion.
! Re
sid ue from thetire sealant may come
ou to fthe fillerh osea fteruse.T hisc ould
cau sestai ns.
The refo re,place thefillerh osei nt he plasti c
ba gw hich contai nedtheTIREFIT kit. H
En
viro nmen talnote
Have theused tire sealant bottl edispo sed
of pro fess iona lly, e.g. ataq ualifi ed spe cial-
ist worksho p.
If tire pressu reof200 kPa(2.0 bar/29 psi)
ha sb eena chieved afteram aximum period of
ten minu tes:
X Swi tch offthe tire inflation comp ressor.
X Unscre wthe fillerh osef rom thevalve ofthe
fau ltytire .
X Stow thetire sealant bottl eand the tire
infl ation comp ressor.
X Pul laway immedi ately.
X Stop afterdriving forappro xima telyten
minu tesand check thetire pressu rewith
the tire inflation comp ressor.
The tirepressu remus tnow beatleast
130 kPa(1.3 bar/19 psi). G
WARNI
NG
If the required tire pressu reisnot reached
afte rdriving forashortper iod,the tire istoo
ba dlyd am aged. The tiresealant cannot
rep airt he tire inthis insta nce. Dama ged
tire sand atire pre ssu rethat istoo low can
sig nifi cantl yimp airt he vehi cle'sbra king and
dri ving characte ristics. Thereisar isko f
acci dent.
Do not continu edriving .Contact aqualifi ed
spe cialist wo rksho p.
i In
case ssucha sthe one mentio ned
ab ove, contact anauthori zedMerce des-
Benz Center. Orcall1-800-FOR -MERCedes
(i nt he USA) or1-800-387-0100 (inC anad a).
X Co rrect thetire pressu reifit is stil latlea st
130 kPa(1.3 bar/19 psi).See theTirea nd
Loa ding Inform ation placa rdon the driver' s
sid eB -pillaro rthe tire pressu retab lein the
fue lfille rf lapf or val ues.
X To inc reas ethe tire press ure:switch on
the tire inflation comp ressor. Fl
at tire
257Breakdo wnassi stanc e Z
Page 266 of 310

Tow
inga nd tow -starti ng Impo
rtant safety notes G
WA
RNING
Wh entow ingortow -sta rtinganothe rvehicle
and itsweight isgre atertha nt he permi ssi-
bl eg ross we ight ofyour veh icle, the :
R the towingeyec ouldde tach itself
R the vehicle/tra iler comb inationc ouldrol l-
ove r.
The reisar isko fana ccident.
Wh entow ingortow -sta rtinganothe rvehi-
cle ,its we ight sho uldn otbe gre atertha n
the permi ssibleg ross we ight ofyour veh icle.
Deta ilso nthe permi ssibleg ross veh iclew eigh t
of your veh iclec an be fou ndonthe vehicle
id enti ficati on plate (Ypage 298 ).
! Wh
enActiv eBrake Assi st,Activ eDistance
Assi stDISTR ONICorthe HOLD functio nis
acti vated ,the veh icleb rakes automa tically
in certa insitua tions.
To avoidd amaget ot he veh icle, de acti vate
the sesystem sint he followi ng orsimil arsit-
ua tio ns:
R wh en tow ingthe vehicle
R in the carwash
! Onl
ysecuret he tow ropeortow bara tthe
tow ingeyes. Othe rwise, the vehiclec ouldbe
da ma ged.
! Do
not uset he tow ingeyef or reco very,
thi sc ouldda ma gethe vehicle. Ifin do ubt,
reco verthe vehiclew ithac rane.
! Wh
entow ing,pulla wa yslowly and
smo othly.Ifthe tractiv epoweristoo high,
the vehicles cou ldbe dama ged.
! Do
not tow with sling -typ eequipm ent.This
cou ldda ma gethe vehicle.
! Wh
entow ingaway veh icles with KEYL ESS-
GO ,use the key instea dofthe Star t/Stop
bu tton. Theautoma tictransmi ssion may
othe rwises hift to positio n005D when you
op en the driver 'sor fro nt-pa ssenge rdoor,
wh ich cou ldda ma gethe transmi ssion. !
Ma
kesure tha tthe electri cparkin gb rake
is rel eased .Ift he electri cparkin gb rake is
fa ulty, visitaq ualifi ed speci alistw orksh op.
! Yo
um aytow thevehiclef or am axim um
di sta nce of30 miles(50 kilome ters).At ow -
ing spee do f30m ph(50 km/h )mustn ot be
exce eded.
For towingdista nces over30m iles
(50 kilome ters),the entireveh iclem ustb e
ra ised and transp orte d.
! Wh
enyoua retow -sta rtingortow ing
ano thervehicle, its weight mu stnot exce ed
the maxim um permi ssibleg ross we ight of
yo ur veh icle.
It is be tter tohave the vehiclet ransp orte d
tha ntoh avei ttow ed away.
The automa tictransmi ssion mu stbe inpo si-
tio n005C when the vehiclei sb eing tow edaway.
The battery mustbe conne ctedandcharged.
Othe rwise, you:
R canno tturnt he Sma rtKeytop ositio n 0048 in
the igniti onlock
R canno tshift the automa tictransmi ssion to
po sitio n005C
Dea ctivate the automa ticlocking feature
be for ethe veh iclei st ow ed (Ypage 179 ).Yo u
cou ldothe rwiseb eloc ked outw henp ushing
or tow ingthe vehicle. In
stal ling /re mov ingt he tow inge ye
In stal ling the towinge ye G
WA
RNING
The exhaust tai lpipem aybe veryhot. The re
is ar isko fburns when rem oving the rear
cove r.
Do not touchthe exhaust pipe .Takep artic u-
la rc arew henr em oving the rearcove r. 26
4 Tow
inga nd tow -starti ngBreak downassistanc e
Page 267 of 310

The
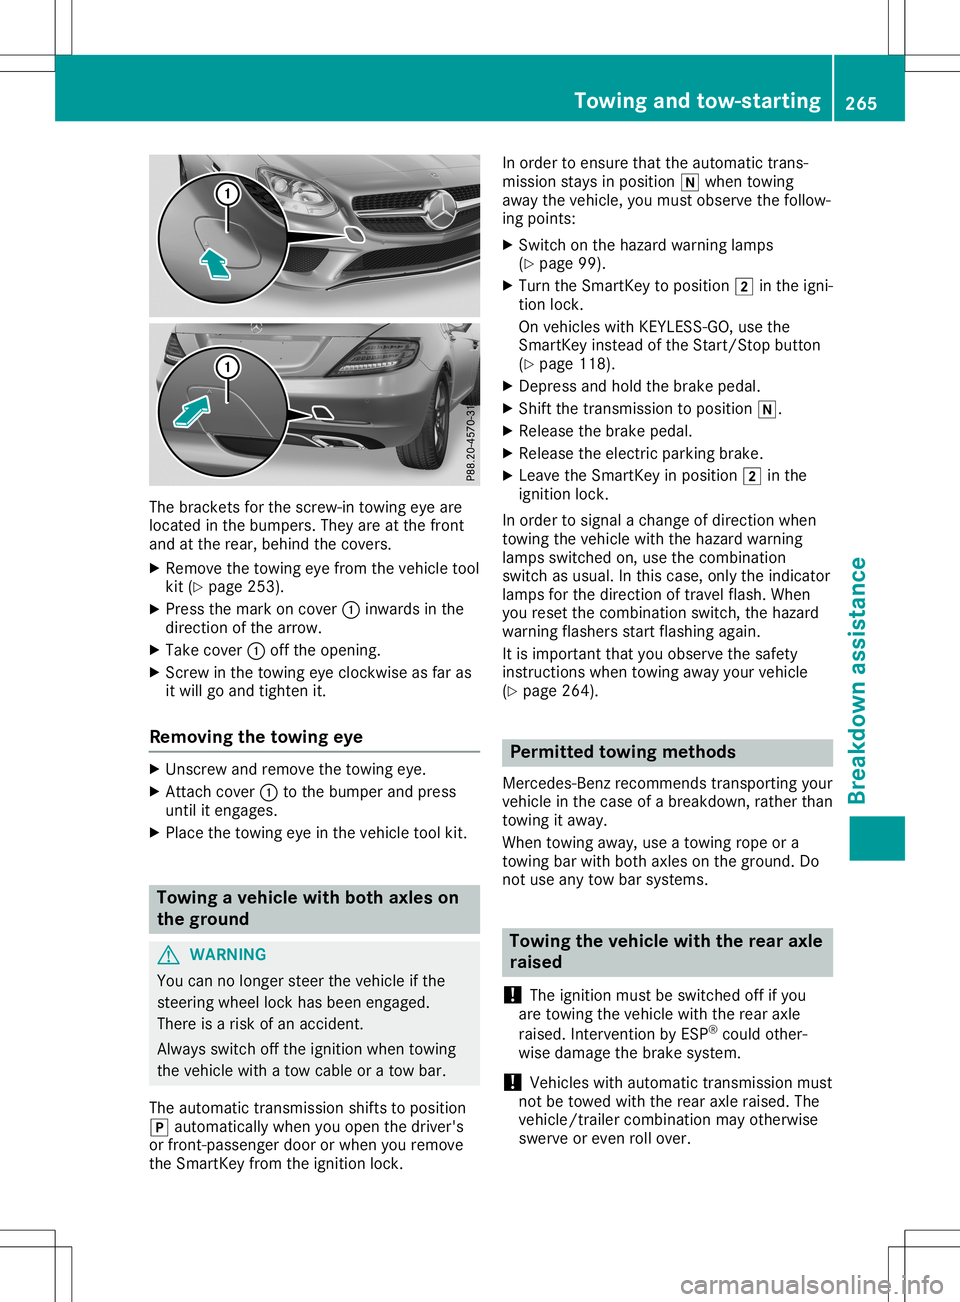
bracket sfor the screw-in towingeyeare
located inthe bumpers. Theyareatthe front
and atthe rear, behind thecovers.
X Remove thetowing eyefrom thevehicle tool
kit (Ypage 253).
X Press themark oncover 0043inwards inthe
direction ofthe arrow.
X Take cover 0043offthe opening.
X Scr ew inthe towing eyeclock wiseasfar as
it will goand tighten it.
Removing thetowing eye X
Unsc rewand remove thetowing eye.
X Attach cover 0043tothe bumper andpress
until itengages.
X Place thetowing eyeinthe vehicle toolkit. Towing
avehicle withboth axles on
the ground G
WARNIN
G
You cannolonger steerthevehicle ifthe
steerin gwheel lockhasbeen engaged.
There isar isk ofan accident .
Always switchoffthe ignition whentowing
the vehicle withatow cable oratow bar.
The automatic transmission shiftstoposition
005D automatically whenyouopen thedriver's
or front -passenger doororwhen youremove
the Smart Keyfrom theignition lock. In
order toensure thattheautomatic trans-
mission staysinposition 005Cwhen towing
away thevehicle, youmust observe thefollow-
ing points:
X Switch onthe hazard warning lamps
(Y page 99).
X Turn theSmart Keytoposition 0048inthe igni-
tion lock.
On vehicles withKEYLE SS-GO, usethe
Smart Keyinstead ofthe Start /Stopbutton
(Y page 118).
X Depress andhold thebrake pedal.
X Shift thetrans mission toposition 005C.
X Release thebrake pedal.
X Release theelectric parking brake.
X Leave theSmart Keyinposition 0048inthe
ignition lock.
In order tosignal achange ofdirection when
towing thevehicle withthehazard warning
lamps switched on,use thecombinat ion
switch asusual. Inthis case, onlytheindicator
lamps forthe direction oftravel flash.When
you reset thecombinat ionswitch, thehazard
warning flashersstartflashing again.
It is important thatyouobserve thesafety
instr uctions whentowing awayyourvehicle
(Y page 264). Permit
tedtowing methods
Mercedes- Benzrecomm endstransportin gyour
vehicle inthe case ofab reakdown, ratherthan
towing itaway .
When towing away,use atowing ropeora
towing barwith both axles onthe ground. Do
not use anytow barsystems. Towing
thevehicle withtherear axle
raised
! The
ignition mustbeswitched offifyou
are towing thevehicle withtherear axle
raised. Intervent ionbyESP ®
could other-
wise damage thebrake system.
! Vehicles
withautomatic transmission must
not betowed withtherear axle raised. The
vehicle/t railercombinat ionmay otherwise
swerve oreven rollover. Towing
andtow-sta rting
265Breakdown assistance Z
Page 268 of 310

Trans
portingthe vehic le
Veh icle sw itha uto matic transmission !
Wh
enthe vehiclei sloa ded fortransp ort,
the frontand rearaxles mu stbe stationar y
and onthe same transp orta tionv ehicle.
Po sitio ning overthe conne ctionpoint ofthe
tra nsp ortveh iclei sn otpermi tted .The drive
tra inma yothe rwiseb ed amaged .
Al lv eh icle s !
Yo
um ayonl ysecuret he veh icleb ythe
wh eels,n ot by parts ofthe vehicles ucha s
axl eo rstee ringc omp onents. Othe rwise, the
veh iclec ouldbe dama ged.
The towingeyec an be used topullthe vehicle
onto atrailer or tra nsp orte rfor tra nsp orting
pu rpo ses .
X Tu rn the Sma rtKeytop ositio n 0048 inthe igni-
tio nlock.
X Shi ftthe transmi ssion topositio n005C.
As soon asthe vehic lehas been loade d:
X Pre vent thevehiclef romr olling away by
ap plying the electri cparkin gb rake.
X Shi ftthe transmi ssion topositio n005D.
X Tu rn the Sma rtKeytop ositio n 0092 inthe igni-
tio nlocka nd rem ove theSma rtKeyfromt he
ig niti onlock.
X Secu rethe vehicle. Tow
-starti ng(emerg ency engine
starti ng)
! Veh
icles with automa tictransmi ssion mu st
not betow -sta rted .You cou ldothe rwise
da ma gethe automa tictransmi ssion. Yo
uc an find informa tiono n"Jump -star ting "at
( Ypa ge261 ). Fu
ses Impo
rtant safety notes G
WA
RNING
If yo um anipulate orbridgeaf aulty fuse orif
yo ur eplace itwi th afusew ithah ighe r
am perage ,the electri ccablesc ouldbe ove r-
lo ad ed .Thisc ouldres ulti na fire. The reisa
ris ko fana ccident and injury.
Alw aysr eplace faulty fuses with the speci -
fie dn ew fuses havin gthe corr ectamperage .
Blo wn fuses mustbe rep laced with fuses of
the same rating ,which youc an reco gnizeby
the colorand value. The fuse rating sarelisted
in the fuse allo cati oncha rt.
The fuse allo cati oncha rtis locate dint he veh i-
cle tool kitinthe stow agec omp artment under
the trunk floor (Y page 253 ).
If an ewlyins erte dfusea lsob lows ,havet he
cau setraced and recti fieda taq ualifi ed spe-
cia list wo rksh op,e.g.a na uthor izedM erced es-
Benz Center.
! Onl
yusefuses thathaveb eena pproved
for Merced es-Benz vehicles and which have
the corr ectfuse rating forthe system con-
cern ed.O the rwise, comp onents orsystem s
cou ldbe dama ged.
! Ma
kesure tha tnom oistu recan ente rthe
fu se boxw hent he cove riso pen.
! Wh
enclosing the cove r,ma kesure tha tit
is lying corr ectlyonthe fuse box.Moi sture
see ping inor dirt cou ldothe rwisei mp airt he
op era tiono fthe fuses .
The fuses inyour veh icles erve toclo sedown
fa ulty cir cui ts. Ifaf useb lows ,allthe comp o-
nents onthe circui tand the irfunctio nsstop
op era ting . Bef
ore chang ingaf use
X Swi tch offthe engine.
X Swi tch offalle lectri cal cons umers. 26
6 Fu
sesBreak downassistanc e
Page 277 of 310

pressure
losswarning system" section
(Y page 275).
Impor tantsafet ynotes The
tirepressure warningsystemdoesnot
warn youofan inco rrectlyset tire pressure.
Observe thenoteson the recom mended tire
pressure (Ypage 271).
The tirepressure losswarning doesnot
replace theneed toregularly checkthe tire
pressure. Aneven lossofpressure onseveral
tires atthe same timecannotbe detec tedby
the tire pressure losswarning system.
The tirepressure monitorisnot able towarn
you ofas udden lossofpressure, e.g.ifthe
tire ispenet rated byaforeign object.In the
event ofas udden lossofpressure, bringthe
vehicle toah alt bybrakin gcarefully. Avoid
abrupt steeringmoveme nts.
The func tion ofthe tire pressure losswarning
system islimited ordelayed if:
R snow chains aremount edon your vehicle's
tires.
R road condition sarewintr y.
R you aredriving onsand orgravel.
R you adopt avery sport ydriving style(corner-
ing athigh speeds ordriving withhigh rates
of accelerat ion).
R you drive withaheavy load.
Resta rting the tirep ressure losswarn-
ing system Restart
thetire pressure losswarning system
if you have:
R chang edthe tire pressure
R chang edthe wheels ortires
R mount ednew wheels ortires
X Befor erest artin g,make surethatthetire
pressures aresetproperly onallfour tires
for the respect iveoperatin gcondition s.
The recom mended tirepressure canbe
found onthe Tire andLoading Informat ion
placard onthe B-pillar .Addit ionally, atire
pressure tableisattac hedtothe fuel filler
flap. Thetirepressure losswarning system
can only givereliable warningsify ou have
set the corr ecttire pressure. Ifan incorrec ttire
pressure isset, these incorrectvalues
will bemonit ored.
X Also observe thenotesinthe sect ionontire
pressures (Ypage 271).
X Make surethattheSmart Keyisin position
0048 inthe ignit ionlock (Ypage 118).
X Press the0059 or0065 buttononthe steer -
ing wheel toselect theServ. Serv.
menu.
X Press the0063 or0064 buttontos elect
Tire Pressu re Tire
Pressu re.
X Press the0076 button.
The Run Flat Indica torActive Press Run
Flat Indica torActive Press
'OK' toRestar t 'OK'
toRestar tmessage appearsinthe
multifun ction display.
If you wish toconfirm therest art:
X Press the0076 button.
The Tire Pressu reNow OK? Tire
Pressu reNow OK?message
appears inthe multifun ction display.
X Press the0063 or0064 buttontos elect
Yes Yes.
X Press the0076 button.
The Run Flat Indica torRestar ted Run
Flat Indica torRestar tedmes-
sage appears inthe multifun ction display.
Aft erateach -inperiod, thetire pressure
loss warning systemwillmonit orthe settire
pressures ofall four tires.
If you wish tocancel therest art:
X Press the0038 button.
or X Ifthe Tire Pressu reNow OK? Tire
Pressu reNow OK?message
appears, usethe0063 or0064 buttonto
select Cancel Cancel
.
X Press the0076 button.
The tirepressure valuesstoredatthe last
rest artwill continue tobe monit ored. Tir
ep ressure monitor
General notes If
at ire pressure monitorisinst alled, thevehi-
cle's wheels havesensor sthat monit orthe tire
pressures inall four tires. Thetirepressure
monit orwarns youifthe pressure dropsinone
or more ofthe tires. Thetirepressure monitor
only functionsifthe corr espondin gsensor s
are installed inall wheels.
Inf ormat ionontire pressures isdisplayed in
the multifun ction display. Afterafew minut es
of driving ,the curren ttire pressure ofeach tire Tir
ep ressure
275Wheels andtires Z
Page 278 of 310

is
shown inthe Serv . Serv
.men uofthe multif unc-
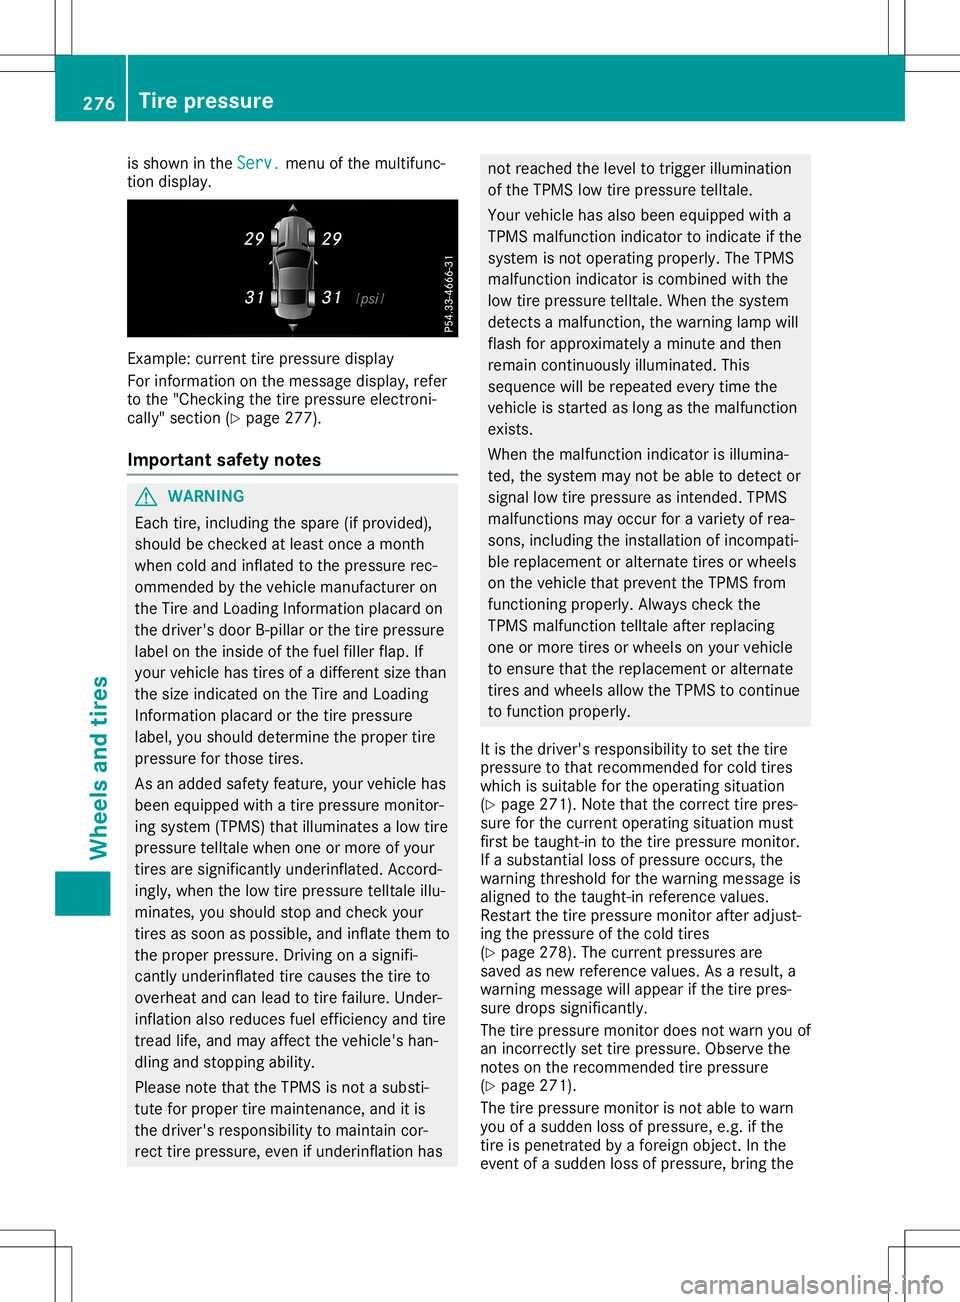
tion display. Ex
ample: currenttirep ress uredisplay
For informat iononthe mess agedisplay, refer
to the "Check ingthe tirep ress ureelect roni-
cally" section(Ypage 277).
Imp ortant safet ynotes G
WARN
ING
Eac htire, inc luding thespare (ifprov ided),
should bechec kedatleast onceam onth
when coldandinflated tothe press urerec-
omme ndedbythe vehic lemanuf acturer on
the Tire andLoadin gInformat ionplacard on
the drive r'sdoor B-pillar orthe tirep ress ure
label onthe inside ofthe fuel filler flap.If
your vehic lehas tires ofad iffe ren tsize than
the size indic ated onthe Tire andLoadin g
Inf ormat ionplacard orthe tirep ress ure
label, youshould determin ethe proper tire
press ureforthosetires.
As anadded safetyfeat ure, your vehic lehas
been equipped withatirep ress uremon itor-
ing syst em(TPMS )that illuminat esalow tire
press uretelltalewhen oneormore ofyour
tir es are sign ifican tlyunder inflated. Accor d-
ingly, when thelow tirep ress uretelltaleillu-
min ates, youshould stopand chec kyour
tir es assoon aspossible ,and inflate themt o
the proper pressure.Drivin gonas ignifi-
can tlyunder inflated tirec auses thetiret o
over heat andcanlead totiref ailure. Under-
inf lation alsoreduc esfuel effic iencyand tire
tr ead life,and may affec tthe vehic le'shan-
dling andstopping ability.
Please notethat the TPMS isnot asubst i-
tut efor proper tirem aint enan ce,and itis
the drive r'srespo nsibilit ytom aintaincor-
rec ttirep ress ure, even ifunder inflation has not
reach edthe level totrigger illuminat ion
of the TPMS lowtirep ress uretelltale.
Your vehic lehas also been equipped witha
TPMS malfun ction indic atortoindic ateifthe
syst emisnot operat ingproper ly.The TPMS
malfun ction indic atoriscom bined withthe
low tirep ress uretelltale. When thesyst em
dete ctsam alfunction, thewarnin glamp will
flash forapprox imatelyam inute and then
remain continuously illuminat ed.This
sequen cewill berepeat edever ytimet he
vehic leisstar ted aslong asthe malfun ction
exis ts.
When themalfun ction indic atorisillumina-
ted, thesyst emmay notbeable todete ctor
sign allow tirep ress ureasintended .TPMS
malfun ctions may occurfor avariet yofrea-
son s,inc luding theinstallation ofinc ompat i-
ble replac ementoralter natetires orwheels
on the vehic lethat preventtheTPMS from
func tioningproper ly.Always checkthe
TPMS malfun ction tellt aleafterreplac ing
one ormore tires orwheels onyour vehic le
to ens ure that thereplac ementoralter nate
tir es and wheels allowtheTPMS tocon tinue
to func tion proper ly.
It is the drive r'srespo nsibilitytoset the tire
press uretothat recomme ndedforcold tires
which issuitable forthe operat ingsituat ion
(Y page 271).Notet hat the correcttirep res-
sure forthe curr entoperat ingsituat ionmust
firs tbetaught -intothe tirep ress uremon itor.
If as ubst antialloss ofpress ureoccurs, the
warnin gthreshold forthe warnin gmessage is
aligned tothe taught -inrefe rencevalues.
Restar tthe tirep ress uremon itorafteradjust -
ing the press ureofthe cold tires
(Y page 278). Thecurrentpress uresare
saved asnew referencevalues. Asaresult ,a
warnin gmessage willappear ifthe tirep res-
sure drops significant ly.
The tirep ress uremon itordoes notwarn youof
an incorre ctly set tirep ress ure. Obser vethe
not eson the recomme ndedtirep ress ure
(Y page 271).
The tirep ress uremon itorisnot able towarn
you ofas udden lossofpress ure,e.g.ifthe
tir ei sp enet ratedbyaf oreign object.Int he
even tofas udden lossofpress ure,bringthe 276
Tir
ep ressur eWheels andtires
Page 295 of 310

!
To
prevent damage tothe paintwork, hold
the wheel securely againstthe wheel hub
while screwing inthe first wheel bolt. X
Clea nthe wheel andwheel hubcont actsur-
faces.
X Slide thewheel tobe mounted ontothe
alignment boltandpush iton.
X Tighten thewheel boltsuntiltheyarefinger-
tight.
X Unscrew thealignment bolt.
X Tighten thelast wheel boltuntil itis finger-
tight.
X Vehicles
withacollapsible sparewheel:
inflate thecollapsi blespare wheel
(Y page 296).
Only thenlower thevehicle.
Low ering thevehicl e G
WARNING
The wheels couldcome looseifthe wheel
bolts orwheel nutsarenot tightened tothe
prescribed tighteningtorque.Thereisar isk
of an accident.
Ensure thatthewheel boltsorwheel nuts
are tightened tothe prescribed tightening
torque.
If you arenot sure, donot move thevehicle.
Contact aqualified speciali stworkshop and
have thetightening torquechecked immedi-
ately.
! Vehicles
withacollapsible spare
wheel :before lowering thevehicle, inflate
the collapsi blespare wheel withthetire
inflation compressor. Thewheel rimcould
otherwise bedamage d. X
Turn thecrank ofthe jack counter-c lockwise
until thevehicle isonce againstanding
firmly onthe ground.
X Place thejack toone side. X
Tighten thewheel boltsevenly inac ross-
wise pattern inthe sequence indicated(0043
to 0083). Thespecified tightening torqueis
96 lb-ft (130 Nm).
X Turn thejack back toits initial position.
X Stow thejack andtherest ofthe vehicle
tools inthe trunk again.
X Vehicles withAMG equipment: insertthe
cover intotheouter sill.
X Check thetire pressure ofthe newly moun-
ted wheel andadjust itifnecessary.
Observe therecommended tirepressure
(Y page 271).
When youaredriving withthecollapsi ble
spare wheel mounted, thetire pressure loss
warning systemorthe tire pressure monitor
cannot function reliably.Only restart thetire
pressure losswarning systemortire pressure
monitor whenthedefective wheelhasbeen
replaced withanew wheel.
Vehicles withatire pressure controlsys-
tem: allinstalled wheelsmustbeequip ped
with functionin gsensors. Wheel
andtirecombination s
You canaskforinformation regardingpermit-
ted wheel/tire combinations atan authorized
Mercedes-Benz Center.
! For
safety reasons, Mercedes-Benz recom-
mends thatyouonly usetires andwheels
which havebeen approved byMercedes-
Benz specificall yfor your vehicle. Wheel
andtirecombin ations
293Wheels andtires Z