2020 MERCEDES-BENZ SLC ROADSTER tow
[x] Cancel search: towPage 239 of 310

locat
edon the door drive unitonthe garage
ceilin g.
Familiar izeyourself withthegarage doordrive
operat inginst ruct ions ,e.g. under "Program-
min gaddition alremo tecon trols", befor ecarry-
ing out thefollowin gsteps.
Your vehic lemust bewithin reachofthe
garage doororgate openerdrive .Make sure
that neither your vehic lenor any perso ns/
obje ctsa represen twithin thesweep ofthe
door orgate.
X Turn theSmar tKey toposit ion0048inthe igni-
tion lock (Ypage 118).
X Get outofthe vehic le.
X Press theprogr ammin gbutton onthe door
drive unit.
Usually, younow have 30seco ndstoinit iate
the nextstep.
X Get intot he vehic le.
X Press previously programed button0044, 0087
or 0085 onthe integrat edgarage dooropener
repeat edlyuntilthe door closes.
The rollin gcode sync hronization isthe n
com plete .
Not eson progra mmingther em ote con-
tr ol
Canadian radiofrequenc ylaws require a
"break "(or interrupt ion)ofthe transm ission
sign alsafterbroadc astingfor afew seco nds.
There fore,the sesign alsmay notlast long
enoug hfor the integrat edgarage dooropener.
The signalisnot recogn ized durin gprogr am-
min g.Comparable withCanadian law,some
U.S .garage dooropenersalso feature a
"break ".
Proc eedasfollows:
R ifyou liveinCanada.
R ifyou have difficulties programmin gthe
garage dooropener(regar dlessofwhere
you live) when followin gthe progr ammin g
ste ps.
X Press andhold oneofbutt ons 0044to0085 on
the integrat edgarage dooropener.
Af ter ashor ttim e,indic atorlamp 0043light s
up yellow.
X Release thebutt on.
Ind icat orlamp 0043flashes yellow.
X Press button0084 ofgarage doorremotecon -
tr ol 0083 for two seco nds, thenrelease itfor
two seco nds. X
Press button0084 again fortwo seco nds.
X Repeat thissequen ceon butt on0084 of
remo tecon trol 0083 untilindic atorlamp 0043
light supg reen .
When indicatorlamp 0043light supg reen :
progr ammin gisf inished.
When indicatorlamp 0043flashes green:pro-
gramm ingwas succ essful.The nextstepi s
to sync hronizethe rollin gcode.
X Release button0084 ofremo tecon trol 0083 of
the garage doordrive.
When indicatorlamp 0043light supred:
repeat theprogr ammin gproc ess forthe cor-
respo ndingbutton onthe rear- view mirror.
When doingso,vary thedistancebetwee n
remo tecon trol 0083 and therear- view mirror.
The require ddistanc ebetwee nremo tecon -
tr ol 0083 and theintegrat edgarage door
open erdepen dson the garage doordrive
syst em. Several attempt smight benec es-
sary. Youshould testever yposit ion forat
least 25seco ndsbefor etrying anot herposi-
tion .
Problem swhen progra mming
If you areexper iencingproblem sprogr ammin g
the integrat edgarage dooropeneron the rear-
view mirror,takenoteo fthe followin ginst ruc-
tion s:
R Check thetransm itter freq uenc yused by
garage doordrive remotecon trol 0083 and
wheth eritis support ed.The transm itter fre-
quenc ycan usually befoun donthe back of
remo tecon trol 0083 for the garage doordrive.
The integrat edgarage dooropeneriscom -
patible withdevic esthat have unitswhich
operat eint he freq uenc yrang eof280 to
433 MHz.
R Replace thebatt eries ingarage doorremote
con trol 0083.T hisincreases thelikelih oodthat
garage doorremotecon trol 0083 will transm it
as trong andprec isesign alto the integrat ed
garage dooropener.
R When programmin g,hold remo tecon trol 0083
at varyin gdistanc esand angles fromb ut-
ton s0044 to0085 which youareprogr ammin g.
Try various anglesatad istanc ebetwee n
2and 8inches (5to2 0cm) oratthe same
angle butatvaryin gdistanc es.
R Ifaf urt her remo tecon trol 0083 isavailable for
the same garage doordrive,repeat the
same programmin gsteps with thisremo te
con trol 0083.B efore perf ormin gthese ste ps, Featu
res
237Stowage andfeatures Z
Page 240 of 310

make
surethatnew batterie shave been
install edingara gedoor drive remote control
0083.
R Note thatsome remote controls onlytrans-
mit foralimi ted amou ntoftime (theindica -
tor lamp onthe remote controlgoesout).
Press button 0084onremote control0083aga in
before transmissi onends.
R Align theantenna cableofthe gara gedoor
opener unit.Thiscanimprove signalrecep-
tion/transmissio n.
Openi ng/closing thegarage door After
ithas been progra mmed, theintegrated
gara gedoor opener performs thefunction of
the gara gedoor system remote control. Please
als oread theopera tinginstructions forthe
gara gedoor system.
X Turn theSmartKey toposi tion 0048inthe igni-
tion lock (Ypage 118).
X Press either button 0044,0087or0085 whi chyou
have progra mmed toopera tethe gara ge
door.
Gara gedoor system withafixed code: indi-
cator lamp0043ligh tsup green.
Gara gedoor system witharolli ng code: indi-
cator lamp0043flash esgreen.
The transmitter willtransmit asignal aslong
as the button ispresse d.The transmissi on
is hal ted after amaximu moften seconds
and indica torlamp 0043ligh tsup yellow .
X Press button 0044,0087or0085 aga inifneces-
sary .
Cle aring thememory Make
surethatyouclear thememory ofthe
integrated garagedoor opener beforeselling
the vehicl e.
X Turn theSmartKey toposi tion 0048inthe igni-
tion lock (Ypage 118).
X Press andhold buttons 0044and 0085.
The indica torlamp initiallyligh tsup yellow
and then green.
X Rel ease buttons 0044and 0085.
The memory ofthe integrated garagedoor
opener inthe rear-vie wmirror iscleare d. Compass
Call ingupthe compass Comp
ass0044disp laysthe compass directionin
which thevehicl eisc urrently traveling:N N,
NE NE,
E E,
SE SE,
S S,
SW SW,
W W
or NW NW.
To receive acorrect displayinrear-vie wmir-
ror 0043,t hecompass mustbecali brated and
the magnetic fieldzone set. 238
Fe
atur esStow ageand features
Page 241 of 310

Setting
thecompass North
America zonemap South
America zonemap
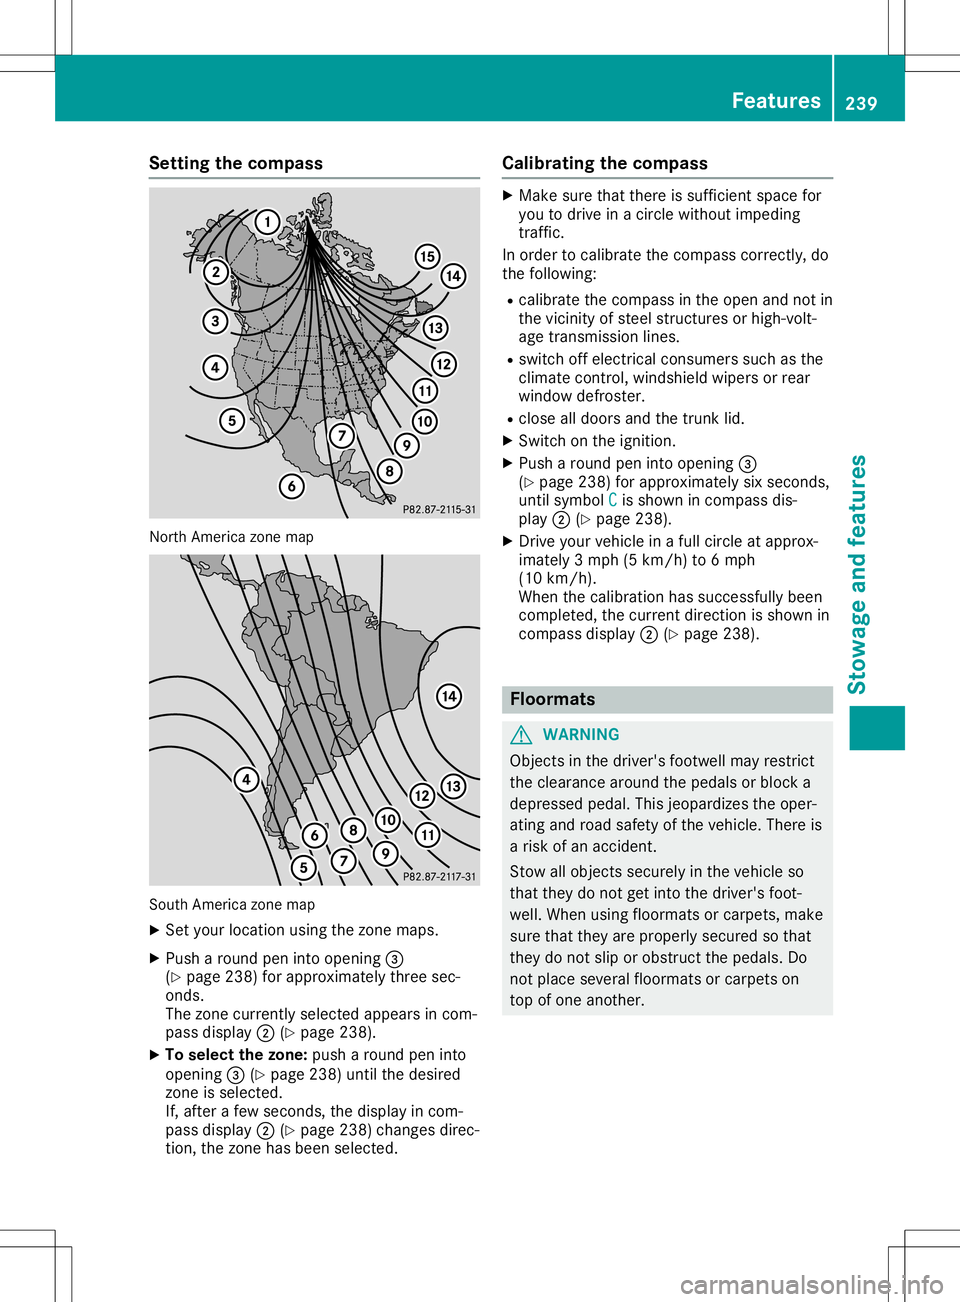
X Set your location usingthezone maps.
X Push around peninto opening 0087
(Y page 238)forapproximately threesec-
onds.
The zone current lyselected appearsincom-
pass display 0044(Ypage 238).
X To selec tthe zone: pusharound peninto
opening 0087(Ypage 238)untilthedesired
zone isselected.
If, after afew seconds, thedisplay incom-
pass display 0044(Ypage 238)changes direc-
tion, thezone hasbeen selected. Calibrating
thecompass X
Make surethatthere issufficient spacefor
you todrive inac ircle without impeding
traffic.
In order tocalibrate thecompass correctly,do
the following:
R calibrate thecompass inthe open andnotin
the vicinity ofsteel struct uresorhigh-volt-
age transm issionlines.
R switch offelectrical consumers suchasthe
climate control,windshield wipersorrear
window defroster.
R close alldoors andthetrunk lid.
X Switch onthe ignition.
X Push around peninto opening 0087
(Y page 238)forapproximately sixseconds,
until symbol C C
is shown incompass dis-
play 0044(Ypage 238).
X Drive yourvehicle inaf ull circle atapprox-
imately 3mph(5km/h) to6m ph
(10 km/h).
When thecalibration hassuccessfully been
completed, thecurrent direction isshown in
compass display0044(Ypage 238). Floo
rmats G
WARNING
Object sint he driver's footwell mayrestrict
the clearance aroundthepedals orblock a
depressed pedal.Thisjeopardizes theoper-
ating androad safety ofthe vehicle. Thereis
ar isk ofan accident.
Stow allobject ssecurely inthe vehicle so
that they donot getinto thedriver's foot-
well. When usingfloormats orcarpets, make
sure thatthey areproperly securedsothat
they donot slip orobstruct thepedals. Do
not place several floormats orcarpets on
top ofone another. Features
239Stowageandfeatu res Z
Page 242 of 310

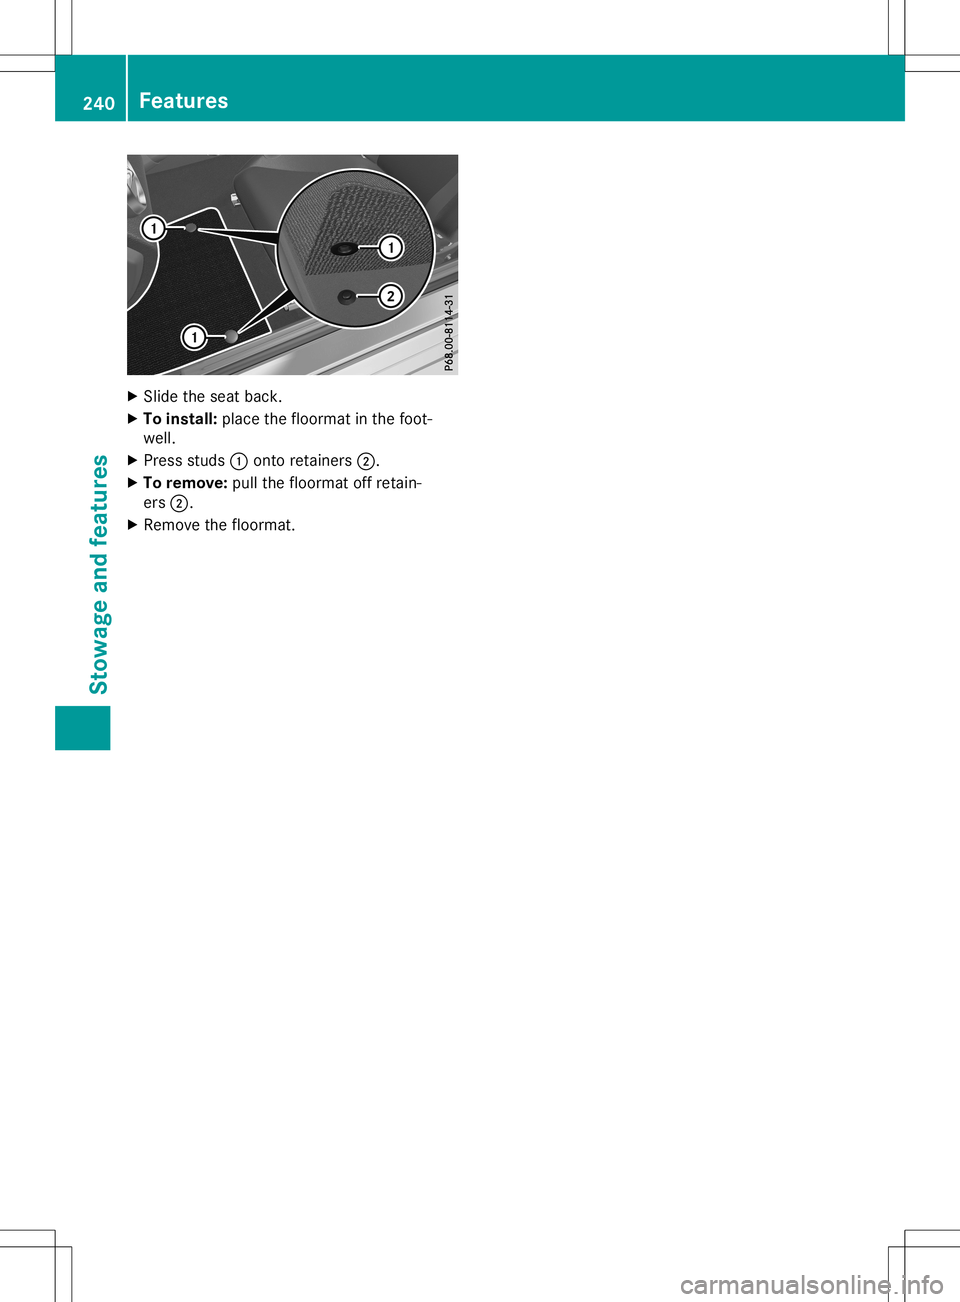
X
Sli de the seatback.
X To instal l:place thefloorma tint he foot-
we ll.
X Pre ssstud s0043 onto retainers0044.
X To remo ve:pullthe floorma toffreta in-
ers 0044.
X Re move thefloorma t. 24
0 Fe
aturesStow ageand features
Page 249 of 310

R
solvents
R cleaning agentscontaining solvents
Do not scrub.
Do not touch thesurfaces andfilms with
hard objects, e.g.rings orice scrapers. Oth-
erwise, youmay scratch ordamage thesur-
faces andfilms.
! Do
not park yourvehicle foralong period
of time directly aftercleaning, particularly
after cleaning thewheel rimwith wheel
cleaner. Wheelcleaner canlead tothe
increased corrosionofthe brake discsand
pads. Therefore, driveforafew minutes
after cleaning. Byheating upthe brakes, the
brake discsandpads dry.Thevehicle can
then beparked foralong period oftime.
Regu larcare ofyour vehicle isac ondition for
retaining thequal ityinthe long term.
Use care products andcleaning agentsrecom-
mended andapproved byMercedes-Benz . Washing
thevehicl eand cleani ng
the paintwork
Automatic carwash G
WARNING
Braking efficiency isreduced afterwashing
the vehicle. Thereisar isk ofan accident.
Aft erthe vehicle hasbeen washed, brake
carefully whilepayingattent iontothe traffic
conditions untilfullbraking poweris
restored.
! When
DISTRONIC PLUSorthe HOLD func-
tion isactivated, thevehicle brakesauto-
matically incertain situations.
To avoid damage tothe vehicle, deactivate
DISTRONIC PLUSandtheHOLD function in
the followi ngorsimilar situations:
R when towing thevehicle
R in the carwash
! It
is preferable touse carwashes with
adjustable high-pressure pre-cleaningthat
corresponds tothe specification forthe
Cabri oletprogram. Incar washes thatuse
high water pressures, thereisar isk that a
small amount ofwater mayleakintothe
vehicle. !
Lock
thecarifyou wash itin an automatic
car wash. Otherwise, thevehicle mightbe
damaged .
! Never
cleanyourvehicle inaT ouchless
Automatic CarWash asthese usespecial
cleaning agents.Thesecleaning agentscan
damage thepaintwork orplastic parts.
If you have yourvehicle cleaned inah igh-
pressure automatic carwash, small
amounts ofwater mayenter thevehicle.
! Make
surethattheautomatic transmission
is in position Nwhen washing yourvehicle
in at ow-through carwash. Thevehicle could
be damaged ifthe transmission isin another
position.
! Make
surethat:
R the side windows androof arecompletely
closed
R the climate controlblower isswitched off
R the windshiel dwiper switch isin position
0
The vehicle mayotherwise bedamaged .
You canclean thevehicle atan automatic car
wash fromthevery start.
Preferably cleanthevehicle atautomatic car
washes thatusetextilewashing elements
without brushes. Thisprevents finescratches
from forming onthe paintwork andfilm.
If the vehicle isvery dirty, pre-wash itbefore
cleaning itin an automatic carwash.
Aft erusing anautomatic carwash, wipeoff
wax from thewindshiel dand the wiper blades.
This willprevent smearsandreduce wiping
noises caused byresidue onthe windshiel d.
i Vehicles
withdecorative film:select a
wash program withouthotwax atthe auto-
matic carwash.
Washing byhand In
some countries, washingbyhand isonly
allow edatspeciall yequip ped washing bays.
Observe thelegal requirements ineach coun-
try.
X Do not use hotwater anddonot wash the
vehicle indirect sunlight.
X Use asoft sponge toclean.
X Use amildcleaning agent,suchasac ar
shampoo approved byMercedes-Benz . Care
247Maintenance andcare Z
Page 250 of 310

X
Thoroughly hosedown thevehicle witha
gentle jetofwater.
X Do not point thewater jetdirectly towards
the airinlet orthe edges ofdecorative foils.
X Use plenty ofwater andrinse outthe
sponge frequent ly.
X Rinse thevehicle withclean water anddry
thoroughly withachamois.
X Do not letthe cleaning agentdryonthe
paintwork orthe decorative foils.
Carefully removealldeposits ofroad saltas
soon aspossible whendriving inwinter.
Power washers G
WARNIN
G
The water jetfrom acircular jetnozzle (dirt
blasters) cancause invisible exteriordam-
age tothe tires orchassis compon ents.
Component sdamaged inthis way may fail
unexpect edly.There isar isk ofan accident .
Do not use power washers withcircular jet
noz zles toclean thevehicle. Havedamaged
tires orchassis compon entsreplaced imme-
diately.
! Vehicles
withdecorative film:parts ofyour
vehicle arecovered withdecorative film.
Maintain adistance ofat least 27.5in
(70 cm) between thefilm-c overed partsof
the vehicle andthenozz leof the power
washer.
Infor mation aboutthecorrec tdistance is
availabl efrom theequipment manufacturer.
Move thepower washer nozzlearound when
cleaning yourvehicle.
The water temperat ureofthe power washer
must notexceed 140‡(60 †).
! Always
maintain adistance ofat least
12 in(30 cm) between thevehicle andthe
power washer nozzle. Infor mation aboutthe
correc tdistance isavailabl efrom theequip-
ment manufact urer.
Move thepower washer nozzlearound when
cleaning yourvehicle.
Do not aim directly atany ofthe following:
R Tires
R Door gaps, roofgaps, joints,etc.
R Elect ricalcompon ents R
Batt ery
R Plug-type couplings
R Light bulbs
R Seals
R Trim elements
R Vent ilation slots
Damaged sealsorelectric alcompon ents
can lead toleaks orfailures.
! If
you clean thetank fillerrecess whenitis
open, donot use apower washer. Thiscan
cause damage tothe seals orother compo-
nent s.
Cleaning thepaint work !
Do
not affix:
R stick ers
R films
R magnetic platesorsimilar items
to painted surfaces. Youcould otherwise
damage thepaintwork .
Scr atches, corrosiv edeposits, areasaffected
by corrosion anddamage causedbyinade-
quate carecannotalway sbec ompletely
repaired. Insuch cases, visitaqualified spe-
cialist workshop.
X Remove dirtimmediately, wherepossible,
while avoiding rubbingtoohard.
X Soak insect remains withinsect remover
and rinse offthe treated areasafterwards.
X Soak birddroppings withwater andrinse off
the treated areasafterwards.
X Remove treeresin, oils,fuels andgreases by
rubbing gentlywithacloth soaked inpetro-
leum ether orlighter fluid
X Remove coolantandbrake fluidwithamoist
cloth andclear water.
X Use tarremover toremove tarstains.
X Use silicone remover toremove wax.
If water nolonger forms"beads" onthe paint
surface, usethepaint careproducts recom-
mended andapproved byMercedes- Benz.This
is the case approximately everythreetofive
mont hs,depending onthe climate conditions
and thecare product used.
If dirt has penetr atedthepaint surface orif
the paint hasbecome dull,thepaint cleaner
recomm endedandapproved byMercedes-
Benz should beused. 248
CareMaintenance
andcare
Page 254 of 310

Where
willIf ind...? Refle
ctive safety jacket
Removi ng/replac ingrefle ctive safety
jackets The
refle ctive safetyjackets areloca tedinthe
safe tyjacket compartments inthe stowa ge
compa rtments ofthe front doors .There are
als os afe tyjacket compartments inthe stow-
age compa rtments ofthe rear doors ,inw hich
refle ctive safetyjackets canbestowed .
X To remove :pul lout safe tyjacket bag0043
with therefle ctive safetyjacket bythe loop .
X Open safetyjacket bag0043and pullout the
refle ctive safetyjacket.
X To stow :fold therefle ctive safetyjacket,
roll itup and stow itin safe tyjacket bag0043.
X Slid esafe tyjacket bag0043along the lower
edge ofthe armres tinto thesafe tyjacket
compa rtment. Meanwhil e,ensure thatthe
loop hangs outwellwithi nreach.
i Remo
vean ew refle ctive safetyjacket
from itspacka gingmateri albefore sliding it
into thesafe tyjacket compartment. The
packa gingmateri almay otherw isecaus eit
to slipo utor make removi ngitdiffi cult.
Obser vethe lega lrequ ireme ntsineach coun-
try. Notes
onthe refle ctive safety jacket 0043
Maxim umnumbe rofw ashes
0044 Maxim umwash tempera ture
0087 Donot bleach
0085 Donot iron
0083 Donot use alau ndry dryer
0084 Donot dry-cl ean
006B This isac lass2v est
R The refle ctive safetyjackets meetthe
requ ireme ntsdefined bythe lega lstanda rd
only if:
- the correct sizeisuse dand
- the refle ctive safetyjacket iscorrectly
fastened
R Before use,ensure thattherefle ctive safety
jacket isclea nand intact. Thespeci alprop-
erties mayotherw isebecompromi sed.
R The refle ctive safetyjackets shouldbe
stored intheir originalpacka ginginad ry
pla ceaway from sourcesofhea tand light.
R The maximu mnumbe rofw ashes speci fied
is not theonly factor influencing thelife
spa nofthe refle ctive safetyjackets. Their
life spanalsod epe nds onuse ,care, storage ,
etc.
R The refle ctive safetyjackets shouldbe dis-
pose dofand repl aced withnewones:
- after 15washes, and/or
- ifthe refle ctive strips havebecome
scratched ,and/or
- ifthe backing materialand/or reflective
strips havebecome soiledand cannot be
clea ned off,and/or
- the refle ctive safetyjacket's fluorescence
has fade d,e.g. due tothe effects ofsun-
lig ht
R Dispos eofthe refle ctive safetyjacket inan
environmenta llyrespo nsiblemanner. Todo 252
Where
willIf ind...?Breakdown assistance
Page 255 of 310

so,
cont actyour local waste disposa lcom-
pany. Vehicle
toolkit
General notes The
vehicle toolkitcan befound inthe trunk
or inthe stowage wellunder thetrunk floor.
Apart fromcertain country-specific variations,
the vehicles arenot equip pedwith atire-
change toolkit.Some toolsforchanging a
wheel arespecific tothe vehicle. Formore
information onwhich toolsarerequired toper-
form awheel change onyour vehicle, consulta
qual ified speciali stworkshop.
Necessary tire-changing toolscaninclude, for
example:
R jack
R wheel chock
R lug wrench
R ratchet wrench
R alignment bolt
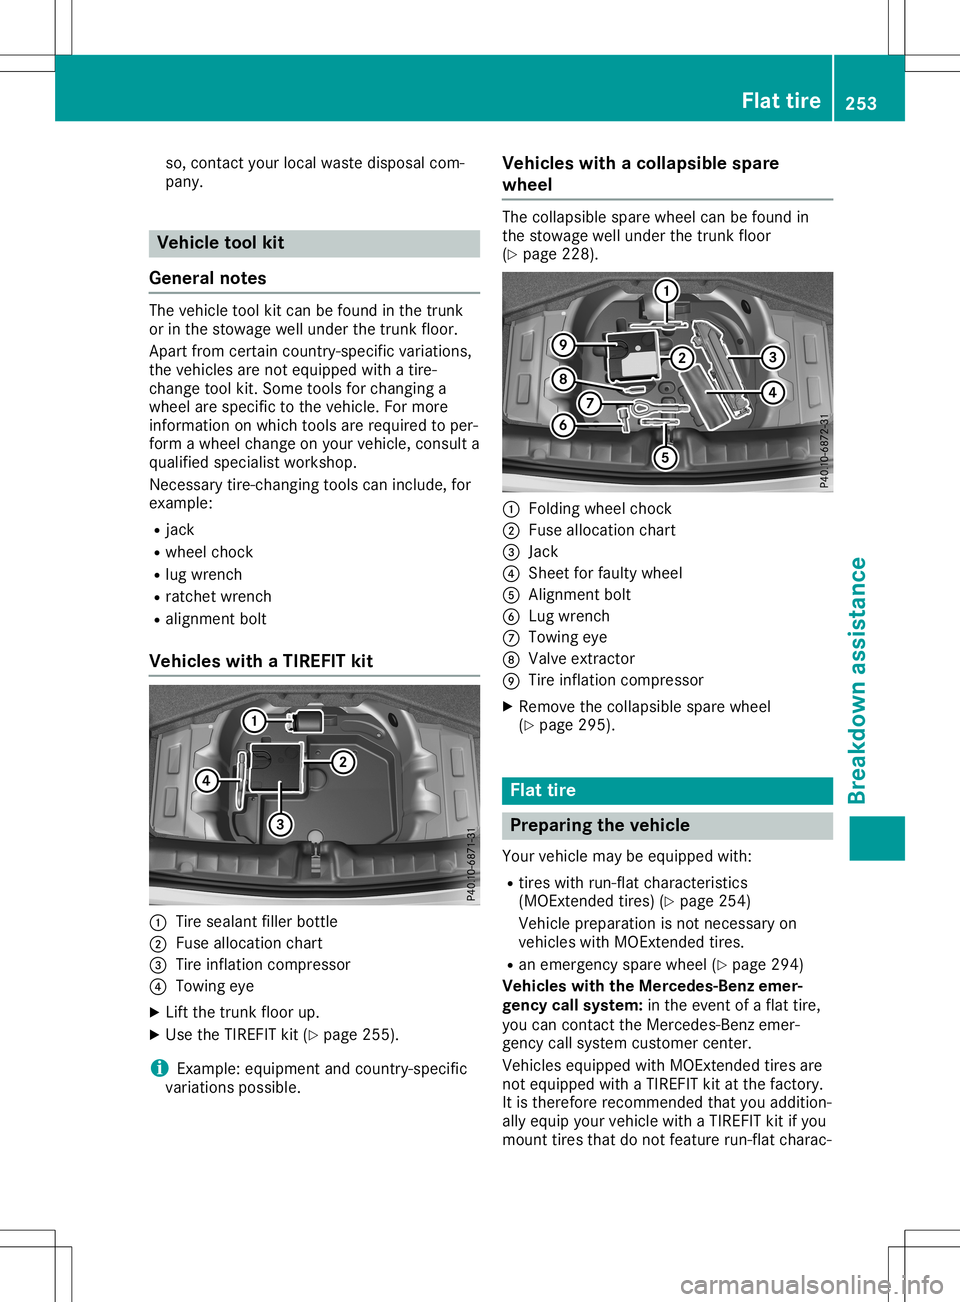
Vehicle swithaTIREFIT kit 0043
Tire seala ntfiller bottle
0044 Fuse alloca tionchart
0087 Tire inflation compressor
0085 Towing eye
X Lift the trunk floorup.
X Use theTIREFIT kit(Ypage 255).
i Example:
equipment andcountry-specific
variations possible. Vehicle
swithacollapsible spare
wheel The
collapsi blespare wheel canbefound in
the stowage wellunder thetrunk floor
(Y page 228). 0043
Folding wheelchock
0044 Fuse allocation chart
0087 Jack
0085 Sheet forfaulty wheel
0083 Alignment bolt
0084 Lug wrench
006B Towing eye
006C Valve extract or
006D Tire inflation compressor
X Remove thecollapsi blespare wheel
(Y page 295). Flat
tire Prepar
ingthe vehicl e
Your vehicle maybeequip pedwith:
R tires withrun-flat characteristics
(MOExt endedtires)(Ypage 254)
Vehicle preparation isnot necessary on
vehicles withMOExt ended tires.
R an emergency sparewheel (Ypage 294)
Vehicles withtheMercedes-Benz emer-
gency callsystem: inthe event ofaflat tire,
you can cont actthe Mercedes-Benz emer-
gency callsystem customer center.
Vehicles equippedwith MOExt ended tiresare
not equip pedwith aTIREFIT kitatthe factory.
It is therefore recommended thatyouaddition-
ally equip yourvehicle withaTIREFIT kitifyou
mount tiresthatdonot feature run-flat charac- Flat
tire
253Breakdown assistance