2020 MERCEDES-BENZ GLS SUV spare wheel
[x] Cancel search: spare wheelPage 6 of 549
Light and sight
......................................... 15 6
Exterior lighting .......................................... 15 6
Interior lighting ...........................................1 63
Wi ndsc reen wipers and windscreen
wa sher sy stem ............................................ 16 5
Mir rors ........................................................ 17 0
Area pe rmeable toradio wav es on the
windscreen ................................................ .173
Infrared-reflective windscreen function ...... 173Climate control
......................................... 174
Overview of climate contro l systems ........... 174
Operating the climate control sy stem ......... 175 Driving and pa
rking ................................. 187
Driving ........................................................ 187
DY NA MIC SELECT switch ............................2 01
Au tomatic transmission .............................. 204
Tr ans fer case .............................................. 209
Fu nction of the 4MATIC ...............................2 11
Re fuelling .................................................... 211
Pa rking ........................................................ 217
Driving and driving sa fety sy stems .............2 24
Tr ailer hit ch................................................ 295 Bicycle
rack function .................................. 300
Ve hicle towing instructions ........................ .302 Instrument display and on-board
comp
uter.................................................. 304
No tes on the instrument display and on-
board computer .......................................... 304
Instrument display overview ...................... .305
Overview of the buttons on thesteering
wheel ..........................................................3 06
Operating the on-board computer .............. 306
Overview of what is shown on the multi‐
function display .......................................... 308
Head-up display .......................................... 308 MBUX multimedia sy
stem ....................... 311
Overview and operation .............................. 311
Sy stem settings .......................................... 320
Na vigation .................................................. 324
Te lephone .................................................. .330
Mercedes me and apps .............................. 333
Mercedes-Benz emer gency call sy stem ...... 342
Ra dio, media & TV...................................... 349
Sound settings ........................................... 355 Main
tenance and care ............................. 357
ASS YST PLUS service inter val display ........ 357
Engine compartment .................................. 358
Cleaning and care ...................................... .364 Breakdown assistance
............................372
Emergency ................................................. .372
Flat tyre ...................................................... 374
Battery (vehicle) ......................................... 380
To w- starting or towing away ....................... 385
Electrical fuses ........................................... 390 Wheels and tyres
..................................... 393
No tes on noise or unusual handling char‐
acteristics .................................................. .393
No tes on regular lyinspecting wheels and
tyres .......................................................... .393
No tes on snow chains ................................ 393
Ty re pressure .............................................. 394
Wheel change ............................................ .397
Emergency spare wheel .............................. 407
Collapsible spare wheel .............................. 409 Contents
3
Page 198 of 549
#
Alw ays drive on inclines in the line of
fa ll (straight up or down) and do not
turn. &
WARNING Risk offire due toflammable
materials on hot parts of theex haust
sy stem
Flammable material such as lea ves, grass or
twigs may ignite if they come into contact
wi th hot parts of theex haust sy stem. #
When driving on unpa vedro ads or off-
ro ad, regular lych eck theve hicle under‐
side. #
Remo vetrapped plants or other flam‐
mable material, in particular. #
Ifth ere is damage, consult a qualified
specialist workshop immediately. When driving off-road, sand, mud and
water or
wate r mixed with oil may getinto the brakes.
This may lead toare duction in braking ef fect or
tot al brake failure as a result of increased wear.
The braking characteristics will vary depending
on the material that has entered the sy stem. Clean
the brakes af ter driving off-road. If you
th en notice reduced braking ef fect or hear
scraping noises, ha vethe brake sy stem checked
at a qualified specialist workshop. Adapt your
driving style to thech anged braking characteris‐
tics.
* NO
TEDama gecaused bydriving over
obs tacles The
vehicle can be damaged by:
R driving up onto high kerbs or unpa ved
ro ads.
R quickly driving over obs tacles su chas
ke rbs, speed bumps or po tholes.
R heavy objects hitting the underbody or
ch assis components. #
Do not drive over obs tacles that could
damage theve hicle. #
Check theve hicle regular lyfor dama ge
during off-road driving. #
Adjust theve hicle speed tosuit the
ro ad sur face conditions. #
Ifth ere is damage, consult a qualified
specialist workshop immediately. +
ENVIRONMENTAL
NOTEEnvironmental
dama gedue tonon-obser vance of pro‐
hibition signs Environmental pr
otection has priority. Treat
nature with respect. #
Be sure toobser veprohibition signs. Checklist before driving off-road
Check
thefo llowing points before driving off-
ro ad:
R Fuel le vel
R Vehicles with a diesel engine: AdBlue ®
le vel
R Engine oil le vel:fill engine oil tothe maxi‐
mum le velto ensure full gradeability
(/ page 360).
R Tyre-change tool kit and spare wheel
R Tyres and wheels Driving and parking
19 5
Page 377 of 549
Re
moving the fire extinguisher &
WARNING Risk of accident due toan
incor rectly secu redfire extinguisher in
th e driver's foot we ll
A fire extinguisher may impede pedal tr avel
or block a depressed pedal.
This jeopardises the operating and road
saf ety of theve hicle.
The fire extinguisher can be flung around and
injure the driver or other vehicle occupants. #
Alw aysst ore and secure thefire extin‐
guisher in the brac ket. #
Do not remo vethefire extinguisher
while driving. #
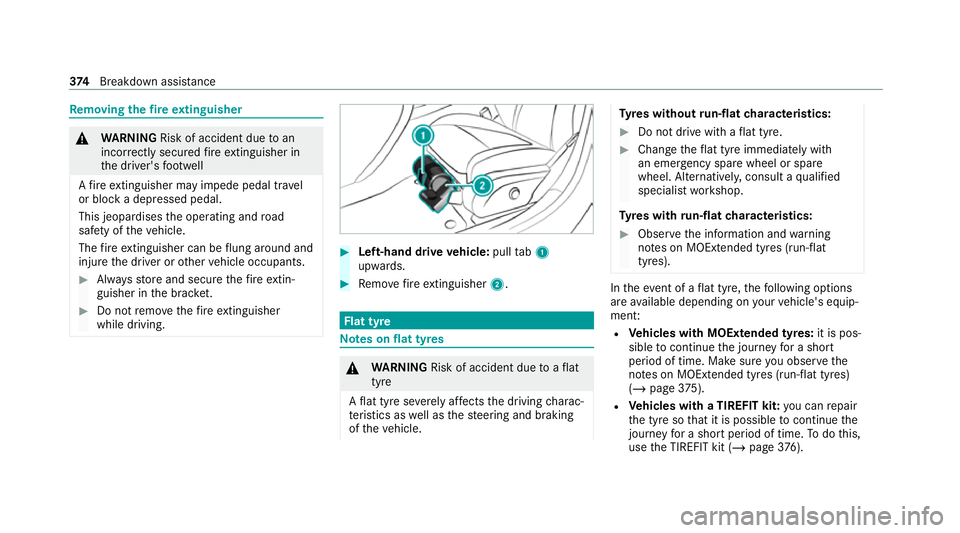
Left-hand drive vehicle: pulltab1
upwards. #
Remo vefire extinguisher 2. Flat tyre
Note
s onflat tyres &
WARNING Risk of accident due toaflat
tyre
A flat tyre se verely affects the driving charac‐
te rist ics as well as thesteering and braking
of theve hicle. Ty
res without run-flat characteristics: #
Do not drive with a flat tyre. #
Chan getheflat tyre immediately with
an emer gency spa rewheel or spare
wheel. Alternativel y,consult a qualified
specialist workshop.
Ty res with run-flat characteristics: #
Obse rveth e information and warning
no tes on MOExtended tyres (run-flat
tyres). In
theeve nt of a flat tyre, thefo llowing options
are available depending on your vehicle's equip‐
ment:
R Vehicles with MOExtended tyres: it is pos‐
sible tocontinue the journey for a short
period of time. Make sure you obse rvethe
no tes on MOExtended tyres (run-flat tyres)
(/ page 375).
R Vehicles with a TIREFIT kit: you can repair
th e tyre so that it is possible tocontinue the
jou rney for a short period of time. Todo this,
use the TIREFIT kit (/ page376). 374
Breakdown assis tance
Page 397 of 549

#
Neverfit snow chains on the front
wheels. #
Only fit snow chains on there ar wheels
in pairs. *
NO
TEDama getocomponents of the
ve hicle body or chassis due tofitted
snow chains If
yo ufit snow chains tothe front wheels of
4MATIC vehicles, you may damage co mpo‐
nents of theve hicle body or chassis. #
Onlyfit snow chains tothere ar wheels
of 4MATIC vehicles. R
Snow chains are on ly permissible for cer tain
wheel/tyre combinations. You can obtain
information about this from a Mercedes-Benz
Service Cent re.
R For saf etyre asons, on lyuse sn owchains that
ha ve been specifically appr ovedfo ryo ur
ve hicle byMercedes-Benz, or snow chains
with the same quality standard. R
If sn owchains are fitted, the maximum per‐
missible speed is 50 km/h.
R Vehicles with Active Parking Assis t:do
not use Active Parking Assist when snow
ch ains are fitted.
R Vehicles with AIRMATIC or E- ACTIVE
BO DY CONT ROL:if sn ow ch ains are fitted,
only drive at raised vehicle le vel .
% You can permanently limit the maximum
ve hicle speed for driving with winter tyres
(/ page 236).
% You can deactivate ESP ®
to pull away
( / page 229). This allo wsthe wheels to
spin, achieving an increased driving forc e. Ty
re pressure Note
s on tyre pressure &
WARNING Risk of accident due toinsuf‐
fi cient or excessive tyre pressure
Ty res with either too low or too high a pres‐
sure present thefo llowing hazards:
R the tyres could bur st
R the tyres could wearexcessively and/or
une venly
R the driving characteristics as well as
st eering and braking characteristics may
be se verely impaired #
Obse rveth ere commended tyre pres‐
su res and check the tyre pressures of
all tyres including the spare wheel:
R monthly
R if altering the load on theve hicle
R prior tolong journe ys
R ifth e operating conditions change, for
ex ample when driving off- road 394
Wheels and tyres
Page 410 of 549
#
Tolowe r the vehicle: turnthera tchet ring
spanner of the jack anti-clockwise. #
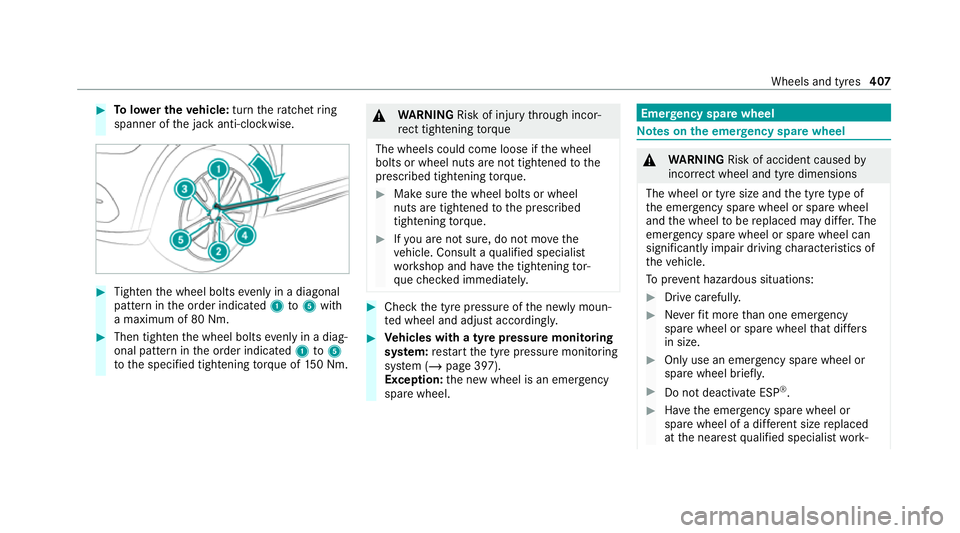
Tighten the wheel bolts evenly in a diagonal
pattern in the order indicated 1to5 with
a maximum of 80 Nm. #
Then tighten the wheel bolts evenly in a diag‐
onal pattern in the order indicated 1to5
to the specified tightening torque of 150 Nm. &
WARNING Risk of inju rythro ugh incor‐
re ct tigh tening torque
The wheels could come loose if the wheel
bolts or wheel nuts are not tightened tothe
prescribed tightening torque. #
Makesure the wheel bolts or wheel
nuts are tightened tothe prescribed
tightening torque. #
Ifyo u are not sure, do not mo vethe
ve hicle. Consult a qualified specialist
wo rkshop and ha vethe tightening tor‐
qu ech ecked immediately. #
Check the tyre pressure of the newly moun‐
te d wheel and adjust according ly. #
Vehicles with a tyre pressure monitoring
sy stem: restart the tyre pressure monitoring
sy stem (/ page 397).
Exception: the new wheel is an emer gency
spa rewheel. Emer
gency spare wheel Note
s onthe emer gency spare wheel &
WARNING Risk of accident caused by
incor rect wheel and tyre dimensions
The wheel or tyre size and the tyre type of
th e emer gency spa rewheel or spare wheel
and the wheel tobe replaced may dif fer. The
emer gency spa rewheel or spare wheel can
significantly impair driving characteristics of
th eve hicle.
To preve nt hazardous situations: #
Drive carefully. #
Neverfit more than one emer gency
spa rewheel or spare wheel that dif fers
in size. #
Only use an emer gency spa rewheel or
spare wheel brief ly. #
Do not deacti vate ESP ®
. #
Have the emer gency spa rewheel or
spare wheel of a dif fere nt size replaced
at the nearest qualified specialist work‐ Wheels and tyres
407
Page 411 of 549
shop. The new wheel must ha
vethe
cor rect dimensions. %
The emergency spa rewheel is fastened in
th e load compartment under the load com‐
partment floor.
% Not for Mercedes-Maybach vehicles.
Obser vethefo llowing no tes on fitting an emer‐
ge ncy spa rewheel:
R Check the tyre pressure of the emer gency
spa rewheel fitted. Co rrect the pressure as
necessar y.
R The maximum permissible speed with an
emer gency spa rewheel fitted is 80 km/h.
R Do not fit th e emer gency spa rewheel with
sn ow ch ains.
R Replace the emer gency spa rewheel af ter six
ye ars at the latest, rega rdless of wear.
% Ve
hicles with a tyre pressure monitoring
sy stem: if an emer gency spa rewheel is fit‐
te dth e tyre pressure monitoring sy stem can‐
not function reliabl y.Fo r a few minutes af ter
an emer gency spa rewheel is fitted, the sys‐ te
m may still display the tyre pressure of the
re mo ved wheel. Only restart the sy stem
again when the emer gency spa rewheel has
been replaced with a new wheel.
Be sure toalso obse rveth efo llowing fur ther
re lated subjects:
R Notes on tyre pressure (/ page 394)
R Tyre pressure table (/ page 395)
R Notes on fitting tyres (/ page 397) Inflating
the emer gency spare wheel *
NO
TEOverheating due tothe tyre infla‐
tion compressor running too long #
Do not runth e tyre inflation compres‐
sor for longer than ten minu tes without
inter ruption. Re
quirements:
Comply with the manufacturer's saf ety no tes on
th est icke r of the emer gency spa rewheel and on
th e tyre inflation compressor. #
Remo vethest icke r with the label 80 km/h
from the tyre inflation compressor housing
and af fix it tothe instrument clus ter within
th e driver's field of vision. #
Remo vethe tyre inflation compressor from
th estow age space under the luggage com‐
partment floor (/ page376). #
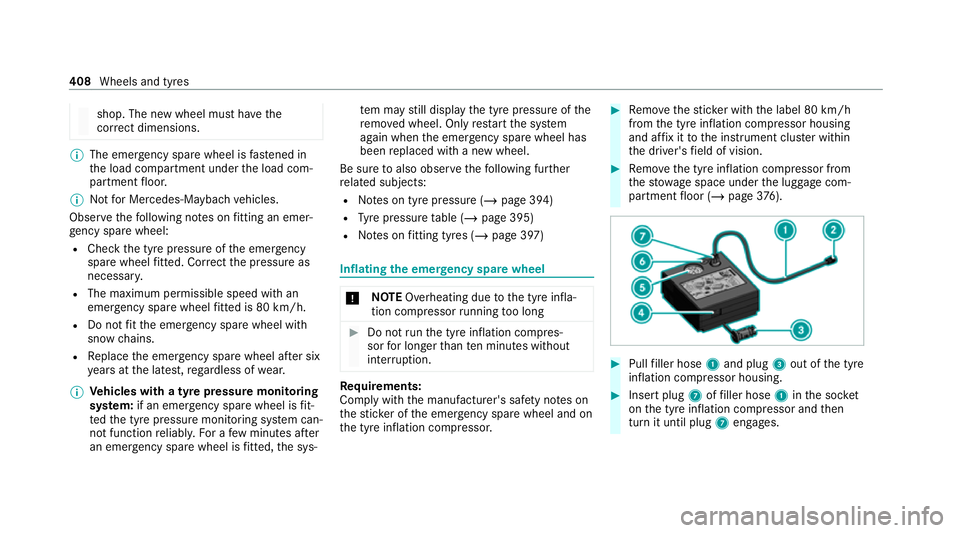
Pull filler hose 1and plug 3out of the tyre
inflation compressor housing. #
Insert plug 7offiller hose 1inthe soc ket
on the tyre inflation compressor and then
turn it until plug 7engages. 408
Wheels and tyres
Page 412 of 549
#
Unscr ew the cap from theva lve on the emer‐
ge ncy spa rewheel. #
Screw union nut 2offiller hose 1onto
va lve. #
Make sure on and off switch 4ofthe tyre
inflation compressor is set to0. #
Insert plug 3in a soc ket in your vehicle.
R Cigar ette lighter soc ket
R 12V soc ket: ( / page 148)
R Obse rveth e no tes on the cigar ette lighter in
th e Digital Owner's Manual
R Obser vethe no tes on soc kets: (/ page 148) #
Press thest art/ stop button once toswitch
on the po wer supp ly (/ page187). #
Press on and off switch 4onthe tyre infla‐
tion compressor toI.
The tyre inflation compressor is switched on.
The tyre is inflated. The tyre pressure
appears on manome ter5. #
Pump the tyre tothe specified tyre pressure. %
The specified tyre pressure is stated on the
label of the emer gency spa rewheel. #
When the specified tyre pressure has been
re ached, press on and off swit ch4 onthe
tyre inflation compressor to0.
The tyre inflation compressor is switched off. #
Press thest art/ stop button toswitch off the
po we r supp ly. #
Ifth e tyre pressure is higher than the speci‐
fi ed pressure, press pressure release valve
bu tton 6until the cor rect tyre pressure has
been reached. #
Unscr ew union nut 2offiller hose 1from
th eva lve. #
Screw theva lve cap of the emer gency spa re
wheel onto theva lve again. #
Stow filler hose 1and plug 3inthe lo wer
section of the tyre inflation compressor
housing. #
Stow th e tyre inflation compressor in the
ve hicle. Collapsible spare wheel
Note
s onthe collapsible spa rewheel &
WARNING Risk of accident caused by
incor rect wheel and tyre dimensions
The wheel or tyre size and the tyre type of
th e emer gency spa rewheel or spare wheel
and the wheel tobe replaced may dif fer.
Mounting an emer gency spa rewheel/spare
wheel may se verely impair the driving char‐
acteristics.
To preve nt hazardous situations: #
Adapt your driving style according lyand
drive carefull y. #
Neverfit more than one emer gency
spa rewheel or spare wheel that dif fers
in size. #
Only use an emer gency spa rewheel or
spare wheel of a dif fere nt size brie fly. #
Do not switch off ESP ®
. #
Have the emer gency spa rewheel or
spare wheel of a dif fere nt size replaced Wheels and tyres
409
Page 413 of 549
at
the nearest qualified specialist work‐
shop. The new wheel must ha vethe
cor rect dimensions. The collapsible spa
rewheel is an emer gency
spa rewheel which is only suitable for use for a
limi ted period of time and in a restricted manner
in theeve nt of a flat tyre (e.g. until the nearest
wo rkshop).
The tyre side walls are folded when in transpo rt
mode. Before use, the collapsible spare wheel
has tobe inflated with the accompanying com‐
pressor.
Check the tyre pressure of the collapsible spare
wheel once fitted. Co rrect the pressure as nec‐
essar y.
The maximum permissible speed with a collapsi‐
ble spare wheel fitted is 80 km/h.
Do not fit snow chains with the collapsible spare
wheel.
Re place the collapsible spare wheel af ter six
ye ars at the latest, rega rdless of wear.
% Ve
hicles with a tyre pressure monitoring
sy stem: if a collapsible spare wheel is fitted th
e tyre pressure monitoring sy stem cann ot
function reliably. For a few minutes af ter an
emergency spare wheel is fitted, the sy stem
may still display the tyre pressure of the
re mo ved wheel. Only restart the sy stem
again when the collapsible spare wheel has
been replaced with a new wheel.
Be sure toalso obse rveth efo llowing fur ther
re lated subjects:
R Notes on tyre pressure (/ page 394)
R Tyre pressure table (/ page 395)
Note s onvehicles with a Burmes ter sound
sy stem &
WARNING Risk of inju ryor death due to
an unsecured collapsible spare wheel
If th e collapsible spare wheel is not secured
cor rectl y,it can slip, tip over or be thrown
around.
Ve hicle occupants could be hit byan unse‐
cured collapsible spare wheel and be seri‐
ously injured as a result, particularly when accelerating, braking, abruptly
changing
direction or in theeve nt of an accident. #
Alw aysst ore the collapsible spare
wheel in the emer gency spa rewheel
bag and attach it tothe brac ket in the
load compartment. #
Alw ays ensure that the lashing stra ps
on the emer gency spa rewheel bag are
safely secured on there ar tie-down
ey es on the load compartment floor. Depending on
theve hicle's equipment, the col‐
lapsible spare wheel is located in an emer gency
spa rewheel bag on a brac ket in the load com‐
partment. The collapsible spare wheel in the
emer gency spa rewheel bag and the brac ket are
lashed wi thstra ps and secured using there ar
tie-down eyes on the load compartment floor. Re
moving the collapsible spare wheel Ve
hicles without a Burmes ter sound sy stem
The collapsible spare wheel is located under the
load compartment floor. 41 0
Wheels and tyres