2020 MERCEDES-BENZ GLS SUV stop start
[x] Cancel search: stop startPage 193 of 549
Ensu
rethefo llowing before starting the engine:
R the legal stipulations in the area where your
ve hicle is par ked allow engine starting via
smartphone.
R it is safe tostart and runth e engine where
yo ur vehicle is par ked.
R The fuel tank is su fficiently full.
St arting theve hicle (Remo teOnline) &
WARNING Risk of crushing or entrap‐
ment due tounin tentional starting of the
engine
Limbs could be crushed or trapped if the
engine is star ted unintentionally during
service or maintenance work. #
Alw ays secure the engine against unin‐
te ntional starting before car rying out
maintenance or repair work. Re
quirements:
R park position jis selected.
R the anti- theft alarm sy stem is not activated.
R the panic alarm is not activated. R
the hazard warning light sy stem is switched
off.
R the bonn etis closed.
R the doors are closed and loc ked.
R the windo wsand sliding sun roof are closed. #
Start theve hicle using the smartphone.
Af tereve ryengine start, the engine runs for
te n minu tes.
Yo u can car ryout a maximum of two consecu‐
tive starting attem pts. Yo u must start theve hicle
once with theke y before trying tostart the
engine again with the smartphone. you can stop
th eve hicle again at any time.
% Further information can be found in the
smartphone app.
Securing the engine against starting before
car rying out maintenance or repair work: #
switch on the hazard warning light sy stem.
or #
unlock the doors.
or #
open a side window or the sliding sunroof. Ru
nning-in no tes To
preser vethe engine during thefirs t15 00 km:
R drive at varying road speeds and engine
speeds.
R do not drive at speeds greater than
14 0 km/h.
R drive theve hicle in drive program A
or ;.
R shift tothe next highest gear at theve ry lat‐
est when the needle reaches the last third
before there d area in there v counter.
R do not shift down a gear manually in order to
brake.
R avoidove rstraining theve hicle, e.g. driving at
full thro ttle.
R do not depress the accelera tor pedal past
th e pressure point (kickdown).
R only increase the engine speed gradually and
accelera tetheve hicle tofull speed af ter
15 00 km. 19 0
Driving and pa rking
Page 199 of 549
%
Further information about special all-ter rain
tyres forre trofitting can be ob tained from a
qu alified specialist workshop.
Off-road driving
Re ad this section before driving your vehicle off-
ro ad. Practise bydriving over more gentle off-
ro ad terrain firs t.
R Obse rveth e no tes on the cross-country ABS
(/ page 226).
R If necessar y,select theF orG drive
program (vehicles with an Off-road pac kage)
before driving off-road (/ page 203).
R Before driving off-road, shift the transfer
case totheLO W RANGE off-roadgear (vehi‐
cles with an Offroad pac kage ) (/ page 210).
R Select a vehicle le vel suitable for off-road ter‐
ra in (/ page 265). Toavo id damaging the
ve hicle, make sure there is alw ays suf ficient
ground clearance.
R Alw ayske ep the engine running and in gear
when driving on downhill gradients and
slopes. Obse rveth e no tes on driving in
mountainous terrain. R
Do not drive on unknown terrain that is not
easily visible and stay on mar kedro utes.
R Alw ayske ep the doors and windo wsclosed
while theve hicle is in motion.
R Deactivate Active Dis tance Assi st
DISTRONIC, cruise control and theva riable
limiter.
R Adapt your driving style to thete rrain.
R Do not use the HOLD function on steep
downhill or uphill gradients with slippery or
loose sur faces.
Driving on sand
When driving on sand, also obser vethefo llowing
instructions:
R Select theF drive program.
R Select a higher vehicle le vel.
R Shift toa lo werge ar.
R Drive quickly to overcome thero lling resist‐
ance, otherwise theve hicle may dig itself in.
R Drive in the trac ksofother vehicles if possi‐
ble. Make sure that thefo llowing prerequi‐
sites are me t: -
the tyre ruts are not too deep
- the sand is firm enough
- the ground clearance is suf ficient
Fo rding
Also obser vethefo llowing information when
fo rd ing:
R Drive no fasterthan 10 km/h.
R Obser vethe maximum permissible ford ing
dep th (/ page 428).
R Switch off automatic climate control
(/ page 176).
R Vehicles with stationary heater/ventila‐
tion: switch thest ationary heater/ ventilation
off (/ page 180).
R Ensu rethat a bow wave does not form asyou
drive.
R Do not stop in thewa ter and do not switch
off the engine. Ensure the ECO start/ stop
function is switched off (/ page198).
Driving in mountainous terrain 19 6
Driving and pa rking
Page 200 of 549

Also obser
vethefo llowing information when
driving in moun tainous terrain:
R Obse rveth eva lues of the approach/depar‐
ture angle and of the maximum gradient
(/ page 428).
R Avoid high engine speeds.
R Use the braking po wer of the engine when
driving downhill.
R Shift toa lo werge ar on uphill gradients and
on long, steep downhill gradients.
R Activate DSR be fore driving downhill, if nec‐
essary (/ page244).
Checklis t after driving off-road
Driving off-road places grea ter demands on your
ve hicle than driving on no rmalroads. Check the
entire vehicle for dama geand fore ign bodies
eve rytime af ter driving off-road. Foreign bodies
in the wheels or driv etra in can lead toimbalan‐
ces and therefore vibrations.
R Ifth eF orG drive prog ram is selec‐
te d: select ano ther drive prog ram.
R Shift the transfer case tothe on-ro ad posi‐
tion HIGH RANGE. R
Deactivate DSR.
R Lowe rth eve hicle le vel again toa le vel suita‐
ble tothero ad conditions, e.g. tothe normal
le ve l.
R Apply the brakes todry them af terfo rd ing.
R Check that the service brake is working nor‐
mally af ter a long downhill stre tch.
R Clean thefo llowing components everytime
af te r driving off-road:
- licence plate number
- headlamps and tail lamps
- tyres, wheels and wheel ar ches
- underbody
R After driving thro ugh sand, mud, water or
gr ave l, ha vethefo llowing components
ch ecked and cleaned:
- brake disks and brakepads
- tyres and wheels
- axle joints ECO
start/s top function Ope
ration of the ECO start/s top function
% The ECO start/ stop function is not available
in all drive prog rams, depending on the
engine. Obser vethest atus display in the
multifunction display forth is.
The engine is switched off automatically in the
fo llowing situations if all vehicle conditions for
an automatic engine stop are me t:
R you brake theve hicle toast andstill in trans‐
mission position hori.
R vehicles with a 48 V on-board electrical
sy stem: you depress the brake pedal when
tra velling at a low speed.
If th e sy stem has de tected one of thefo llowing
situations, the engine will not stop:
R youstop at a stop sign and there is no vehi‐
cle in front of you.
R theve hicle that stopped in front of youstarts
up again.
R you manoeuv re, turn thesteering wheel
sharply or engage reve rsege ar. Driving and parking
197
Page 201 of 549
%
Ifth e sy stem de tects an intelli gent stop
inhibitor, e.g. a stop sign, the engine will not
st op.
If yo u activate the HOLD function or engage
th e park position j,the engine can be
switched off in spite of an intelligent stop
inhibitor.
The engine is restar ted automatically if:
R you en gage transmission position hork.
R you depress the accelera tor pedal.
R an auto matic engine start is requ ired bythe
ve hicle.
R youre lease the brake pedal.
R vehicles with a 48 V on-board electrical
sy stem:
- youre lease the brake pedal on a downhill
gradient and theve hicle does not roll.
- theve hicle rolls on a downhill gradient
and does not automatically enter glide
mode at 20 km/h. ECO
start/ stop function symbols in the multi‐
function display:
R the symbol è(green) appears when the
ve hicle is at a standstill: the engine was
switched off bythe ECO start/ stop function.
R the symbol ç(yellow) appears when the
ve hicle is at a standstill: not all vehicle condi‐
tions for an engine stop ha vebeen met.
R neither the symbol ènorç appears
when theve hicle is at a standstill: an intelli‐
ge nt stop inhibitor was de tected, e.g. a stop
sign.
R the symbol sappears: the ECO start/
st op function is deactivated or there is a mal‐
function.
If th e engine was switched off bythe ECO start/
st op function and you lea vetheve hicle, a warn‐
ing tone sounds and the engine is not restar ted.
In addition, thefo llowing display message
appears in the multifunction display:
Vehicle is operational Switch off ignition before
exiting If
yo u do not swit choff the ignition, it is auto‐
matically switched off af terth re e minutes.
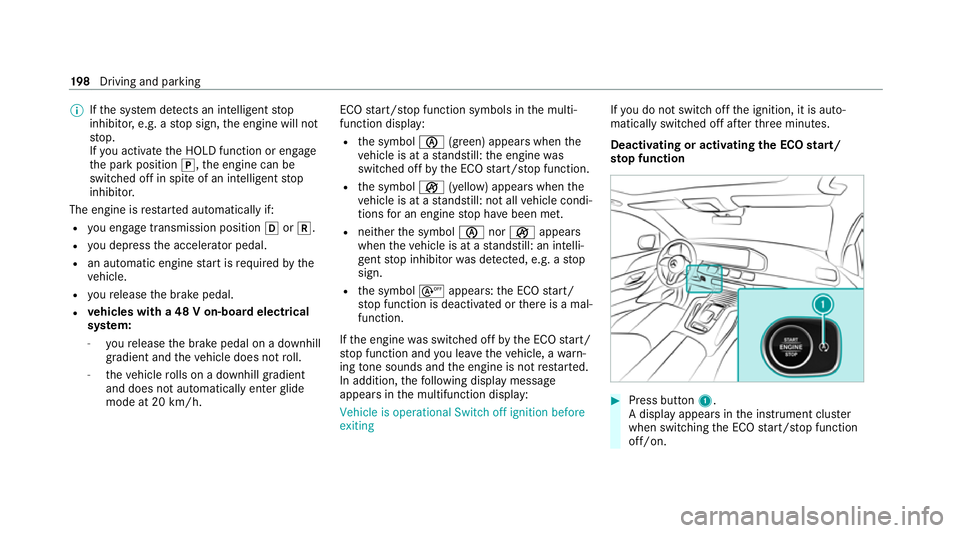
Deactivating or activating the ECO start/
sto p function #
Press button 1.
A displ ayappears in the instrument clus ter
when swit ching the ECO start/ stop function
off/on. 19 8
Driving and pa rking
Page 202 of 549
%
A continuous sdisplayappears in the
instrument clus ter while the ECO start/ stop
function is deactivated. ECO display function
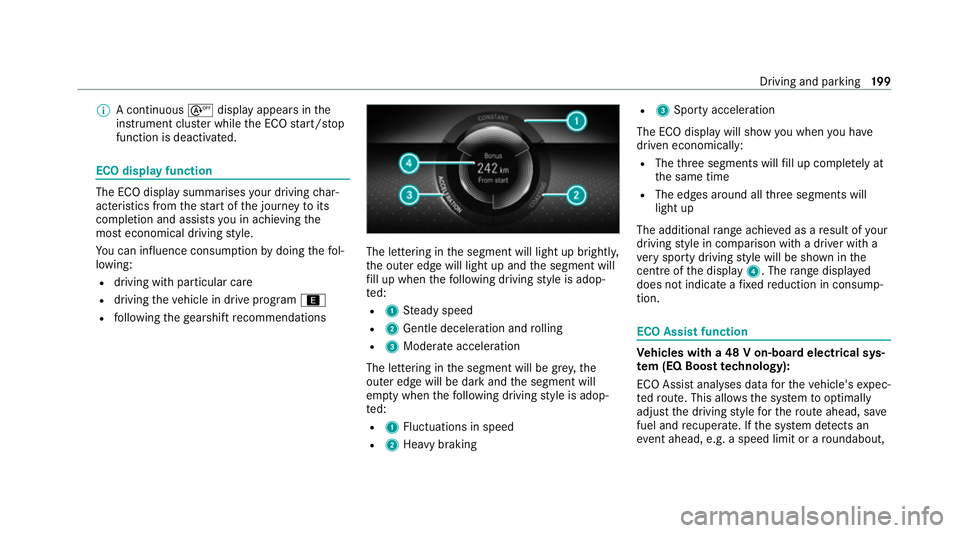
The ECO display summarises
your driving char‐
acteristics from thest art of the journey toits
completion and assists you in achieving the
most economical driving style.
Yo u can influence consum ption bydoing thefo l‐
lowing:
R driving with particular care
R driving theve hicle in drive program ;
R following thege arshift recommendations The lettering in
the segment will light up brightl y,
th e outer edge will light up and the segment will
fi ll up when thefo llowing driving style is adop‐
te d:
R 1 Steady speed
R 2 Gentle deceleration and rolling
R 3 Moderate acceleration
The lettering in the segment will be gr ey,the
outer edge will be dark and the segment will
em pty when thefo llowing driving style is adop‐
te d:
R 1 Fluctuations in speed
R 2 Heavy braking R
3 Sporty acceleration
The ECO display will show you when you ha ve
driven economically:
R The thre e segments will fill up comple tely at
th e same time
R The edges around all thre e segments will
light up
The additional range achi eved as a result of your
driving style in comparison with a driver with a
ve ry sporty driving style will be shown in the
centre of the display 4. Therange displ ayed
does not indicate a fixe dre duction in consump‐
tion. ECO Assist function
Ve
hicles with a 48 V on-board electrical sys‐
te m (EQ Boo sttech nology):
ECO Assist analyses data forth eve hicle's expec‐
te dro ute. This allo wsthe sy stem tooptimally
adjust the driving style fo rth ero ute ahead, sa ve
fuel and recuperate. If the sy stem de tects an
eve nt ahead, e.g. a speed limit or a roundabout, Driving and parking
19 9
Page 206 of 549
If one of
these drive prog rams is set or selected,
th e symbol is shown as a
warning. When
th is symbol is shown, the selected drive program
is not suitable for transporting a load on the
ro of.
The following drive prog rams are af fected:
R Sport drive program
R Sport + drive program
R Individual drive program wi th the ESP ®
set‐
ting Sport or Sport+
% The symbol is also shown in thefo llowing sit‐
uations:
R Within theth emes if a cor responding
drive program is sa ved
Fo r more information on themes see .
R Within there set display if the pr eviously
active drive prog ram is unsui tableforthe
transpo rtof a roof load
Fo r fur ther information on there set dis‐
pla y,see (/ page 203). Selecting
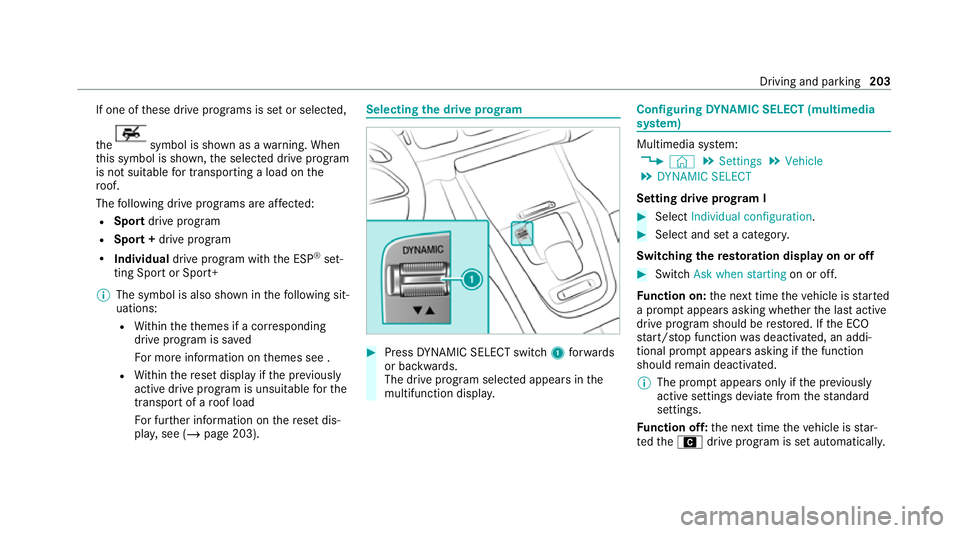
the drive prog ram #
Press DYNA MIC SELECT switch 1forw ards
or backwards.
The drive prog ram selected appears in the
multifunction displa y. Configuring
DYNA MIC SELECT (multimedia
sy stem) Multimedia sy
stem:
4 © 5
Settings 5
Vehicle
5 DYNAMIC SELECT
Setting drive prog ram I #
Select Individual configuration. #
Select and set a categor y.
Switching there storation display on or off #
Swit chAsk when starting on or off.
Fu nction on: the next time theve hicle is star ted
a prom ptappears asking whe ther the last active
drive prog ram should be restored. If the ECO
st art/ stop function was deactivated, an addi‐
tional prom ptappears asking if the function
should remain deactivated.
% The prom ptappears on ly ifthe pr eviously
active settings deviate from thest andard
settings.
Fu nction off: the next time theve hicle is star‐
te dth eA drive program is set automatically. Driving and parking
203
Page 207 of 549
The ECO
start/ stop function is activated auto‐
matically.
% This function must be activated for each user
profile sepa rately. Only when this function is
activated will the drive prog ram and Eco
st art/ stop setting forth e pr evious journey
be sa vedfo rth ere spective user profile. Displaying
vehicle data Multimedia sy
stem:
4 © 5
Info #
Select Vehicle.
The vehicle data is displa yed. Displaying engine data
Multimedia sy
stem:
4 © 5
Info #
Select Engine.
The engine data is displa yed.
% The actual (maximum) values that can be
achie vedfo r engine output and engine tor‐
qu e may deviate from the certified values within
the count ry-specific guidelines for
permissible tolerances (basis: UN-ECE No.
85 or country -specific guidelines).
Fa ctors that can influence this are, forex am‐
ple:
R Sea le vel
R Fuel grade
R Outside temp erature
R Operating temp erature of the engine
% The values displa yed ser veonly as orienta‐
tion. The values for engine output and
engine torque sh own in the media display
may deviate from the actual values. Calling up
the consum ption indicator Multimedia sy
stem:
4 © 5
Info #
Select Consumption.
The cur rent and average consu mption is dis‐
pl ay ed. Au
tomatic transmission DIRECT SELECT le
ver Fu
nction of the DIRECT SELECT le ver &
WARNING Risk of accident due toincor‐
re ct gearshifting
If th e engine speed is higher than the idle
speed and you en gage the transmission posi‐
tion hork, theve hicle may accelerate
sharply. #
Ifyo u en gage the transmission position
h ork when theve hicle is at a
st andstill, alw ays depress the brake
pedal firm lyand do not accelerate at
th e same time. 204
Driving and parking
Page 218 of 549
Obser
vethe no tes on operating fluids
(/ page 417).
Ad Blue ®
is available here:
R AdBlue ®
can be topped up byfast service at
a qu alified specialist workshop, e.g. a
Mercedes-Benz Service Centre.
R AdBlue ®
is available at many filling stations
from AdBlue ®
filling pumps.
R Alternativel y,Ad Blue ®
is available at qualified
specialist workshops, e.g. Mercedes-Benz
Service Centres, and at many filling stations
in Ad Blue ®
re fill canis ters or AdBlue ®
re fill
bottles.
% Ensure the connection between there fill
con tainer and vehicle filler neck does not
drip. To
pping up AdBlue ®
* NOTEEngine dama gedue toAd Blue ®
being in the fuel #
AdBlue ®
must not be used tofill the
fuel tank. #
Only use AdBlue ®
to fill th eAd Blue ®
ta nk. #
Do not overfill theAd Blue ®
tank. *
NO
TEContamination of theve hicle inte‐
ri or due toAd Blue ®
lea kage #
Afterto pping up, carefully close the
Ad Blue ®
re fill con tainer. #
Avoid car rying AdBlue ®
re fill con tainers
permanently in theve hicle. Re
quirements:
R The vehicle is unloc ked. The
following messages appear in order in the
multifunction display when theAd Blue ®
tank
requ irestopping up:
R Refill AdBlue See Owner’s Manual The
Ad Blue ®
leve l has fallen below there ser ve
ra nge. Top up AdBlue ®
immediately.
R Top up AdBlue Emergency op. in XXX miles
See Owner's ManualThe low AdBlue ®
level
will lead tolimited per form ance af terthe
re maining dis tance displ ayed has been
driven. Top up AdBlue ®
immediately.
R XX,X l Top up AdBlue Emer. op.: max. XXX
km/h Start not poss. in XXX kmThe low
AdBlue ®
leve l will lead tolimited per form‐
ance from the speed displa yed. Af terthe
re maining dis tance displ ayed has been cov‐
ered, it will no longer be possible tostart the
engine. Top up with at least the amount of
Ad Blue ®
displ ayed.
R XX,X l Top up AdBlue Switch on ignition, wait
60 sec. or eng. start not poss. TheAdBlue ®
ta nk is em pty. Yo u can no lon gerst art the
engine. Top up with at least the amount of Driving and parking
215