2020 MERCEDES-BENZ GLS SUV warning
[x] Cancel search: warningPage 169 of 549
#
Switching intermittent wiping on/off:
press button 2.
Ve hicles with rain sensor: the wipe inter val
automatically adapts tothe driving condi‐
tions.
The è symbol will appear on the instru‐
ment clus ter when there ar wind owwiper is
swit ched on. Re
placing the windsc reen wiper blades &
WARNING Risk of becoming trapped if
th e windscreen wipers are switched on
while wiper blades are being replaced
If th e windscreen wipers begin tomo vewhile
yo u are changing the wiper blades, you can
be trapped bythe wiper arm. #
Alw ays switch off the windscreen wip‐
ers and ignition before changing the
wiper blades. Moving
the wiper arms into there placement
position #
Switch the ignition on and then off again
immediatel y. #
Within around 15seconds, press and hold
th eî button on the combination switch
fo r appro ximately thre e seconds
(/ page 165).
The wiper arms will mo veinto there place‐
ment position.
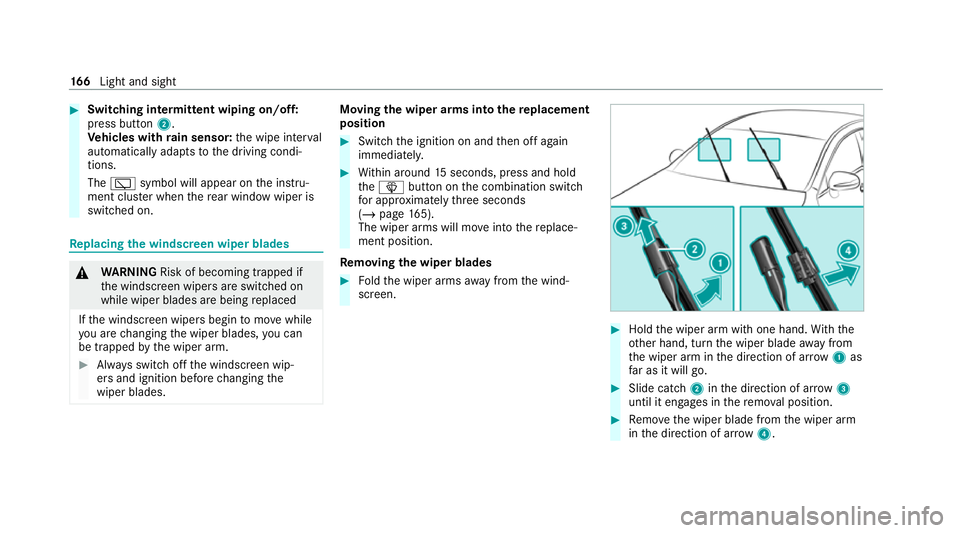
Re moving the wiper blades #
Foldthe wiper arms away from the wind‐
screen. #
Hold the wiper arm with one hand. With the
ot her hand, turn the wiper blade away from
th e wiper arm in the direction of ar row 1 as
fa r as it will go. #
Slide catch 2inthe direction of ar row 3
until it engages in there mo val position. #
Remo vethe wiper blade from the wiper arm
in the direction of ar row4. 16 6
Light and sight
Page 172 of 549
#
Press the wiper blade onto the wiper arm in
th e direction of ar row3beyond the point of
re sis tance.
The wiper blade will engage wi tha noticeable
click and mo vefreely again. #
Foldthe wiper arm back onto the wind‐
screen. Re
placing the rear window wiper blade &
WARNING Risk of becoming trapped if
th e windscreen wipers are switched on
while wiper blades are being replaced
If th e windscreen wipers begin tomo vewhile
yo u are changing the wiper blades, you can
be trapped bythe wiper arm. #
Alw ays switch off the windscreen wip‐
ers and ignition before changing the
wiper blades. Re
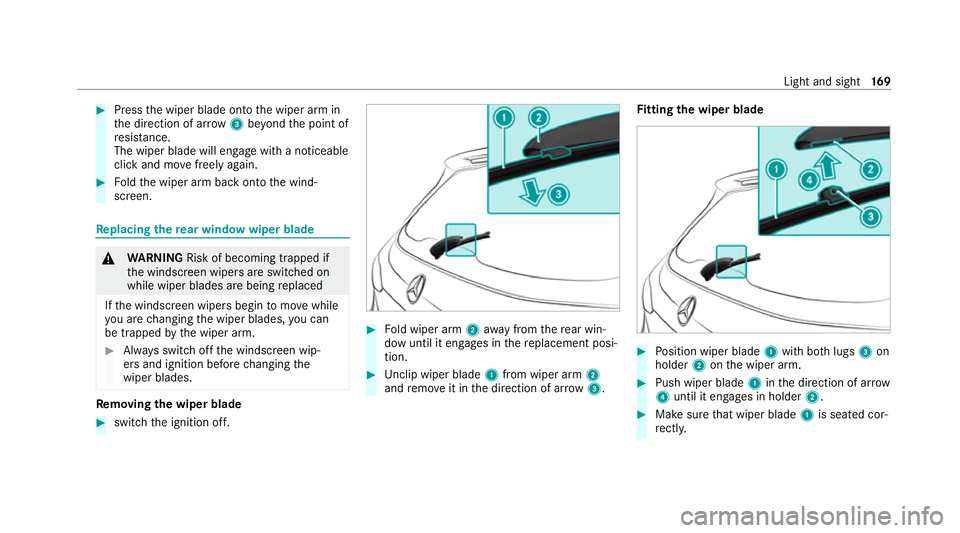
moving the wiper blade #
switch the ignition off. #
Fold wiper arm 2away from there ar win‐
dow until it engages in there placement posi‐
tion. #
Unclip wiper blade 1from wiper arm 2
and remo veit in the direction of ar row 3. Fi
tting the wiper blade #
Position wiper blade 1with bo thlugs 3on
holder 2onthe wiper arm. #
Push wiper blade 1inthe direction of ar row
4 until it en gage s in holder 2. #
Make sure that wiper blade 1is seated cor‐
re ctly. Light and sight
16 9
Page 173 of 549
#
Foldthe wiper arm from there placement
position back onto there ar wind ow. Mir
rors Operating
the outside mir rors &
WARNING Risk of accident due to
adjusting vehicle settings while theve hi‐
cle is in motion
Yo u could lose cont rol of theve hicle in the
fo llowing situations in particular:
R Ifyo u adjust the driver's seat, the head
re stra ints, thesteering wheel or the mir‐
ro r while theve hicle is in motion.
R Ifyo ufast enyour seat belt while theve hi‐
cle is in motion. #
Before starting the engine: adjust the
driver's seat, the head restra ints, the
st eering wheel and the mir ror and fas‐
te nyo ur seat belt. &
WARNING Risk of accident due tomis‐
judgement of dis tance when using the
outside mir ror
The outside mir rors reflect objects on a
smaller scale. The objects in view are in fact
closer than they appear. #
Therefore, alw ays look over your shoul‐
der in order toensure that you are
aw are of the actual dis tance between
yo u and thero ad users driving behind
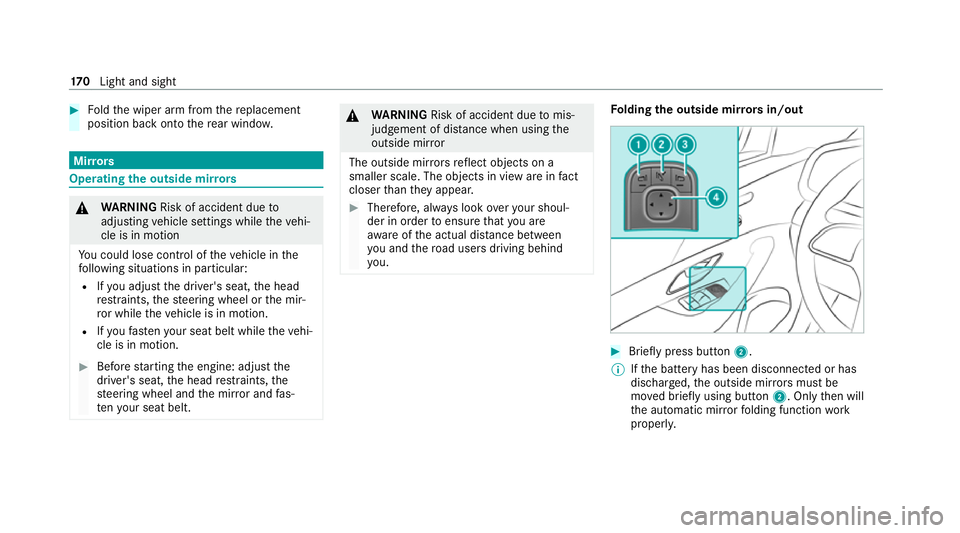
yo u. Fo
lding the outside mir rors in/out #
Brief lypress button 2.
% Ifth e battery has been disconnected or has
dischar ged, the outside mir rors must be
mo ved briefly using button 2. Onlythen will
th e automatic mir rorfo lding function work
proper ly. 17 0
Light and sight
Page 174 of 549

%
Mercedes-Maybach vehicles: when the out‐
side mir rors fold in, theex tendable running
boards will retract if they wereprev iously
ex tended.
Ad justing the outside mir rors #
Press button 1or3 toselect the outside
mir rorto be adjus ted. #
Use button 4toadjust the position of the
mir rorgl ass.
Engaging the outside mir rors
If an outside mir ror has been forc ibly disen‐
ga ge d, proceed as follo ws. #
Vehicles without electrically folding outside
mir rors: manually mo vethe outside mir ror
into the cor rect position. #
Vehicles with electrically folding outside mir‐
ro rs: press and hold button 2.
Yo u will hear a click and the mir ror will audi‐
bly click into place. The outside mir ror will
now be set tothe cor rect position. Au
tomatic anti-dazzle mir rors function &
WARNING Risk of acid bu rns and poi‐
soning due tothe anti-dazzle mir ror elec‐
trolyte
Electrolyte may escape if theglass in an
automatic anti-dazzle mir ror breaks.
The electrolyte is hazardous tohealth and
causes ir rita tion. It mu stnot come into con‐
ta ct wi thyour skin, eyes,respiratory or gans
or clo thing or be swallo wed. #
Ifyo u come into contact with electro‐
ly te , obser vethefo llowing:
R Immediately rinse the electrolyte
from your skin with water and seek
medical attention.
R If electrolyte comes into contact
with your eyes, immediately rinse
th em thoroughly with clean water
and seek medical attention.
R Ifth e electrolyte is swallo wed,
immediately rinse your mouth out
th oroughl y.Do not induce vomiting.
Seek medical attention immediately. R
Immedia tely ch ange out of clo thing
which has been con taminated with
electrolyte.
R If an allergic reaction occurs, seek
medical attention immediatel y. The inside
rearview mir ror and the outside mir‐
ro r on the driver's side will automatically go into
anti-dazzle mode if light from a headlamp hits
th e sensor on the inside rearview mir ror.
Sy stem limits
The sy stem will not go into anti-dazzle mode if:
R the engine is switched off.
R reve rsege ar is engaged.
R the interior lighting is switched on. Fr
ont-passenger outside mir ror parking posi‐
tion function %
The pa rking position is available on ly invehi‐
cles with a memory function.
The parking position makes parking easier. Light and sight
171
Page 181 of 549
#
Toactivate: press button Á.
Re sidual heat will be switched off automaticall y.Switching
there sidual heat in there ar
on/off Re
quirements:
R The vehicle is par ked.
When there sidual heat of the engine is activated
in there ar compartment, you can heat or venti‐
la te there ar compartment for appro ximately
30 minutes. #
Press button 5(/ page 175). Ac
tivating/deactivating ionisation Ionisation impr
oves thequ ality of theve hicle's
interior air. Ionisation of the interior air is odour‐
less. #
Call up the air conditioning menu
(/ page 175). #
Select Air quality. #
Select IONISATION . Fr
ag rance sy stem Setting
the frag rance sy stem
Re quirements:
R Automatic clima tecontrol is acti vated.
R The glove box is closed.
The fragrance sy stem distributes a pleasant fra‐
grance thro ughout theve hicle interior from a fla‐
con located in theglov e box. #
Call up the climate control menu
(/ page 175). #
Select Air quality. #
Select AIR FRESHENER . #
Keep pressing until the desired intensity is
re ached. Inserting or
removing the flacon ofthe fra‐
gr ance sy stem &
WARNING Risk of inju ryfrom liquid per‐
fume
If ch ildren open theflacon, they could drink
th e liquid perfume or it could come into con‐
ta ct wi th theireyes. #
Do not lea vechildren unat tended in the
ve hicle. #
Consult a doctor immediately if liquid
perfume has been drunk. #
If liquid perfume comes into contact
with your eyes or skin, rinse your eyes
with clean water. #
If sym ptoms continue, consult a doctor. 17 8
Climate cont rol
Page 183 of 549
St
ationary heater/ventilation St
ationary heater/ventilation function
R The air inside theve hicle is heated or ventila‐
te dto the set temp erature.
R The air inside theve hicle cannot be cooled
down to temperatures below the outside
te mp erature.
R Ifth e outside temp erature changes, ventila‐
tion mode au tomatical lyswitches toheating
mode or heating mode automatically
switches toventilation mode.
The stationary heater and theex haust gas outlet
are situated behind theright-hand front wheel.
Switching thest ationary heater/ventilation
on/off via the operating unit &
DANG ER Risk of fata l injury due topoi‐
sonous exhaust gases
If th eta ilpipe is bloc ked or suf ficient ventila‐
tion is not possible, poisonous exhaust gases
such as carbon monoxide may enter theve hi‐
cle. This is the case in enclosed spaces or if
th eve hicle gets stuck in sn ow,fo rex ample. #
Alw ays switch thest ationary heater off
in enclosed spaces without an air
ex traction sy stems, e.g. in garage s. #
Keep theta ilpipe and the area around
th eve hicle free from snow when the
engine or thest ationary heater are run‐
ning. #
Open a window on the windward side of
th eve hicle toensure an adequate sup‐
ply of fresh air. &
WARNING Risk offire due tohot station‐
ary heater components and exhaust
ga ses
Flammable materials such as lea ves, grass or
twigs may ignite. #
When thest ationary heater is swit ched
on, make sure that:
R hot vehicle parts do not come into
contact with flammable materials.
R theex haust gas can flow out of the
st ationary heater exhaust pipe
unhindered. R
theex haust gas does not come into
contact with flammable materials. *
NO
TEBattery discharge caused bysta‐
tionary heater or stationary ventilation
operation Ope
rating thest ationary heater or stationary
ve ntilation drains the batter y. #
After heating or ventilating theve hicle
twice, drive for a longer period of time. Re
quirements:
R The fuel tank is su fficiently full.
% Please no tethat if theta nk fill le vel is too
lo w, it can result in function restrictions dur‐
ing auxilia ryheating operation. #
Set the desired temp erature using thew
button. #
Press the& button.
The red or blue indicator lamp on the&
button will light up or go out. 18 0
Climate cont rol
Page 187 of 549
FA
IL¯
¯ appea rson there mo tecont rol dis‐
play
Po ssible cause:
R There is a malfunction in thest ationary
heater. #
Have thest ationary heater checked at a
qu alified specialist workshop. Air
vents Ad
justing the front air vents &
WARNING Risk of bu rns and frostbite
due tobeing too close tothe air vents
Ve ry hot or very cold air can flow from the air
ve nts. #
Makesure that all vehicle occupants
alw ays maintain a suf ficient di stance
from the air vents. #
If necessa ry, direct the air flow to
ano ther area of theve hicle interior. To
guarantee theflow of fresh air thro ugh the air
ve nts into theve hicle interior, comply with the
fo llowing:
R Alw ayske ep theve nts and vent grilles in the
ve hicle interior free.
R Keep the air inlet free of residue build-up
(/ page 364).
R Optimum climate comfort is achie ved with
th e air vents in the cent reposition. #
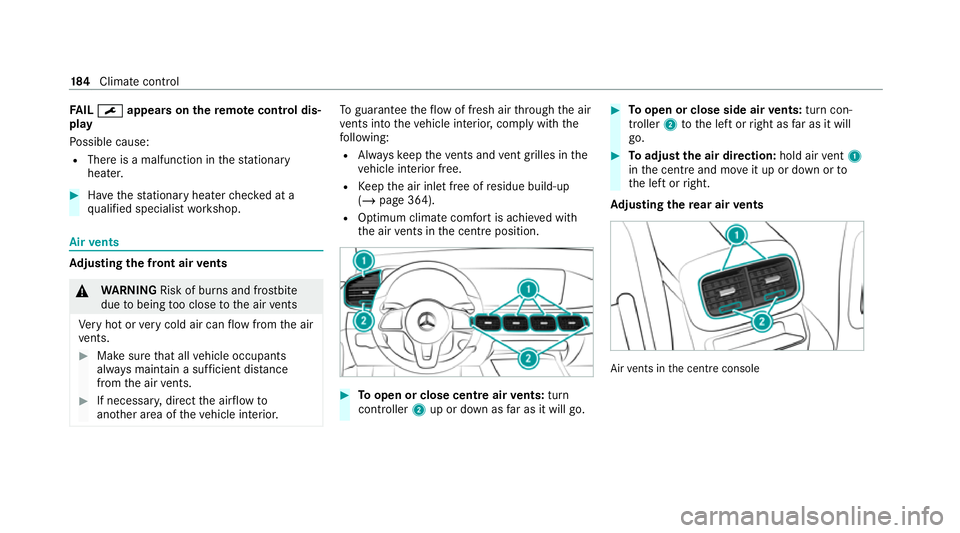
Toopen or close centre air vents: turn
cont roller 2up or down as far as it will go. #
Toopen or close side air vents: turn con‐
troller 2tothe left or right as far as it will
go. #
Toadjust the air direction: hold airvent 1
in the cent reand mo veit up or down or to
th e left or right.
Ad justing the rear air vents Air
vents in the cent reconsole 184
Climate cont rol
Page 190 of 549
Driving
Note
s on Mercedes-AMG vehicles Obser
vethe no tes on thefo llowing topics in the
Supplement, otherwise you may failto recognise
dangers.
% The availability of cer tain functions depends
on the equipment and model of theve hicle.
R Emotion Start
R AMG Performance exhaust sy stem
R AMG ceramic high-per form ance composite
brake sy stem
R AMG ACTIVE RIDE CONTROL
R AMG steering-wheel buttons Switching on
the po wer supp lyor ignition &
WARNING Risk of accident and inju ry
due tochildren left unat tended in the
ve hicle
If ch ildren are left unsupervised in theve hi‐
cle, they could, in pa rticular:
R open doors, thereby endangering other
persons or road users.
R get out and be stru ck byoncoming traf‐
fi c.
R ope rate ve hicle equipment and become
trapped, forex ample.
In addition, thech ildren could also set the
ve hicle in motion, forex ample by:
R releasing the parking brake.
R changing the transmission position.
R starting theve hicle. #
Never lea vechildren unat tended in the
ve hicle. #
When leaving theve hicle, alw aysta ke
th eke y with you and lock theve hicle. #
Keep theve hicle key out of reach of
ch ildren. Re
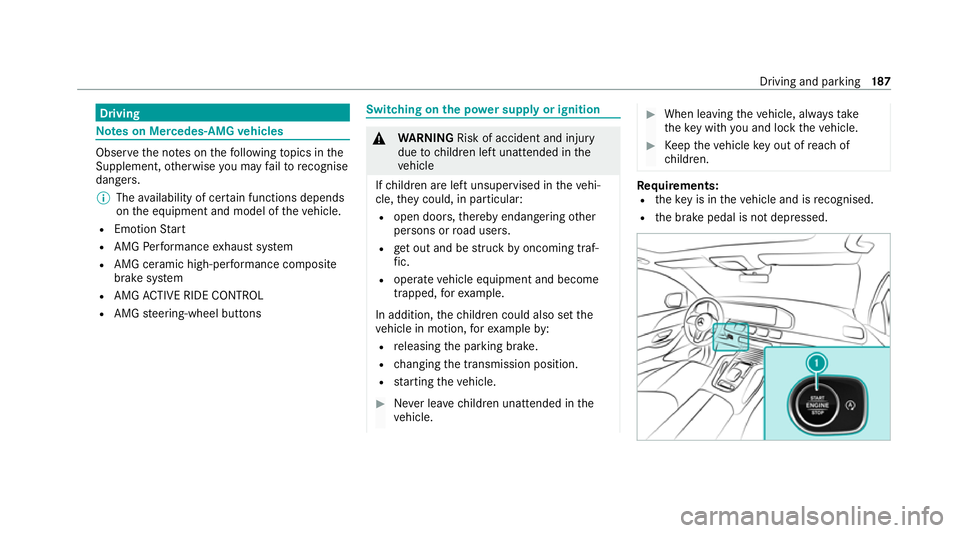
quirements:
R theke y is in theve hicle and is recognised.
R the brake pedal is not depressed. Driving and parking
187