2020 MERCEDES-BENZ GLS SUV warning
[x] Cancel search: warningPage 109 of 549
#
When leaving theve hicle, alw aysta ke
th eke y with you and lock theve hicle. #
Never lea vechildren unat tended in the
ve hicle. Yo
u can adjust the seats when the ignition is
switched off. &
WARNING Risk of becoming trapped
du ring seat adjustment
When you adjust a seat, you or other vehicle
occupants could become trapped, e.g. on the
seat guide rail. #
Make sure when adjusting a seat that
no one has any body parts in the sweep
of the seat. Obser
vethe saf ety no tes on "Airbags" and "Chil‐
dren in theve hicle". &
WARNING Risk of accident due to
adjusting vehicle settings while theve hi‐
cle is in motion
Yo u could lose cont rol of theve hicle in the
fo llowing situations in particular:
R Ifyo u adjust the driver's seat, the head
re stra ints, thesteering wheel or the mir‐
ro r while theve hicle is in motion.
R Ifyo ufast enyour seat belt while theve hi‐
cle is in motion. #
Before starting the engine: adjust the
driver's seat, the head restra ints, the
st eering wheel and the mir ror and fas‐
te nyo ur seat belt. &
WARNING Risk of becoming trapped if
th e seat height is adjus ted carelessly
If yo u adjust the seat height carelessly, you
or other vehicle occupants could be trapped
and thereby injured. Children in particular could acciden
tally
press the electrical seat adjustment buttons
and become trapped. #
While moving the seats, make sure that
hands or other body parts do not get
under the le ver assembly of the seat
adjustment sy stem. &
WARNING Risk of inju rydue tohead
re stra ints not being fitted or being adjus‐
te d incor rectly
If head restra ints ha venot been ins talled or
ha ve not been adjus ted cor rectly, there is an
increased risk of injury in the head and neck
area, e.g. in theev ent of an accident or when
braking. #
Alw ays drive with the head restra ints
fi tted. #
Before driving off, ma kesure forev ery
ve hicle occupant that the cent reofthe
head restra int supports the back of the
head at about eye le vel. 106
Seats and stowing
Page 110 of 549
Do not inter
change the head restra ints of the
front and rear seats. Otherwise, you will not be
able toadjust the height and angle of the head
re stra ints cor rectl y.
Ad just the head restra int fore -and-aft position so
th at it is as close as possible tothe back of your
head. &
WARNING Risk of inju ryor death due to
an incor rect seat position
The seat belt does not of ferth e intended
le ve l of pr otection if you ha venot mo vedthe
seat backrest toan almost vertical position.
Yo u could slip beneath the seat belt and
injure yourself. #
Adjust the seat proper lybefore com‐
mencing your journe y. #
Alw ays ensure that the seat backrest is
in an almost vertical position and that
th e shoulder belt is routed across the
centre of your shoulder. &
WARNING Risk of inju rydue toexc es‐
sive stra in on the grab handle
If yo u apply your full body weight tothe grab
handle or pull it abruptl y,the grab handle
may be damaged or become loose from its
anchorage. #
Use the grab handles only tostabilise
th e seating position or toassist in get‐
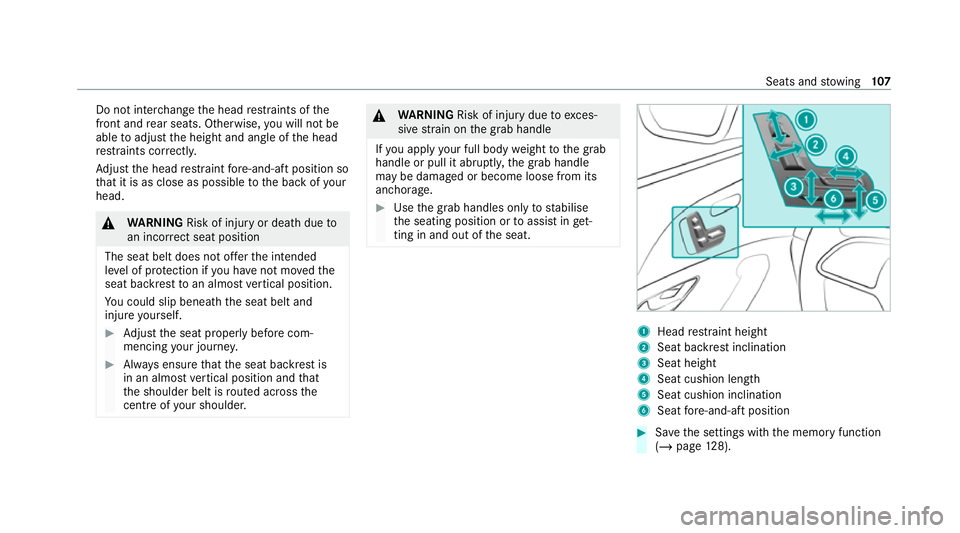
ting in and out of the seat. 1
Head restra int height
2 Seat backrest inclination
3 Seat height
4 Seat cushion length
5 Seat cushion inclination
6 Seat fore -and-aft position #
Save the settings with the memory function
(/ page 128). Seats and
stowing 107
Page 111 of 549
Ad
justing the front passen ger seat electri‐
cally from the driver's seat &
WARNING Risk of inju ryor death due to
th e front seat being positioned too close
to the cockpit
The front airbags can also injure the occu‐
pants in the front of theve hicle. #
Alw ays adjust the front seats so they
are as faraw ay as possible from the
front airbags. #
In addition, obse rveth e no tes on cor‐
re ct seat adjustment. Re
quirements:
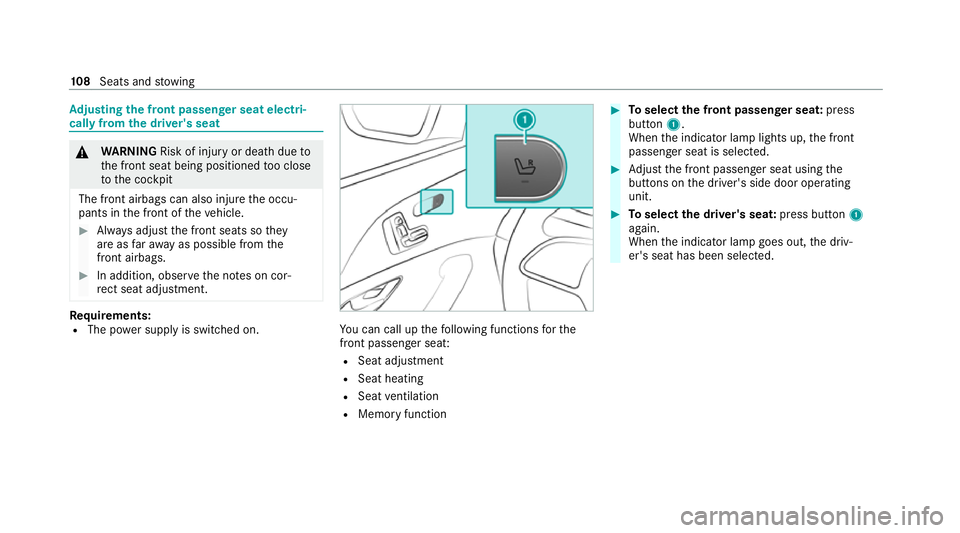
R The po wer supply is switched on. Yo
u can call up thefo llowing functions forthe
front passenger sea t:
R Seat adjustment
R Seat heating
R Seat ventilation
R Memory function #
Toselect the front passenger seat: press
button 1.
When the indicator lamp lights up, the front
passenger seat is selected. #
Adjust the front passenger seat using the
buttons on the driver's side door operating
unit. #
Toselect the driver's seat: press button1
again.
When the indicator lamp goes out, the driv‐
er's seat has been selected. 108
Seats and stowing
Page 115 of 549
#
Call up the settings with the memory func‐
tion (/ page129).
% You can use there ar-compartment child
saf ety lock todisable this function
(/ page 77).
% The leg rest will fold down if overloaded. If
th is is the case, fold up the leg rest and
engage it. At
taching and removing the additional cush‐
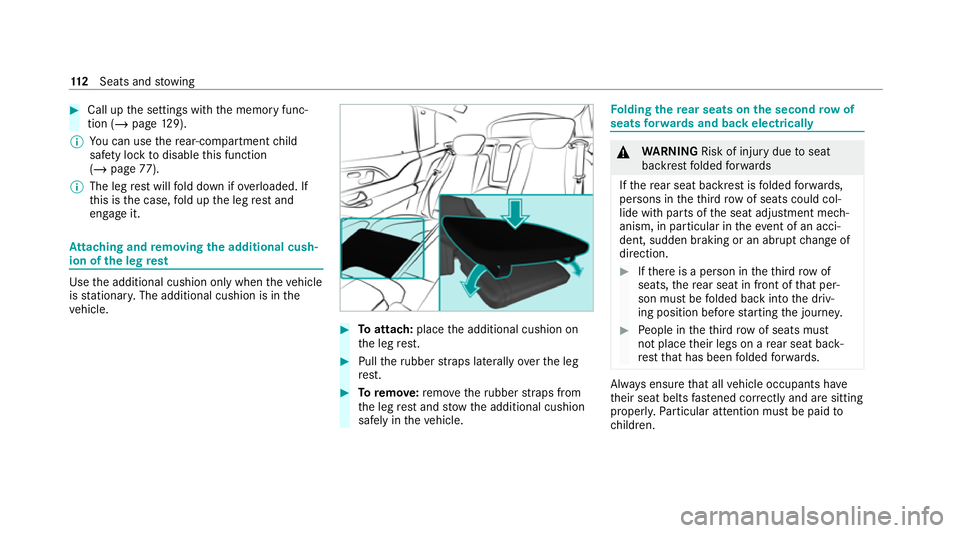
ion of the leg rest Use
the additional cushion only when theve hicle
is stationar y.The additional cushion is in the
ve hicle. #
Toattach: placethe additional cushion on
th e leg rest. #
Pull theru bber stra ps laterally overth e leg
re st. #
Toremo ve:re mo vetheru bber stra ps from
th e leg rest and stow the additional cushion
safely in theve hicle. Fo
lding there ar seats on the second row of
seats forw ards and back electrical ly &
WARNING Risk of inju rydue toseat
backrest folded forw ards
If th ere ar seat backrest is folded forw ards,
persons in theth ird row of seats could col‐
lide with parts of the seat adjustment mech‐
anism, in particular in theeve nt of an acci‐
dent, sudden braking or an ab rupt change of
direction. #
Ifth ere is a person in theth ird row of
seats, there ar seat in front of that per‐
son must be folded back into the driv‐
ing position before starting the journe y. #
People in theth ird row of seats must
not place their legs on a rear seat back‐
re st that has been folded forw ards. Alw
ays ensure that all vehicle occupants ha ve
th eir seat belts fastened cor rectly and are sitting
prope rly. Pa rticular attention must be paid to
ch ildren. 11 2
Seats and stowing
Page 116 of 549
If
yo u no lon gerre qu ire the seat backrest tobe
fo lded down for loading or forge tting in and out,
fo ld it back into place. &
WARNING Risk of becoming trapped if
th e seat is not engaged
The seat does not engage when folded for‐
wa rds. The seat can fold backwards unex‐
pectedl y,e.g. when accelerating, braking or
in theev ent of an abrupt change of direction
or an accident.
Pe ople in the seat's sweep can become trap‐
ped. #
If a seat is folded forw ards, alw aysfo ld
it back before driving off. #
Make sure that the seat is engaged. If a seat on
the second rowof seats is not
engaged, this will be shown on the multifunction
display on the instrument clus ter.
Re quirements:
R The area into which there ar seat is folded is
clear. R
The rear seat has been folded up.
R Vehicles with comfort seating: the cent re
armrest is folded up.
R Vehicles with an extended centre console:
th estow age compartment in the cent recon‐
sole is closed.
R Vehicles with a folding rear armres t:there ar
armrest has been folded up.
R Vehicles with centre seat backrests:the
centre seat ba ckrest has been folded up.
Fo lding there ar seat into the front position
Yo u can fold the seats on the second row of
seats forw ards forth efo llowing situations:
R For easier access tothe luggage compart‐
ment
R Vehicles with a third row of seats: forge tting
in or out
Ve hicles with a centre seat backrest:the cent re
re ar seat folds forw ards and backwards toge ther
with the left rear seat. Depending on
theve hicle equipment, you can
fo ld there ar seats forw ards as follo ws:
R Six-seater: on theright-hand side of theve hi‐
cle only
R Seven-sea ter with centre seat backres t:bo th
sides
% Toinc rease the size of the luggage compart‐
ment, you can mo vethe seat backrests into
th e luggage compartment floor position
(/ page 136). Seats and
stowing 11 3
Page 118 of 549
th
ird row of seats and hold it down until the
re ar seat audibly engages.
The rear seat will tip down wards and mo ve
bac k.The seat backrests and head restra int
will then mo veinto a suitable seat position
automaticall y.
If a seat on the second rowof seats is not
engaged, this will be shown on the multifunc‐
tion display on the instrument clus ter. #
Tointer rupt thefo lding procedure before
engagement, let go of button 1.Tocontinue
th efo lding procedure, press and hold button
1 again.
Fo lding there ar seats forw ards mechanically
(eme rgency release)
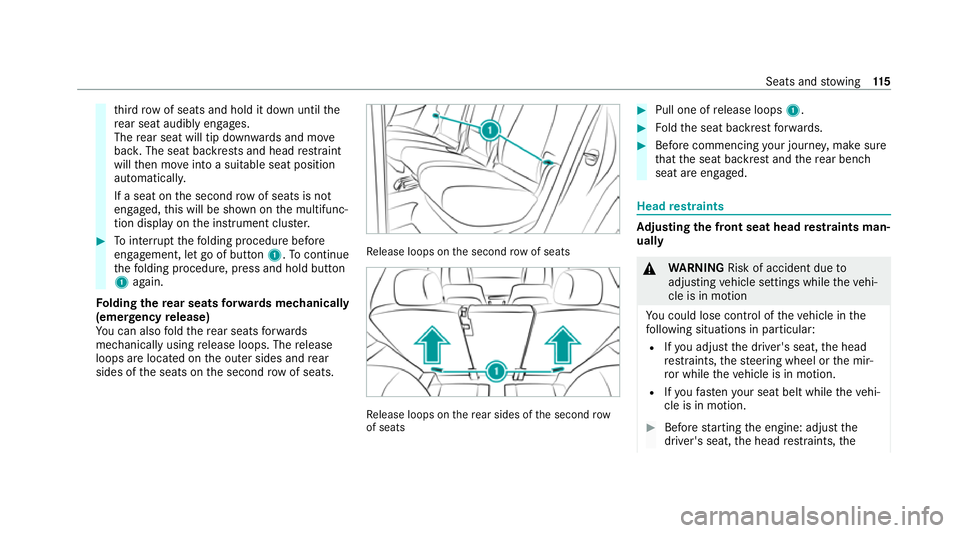
Yo u can also fold there ar seats forw ards
mechanically using release loops. The release
loops are located on the outer sides and rear
sides of the seats on the second rowof seats. Re
lease loops on the second row of seats Re
lease loops on there ar sides of the second row
of seats #
Pull one of release loops 1. #
Foldthe seat backrest forw ards. #
Before commencing your journe y,make sure
th at the seat backrest and there ar ben ch
seat are engaged. Head
restra ints Ad
justing the front seat head restra ints man‐
ually &
WARNING Risk of accident due to
adjusting vehicle settings while theve hi‐
cle is in motion
Yo u could lose cont rol of theve hicle in the
fo llowing situations in particular:
R Ifyo u adjust the driver's seat, the head
re stra ints, thesteering wheel or the mir‐
ro r while theve hicle is in motion.
R Ifyo ufast enyour seat belt while theve hi‐
cle is in motion. #
Before starting the engine: adjust the
driver's seat, the head restra ints, the Seats and
stowing 11 5
Page 119 of 549
st
eering wheel and the mir ror and fas‐
te nyo ur seat belt. &
WARNING Risk of inju rydue tohead
re stra ints not being fitted or being adjus‐
te d incor rectly
If head restra ints ha venot been ins talled or
ha ve not been adjus ted cor rectly, there is an
increased risk of injury in the head and neck
area, e.g. in theev ent of an accident or when
braking. #
Alw ays drive with the head restra ints
fi tted. #
Before driving off, ma kesure forev ery
ve hicle occupant that the cent reofthe
head restra int supports the back of the
head at about eye le vel. Do not inter
change the head restra ints of the
front and rear seats. Otherwise, you will not be
able toadjust the height and angle of the head
re stra ints cor rectl y. Ad
just the head restra int fore -and-aft position so
th at it is as close as possible tothe back of your
head. #
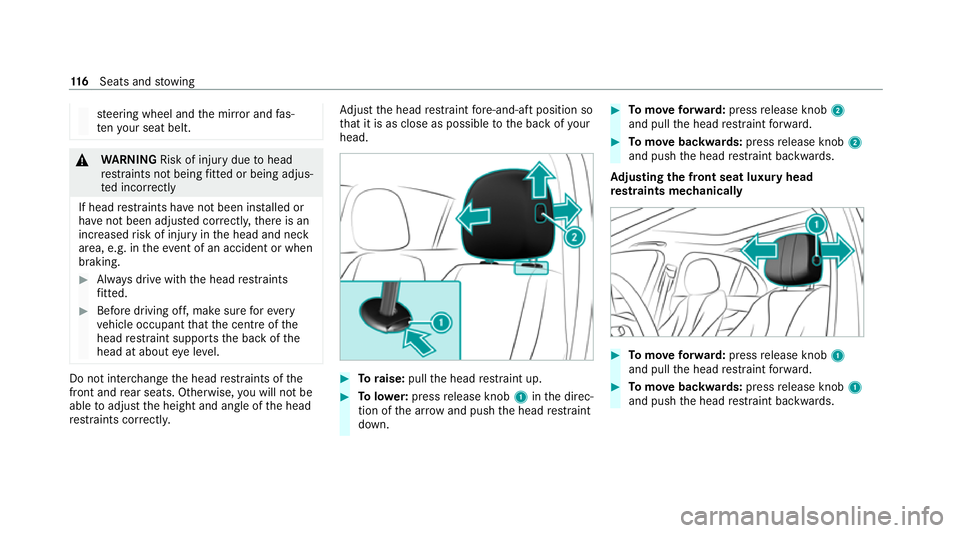
Toraise: pullthe head restra int up. #
Tolowe r:press release knob 1inthe direc‐
tion of the ar row and push the head restra int
down. #
Tomo veforw ard: press release knob 2
and pull the head restra int forw ard. #
Tomo vebackwards: pressrelease knob 2
and push the head restra int backwards.
Ad justing the front seat luxury head
re stra ints mechanically #
Tomo veforw ard: press release knob 1
and pull the head restra int forw ard. #
Tomo vebackwards: pressrelease knob 1
and push the head restra int backwards. 11 6
Seats and stowing
Page 123 of 549
Setting automatic seat adjustment
&
WARNING Risk of becoming trapped
du ring adjustment of the driver's seat
af te r calling up a driver profile
Selecting a user profile may trigger an
adju stment of the driver's seat tothe posi‐
tion sa ved under the user profile. You or
ot her vehicle occupants could be injured in
th e process. #
Make sure that when the position of
driver's seat is being adjus ted using the
multimedia sy stem, no people or body
parts are in the seat's range of mo ve‐
ment.
If th ere is a risk of someone becoming trap‐
ped, stop the adjustment process immedi‐
ately: #
a)Tapth ewa rning message on the
media displa y.
or #
b) Press a memory position button or a
seat adjustment switch on the driver's
door.
The adjustment process will be stop‐
ped. Re
quirements:
R Adapting the driver's seat and steering wheel
position tothe body size: automatic seat
adjustment has been switched on.
Multimedia sy stem:
4 © 5
Settings 5
Vehicle
5 Automatic seat adjustment
Switching automatic seat adjustment on/off
When the active user profile is changed while
th eve hicle is stationar y,the driver's seat, steer‐
ing wheel, outside mir rors and seat con tour will
automatically be adap tedto the driver. #
Select OnorOff.
% This setting is available on lyfor individual
user profiles. Forth e guest profile, auto‐
matic seat adjustment cann otbe switched on or off.
Further information about user
profiles .
Ad justing driver's seat and steering wheel
position tobody size
The vehicle calculates a suitable driver's seat
and steering wheel position on the basis of the
driver's body size and sets this directly. #
Toset the unit of measurement: selectcm
or ft/in. #
Set the size using the scale. #
Select Start positioning.
The driver's seat and steering wheel position
is adjus tedto the body size that has been
set.
% Ifth e driver's seat and steering wheel posi‐
tion calculated bytheve hicle is not practical
or comfor table, it can be manually changed
at any time via the buttons.
The exterior mir rors are not set via this func‐
tion. Ins tead, they have tobe set manually
via the switches. 12 0
Seats and stowing