2020 MERCEDES-BENZ GLS SUV ground clearance
[x] Cancel search: ground clearancePage 89 of 549

R
Ifyo u are driving at a speed greaterth an
4 km/h.
If yo u ha veselected the automatic mode in the
multimedia sy stem and you manually extend the
ru nning boards when the doors are closed, the
ru nning boards will remain extended. Even if you
open a door and then close it again, theru nning
boards will remain extended. Automatic mode
will be reactivated on ly whenyou are driving at a
speed greater than 4 km/h. &
WARNING Risk of inju rywhen extending
or retracting theru nning boards
The running boards extend at the side during
ex tension. During retraction, theru nning
boards are integrated in the side skirt. Parts
of the body could become trapped. There
may be people in thera nge of mo vement.
There is a risk of injur y. #
Alw ays ensure that there are no people
within thera nge of mo vement of the
ru nning boards. *
NO
TEDama getotheru nning boards
du ring extension or retraction The
running boards extend at the side during
ex tension. During retraction, theru nning
boards are integrated in the side skirt. #
Make sure that there is suf ficient space
du ring extension and retraction. *
NO
TEDama getotheve hicle body or
underbody due tolow ground clearance The
running boards are attached totheve hi‐
cle body via the underbody. This limits the
ground clearance. #
Drive over obs tacles, su chaskerbs,
particula rly careful lyand slowl y. Obser
vethe cor responding display messages in
th e instrument clus ter (/ page 433). Extending and
retracting the running boards
via the multimedia sy stem Multimedia sy
stem:
4 © 5
Settings 5
Vehicle
5 SIDE RUNNING BOARD #
Select Extend orRetract .
Au tomatically extending and retracting the
ru nning boards #
Activate or deacti vate AUTOMATIC EXTEN-
SION .
% This equipment is available on lyfor
Mercedes-Maybach vehicles. Load compartment
Opening
the tailgate &
DANG ER Risk of exhaust gas poisoning
Combustion engines emit poisonous exhaust
ga ses such as carbon monoxide. Exhaust
ga ses can enter theve hicle interior if theta il‐ 86
Opening and closing
Page 199 of 549
%
Further information about special all-ter rain
tyres forre trofitting can be ob tained from a
qu alified specialist workshop.
Off-road driving
Re ad this section before driving your vehicle off-
ro ad. Practise bydriving over more gentle off-
ro ad terrain firs t.
R Obse rveth e no tes on the cross-country ABS
(/ page 226).
R If necessar y,select theF orG drive
program (vehicles with an Off-road pac kage)
before driving off-road (/ page 203).
R Before driving off-road, shift the transfer
case totheLO W RANGE off-roadgear (vehi‐
cles with an Offroad pac kage ) (/ page 210).
R Select a vehicle le vel suitable for off-road ter‐
ra in (/ page 265). Toavo id damaging the
ve hicle, make sure there is alw ays suf ficient
ground clearance.
R Alw ayske ep the engine running and in gear
when driving on downhill gradients and
slopes. Obse rveth e no tes on driving in
mountainous terrain. R
Do not drive on unknown terrain that is not
easily visible and stay on mar kedro utes.
R Alw ayske ep the doors and windo wsclosed
while theve hicle is in motion.
R Deactivate Active Dis tance Assi st
DISTRONIC, cruise control and theva riable
limiter.
R Adapt your driving style to thete rrain.
R Do not use the HOLD function on steep
downhill or uphill gradients with slippery or
loose sur faces.
Driving on sand
When driving on sand, also obser vethefo llowing
instructions:
R Select theF drive program.
R Select a higher vehicle le vel.
R Shift toa lo werge ar.
R Drive quickly to overcome thero lling resist‐
ance, otherwise theve hicle may dig itself in.
R Drive in the trac ksofother vehicles if possi‐
ble. Make sure that thefo llowing prerequi‐
sites are me t: -
the tyre ruts are not too deep
- the sand is firm enough
- the ground clearance is suf ficient
Fo rding
Also obser vethefo llowing information when
fo rd ing:
R Drive no fasterthan 10 km/h.
R Obser vethe maximum permissible ford ing
dep th (/ page 428).
R Switch off automatic climate control
(/ page 176).
R Vehicles with stationary heater/ventila‐
tion: switch thest ationary heater/ ventilation
off (/ page 180).
R Ensu rethat a bow wave does not form asyou
drive.
R Do not stop in thewa ter and do not switch
off the engine. Ensure the ECO start/ stop
function is switched off (/ page198).
Driving in mountainous terrain 19 6
Driving and pa rking
Page 266 of 549

ensures
the best possible suspension and con‐
st ant ground clearance, even wi tha laden vehi‐
cle. When driving at speed, theve hicle is low‐
ered automatically toimpr ovedriving saf ety and
to reduce fuel consum ption. You also ha vethe
option of manually adjusting theve hicle le vel.
AIRMATIC is comprised of thefo llowing func‐
tions and components:
R All-round air suspension
R Speed-dependent lo wering
R Manually selectable high le vel setting for
grea ter ground clea rance which can be
adjus ted using a le vel button
R Vehicles with ADS PLUS: alsoAdaptive
Damping Sy stem with const ant adjustment
of damping characteristics for impr oved driv‐
ing comfort
Suspension setting and vehicle le vel per
drive prog ram
Drive program Aand;:
R The suspension setting is comfor table.
R The vehicle is set tothe normal le vel. R
When driving at speeds abo veappr oximately
14 0 km/h, theve hicle is lo wered.
R When driving at speeds below appr oximately
40 km/h, theve hicle is raised again.
Drive prog ram £ (Mercedes-Maybach vehi‐
cles only):
R The suspension setting is very comfor table.
R The vehicle is set tothe normal le vel.
R When driving at speeds abo veappr oximately
14 0 km/h, theve hicle is lo wered.
R When driving at speeds below appr oximately
40 km/h, theve hicle is raised again.
Drive prog ram C:
R The suspension setting is firm er.
R The vehicle is lo weredto sport le vel.
Drive prog ram B:
R The suspension setting is evenfirm er.
R The vehicle is lo weredto Sport + le vel. Drive program
F(vehicles without Off- road
pac kage)
R The suspension setting is suitable for easily
negotiable off-road terrain.
R The vehicle is set tooff-road le vel +1.
R When driving at speeds abo veappr oximately
80 km/h, theve hicle is lo wered.
R When driving at speeds below appr oximately
45 km/h, theve hicle is raised.
Drive program F(vehicles with Off- road
pac kage)
R The suspension setting is suitable for easi ly
negotiable off-road terrain.
R The vehicle is set tooff-road le vel +1.
R When driving at speeds abo veappr oximately
11 5 km/h, theve hicle is lo wered.
R When driving at speeds below appr oximately
75 km/h, theve hicle is raised.
Drive program G(vehicles with Off- road
pac kage)
R The suspension setting is suitable for dif ficult
off-road terrain. Driving and parking
263
Page 272 of 549
The
vehicle is lo wered at there ar axle by
appr ox. 40 mm. When theve hicle has been
lo we red, indicator lamp 2remains lit.
Lo we ring is inter rupte d in thefo llowing situa‐
tions:
R ave hicle door is opened.
R switch 1is pulled again.
R theve hicle is being driven fasterthan
2 km/h.
% The vehicle is automatically set tothe le vel
of the selected drive prog ram if you drive at
speeds greater than 2 km/h.
If indicator lamp 2flashes twice and there ar of
th eve hicle does not lo wer: #
Make sure that there qu irements are met.
% Lowe ring there ar of theve hicle allo wsthe
ve hicle tobe loaded more easil y.Obser ve
th e no tes on loading theve hicle when doing
th is (/ page132).
Ra ising there ar of theve hicle #
Che ckifth e battery is suf ficiently charge d. If
necessar y,start the engine. #
Pull switch 1briefly.
Indicator lamp 2goes out.
The vehicle will be raised tothe cur rently
selected le vel.
% The vehicle is automatically set tothe le vel
of the selected drive prog ram if you drive at
speeds greater than 2 km/h.
If th eve hicle cannot be raised: #
Ensure that the battery is suf ficiently
ch arge d; if necessar y,start the engine.
The raising process continues. E-
AC TIVE BODY CONT ROL Fu
nction of E- ACTIVE BODY CONT ROL
E- AC TIVE BODY CONTROL is an electrohydraulic
suspension sy stem with variable damping for
impr oved driving comfort. The all-round le vel
control sy stem ensures the best possible sus‐
pension and const ant ground clearance, even
with a laden vehicle. When driving at speed, the
ve hicle is lo wered automatically toimpr ovedriv‐
ing saf ety and toreduce fuel consum ption. The
suspension setting is adjus ted depending on thero
ad sur face, vehicle load and the drive program
selected.
The ROAD SUR FACE SCAN function de tects
areas of une venness in thero ad before you drive
ove rth em bymeans of a multifunction camera.
This reduces chassis mo vements.
The damping is adju sted individually toeach
wheel and depends on thefo llowing factors:
R Driving style, e.g. sporty
R Road condition, e.g. bumps
R Drive program
E- AC TIVE BODY CONTROL is comprised of the
fo llowing functions and components:
R Vehicles with Driving Assistance Pack‐
age: ROAD SUR FACE SCAN
R Cur veinclination function CURVE
R Recovery mode
R Individual wheel control
R Air suspension with auto matic level control
R Speed-dependent lo wering toreduce fuel
consum ption Driving and parking
269
Page 275 of 549
Ve
hicle
le vel Ve
hicles
without Off-
ro ad pac kage Ve
hicles with
Off-road pack‐
age
Spor tA pprox.
-15 mm App
rox.
-15 mm
Spo rt+A pprox.
-25 mm App
rox.
-25 mm Fu
nction of ROAD SUR FACE SCAN
% This function is not available in all countries.
The ROAD SUR FACE SCAN function monitors the
ro ad in front of your vehicle using a multifunc‐
tion camera (/ page 224).ROAD SUR FACE
SCAN de tects une venness in thero ad sur face,
e.g. bu mps, before theve hicle drives overth em.
Chassis mo vements are reduced and driving
comfort is increased.
RO AD SUR FACE SCAN is automatically activated
if th efo llowing conditions are me t:
R Drive prog ram A orN is selected.
R The vehicle is set tothe normal le vel. R
You are driving at a speed between 7 km/h
and 180 km/h.
Sy stem limits
RO AD SUR FACE SCAN can be impaired in the
fo llowing situations or can stop functioning:
R Ifth e car riag ewa y is insuf ficiently lit, e.g. at
night.
R In sno w,rain, fog, heavy spr ay, if there is
gl are, in direct sunlight or in great lyvarying
light conditions.
R Ifth e windscreen in the area of multifunction
camera is dirty, mis ted up, damaged or cov‐
ered.
R Ifth ero ad sur face has no optic stru cture or
re flects light.
R Ifyo u are driving too close totheve hicle in
front.
R If sections of thero ute ha veave ry small
ra dius of cur vature.
R During ab rupt driving manoeuvres, e.g. heavy
braking or sudden acceleration. Obser
vethe no tes on cleaning the multifunction
camera (/ page 369).
Fu nction of reco very mode &
WARNING Risk of inju rydue totheve hi‐
cle moving up and down
During reco very mode, theve hicle mo ves up
and down and can cause injuries. #
When activating reco very mode, make
cer tain that no one is in the vicinity of
th eve hicle. *
NO
TERisk of dama gedue totheve hicle
moving up and down When free driving mode is activated,
the
ve hicle mo ves up and down. Vehicle parts
may be damaged if the underbody bottoms
out. #
Make sure that there is suf ficient
ground clearance when rocking free
mode is activated. 272
Driving and pa rking
Page 367 of 549
Ke
eping the air-water duct free #
Keep the area between the bonn etand the
windscreen free of deposits, e.g. ice, sn ow
and lea ves. Cleaning and care
Information on
washing theve hicle in a car
wa sh &
WARNING Risk of an accident due to
re duced braking po wer af terwa shing the
ve hicle
Braking ef ficiency is reduced af terwa shing
th eve hicle. #
Afterth eve hicle has been washed,
brake carefully while paying attention to
th e traf fic conditions until braking
po we r has been fully restored. *
NO
TEDama gefrom auto matic braking If one of
thefo llowing functions is switched
on, theve hicle brakes automatically in cer‐
ta in situations:
R Active Brake Assi st
R Active Dis tance Assi stDISTRONIC
R HOLD function
R Active Parking Assist
To avo id damage totheve hicle, deactivate
th ese sy stems in thefo llowing or similar sit‐
uations: #
during towing #
in a car wash *
NO
TEDama gedue tounsuitable car
wa sh #
Before driving into a car wash make
sure that the car wash is suitable for
th eve hicle dimensions. #
Ensure there is suf ficient ground clear‐
ance between the underbody and the
guide rails of the car wash. #
Ensure that the clearance width of the
car wash, in particular the width of the
guide rails, is suf ficient. To
avo id damage to yourvehicle when using a
car wash, ensure thefo llowing beforehand:
R Active Dis tance Assi stDISTRONIC is deacti‐
va ted.
R the HOLD function is switched off.
R the 360° Camera or there ve rsing camera is
switched off.
R the side windo wsand sliding sun roof are
comple tely closed.
R the outside mir rors are folded in.
R the blo werfo rth eve ntilation/heating is
switched off.
R the windscreen wiper switch is in position
g. 364
Maintenance and care
Page 430 of 549
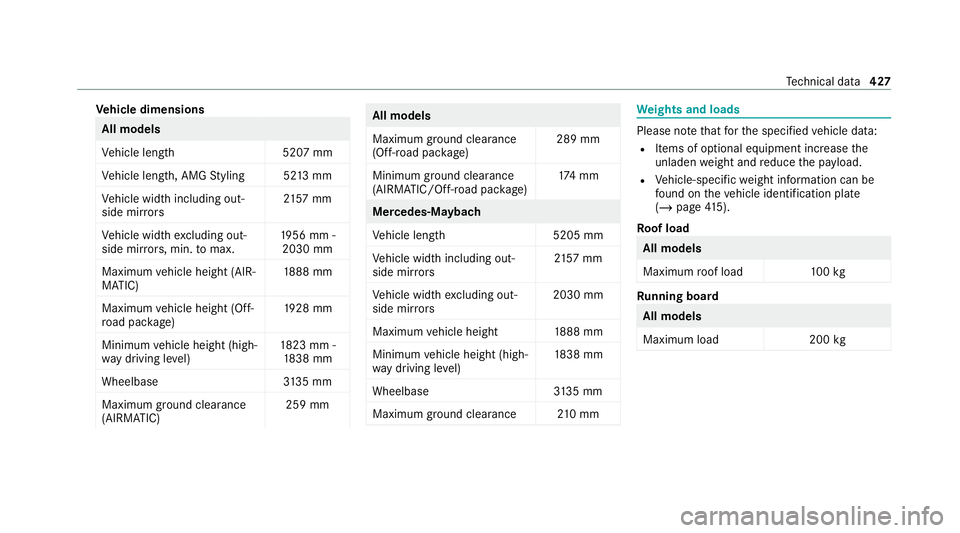
Ve
hicle dimensions All models
Ve
hicle lengt h5 207 mm
Ve hicle length, AMG Styling 52 13mm
Ve hicle width including out‐
side mir rors 21
57 mm
Ve hicle width excluding out‐
side mir rors, min. tomax. 19
56 mm -
2030 mm
Maximum vehicle height (AIR‐
MATIC) 18
88 mm
Maximum vehicle height (Off-
ro ad pac kage) 19
28 mm
Minimum vehicle height (high‐
wa y driving le vel) 18
23 mm -
18 38 mm
Wheelbase 3135 mm
Maximum ground clea rance
(AIRMATIC) 259 mm All models
Maximum ground clearance
(Off-road pa
ckage) 289 mm
Minimum ground clearance
(AIRMATIC/Off- road pac kage) 17
4 mm Mercedes‑Maybach
Ve
hicle lengt h5 205 mm
Ve hicle width including out‐
side mir rors 21
57 mm
Ve hicle width excluding out‐
side mir rors 2030 mm
Maximum vehicle height 1888 mm
Minimum vehicle height (high‐
wa y driving le vel) 18
38 mm
Wheelbase 3135 mm
Maximum ground clea rance 210 mm We
ights and loads Please no
tethat forth e specified vehicle data:
R Items of optional equipment increase the
unladen weight and reduce the pa yload.
R Vehicle-specific weight information can be
fo und on theve hicle identification plate
(/ page 415).
Ro of load All models
Maximum
roof load 100kg Ru
nning board All models
Maximum load
200kg Te
ch nical da ta427
Page 447 of 549

Display messages
Possible causes/consequences and M
MSolutions #
Stop theve hicle immediately in accordance with the traf fic conditions. Do not continue driving. #
Uncouple the trailer and secure it against rolling away. #
Initiate a new swivel mo vement and do not re-couple the trailer until thewa rning/indicator lamp goes out. #
Initiate a new swivel mo vement (/ page 296). #
When the display message disappears, couple up the trailer and drive on.
If th e display message does not disappear, the trailer hitch is malfunctioning and the ball neck is not loc ked. #
Do not couple up the trailer. Drive on without the trailer. No tethere duced ground clearance due tothe
unlo cked ball nec k. #
Consult a qualified specialist workshop.
*T he trailer hitch will not be operational when theve hicle is stationar y. #
Uncouple the coupled trailer and secure it against rolling away. #
Ifth e ball neck has been retracted: initiatea new swivel mo vement (/ page 296).
The ball neck will engage vertically in the loc ked position and then engage beneath the bumper. #
Ifth e ball neck has been extended: initiate a new swivel mo vement (/ page 296).
The ball neck will engage benea th the bumper.
If th e display message does not disappear, the trailer hitch is malfunctioning and the ball neck is not loc ked. 444
Displaymessa ges and warning/indicator lamps