2020 MERCEDES-BENZ GLS SUV tow
[x] Cancel search: towPage 156 of 549
Wire
lesscharging of a mobile phone in the
cockpit Re
quirements:
R The mobile phone is suitable for wireless
ch arging.
% A list of compatible mobile phones can be
found at: https://www.mercedes-benz-
mobile.com/ #
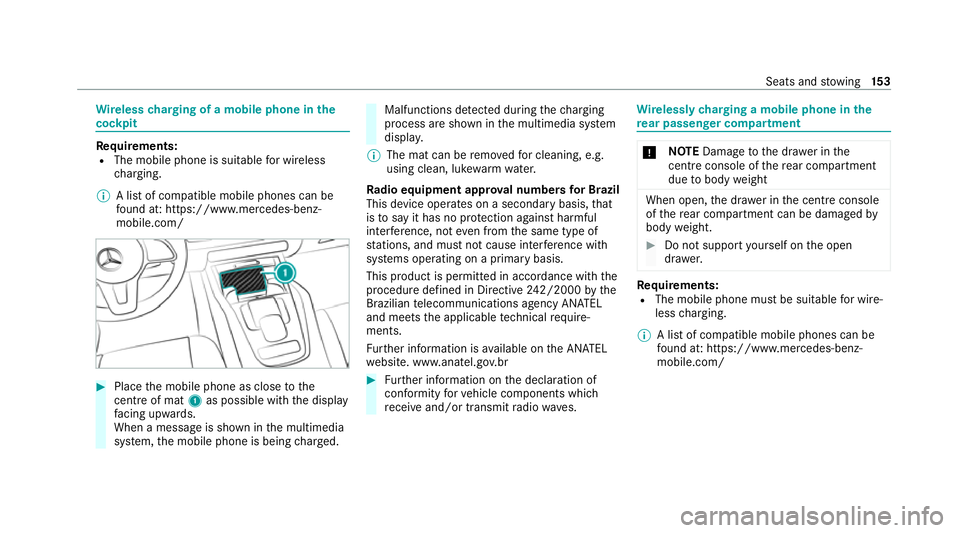
Place the mobile phone as close tothe
centre of mat 1as possible wi th the display
fa cing up wards.
When a message is shown in the multimedia
sy stem, the mobile phone is being charge d. Malfunctions de
tected du ring thech arging
process are shown in the multimedia sy stem
displa y.
% The mat can be remo vedfo r cleaning, e.g.
using clean, luk ewarmwate r.
Ra dio equipment appr oval numbers for Brazil
This device operates on a secondary basis, that
is to say it has no pr otection against harmful
inter fere nce, not even from the same type of
st ations, and must not cause inter fere nce wi th
sy stems operating on a primary basis.
This product is permitted in accordance with the
procedure defined in Directive 242/2000 bythe
Brazilian telecommunications agency AN ATEL
and meets the applicable tech nical requ ire‐
ments.
Fu rther information is available on the AN ATEL
we bsite. www.anatel.go v.br #
Further information on the declaration of
confo rmity forve hicle components which
re cei veand/or transmit radio wav es. Wire
lessly charging a mobile phone in the
re ar passenger comp artment *
NO
TEDama getothe dr awe r inthe
centre console of there ar compartment
due tobody weight When open,
the dr awe r inthe cent reconsole
of there ar compartment can be damaged by
body weight. #
Do not support yourself on the open
dr awe r. Re
quirements:
R The mobile phone must be suitable for wire‐
less charging.
% A list of compatible mobile phones can be
found at: https://www.mercedes-benz-
mobile.com/ Seats and
stowing 15 3
Page 157 of 549
Mat in front of
thestow age compartment in the
re ar armrest Mat in
the cent reconsole of there ar compartment
(only Mercedes-Maybach vehicles with individual
re ar seats) #
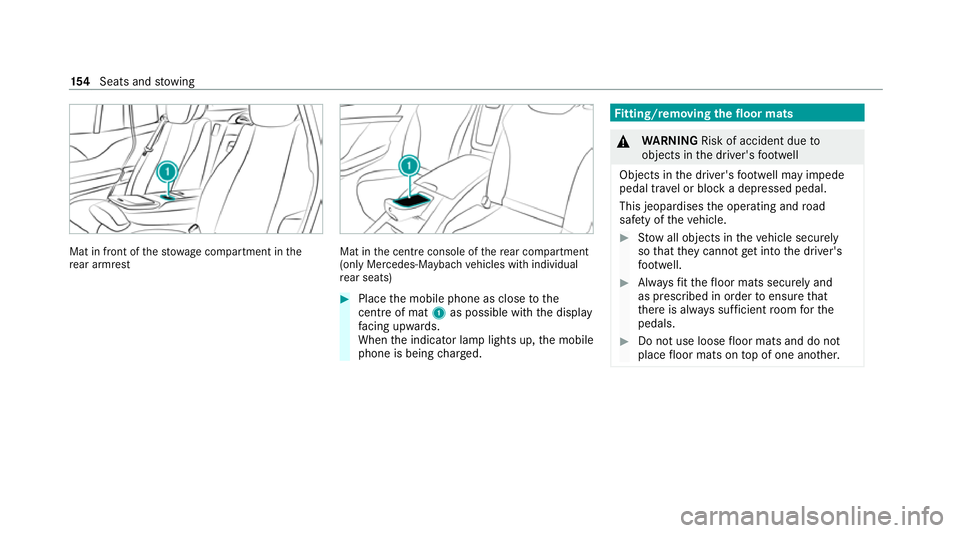
Place the mobile phone as close tothe
centre of mat 1as possible wi th the display
fa cing up wards.
When the indicator lamp lights up, the mobile
phone is being charge d. Fi
tting/ removing the floormats &
WARNING Risk of accident due to
objects in the driver's foot we ll
Objects in the driver's foot we ll may impede
pedal tr avel or block a depressed pedal.
This jeopardises the operating and road
saf ety of theve hicle. #
Stow all objects in theve hicle securely
so that they cannot getinto the driver's
fo ot we ll. #
Alw aysfit th efloor mats securely and
as prescribed in order toensure that
th ere is alw ays suf ficient room forthe
pedals. #
Do not use loose floor mats and do not
place floor mats on top of one ano ther. 15 4
Seats and stowing
Page 158 of 549
Fi
tting floor mats #
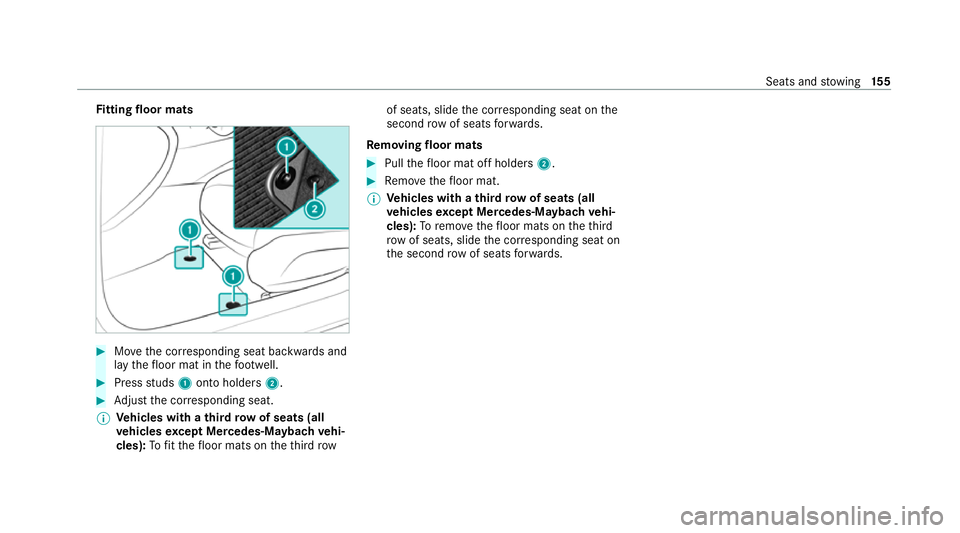
Movethe cor responding seat backwards and
lay thefloor mat in thefo ot we ll. #
Press studs 1onto holders 2. #
Adjust the cor responding seat.
% Ve
hicles with a third row of seats (all
ve hicles except Mercedes-Maybach vehi‐
cles): Tofit th efloor mats on theth ird row of seats, slide
the cor responding seat on the
second rowof seats forw ards.
Re moving floormats #
Pull thefloor mat off holders 2. #
Remo vethefloor mat.
% Ve
hicles with a third row of seats (all
ve hicles except Mercedes-Mayba chvehi‐
cles): Toremo vethefloor mats on theth ird
row of seats, slide the cor responding seat on
th e second rowof seats forw ards. Seats and
stowing 15 5
Page 188 of 549
Air
vents in the B-pillar Air
vents ab ovethe second and third row of seats
(all vehicles except Mercedes-Maybach vehicles) #
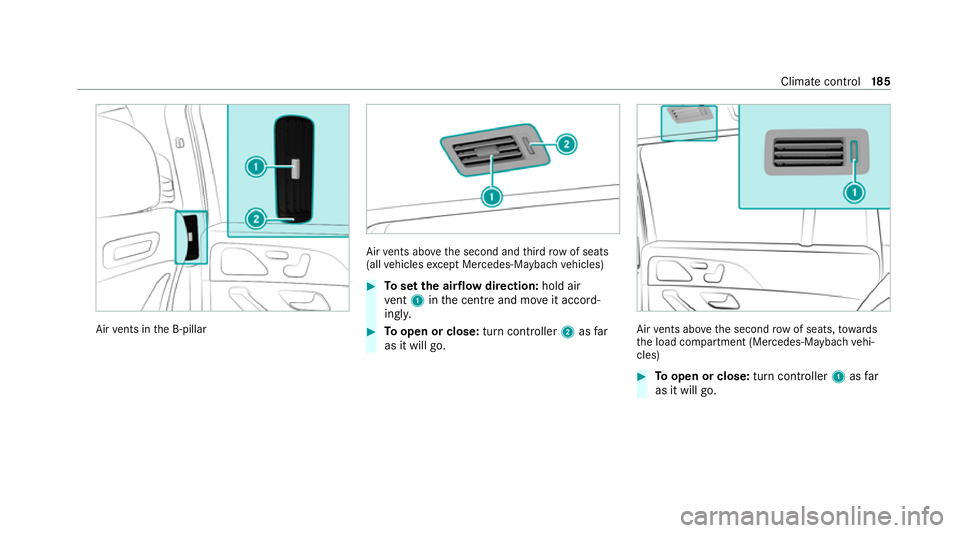
Toset the air flow direction: hold air
ve nt 1 inthe cent reand mo veit accord‐
ingly. #
Toopen or close: turn controller2asfar
as it will go. Air
vents ab ovethe second row of seats, towa rds
th e load compartment (Mercedes-Maybach vehi‐
cles) #
Toopen or close: turn controller1asfar
as it will go. Climate control
18 5
Page 195 of 549
#
After no more than five seconds, take your
left foot quickly off the brake, but keep the
accelerator pedal depressed.
The vehicle pulls away at maximum accelera‐
tion. #
Swit chon ESP ®
once the acceleration proce‐
dure is comple te.
Ending optimised acceleration #
Remo veyour foot from the accelerator pedal. #
Reactivate the ESP ®
.
% Afteryo u pull away with optimised accelera‐
tion, components of the driv etra in can
become very hot, which means that opti‐
mised acceleration values may be reached
again on lyafte r a few minutes. Note
s on driving &
WARNING Risk of accident due to
objects in the driver's foot we ll
Objects in the driver's foot we ll may impede
pedal tr avel or block a depressed pedal. This jeopardises
the operating and road
saf ety of theve hicle. #
Stow all objects in theve hicle securely
so that they cannot getinto the driver's
fo ot we ll. #
Alw aysfit th efloor mats securely and
as prescribed in order toensure that
th ere is alw ays suf ficient room forthe
pedals. #
Do not use loose floor mats and do not
place floor mats on top of one ano ther. &
WARNING Risk of accident due toincor‐
re ct foot we ar
Incor rect foot we ar includes, forex ample:
R shoes with plat form soles
R shoes with high heels
R slippers #
Alw ayswe ar suitable foot we ar so that
yo u can operate the pedals safel y. &
WARNING Risk of accident if the ignition
is switched off while driving
If yo u swit choff the ignition while driving,
saf ety functions are restricted or no longer
av ailable.
Yo u will then need, forex ample, touse con‐
siderably more forc eto steer and brake. #
Do not switch off the ignition while driv‐
ing. &
DANG ER Risk of death caused by
ex haust gases
Combustion engines emit poisonous exhaust
ga ses such as carbon monoxide. Inhaling
th ese exhaust gases is hazardous tohealth
and leads topoisoning. #
Never lea vethe engine or, if present,
th e auxiliary heating running in an
enclosed space wi thout suf ficient venti‐
lation. 19 2
Driving and pa rking
Page 204 of 549
If
th e sy stem does not inter vene du ring the
eve nt ahead, no thing will be displa yed. The sys‐
te m will be passive.
ECO Assist is active only in drive programs ;
and A.
Sy stem limits
ECO Assist can function even more precisely if
th ero ute is adhered towhen route guidance is
active. The basic function is also available with‐
out active route guidance. Notall information
and traf fic situations can be fore seen. The qual‐
ity depends on the map data.
ECO Assist is only an aid. The driver is responsi‐
ble forke eping a safe dis tance from theve hicle
in front, forve hicle speed and for braking in
good time. The driver must be ready tobrake at
all times ir respective of whe ther the sy stem
inter venes.
The sy stem may be impaired or may not function
in thefo llowing situations:
R If visibility is poor, e.g. due toinsuf ficient illu‐
mination of thero ad, high lyvariable shade
conditions, rain, sno w,fog or heavy spr ay.R
Ifth ere is glare, e.g. from oncoming traf fic,
di re ct sunlight or reflections.
R Ifth ere is dirt on the windscreen in the area
of the multifunction camera or the camera is
mis ted up, damaged or obscured.
R If traf fic signs are ha rdtodiscern, e.g. due to
dirt, snow or insuf ficient lighting, or because
th ey are obscured.
R Ifth e information on the navigation sy stem's
digital map is incor rect or out of da te.
R If signs are ambiguous, e.g. traf fic signs in
ro adwor ksor in adjacent lanes. DY
NA MIC SELECT switch Fu
nction of theDY NA MIC SELECT switch *
NO
TEMercedes-AMG vehicles #
Obser vethe no tes in the Supplement.
Yo u could otherwise failto recognise
dangers. %
Depending on the engine and equipment,
th eve hicle has dif fere nt drive programs. Use
theDY NA MIC SELECT switch tochange
between thefo llowing drive programs.
The drive prog ram selected appears in the multi‐
function display of the on-board computer.
= Individual
R individual settings
B Sport+
R particularly sporty driving
R emphasises theve hicle's ownove rste ering
and under steering characteristics for a more
active driving style
R only suitable for good road conditions, a dry
ro ad sur face and a clear stre tch of road
C Sport
R continues toofferst ability but with a sporty
setup
R allows th e sporty driver a more active driving
st yle
R only suitable for good road conditions, a dry
ro ad sur face and a clear stre tch of road Driving and parking
201
Page 208 of 549
&
WARNING Risk of accident and inju ry
due tochildren left unat tended in the
ve hicle
If ch ildren are left unsupervised in theve hi‐
cle, they could, in pa rticular:
R open doors, thereby endangering other
persons or road users.
R get out and be stru ck byoncoming traf‐
fi c.
R ope rate ve hicle equipment and become
trapped, forex ample.
In addition, thech ildren could also set the
ve hicle in motion, forex ample by:
R releasing the parking brake.
R changing the transmission position.
R starting theve hicle. #
Never lea vechildren unat tended in the
ve hicle. #
When leaving theve hicle, alw aysta ke
th eke y with you and lock theve hicle. #
Keep theve hicle key out of reach of
ch ildren. Use
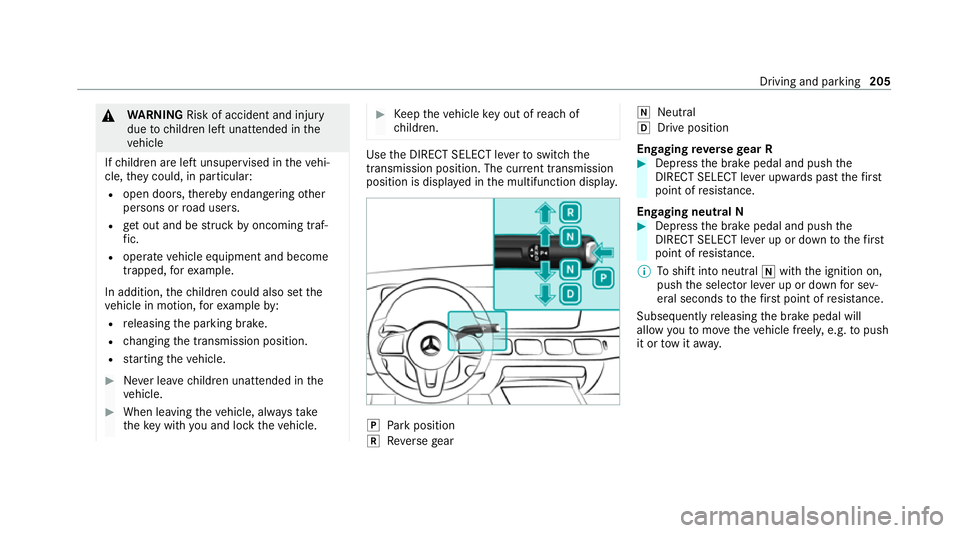
the DIRECT SELECT le verto switch the
transmission position. The cur rent transmission
position is displ ayed in the multifunction displa y. j
Park position
k Reversege ar i
Neut ral
h Drive position
En gaging reve rsege ar R #
Depress the brake pedal and push the
DIRECT SELECT le ver upwards past thefirst
point of resis tance.
En gaging neutral N #
Depress the brake pedal and push the
DIRECT SELECT le ver up or down tothefirst
point of resis tance.
% Toshift into neutral iwith the ignition on,
push the selector le ver up or down for sev‐
eral seconds tothefirs t point of resis tance.
Subsequently releasing the brake pedal will
allow youto mo vetheve hicle freel y,e.g. topush
it or tow it away. Driving and pa
rking 205
Page 223 of 549
#
Point remo tecontrol 5from a di stance of
1 cm to8 cm towa rds button 1,2or3. #
Press and hold button 6ofremo tecontrol
5 until one of thefo llowing signals appears:
R Indicator lamp 4lights up green contin‐
uousl y.Programming is comple te.
R Indicator lamp 4flashes green. Pro‐
gramming was successful. Additionall y,
synchronisation of thero lling code with
th e door sy stem must also be car ried out. #
If indicator lamp 4does not light up or flash
green: repeat the procedure. #
Release all of the buttons.
% The remo tecontrol forth e door drive is not
included in the scope of delivery of the
ga rage door opener.
Synchronising thero lling code
Re quirements:
R The door sy stem uses a rolling code.
R The vehicle must be within range of the
ga rage door or door drive. R
The vehicle as well as persons and objects
are located outside thera nge of mo vement
of the door. #
Press the programming button on the door
drive unit.
Initiate the next step within appr oximately
30 seconds. #
Press pr eviously prog rammed button 1,2
or 3 repeatedly until the door closes.
When the door closes, programming is com‐
ple ted.
% Please also read the operating instructions
fo rth e door drive.
Tr oubleshooting when prog ramming the
re mo tecont rol #
Check if the transmit ter frequency of remo te
control 5is suppo rted. #
Replace the batteries in remo tecontrol 5. #
Hold remo tecontrol 5atvarious angles
from a dis tance of 1 cm to8 cm front of the
inside rearview mir ror.Yo u should test eve ry
position for at least 25 seconds before trying
ano ther position. #
Hold remo tecontrol 5atthe same angles
at various dis tances in front of the inside rear
view mir ror.Yo u should test eve ryposition
fo r at least 25 seconds before trying ano ther
position. #
Onremo tecontrols that transmit on lyfor a
limi ted period, press button 6onremo te
control 5again before transmission ends. #
Align the aerial line of the door opener unit
with there mo tecontrol.
% Support and additional information on pro‐
gramming:
R Onthe HomeLink ®
Hotline on (0) 08000
466 354 65 or +49 (0) 6838 907-2 77
R Onthe Internet at https://
www.homelin k.com
Opening or closing the garage door
Requ irements:
R The cor responding button is programmed to
operate the door. #
Press and hold buttons 1,2or3 until
th e door opens or closes. 220
Driving and parking