2020 MERCEDES-BENZ GLE COUPE ignition
[x] Cancel search: ignitionPage 205 of 757
Ad
Blue ®
displ ayed. Switch on the ignition
and waitfor appro ximately 60 seconds. Start
th e engine.
Yo u can see theAd Blue ®
ra nge and le vel in the
multifunction display (/ page 306).
% The AdBlue ®
ra nge shown depends strongly
on the driving style and operating condi‐
tions. The actual range can therefore deviate
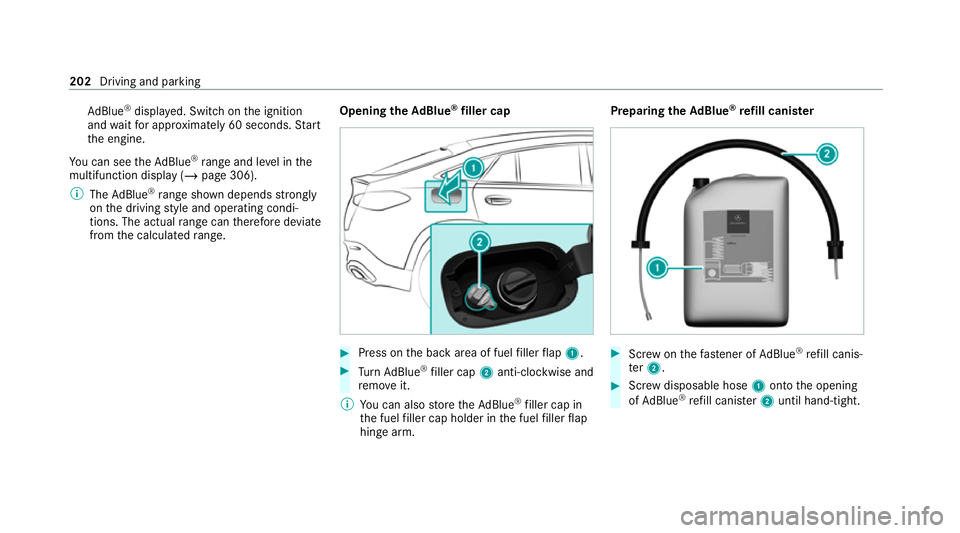
from the calculated range. Opening the
AdBlue ®
filler cap #
Press on the back area of fuel filler flap 1. #
Turn AdBlue ®
filler cap 2anti-clockwise and
re mo veit.
% You can also store theAd Blue ®
filler cap in
th e fuel filler cap holder in the fuel filler flap
hin gearm. Prepa
ring theAd Blue ®
re fill canis ter #
Screw onthefast ener of AdBlue ®
re fill canis‐
te r2. #
Screw disposable hose 1onto the opening
of Ad Blue ®
re fill canis ter2 until hand-tight. 202
Driving and parking
Page 206 of 757
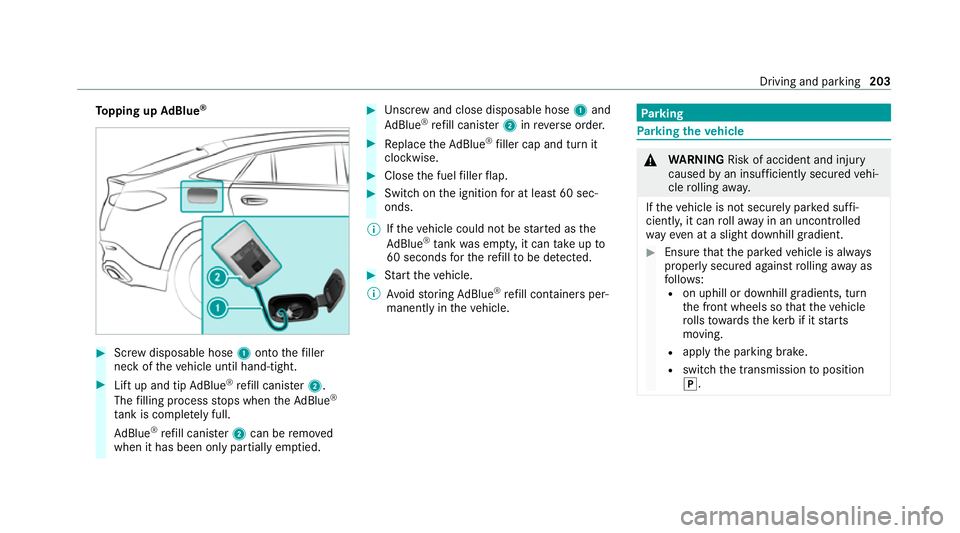
To
pping up AdBlue ® #
Screw disposable hose 1onto thefiller
neck of theve hicle until hand-tight. #
Lift up and tip AdBlue ®
re fill canis ter2.
The filling process stops when theAd Blue ®
ta nk is compl etely full.
Ad Blue ®
re fill canis ter2 can be remo ved
when it has been only partially em ptied. #
Unscr ew and close disposable hose 1and
Ad Blue ®
re fill canis ter2 inreve rse order. #
Replace theAd Blue ®
filler cap and turn it
clockwise. #
Close the fuel filler flap. #
Swit chon the ignition for at least 60 sec‐
onds.
% Ifth eve hicle could not be star ted as the
Ad Blue ®
tan kwa s em pty, it can take up to
60 seconds forth ere fill to be de tected. #
Start theve hicle.
% Avoid storing AdBlue ®
re fill con tainers per‐
manently in theve hicle. Pa
rking Pa
rking theve hicle &
WARNING Risk of accident and inju ry
caused byan insuf ficiently secu redve hi‐
cle rolling away.
If th eve hicle is not securely par ked suf fi‐
ciently, it can rollaw ay in an uncont rolled
wa yev en at a slight downhill gradient. #
Ensure that the par kedve hicle is alw ays
properly secured against rolling away as
fo llo ws:
R on uphill or downhill gradients, turn
the front wheels so that theve hicle
ro lls towa rdsth eke rb if it starts
moving.
R apply the parking brake.
R switch the transmission toposition
005D. Driving and parking
203
Page 208 of 757
#
Engage transmission position 005Din a station‐
ary vehicle with the brake pedal applied
(/ page 193). #
Switch off the engine and the ignition by
pressing the1 button. #
Release the service brake slowl y.#
Get out of theve hicle and lock it.
% When you park theve hicle, you can still
opera tethe side windo wsand the panorama
sliding sunroof for appro ximately five
minutes if the driver's door is closed. Garage door opener
Prog
ramming buttons for the garage door
opener &
DANG ER Risk of death caused by
ex haust gases
Combustion engines emit poisonous exhaust
ga ses such as carbon monoxide. Inhaling
th ese exhaust gases is hazardous tohealth
and leads topoisoning. #
Never lea vethe engine or, if present,
th e auxiliary heating running in an
enclosed space wi thout suf ficient venti‐
lation. &
WARNING Risk of inju rywhen opening
or closing a door with thega rage door
opener
When you operate or program the door with
th e integrated garage door opener, people in
th era nge of mo vement of the door may
become trapped or stru ck bythe door. #
When using the integrated garage door
opener, alw ays make sure that nobody
is within thera nge of mo vement of the
door. Re
quirements:
R The vehicle has been par ked outside the
ga rage or outside thera nge of mo vement of
th e door.
R The engine is switched off.
R The ignition is switched on. %
The garage door opener function is alw ays
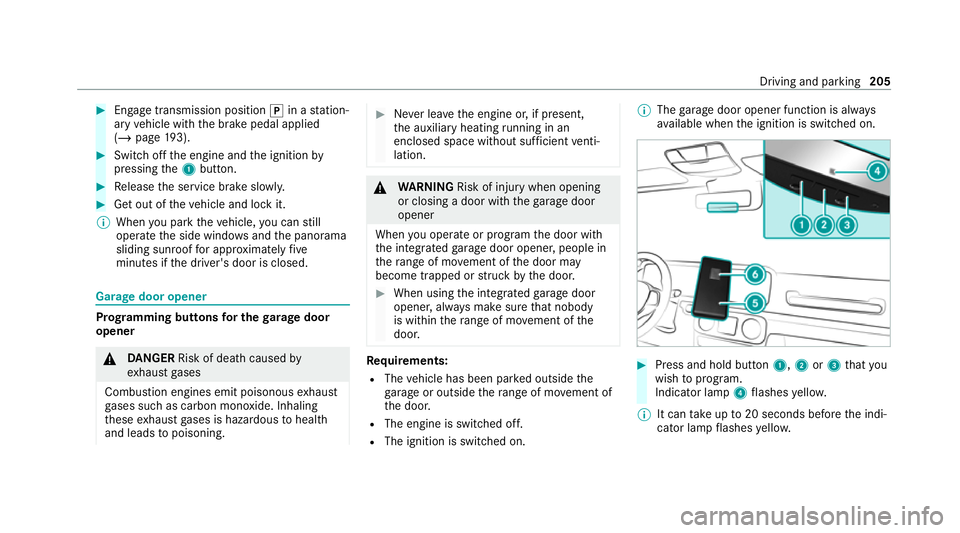
av ailable when the ignition is switched on. #
Press and hold button 1,2or3 that you
wish toprog ram.
Indicator lamp 4flashes yello w.
% It can take up to20 seconds before the indi‐
cator lamp flashes yello w. Driving and pa
rking 205
Page 213 of 757
When
the electric parking brake is released, the
re d0024 indicator lamp in the instrument clus‐
te r goes out.
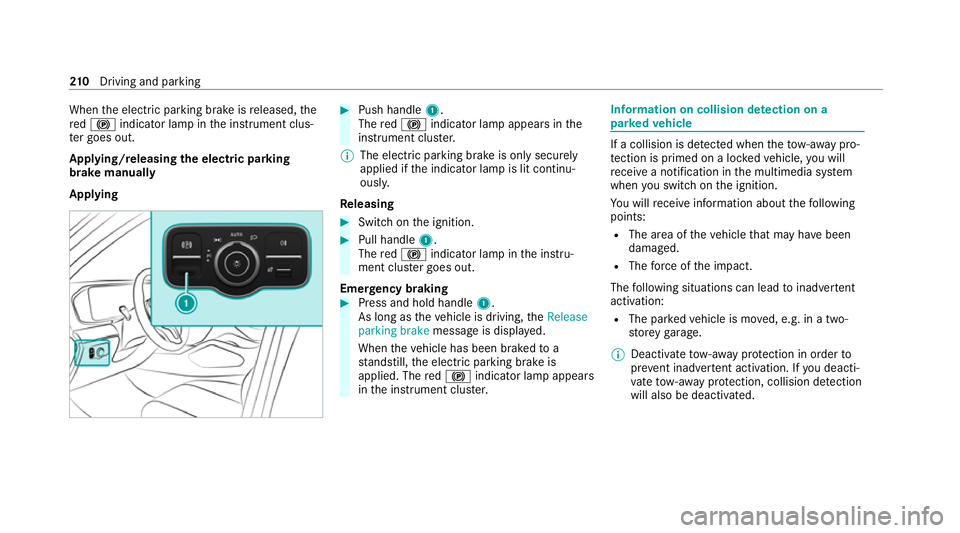
Applying/releasing the electric pa rking
brake manually
Applying #
Push handle 1.
The red0024 indicator lamp appears in the
instrument clus ter.
% The electric parking brake is only securely
applied if the indicator lamp is lit continu‐
ously.
Re leasing #
Swit chon the ignition. #
Pull handle 1.
The red0024 indicator lamp in the instru‐
ment clus ter goes out.
Emer gency braking #
Press and hold handle 1.
As long as theve hicle is driving, theRelease
parking brake message is displa yed.
When theve hicle has been braked to a
st andstill, the electric parking brake is
applied. The red0024 indicator lamp appears
in the instrument clus ter. Information on collision de
tection on a
pa rked vehicle If a collision is de
tected when theto w- aw ay pro‐
te ction is primed on a loc kedve hicle, you will
re cei vea notification in the multimedia sy stem
when you swit chon the ignition.
Yo u will recei veinformation about thefo llowing
points:
R The area of theve hicle that may ha vebeen
damaged.
R The forc e of the impact.
The following situations can lead toinadver tent
acti vation:
R The pa rked vehicle is mo ved, e.g. in a two-
st or ey garage.
% Deactivate tow- aw ay protection in order to
pr eve nt inadver tent acti vation. If you deacti‐
va te tow- aw ay protection, collision de tection
will also be deactivated. 210
Driving and pa rking
Page 214 of 757
Sy
stem limits
De tection may be restricted in thefo llowing sit‐
uations:
R theve hicle is damaged without impact, e.g. if
an outside mir ror is torn off or the paint is
damaged byakey
R an impact occurs at low speed
R the electric parking brake is not applied Note
s on parking up theve hicle If
yo u lea vetheve hicle par ked up for longer than
six weeks, it may suf fer dama gethro ugh disuse.
The 12V battery may also be impaired or dam‐
aged byheavy discharging.
% Further information can be obtained at a
qu alified specialist workshop.
Plug-in hybrid: obser vethe no tes on the high-
vo ltage battery in the Supplement. Otherwise,
yo u may failto recognise dangers. St
andby mode (extension of the star ter bat‐
te ry 's period out of use) St
andby mode function
% This function is not available for all models.
If standby mode is activated, ene rgy loss will be
minimised during extended pe riods of non-oper‐
ation.
St andby mode is characterised bythefo llowing:
R thest ar ter battery is preser ved.
R the maximum non-operational time appears
in the media displa y.
R the connection toonline services is inter rup‐
te d.
R theAT A (anti-theft alarm sy stem) is not avail‐
able.
R the interior pr otection and tow- aw ay protec‐
tion functions are not available.
R the function for de tecting collisions on a
pa rked vehicle is not available. If
th efo llowing conditions are fulfilled, standby
mode can be activated or deactivated using the
multimedia sy stem:
R The engine is switched off.
R The ignition is switched on.
Exceeding theve hicle's displa yed non-opera‐
tional time may cause inco nvenience, i.e. it can‐
not be guaranteed that thest ar ter battery will
re liably start the engine.
The star ter battery must be charge dfirs t in the
fo llowing situations:
R The vehicle's non-operational time must be
ex tended.
R The Battery charge insufficient for standby
mode messa geappears in the media displa y.
% Standby mode is automatically deactivated
when the ignition is switched on.
Ac tivating/deactivating standby mode (park‐
ing up theve hicle)
Re quirements:
R The engine is switched off. Driving and parking
211
Page 227 of 757
R
Activation byan abrupt steering mo vement
during a swerving manoeuvre.
R Assis tance du ring swerving and stra ightening
of theve hicle.
R Reaction from a speed of appr oximately
20 km/h up toa speed of appr oximately
70 km/h.
Yo u can pr eventthe assis tance at any time by
actively steering.
Cornering function (only vehicles with Driv‐
ing Assistance Package)
If a danger of collision from an oncoming vehicle
is de tected when turning across an oncoming
lane, au tonomous braking can be initia ted at
speeds below 15km/h be fore you ha veleft the
lane in which you are driving. &
WARNING Risk of an accident despi te
Evasive Steering Assist
Evasive Steering Assist cann otalw ays clearly
identify objects and complex traf fic situa‐
tions. In addition,
thesteering support of Evasive
St eering Assist is general lynot su fficient to
avo id a collision.
In such cases Evasive Steering Assist can:
R give an unnecessary warning or pr ovide
assis tance
R not gi veawa rning or not pr ovide assis‐
ta nce #
Alw ays pay careful attention tothe traf‐
fi c situation; do not rely on Ev asive
St eering Assist alone. #
Beready tobrake and take evasive
action, if necessar y. #
Preve ntthe assis tance byactively
st eering in non-critical driving situa‐
tions. #
Drive at an appropriate speed if pedes‐
trians are close tothe path of your vehi‐
cle. Sy
stem limits
Fu ll sy stem per form ance is not available for a
fe w seconds af ter switching on the ignition or
af te r driving off.
The sy stem may be impaired or may not function
in thefo llowing situations:
R In sno w,rain, fog, heavy spr ay, if there is
gl are, in direct sunlight or in greatlyvarying
light conditions.
R Ifth e sensors are dirty, mis ted up, damaged
or co vered.
R Ifth e sensors are impaired due tointer fer‐
ence from other radar sources, e.g. strong
ra dar reflections in multi-s torey car par ks.
R If a loss of tyre pressure or a defective tyre
has been de tected and displ ayed.
R If DSR is activated.
R In complex tra ffic situations where objects
cannot alw ays be clear lyidentified.
R If pedestrians or vehicles mo vequickly into
th e sensor de tection range.
R If pede strians are hidden by other objects. 224
Driving and parking
Page 228 of 757
R
Ifth e typical outline of a pedestrian cann ot
be distinguished from the bac kground.
R If a pedestrian is not de tected as su ch, e.g.
due tospecial clo thing or other objects.
R On bends with a tight radius.
% The Active Brake Assi stsensors adjust auto‐
matically while a cer tain dis tance is being
driven af terth eve hicle has been delivered.
Ac tive Brake Assi stis una vailable or only
partially available during this teach-in period. Setting
Active Brake Assi st Re
quirements:
R The ignition is switched on.
Multimedia sy stem:
4 © 5
Settings 5
Assistance
5 Active Brake Assist
The following settings are available:
R Early
R Medium
R Late #
Select a setting.
The setting is retained when the engine is
next star ted.
Deactivating Active Brake Assi st
% It is recommended that you alw ays lea ve
Ac tive Brake Assi stactivated. #
Select Off.
The dis tance warning function, the autono‐
mous braking function and the Evasive Steer‐
ing Assist are deactivated.
When theve hicle is next star ted, the middle
setting is automatically selected.
% IfAc tive Brake Assi stis deactivated, the
00D4 symbol appears inthest atus bar of the
multifunction displa y. Fu
nction of Adaptive Brake Lights Ad
aptive Brake Lights warnfollowing traf fic in an
emergency braking situation wi th thefo llowing
actions:
R Byflashing the brake lamps
R By activating the hazard warning lights If
th eve hicle is braked sharply from speeds
abo ve50 km/h, the brake lamps flash rapidl y.
This pr ovides traf fic tr avelling behind you with an
ev en more noticeable warning.
If th eve hicle is tr avelling at speeds of more than
70 km/h at the beginning of the brake applica‐
tion, the hazard warning lights switch on once
th eve hicle is stationar y.When you pull away
again, the hazard warning lights will switch off
automatically at appr oximately 10km/h. Yo u
can also switch off the hazard warning lights
using the hazard warning button. Cruise control and limiter
Fu
nction of cruise control
Plug-in hybrid: obser vethe no tes in the Supple‐
ment. You could otherwise failto recognise dan‐
ge rs.
Cruise cont rolre gulates the speed totheva lue
selec tedby the driver.
If yo u accelerate toove rtake, forex ample, the
st ored speed is not dele ted. If youre mo veyour
fo ot from the accelera tor pedal af terov ertaking, Driving and pa
rking 225
Page 253 of 757
Ra
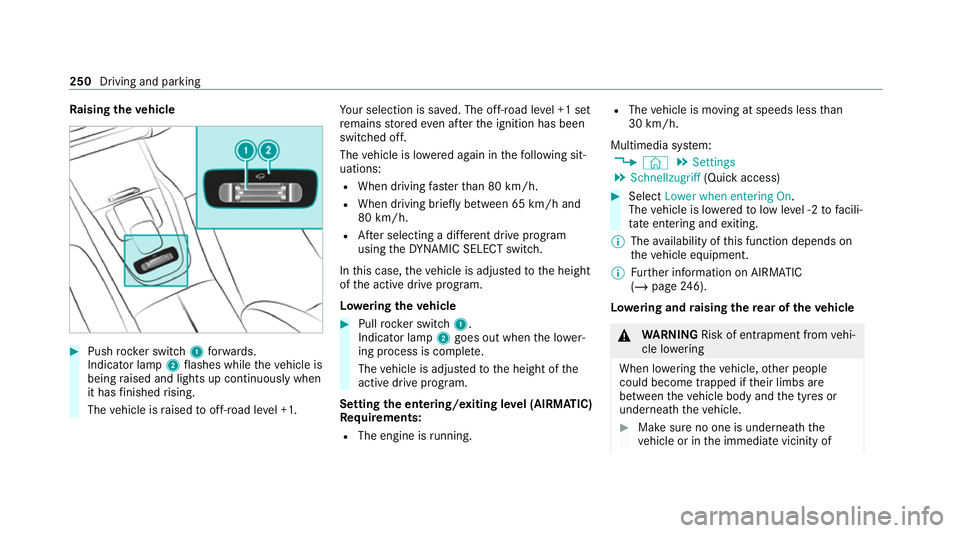
ising theve hicle #
Push rocker switch 1forw ards.
Indicator lamp 2flashes while theve hicle is
being raised and lights up continuously when
it has finished rising.
The vehicle is raised tooff-road le vel +1. Yo
ur selection is sa ved. The off-road le vel +1 set
re mains stored even af terth e ignition has been
switched off.
The vehicle is lo wered again in thefo llowing sit‐
uations:
R When driving fasterthan 80 km/h.
R When driving brief ly between 65 km/ h and
80 km/h.
R After selecting a dif fere nt drive program
using theDY NA MIC SELECT switch.
In this case, theve hicle is adjus tedto the height
of the active drive program.
Lo weri ngtheve hicle #
Pull rock er switch 1.
Indicator lamp 2goes out when the lo wer‐
ing process is comple te.
The vehicle is adjus tedto the height of the
active drive program.
Setting the entering/exiting le vel (AIRMATIC)
Re quirements:
R The engine is running. R
The vehicle is moving at speeds less than
30 km/h.
Multimedia sy stem:
4 © 5
Settings
5 Schnellzugriff (Quick access) #
Select Lower when entering On.
The vehicle is lo weredto low le vel -2 tofacili‐
ta te entering and exiting.
% The availability of this function depends on
th eve hicle equipment.
% Further information on AIRMATIC
(/ page 246).
Lo weri ng and raising there ar of theve hicle &
WARNING Risk of entrapment from vehi‐
cle lo wering
When lo wering theve hicle, other people
could become trapped if their limbs are
between theve hicle body and the tyres or
underneath theve hicle. #
Make sure no one is underneath the
ve hicle or in the immediate vicinity of 250
Driving and parking