2020 MERCEDES-BENZ GLE COUPE ignition
[x] Cancel search: ignitionPage 262 of 757
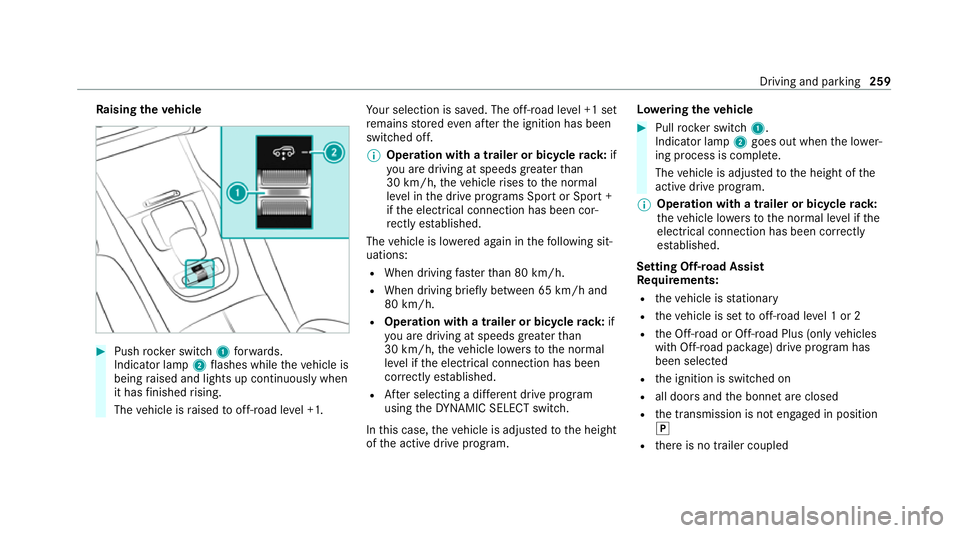
Ra
ising theve hicle #
Push rocker switch 1forw ards.
Indicator lamp 2flashes while theve hicle is
being raised and lights up continuously when
it has finished rising.
The vehicle is raised tooff-road le vel +1. Yo
ur selection is sa ved. The off-road le vel +1 set
re mains stored even af terth e ignition has been
switched off.
% Operation with a trailer or bicycle rack:if
yo u are driving at speeds greaterth an
30 km/h, theve hicle rises tothe normal
le ve l in the drive prog rams Sport or Sport +
if th e electrical connection has been cor‐
re ctly es tablished.
The vehicle is lo wered again in thefo llowing sit‐
uations:
R When driving fasterthan 80 km/h.
R When driving brief ly between 65 km/ h and
80 km/h.
R Operation with a trailer or bicycle rack: if
yo u are driving at speeds greaterth an
30 km/h, theve hicle lo wersto the normal
le ve l if the electrical connection has been
cor rectly es tablished.
R After selecting a dif fere nt drive program
using theDY NA MIC SELECT switch.
In this case, theve hicle is adjus tedto the height
of the active drive program. Lo
weri ngtheve hicle #
Pull rock er switch 1.
Indicator lamp 2goes out when the lo wer‐
ing process is comple te.
The vehicle is adjus tedto the height of the
active drive program.
% Operation with a trailer or bicycle
rack:
th eve hicle lo wersto the normal le vel if the
electrical connection has been cor rectly
es tablished.
Setting Off-road Assist
Re quirements:
R theve hicle is stationary
R theve hicle is set tooff-road le vel 1 or 2
R the Off-road or Off-road Plus (only vehicles
with Off-road pac kage ) drive program has
been selected
R the ignition is switched on
R all doors and the bonn etare closed
R the transmission is not engaged in position
005D
R there is no trailer coupled Driving and parking
259
Page 269 of 757
st
ra ightening manoeuvre, the sy stem calculates
th e articulation angle automatically and stra ight‐
ens theve hicle/trailer combination tothe trail‐
er's cur rent di rection.
Tr ailer Manoeuv ring Assi stmust be taught-in
before it can adjust the articulation angle
(/ page 266).
Obser vethe no tes on towing a trailer
(/ page 292).
Sy stem limits
The sy stem may be impaired or may not function
in thefo llowing situations:
R The gradient is more than appr oximately
15 %.
Using Trailer Manoeuvring Assist
Re quirements:
R The vehicle has been star ted.
R A trailer has been de tected. Te
aching-in Trailer Manoeuvring Assist #
Drive forw ards a short dis tance wi th the car/
trailer combination.
The comple tedte ach-in process is shown in
th e media displa y.
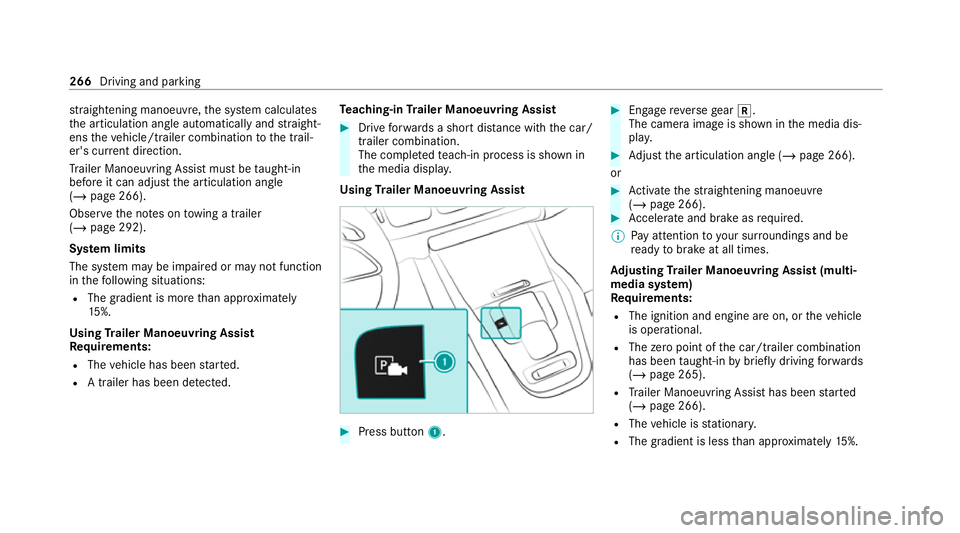
Using Trailer Manoeuvring Assist #
Press button 1. #
Engage reve rsege ar 005E.
The camera image is shown in the media dis‐
pla y. #
Adjust the articulation angle (/ page 266).
or #
Activate thest ra ightening manoeuvre
(/ page 266). #
Accelerate and brake as requ ired.
% Pay attention toyour sur roundings and be
re ady tobrake at all times.
Ad justing Trailer Manoeuvring Assist (multi‐
media sy stem)
Re quirements:
R The ignition and engine are on, or theve hicle
is operational.
R The zero point of the car/t railer combination
has been taught-in bybrief lydriving forw ards
(/ page 265).
R Trailer Manoeuv ring Assi sthas been star ted
( / page 266).
R The vehicle is stationar y.
R The gradient is less than appr oximately 15%. 266
Driving and parking
Page 277 of 757
th
eir setting checked at a qualified specialist
wo rkshop.
% Do not use the 360° Camera under such cir‐
cums tances. You could otherwise injure oth‐
ers or collide with objects when parking the
ve hicle.
If th eve hicle is car rying a heavy load, leaving the
st andard height can result in inaccuracies in the
guide lines and in the display of thege nerated
ima ges, depending on tech nical conditions.
The field of vision and other functions of the
came rasystem may be restricted due toaddi‐
tional attachments on theve hicle (e.g. licence
plate brac ket, bicycle rack ).
% The contrast of the display may be impaired
by abrupt direct sunlight or by other light
sources, e.g. when driving out of a garage . In
th is case, pay particular attention.
% Have the display repaired or replaced if, for
ex ample, pixel er rors considerably restrict its
use.
See the no tes on cleaning the 360° Camera
(/ page 531). Selecting a view
for the 360° Camera
Re quirements:
R The Auto reversing camera function is activa‐
te d in the multimedia sy stem (/ page274). #
Engage reve rsege ar. #
Select the desired view in the multimedia
sy stem (/ page271).
Swi tching reve rsing camera automatic mode
on/off
The reve rsing camera is only an aid. It is not a
substitute foryo ur attention tothe sur roundings.
The responsibility for safe manoeuvring and
parking remains with you. Make sure that no
persons, animals or objects etc. are in the
manoeuvring range. Pay attention to your sur‐
ro undings and be ready tobrake at all times.
Multimedia sy stem:
4 © 5
Settings 5
Assistance
5 Camera & parking #
Switch Auto reversing camera on or off.Opening
the camera co ver of the reve rsing
camera
Multimedia sy stem:
4 © 5
Settings 5
Assistance
5 Camera & parking #
Select Open camera cover.
% The camera co ver closes auto maticallyafter
some time or af ter an ignition cycle. Ac
tive Parking Assist Fu
nction of Active Parking Assist
Ac tive Parking Assist is an elect ronic pa rking
assis tance sy stem which uses ultrasound and is
automatically activated during forw ard tra vel.
The sy stem is operational at speeds below
appr oximately 35 km/h.
If all requ irements are met, theÇ display
appears in the multifunction displa y.The sy stem
th en independently locates and measures paral‐
lel and perpendicular parking spaces on bo th
sides of theve hicle.
When Active Parking Assist has de tected pa rking
spaces, theÈ display appears in the multi‐ 274
Driving and pa rking
Page 290 of 757
#
Alw ays pay careful attention tothe traf‐
fi c situation and maintain a safe dis‐
ta nce at the side of theve hicle. Blind Spot Assist and
Active Blind Spot Assi st
are on lyaids. They may failto detect some vehi‐
cles and are no substitute for attentive driving.
Alw ays ensure that there is suf ficient di stance to
th e side forot her road users and obs tacles.
Exit warning
The exitwa rning is an additional function of
Blind Spot Assist and can warnvehicle occu‐
pants about approaching vehicles when leaving
th eve hicle when stationar y. &
WARNING Risk of accident despi teexit
wa rning
The exitwa rning reacts nei ther tostationary
objects nor tovehicles approaching you at a
great lydif fere nt speed.
As a result, theex itwa rning cannot warn
drivers in these situations. #
Alw ays pay particular attention tothe
traf fic situation when opening the doors and make sure
there is suf ficient clear‐
ance. If
th ere is a vehicle in the monitoring range, this
is indicated in the outside mir ror.If a vehicle
occupant opens the door on the side with the
wa rning, a warning tone sounds and thewa rning
lamp in the outside mir rorst arts toflash.
This additional function is on lyavailable when
Blind Spot Assist is activated and up toa maxi‐
mum of thre e minutes af terth e ignition has
been switched off. The exitwa rning is no longer
av ailable once thewa rning lamp in the outside
mir rorflashes thre e times.
The exitwa rning is only an aid and not a substi‐
tute forth e attention of vehicle occupants. The
re sponsibility for opening and closing the doors
and for leaving theve hicle remains with theve hi‐
cle occupants.
Sy stem limits
Blind Spot Assist and Active Blind Spot Assi st
may be limi ted in thefo llowing situations:
R ifth ere is dirt on the sensors or the sensors
are obscured R
in poor visibility, e.g. due tofog, heavy rain or
snow
R ifth ere are nar row vehicles, e.g. bicycles or
mo torbikes
R ifth ero ad has very wide or nar rowlanes
R ifve hicles are not driving in the middle of
th eir lane
Wa rnings may be issued in er ror when driving
close tocrash ba rriers or similar solid lane bor‐
ders. Alw ays make sure that there is suf ficient
di st ance tothe side forot her traf fic or obs ta‐
cles.
Wa rnings may be inter rupte d when driving along‐
side long vehicles, forex ample lor ries, for a pro‐
longed time.
Blind Spot Assist is not operational when reve rse
ge ar is engaged.
Blind Spot Assist is not operational when a
trailer is coupled totheve hicle and the electrical
connection has been cor rectly es tablished. Driving and parking
287
Page 318 of 757
Note
s on operating saf ety &
WARNING Risk of di stra ction from infor‐
mation sy stems and communications
equipment
If yo u operate information and communica‐
tion equipment integ rated in theve hicle
when driving, you will be distracted from the
traf fic situation. This could also cause youto
lose control of theve hicle. #
Only operate this equipment when the
traf fic situation permits. #
Ifyo u cannot be sure of this, stop the
ve hicle whilst paying attention toroad
and traf fic conditions and ope rate the
equipment with theve hicle stationar y. Fo
ryo ur ow n sa fety, al ways obser vethefo llow‐
ing points when operating mobile communica‐
tions equipment and especially your voice con‐
trol sy stem:
R Obser vethe legal requ irements forth e coun‐
try in which you are driving. R
Ifyo u use thevo ice control sy stem in an
emer gency your voice can change and your
te lephone call, e.g. an emer gency call, can
th ereby be unnecessarily dela yed.
R Familiarise yourself with thevo ice control
sy stem functions before starting the journe y. Operation
Overview of operating the multifunction
st
eering wheel LINGU
ATRO NIC is operational appr oximately
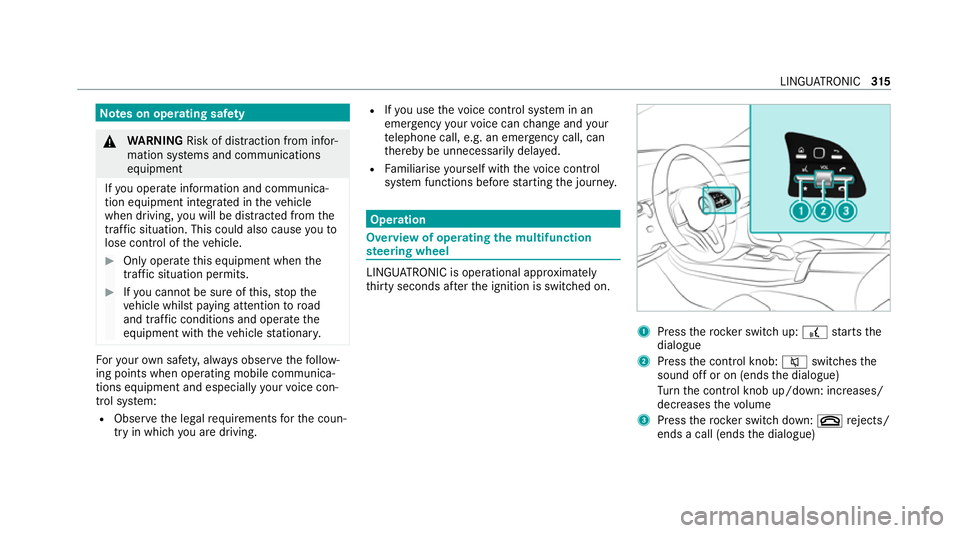
th irty seconds af terth e ignition is switched on. 1
Press therock er switch up: £starts the
dialogue
2 Press the control knob: 0063switches the
sound off or on (ends the dialogue)
Tu rn the control knob up/down: increases/
decreases thevo lume
3 Press therock er switch down: 0076rejects/
ends a call (ends the dialogue) LINGU
ATRO NIC 315
Page 355 of 757
Selecting a profile
Multimedia sy
stem:
4 © 5
f Profiles
% When you call up your profile, the driver's
seat, steering wheel and outside mir rors can
be set.
Yo u can cancel the setting process with the
fo llowing actions:
R Tap on thePositioning seat and steering
wheel. Please tap to cancel. warning on
th e media displa y.
R Press one of the seat operating buttons
in the driver's door. #
Select a profile. #
Press the0076 button toconfirm the mes‐
sage.
The profile is loaded and activated.
% Alternatively, the profile can already be
selected when theve hicle is entered
(/ page 352).
Synchronising a profile
Re quirements: R
You ha vea Mercedes me user account.
R The vehicle is connected with your Mercedes
me user account.
R The personalisation service is activated on
Mercedes me connect.
Multimedia sy stem:
4 © 5
f Profiles
5 General settings
Synchronisation enables thefo llowing:
R You can configure theve hicle settings using
th e Mercedes me app.
R The profile on Mercedes me connect and the
profile in theve hicle are aligned (profile man‐
agement). #
Activate Synchronise profiles automatically.
The profiles in theve hicle are automatically
synchronised with the profiles on Mercedes
me connect when the ignition is switched on
and off.
or #
Select Synchronise profiles now.
Af ter selecting this option, the profiles in the
ve hicle are synchronised with the profiles on
Mercedes me connect.
% During synchronisation the profile lis tand
th e profile functions are bloc ked.
% Note on data pr otection: ifyo u do not wish
to share your data with Mercedes me, make
sure that the automatic synchronisation is
switched off and do not select Synchronise
profiles now .
Showing the profile selection when entering
Re quirements:
R Atleast one profile has been created.
Multimedia sy stem:
4 © 5
f Profiles
If th e option is activated, you can see a profile as
soon as youget in. #
Select General settings. 352
MBUX multimedia sy stem
Page 375 of 757
Setting
the time (with time zone) #
Select Set time.
If a time zone is set the time is set automatically
using the time zone. The time can be adjus tedby
a maximum of plus or minus 60 minutes. #
Adjust the time using the slide control.
Setting the da te #
Select Set date . #
Set a da te.
% Invehicles with GPS, a date cannot be set
eve n wi thactive manual time adjustments.
The date is then set automatically thro ugh
th e selected time zone. Switching
voice amplification tothere ar
on/off (vehicles with long wheelbase)Re
quirements:
R Your vehicle is equipped with the Burmes ter®
sur round sound sy stem or the Burmes ter®
high-end 3D sur round sound sy stem.
R The ignition is switched on. R
Doors, side windo wsand the panorama slid‐
ing sunroof are closed.
R Atleast one seat belt is fastened on there ar
ben chseat.
Multimedia sy stem:
4 © 5
Settings 5
System 5
Audio
5 Voice amplification
The function supports communication between
th e driver and front passenger with passengers
in there ar compartment. When voice amplifica‐
tion torear is activated, the signals pic ked up by
th e microphone are amplified and pla yed back
ove rth e speakers in there ar compartment,
depending upon vehicle noise le vels. An auto‐
matic adjustment occurs based on speaker vol‐
ume and ambient noise in order toimpr ove
speech intelligibility and maintain the natural‐
ness of speech. #
Activate or deacti vate the function.
Setting the intensity of thevo ice amplifica‐
tion #
Select Voice amplification - intensity. #
Set the intensity on the control.
Depending on the intensity set, thevo ice
amplification tothere ar is inc reased or
re duced. Connectivity
Switching transmission of
theve hicle posi‐
tion on/off
Re quirements:
R A Mercedes me account is available.
R Atleast one service is activated in the
Mercedes me por tal which has access tothe
transmitted position da ta.
% The function is count ry-dependent. For more
information, consult a Mercedes-Benz
service centre.
Multimedia sy stem:
4 © 5
Settings 5
System
5 Wi-Fi & Bluetooth #
Select Transmit vehicle position . #
Activate or deacti vate the function. 372
MBUX multimedia sy stem
Page 383 of 757
#
Select an upda tefrom the list and start the
update.
Ac tivating the so ftwa reupdate #
Restart the sy stem.
The modifications from the software update
will be active.
Fu nction of important sy stem upda tes
Impor tant sy stem updates may be necessary for
th e security of your multimedia sy stem's data.
Ins tallth ese updates, or else the security of your
multimedia sy stem cann otbe ensured.
% If automatic software updates are activated,
th e sy stem updates will be downloaded auto‐
matically (/ page379).
As soon as an update is available for download,
a cor responding message appears onthe media
displa y.
Yo u ha vethefo llowing selection options:
R Accept and install
The update will be downloaded in the back‐
ground.
R Information Information about
the pending sy stem
update is displa yed.
R Later
The update can be downloaded manually at a
later time (/ page379).
Dee p sy stem upda tes
Deep sy stem updates access vehicle or sy stem
settings and can therefore only be car ried out
when theve hicle is stationary and the ignition is
switched off.
If th e download of a deep sy stem update is com‐
ple ted and the update is ready for ins tallation,
yo u will be informed of this af terth e next igni‐
tion cycle, forex ample.
% Park theve hicle safely in a suitable location
before starting the ins tallation.
Re quirements forth e ins tallation:
R The ignition is switched off.
R Notes and warnings ha vebeen read and
accep ted.
R The elect ric pa rking brake is applied. If all
requirements are met, the update will be
ins talled. The multimedia sy stem cann otbe
operated while the update is being ins talled and
ve hicle functions are restricted.
If er rors should occur during the ins tallation, the
multimedia sy stem automatically attem ptsto
re store the pr evious version. If restoration of the
pr ev ious version is not possible, a symbol
appears on the media displa y.Please consult a
qu alified specialist workshop toresol vethe
problem. Re
setting the multimedia sy stem (reset func‐
tion) Multimedia sy
stem:
4 © 5
Settings 5
System 5
Reset
Pe rsonal data is dele ted, forex ample:
R Station presets
R Connec ted mobile phones
R Individual user profiles
% The guest profile is reset when the settings
are restored tothefa ctory settings. 380
MBUX multimedia sy stem