2020 MERCEDES-BENZ GLE COUPE ignition
[x] Cancel search: ignitionPage 148 of 757
The function is automatically deactivated under
th efo llowing conditions:
R Atspeeds abo ve100 km/h af ter activation.
R When there ar fog light is switched off.
% You can activate the enhanced fog light func‐
tion up toa speed of 100 km/h byswitching
on there ar fog light.
Fu nction of the off-road light
The off- road light impr oves illumination during
off-road driving. The low beam is distributed
symmetrically and across a wide angle, and
brightness is increased slightl y.This makes it
easier tofind your wa y when driving off- road and
to detect obs tacles at an ea rly st age. The active
headlamps function is deactivated during this
time so that steering mo vements do not change
th e illumination.
The function is active when the low beam is
switched on if you are not driving at a speed
greater than 50 km/h and theF (Offroad) or
G (Offroad Plus) drive program has been
selected. Switching
the Intelligent Light Sy stem
on/off
Re quirements:
R the ignition is switched on.
Multimedia sy stem:
4 © 5
Settings 5
Lights
5 Intelligent Light System #
Activate or deacti vate the function. Ad
aptive Highbeam Assist Ad
aptive Highbeam Assist function &
WARNING Risk of accident despi te
Ad aptive Highbeam Assist
Ad aptive Highbeam Assist does not recog‐
nise thefo llowing road users:
R Road users without lights, e.g. pedes‐
trians
R Road users with poor lighting, e.g.
cyclists R
Road users whose lighting is obstructed,
e.g. bya bar rier
On very rare occasions, Adaptive Highbeam
Assist may failto recognise other road users
with their own lighting, or may recognise
th em too late.
In this, or in similar situations, the automatic
main beam will not be deactivated or will be
activated despite the presence of other road
users. #
Alw ays obser vethe tra ffic carefully and
switch off the main beam in good time. Sy
stem limits
Ad aptive Highbeam Assist cannot take into
account road, weather or traf fic conditions.
De tection may be restricted in thefo llowing
cases:
R In poor visibilit y,e.g. fog, heavy rain or snow
R Ifth ere is dirt on the sensors or the sensors
are obscured
Ad aptive Highbeam Assist is on lyan aid. You are
re sponsible for adju sting theve hicle's lighting to Light and sight
14 5
Page 154 of 757
004A
00AA Continuous wiping, slow
004B 00A9 Continuous wiping, fast #
Turn the combination switch tothe cor rect
position 0047-004B. #
Single wipe/washing: pushthe button on
th e combination switch in the direction of
ar row 1.
R 00D3 Single wipe
R 00D4 Wipes with washer fluid
Ve hicles with MAGIC VISION CONTROL: in
position 0048or0049 ,th e windscreen washing
process is automatically triggered if dirt is de tec‐
te d on the windscreen unless theTop up
washer fluid message is being displa yed. Re
placing the windsc reen wiper blades &
WARNING Risk of becoming trapped if
th e windscreen wipers are switched on
while wiper blades are being replaced
If th e windscreen wipers begin tomo vewhile
yo u are changing the wiper blades, you can
be trapped bythe wiper arm. #
Alw ays switch off the windscreen wip‐
ers and ignition before changing the
wiper blades. Moving
the wiper arms into there placement
position #
Switch the ignition on and switch off again
immediatel y. #
Within around 15seconds, press and hold
th e00D4 button on the combination switch
fo r appro ximately thre e seconds
(/ page 150).
The wiper arms will mo veinto there place‐
ment position. Re
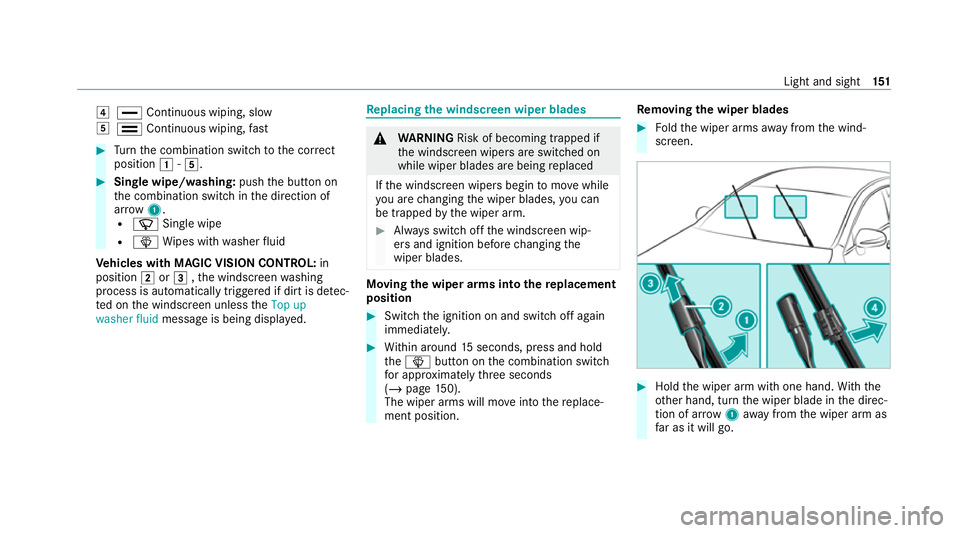
moving the wiper blades #
Foldthe wiper arms away from the wind‐
screen. #
Hold the wiper arm with one hand. With the
ot her hand, turn the wiper blade in the direc‐
tion of ar row1away from the wiper arm as
fa r as it will go. Light and sight
151
Page 155 of 757
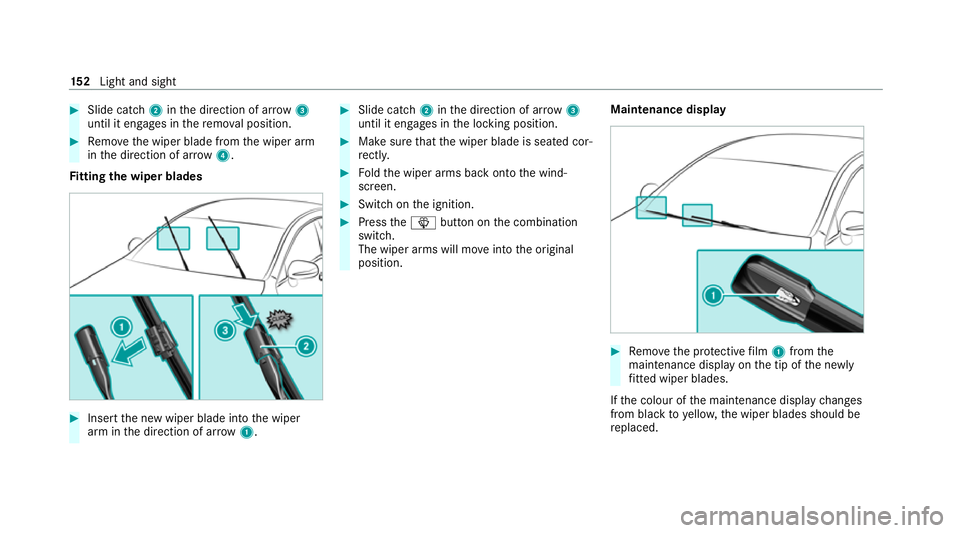
#
Slide catch 2inthe direction of ar row 3
until it engages in there mo val position. #
Remo vethe wiper blade from the wiper arm
in the direction of ar row4.
Fi tting the wiper blades #
Inse rtthe new wiper blade into the wiper
arm in the direction of ar row1. #
Slide catch 2inthe direction of ar row 3
until it engages in the locking position. #
Make sure that the wiper blade is seated cor‐
re ctly. #
Foldthe wiper arms back onto the wind‐
screen. #
Switch on the ignition. #
Press the00D4 button on the combination
switch.
The wiper arms will mo veinto the original
position. Maintenance display #
Remo vethe pr otective film 1 from the
maintenance display on the tip of the newly
fi tted wiper blades.
If th e colour of the maintenance display changes
from black to yellow, the wiper blades should be
re placed. 15 2
Light and sight
Page 156 of 757
%
The duration until the colour changes varies
depending on the usage conditions. Re
placing the windsc reen wiper blades
(MAGIC VISION CONT ROL) Moving
the wiper arms into there placement
position #
Switch the ignition off. #
Within around 15seconds, press the00D4
button on the combination switch
(/ page 150).
The wiper arms will mo veinto there place‐
ment position. Re
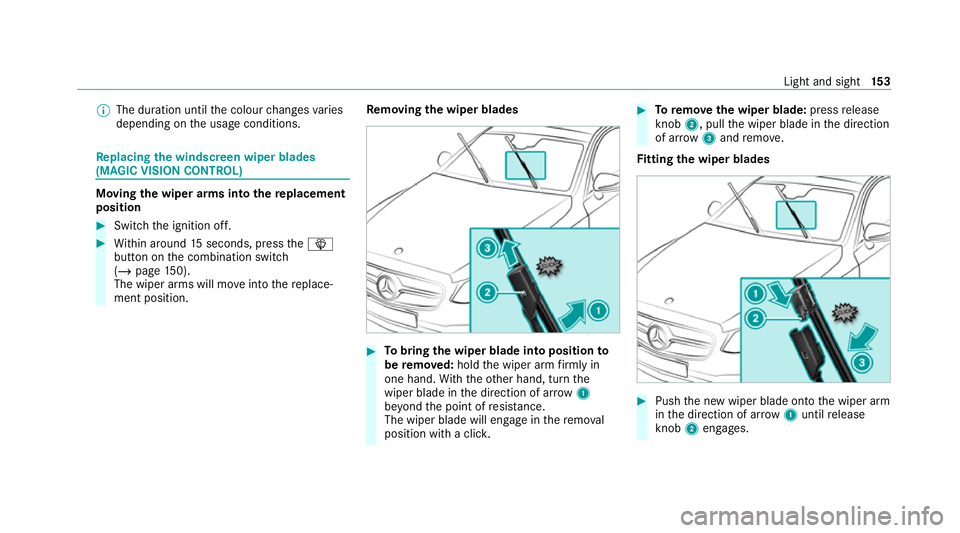
moving the wiper blades #
Tobring the wiper blade into position to
be remo ved: hold the wiper arm firm ly in
one hand. With th eot her hand, turn the
wiper blade in the direction of ar row1
be yond the point of resis tance.
The wiper blade will engage in there mo val
position with a clic k. #
Toremo vethe wiper blade: pressrelease
knob 2, pull the wiper blade in the direction
of ar row3and remo ve.
Fi tting the wiper blades #
Push the new wiper blade onto the wiper arm
in the direction of ar row1until release
knob 2engages. Light and sight
15 3
Page 177 of 757
R
you press but ton1 twice more. #
Toswitch on the ignition: press button 1
twice.
The indicator lamps in the instrument clus ter
light up.
The ignition is switched off again if one of the
fo llowing conditions is me t:
R you do not start theve hicle within
15 minutes and the transmission is in posi‐
tion 005Dorthe electric parking brake is
applied.
R you press but ton1 once. St
arting theve hicle St
arting theve hicle with thest art/s top but‐
ton &
DANG ER Risk of death caused by
ex haust gases
Combustion engines emit poisonous exhaust
ga ses such as carbon monoxide. Inhaling th
ese exhaust gases is hazardous tohealth
and leads topoisoning. #
Never lea vethe engine or, if present,
th e auxiliary heating running in an
enclosed space wi thout suf ficient venti‐
lation. &
WARNING Risk offire due toflammable
material in the engine compartment or
th eex haust sy stem
Flammable materials brought in byeither ani‐
mals or environmen tal influences may ignite
if th ey come into contact wi thhot parts of
th e engine or exhaust sy stem. #
Therefore, check regularly that there
are no flammable materials in the
engine compartment or on theex haust
sy stem. Re
quirements:
R theke y is located in theve hicle and thekey
battery is not dischar ged. R
or: a Digital Vehicle Key is located in the
mar ked space (/ page175). #
Shift the transmission toposition 005Dor005C. #
Depress the brake pedal and press button
1 once. #
Ifth eve hicle does not star t:switch off non-
essential consumers and press button 1
once.
If th eve hicle still does not start, one of thefo l‐
lowing display messages appears in the multi‐
function display: #
Place the key in the marked space See Own-
er's Manual :St arting theve hicle with thekey
in the mar ked space (emer gency operation
mode) (/ page 176).
or #
Key not detected Place smartphone in charg-
ing bracket: place the mobile phone in the
mar ked space (/ page138). 174
Driving and pa rking
Page 179 of 757
St
arting theve hicle with theke y in the
ma rked space (emer gency operation mode)
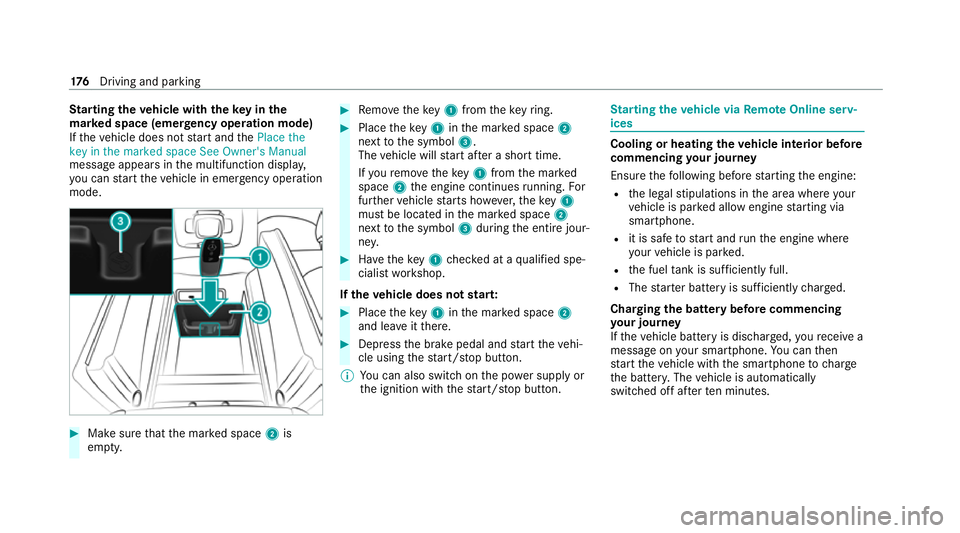
If th eve hicle does not start and thePlace the
key in the marked space See Owner's Manual
message appears in the multifunction displa y,
yo u can start theve hicle in emer gency operation
mode. #
Makesure that the mar ked space 2is
em pty. #
Remo vetheke y1 from theke yring. #
Place theke y1 inthe mar ked space 2
next tothe symbol 3.
The vehicle will start af ter a short time.
If yo ure mo vetheke y1 from the mar ked
space 2the engine continues running. For
fur ther vehicle starts ho wever,th eke y1
must be located in the mar ked space 2
next tothe symbol 3during the entire jour‐
ne y. #
Have theke y1 checked at a qualified spe‐
cialist workshop.
If th eve hicle does not star t: #
Place theke y1 inthe mar ked space 2
and lea veitth ere. #
Depress the brake pedal and start theve hi‐
cle using thest art/ stop button.
% You can also swit chon the po wer supp lyor
th e ignition with thest art/ stop button. St
arting theve hicle via Remo teOnline serv‐
ices Cooling or heating
theve hicle interior before
commencing your journey
Ensure thefo llowing before starting the engine:
R the legal stipulations in the area where your
ve hicle is par ked allow engine starting via
smartphone.
R it is safe tostart and runth e engine where
yo ur vehicle is par ked.
R the fuel tank is su fficiently full.
R The star ter battery is suf ficiently charge d.
Charging the bat tery before commencing
yo ur journey
If th eve hicle battery is dischar ged, youre cei ve a
messa geon your smartphone. You can then
st art theve hicle with the smartphone tocharge
th e batter y.The vehicle is automatically
switched off af terte n minu tes. 176
Driving and pa rking
Page 182 of 757
#
Dep ress and hold the brake pedal firm ly wi th
yo ur left foot. #
With your right foot , fully depress the accel‐
erator pedal. #
After no more than five seconds, take your
left foot quickly off the brake, but keep the
accelerator pedal depressed.
The vehicle pulls away at maximum accelera‐
tion. #
Swit chon ESP ®
once the acceleration proce‐
dure is comple te.
Ending optimised acceleration #
Remo veyour foot from the accelerator pedal. #
Reactivate the ESP ®
.
% Afteryo u pull away with optimised accelera‐
tion, components of the driv etra in can
become very hot, which means that opti‐
mised acceleration values may be reached
again on lyafte r a few minutes. Note
s on driving &
WARNING Risk of accident due to
objects in the driver's foot we ll
Objects in the driver's foot we ll may impede
pedal tr avel or block a depressed pedal.
This jeopardises the operating and road
saf ety of theve hicle. #
Stow all objects in theve hicle securely
so that they cannot getinto the driver's
fo ot we ll. #
Alw aysfit th efloor mats securely and
as prescribed in order toensure that
th ere is alw ays suf ficient room forthe
pedals. #
Do not use loose floor mats and do not
place floor mats on top of one ano ther. &
WARNING Risk of accident due to
unsuitable foot we ar
Operating the pedals may be impaired by
we aring unsuitable foot we ar, e.g.:
R plat form shoes
R high-heeled shoes
R slippers #
Alw ayswe ar suitable foot we ar when
driving so that you can operate the ped‐
als safel y. &
WARNING Risk of accident when switch‐
ing off the ignition when driving
If yo u swit choff the ignition while driving,
saf ety functions are restricted or no longer
av ailable. This may af fect the po werst eering
sy stem and the brake forc e boosting, for
ex ample.
Yo u will then need touse considerably more
fo rc eto steer and brake. Driving and parking
17 9
Page 183 of 757
#
Do not switch off the ignition while driv‐
ing. &
DANG ER Risk of death caused by
ex haust gases
Combustion engines emit poisonous exhaust
ga ses such as carbon monoxide. Inhaling
th ese exhaust gases is hazardous tohealth
and leads topoisoning. #
Never lea vethe engine or, if present,
th e auxiliary heating running in an
enclosed space wi thout suf ficient venti‐
lation. &
WARNING Risk of skidding and of an
accident due toshifting down on slippery
ro ad sur faces
If yo u shift down on slippery road sur faces to
inc rease the engine braking ef fect, the drive
wheels may lose traction. #
Do not shift down on slippery road sur‐
fa ces toinc rease the engine braking
ef fect. &
DANG ER Risk of fata l injury due topoi‐
sonous exhaust gases
If th eta ilpipe is bloc ked or suf ficient ventila‐
tion is not possible, poisonous exhaust gases
such as carbon monoxide may enter theve hi‐
cle. This is the case when theve hicle
becomes stuck in sn ow,fo rex ample. #
Keep theta ilpipe and the area around
th eve hicle free from snow when the
engine or thest ationary heater are run‐
ning. #
Open a window on the side of theve hi‐
cle facing away from the wind toensure
an adequate supply of fresh air. &
WARNING Risk of accident due tothe
brake sy stem overheating
If yo u lea veyour foot on the brake pedal
when driving, the brake sy stem may over‐
heat.
This increases the braking dis tance and the
brake sy stem may evenfa il. #
Never use the brake pedal as a foot re st. #
Do not depress the brake pedal and the
accelerator pedal at the same time
while driving. *
NO
TECausing wearto the brake linings
by permanently depressing the brake
pedal #
Do not permanently depress the brake
pedal while driving. #
Touse braking ef fect of the engine,
shift toa lo werge ar in good time. *
NO
TEDama getothe driv etra in and
engine when pulling away #
Do not warm upthe engine while the
ve hicle is stationar y.Pull away immedi‐
atel y. #
Avoid high engine speeds and driving at
full thro ttle until the engine has reached
its operating temp erature. 18 0
Driving and pa rking