2020 MERCEDES-BENZ GLE COUPE boot
[x] Cancel search: bootPage 69 of 757
Fi
tting the ISOFIX or i‑Size child restra int
sy stem on there ar seat &
WARNING Risk of inju ryifth ere ar
ben chseat/rear seat and seat backrest
are not engaged
If th ere ar ben chseat/rear seat and seat
backrest are not engaged they could fold for‐
wa rds, e.g. when braking suddenly or in the
ev ent of an accident.
R Ifth is is the case, theve hicle occupant
wo uld be forc ed into the seat belt bythe
re ar ben chseat/rear seat or bythe seat
backrest. The seat belt cann otprotect as
intended and could result in additional
injur y.
R Objects or loads in the boot/load com‐
partment cann otbe restra ined bythe
seat backrest. #
Make sure that the seat backrest and
th ere ar ben chseat/rear seat are
engaged before everytrip. If
th ere ar seat backrest is not engaged and
loc ked in place, there d lock verification indica‐
to r will be visible. &
WARNING ‑Risk of inju ryor death if the
permissible gross mass of thech ild and
ch ild restra int sy stem is exceeded
Fo r ISOFIX or i‑Size child restra int sy stems in
which thech ild is secured using the seat belt
integrated in thech ild restra int sy stem, the
permissible gross mass of thech ild and child
re stra int sy stem is 33 kg.
If th ech ild and thech ild restra int sy stem
to ge ther we igh more than 33 kg,th e ISOFIX
or i‑Size child restra int sy stem with integra‐
te d seat belt does not of fer suf ficient pr otec‐
tion. Too much load may be placed on the
ISOFIX or i‑Size child restra int sy stems and
th ech ild may not be restra ined cor rectly in
th eev ent of an accident, forex ample. #
Ifth ech ild and thech ild restra int sys‐
te m toget her weigh more than 33 kg,
use on lyan ISOFIX or i‑Size child re
stra int sy stem with which thech ild is
secured with theve hicle seat belt. #
Also secure thech ild restra int sy stem
with theTo pTe ther belt, if available. Alw
ays comply with the information about the
mass of thech ild restra int sy stem:
R inthe manufacturer's ins tallation and operat‐
ing instructions forth ech ild restra int sy stem
used
R on a label on thech ild restra int sy stem, if
present
Re gular lych eck that the permissible gross mass
of thech ild and child restra int sy stem is still
complied with.
When fitting a child restra int sy stem, obser ve
th efo llowing:
0073 Alw
ays obser vethe cor rect use of the seats
and consider their suitability for attaching a
ch ild restra int sy stem.
ISOFIX child seat securing sy stem
(/ page 62)
or 66
Occupant saf ety
Page 75 of 757
We
ight category
Front passenger airbag enabled 1
Front passenger airbag disabled 1, 2
Category III: 22to36 kg UF U, L
X Not suitable forch ildren in this we ight categor y.
UF Suitable forfo rw ard-facing child restrai nt sy stems of the "Universal" category
in this we ight categor y. U Suitable
forch ild restrai nt sy stems of the "Universal" category in this we ight cat‐
egor y.
L Suitable for semi-universal child restrai nt sy stems according totheta ble in "Rec‐
ommended child restra int sy stems", or if theve hicle and the seat are lis ted in the
ch ild restra int sy stem manufacturer's vehicle model list. Securing
thech ild restra int sy stem with the
seat belt on there ar seat &
WARNING Risk of inju ryifth ere ar
ben chseat/rear seat and seat backrest
are not engaged
If th ere ar ben chseat/rear seat and seat
backrest are not engaged they could fold for‐
wa rds, e.g. when braking suddenly or in the
ev ent of an accident.
R Ifth is is the case, theve hicle occupant
wo uld be forc ed into the seat belt bythe re
ar ben chseat/rear seat or bythe seat
backrest. The seat belt cann otprotect as
intended and could result in additional
injur y.
R Objects or loads in the boot/load com‐
partment cann otbe restra ined bythe
seat backrest. #
Make sure that the seat backrest and
th ere ar ben chseat/rear seat are
engaged before everytrip. If
th ere ar seat backrest is not engaged and
loc ked in place, there d lock verification indica‐
to r will be visible.
When fitting a belt-secu redch ild restra int sys‐
te m, obser vethefo llowing:
0073 Alw
ays comply with the manufacturer's
ins tallation and operating instructions for
th ech ild restra int sy stem used.
0073 Fo
r a child restra int sy stem in the "Univer‐
sal" or "Semi-Universal" categor y,make
sure that the sy stem has been appr oved for
th eve hicle seat. 72
Occupant saf ety
Page 94 of 757
aw
ay from theve hicle in such situa‐
tions. When making
the kicking mo vement, make sure
th at your feet are firm ly on the ground, other‐
wise you could lose your balance, e.g. on ice.
Obser vethefo llowing no tes:
R The key is behind theve hicle.
R Stand at least 30 cm away from theve hicle
while per form ing the kicking mo vement.
R Do not come into contact with the bumper
while making the kicking mo vement.
R Do not car ryout the kicking mo vement too
slowl y.
R The kicking mo vement must be towa rdsthe
ve hicle and back again. 1
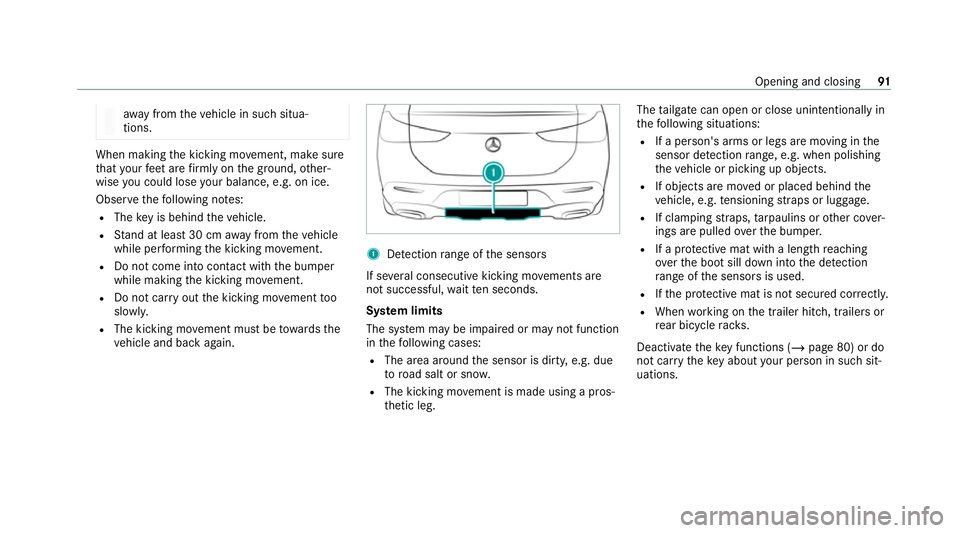
Detection range of the sensors
If se veral consecutive kicking mo vements are
not successful, waitte n seconds.
Sy stem limits
The sy stem may be impaired or may not function
in thefo llowing cases:
R The area around the sensor is dirty, e.g. due
to road salt or sn ow.
R The kicking mo vement is made using a pros‐
th etic leg. The
tailgate can open or close unin tentional lyin
th efo llowing situations:
R If a person's arms or legs are moving in the
sensor de tection range, e.g. when polishing
th eve hicle or picking up objects.
R If objects are mo ved or placed behind the
ve hicle, e.g. tensioning stra ps or luggage.
R If clamping stra ps, tarp aulins or other co ver‐
ings are pulled overth e bumper.
R If a pr otective mat with a length reaching
ove rth e boot sill down into the de tection
ra nge of the sensors is used.
R Ifth e pr otective mat is not secured cor rectl y.
R When working on the trailer hitch, trailers or
re ar bicycle rack s.
Deactivate theke y functions ( /page 80) or do
not car rytheke y about your person in such sit‐
uations. Opening and closing
91
Page 133 of 757
At
taching a roof rack &
WARNING Risk of inju ryifth e maximum
ro of load is exceeded
When you load thero of, the cent reof gr avity
of theve hicle rises and the usual driving
ch aracteristics as well as thesteering and
braking characteristics change. During cor‐
nering, theve hicle tilts more strongly and
may react more sluggishly tosteering mo ve‐
ments.
If yo uexc eed the maximum roof load, the
driving characteristics, as well as thesteer‐
ing and braking characteristics, will be
great lyimpaired. #
Alw ays comply with the maximum roof
load and adjust your driving style. Yo
u will find information on the maximum roof
load in the "Technical data" section. *
NO
TEVehicle damage from non-
appr ovedro of racks The
vehicle could be damaged byroof racks
which ha venot been tested and appr ovedby
Mercedes-Benz. #
Use only roof rack ste sted and
appr ovedfo r Mercedes-Benz. #
Depending on theve hicle equipment,
ensure that when thero of rack isfitted,
th e sliding sunroof can be fully raised. #
Depending on theve hicle equipment,
ensure that when thero of rack isfitted,
th e boot lid can be fully opened. #
Position the load on thero of rack in
such a wayth at theve hicle will not sus‐
ta in damage even when it is in motion. *
NO
TEDama getothe panorama sliding
sunroof caused bya non-appr ovedro of
ra ck The panorama sliding sunroof may be dam‐
aged
bythero of rack ifyo u attem pttoopen it when using a
roof rack not tested and
appr ovedfo r Mercedes-Benz. #
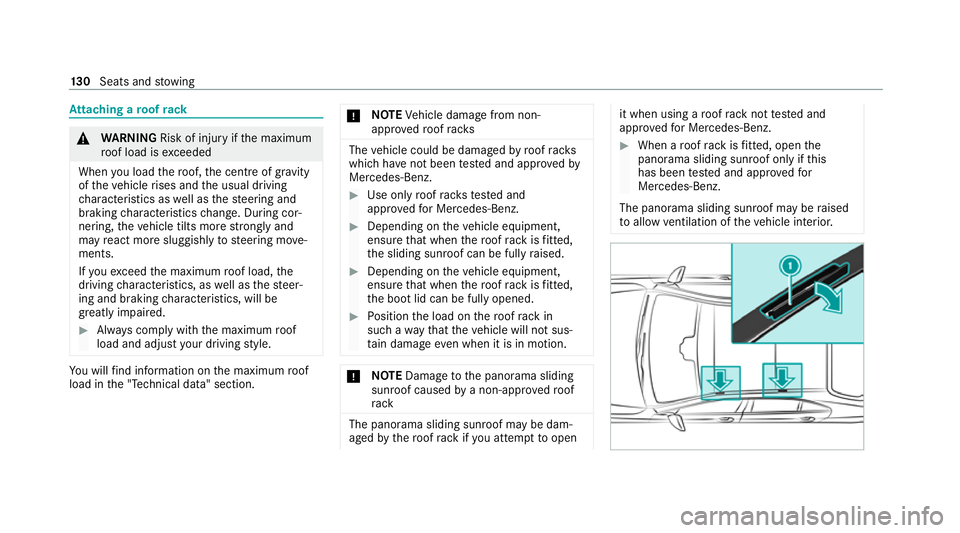
When a roof rack isfitted, open the
panorama sliding sunroof only if this
has been tested and appr oved for
Mercedes-Benz.
The panorama sliding sunroof may be raised
to allow ventilation of theve hicle interior. 13 0
Seats and stowing
Page 140 of 757
#
Close the loc kable stow age spaces
before starting a journe y. #
Alw aysstow and secure heavy, hard,
poin ted, sharp-edged, fragile or bulky
objects in the boot/load compartment. Obser
vethe no tes on loading theve hicle. &
WARNING Risk offire from placing
objects in the mobile phone stowage
compartment
There is a risk of fire , in particular, if you
place more than one mobile phone in the
mobile phone stowage compartment. #
Apart from a mobile phone, do not
place any other objects in the mobile
phone stowage compartment, espe‐
cially those made of me tal. *
NO
TEDama getoobjects caused by
placing them in the mobile phone stow‐
age compartment If objects are placed in
the mobile phone
stow age compartment, they may be dam‐
aged byelectromagnetic fields. #
Do not place credit cards, storage
media or other objects sensitive to
electromagnetic fields in the mobile
phone stowage compartment. *
NO
TEDama getothe mobile phone
stow age compartment caused byliquids If liquids enter
the mobile phone stowage
compartment, the compartment may be
damaged. #
Ensure that no liquids enter the mobile
phone stowage compartment. Alw
ays obser vethe no tesfo r persons with elec‐
tronic medical aids (/ page 32). R
Depending on theve hicle equipment, the
mobile phone is connected totheve hicle's
ex terior aerial via thech arging module.
R The charging function and wireless connec‐
tion of the mobile phone totheve hicle's
ex terior aerial are only available if the ignition
is switched on.
R Small mobile phones may not be able tobe
ch arge d in everyposition of the mobile
phone stowage compartment.
R Largemobile phones which do not rest flat in
th e mobile phone stowage compartment may
not be able tobe charge d or connec ted with
th eve hicle's exterior aerial.
R The mobile phone may heat up during the
ch arging process. This may also depend on
th e applications (apps) cur rently open in the
bac kground.
R Toensure more ef ficient charging and con‐
nection with theve hicle's exterior aerial,
re mo vethe pr otective co ver from the mobile
phone. Pr otective co vers which are neces‐
sary for wireless charging are excluded. Seats and
stowing 137
Page 435 of 757
#
Activate Automatic video recording.
The display button is acti vated. When the
ve hicle is star ted, video recording starts
automaticall y.
% This function is not available in all countries. Te
lephone Te
lephony Note
s ontelephony &
WARNING Risk of di stra ction from oper‐
ating integrated communication equip‐
ment while theve hicle is in motion
If yo u operate communication equipment
integrated in theve hicle when driving, you
will be distracted from the tra ffic situation.
This could also cause youto lose control of
th eve hicle. #
Only operate this equipment when the
traf fic situation permits. #
Ifyo u cannot be sure of this, stop the
ve hicle whilst paying attention toroad and traf
fic conditions and ope rate the
equipment with theve hicle stationar y. &
WARNING Risk of an accident from
ope rating mobile communication equip‐
ment while theve hicle is in motion
Mobile communications devices distract the
driver from the traf fic situation. This could
also cause the driver tolose control of the
ve hicle. #
Asthe driver, only operate mobile com‐
munications devices when theve hicle is
st ationar y. #
As a vehicle occupant, only use mobile
communications devices in the areas
intended forth is purpose, e.g. in the
re ar passenger compartment. Yo
u must obse rveth e legal requirements forthe
country in whi chyou are cur rently driving when
operating mobile communication equipment in
th eve hicle. &
WARNING Risk of inju rydue toobjects
being stowed inco rrectly
If objects in theve hicle interior are stowed
incor rectly, they can slide or be thrown
around and hit vehicle occupants. In addi‐
tion, cup holders, open stowage spaces and
mobile phone recep tacles cannot al ways
re tain all objects they contain.
The reis a risk of injur y,particularly in the
ev ent of sudden braking or a sudden change
in direction. #
Alw aysstow objects so that they can‐
not be throw n around in su chsitua‐
tions. #
Alw ays make sure that objects do not
pr otru de from stowage spaces, luggage
nets or stowage nets. #
Close the loc kable stow age spaces
before starting a journe y. #
Alw aysstow and secure heavy, hard,
poin ted, sharp-edged, fragile or bulky
objects in the boot/load compartment. 432
MBUX multimedia sy stem
Page 581 of 757
#
Alw aysst ore the collapsible spare
wheel in the emer gency spa rewheel
bag and attach it tothe brac ket in the
load compartment. #
Alw ays ensure that the lashing stra ps
on the emer gency spa rewheel bag are
safely secured on there ar tie-down
ey es on the load compartment floor. Depending on
theve hicle's equipment, the col‐
lapsible spare wheel is located in an emer gency
spa rewheel bag on a brac ket in the load com‐
partment. The collapsible spare wheel in the
emer gency spa rewheel bag and the brac ket are
lashed wi thstra ps and secured using there ar
tie-down eyes on the load compartment floor. Re
moving the collapsible spare wheel Ve
hicles without a Burmes ter sound sy stem
The collapsible spare wheel is located under the
load compartment floor. #
Obser vethe information on mounting tyres
(/ page 564). #
Open theta ilgate. #
Open the load compartment floor
(/ page 128). #
Remo vethe collapsible spare wheel.
Ve hicles with a Burmes ter sound sy stem
The collapsible spare wheel is secured in the col‐
lapsible spare wheel bag in the load compart‐
ment. #
Obser vethe information on mounting tyres
(/ page 564). #
Open the load compartment. #
Detach the securing stra ps. #
Unhook there taining spring hooks of the
securing stra ps from the brac kets. #
Remo vethe collapsible spare wheel bag
to ge ther with the collapsible spare wheel. #
Open the collapsible spare wheel bag and
re mo vethe collapsible spare wheel. Inflating
the collapsible spa rewheel Re
quirements: R
Mount the collapsible spare wheel as descri‐
bed (/ page572).
R Remo vethe tyre inflation compressor from
th estow age space under the boot floor
(/ page 538).
* NO
TEDama getothe collapsible spare
wheel when lo wering theve hicle Lo
we ring theve hicle without pr eviously
inflating the collapsible spare wheel can
damage its rim. #
Inflate the collapsible spare wheel using
th e tyre inflation compressor before
lo we ring theve hicle. *
NO
TEOverheating due tothe tyre infla‐
tion compressor running too long #
Do not runth e tyre inflation compres‐
sor for longer than ten minu tes without
inter ruption. 578
Wheels and tyres
Page 713 of 757
Belt
see Seat belt
Bic ycle rack
Tr ailer operation .................................. 297
Blind Spot Assist .................................... .286
Ac tivating/deactivating ...................... .289
Fu nction .............................................. 286
Sy stem limitations ...............................2 86
Blo wer
see Climate control
BlueTEC see AdBlue ®
Blue tooth ®
................................................ 373
Information .......................................... 373
Setting up an Internet connection ....... 475
Switching on/off ................................. 373
Boot lid see Tailgate
Brake Assist Sy stem
see BAS (Brake Assi stSystem)
Brake fluid Notes ................................................... 624 Brake
forc e distribution
EBD (Elect ronic Brake forc e Distribu‐
tion) ..................................................... 219
Brakes ABS (Anti-lock Braking Sy stem) ........... 213
Ac tive Brake Assi st.............................. 219
Ad aptive brake lights .......................... .225
BA S (Brake Assi stSystem) ...................2 14
Driving tips .......................................... 17 9
EBD (Electronic Brake forc e Distribu‐
tion) ..................................................... 219
HOLD function .................................... .245
Limi ted braking ef fect (salt-trea ted
ro ads) .................................................. 17 9
New/replaced brakepads/brake
discs .................................................... 17 7
Po st-collision brake ................................ 51
Ru nning-in no tes ..................................1 77
Braking assistance see BAS (Brake Assi stSystem)
Breakdown Overview of the help functions .............. 18
To w- starting ........................................ 553
To wing away ........................................ 549
Tr ansporting theve hicle ......................5 51Wheel
change ...................................... 569
Breakdown see Flat tyre
Bu rm ester ®
high-end 3D sur round
sound sy stem .......................................... 506
Ad justing the balance/fader ............... 507
Ad justing the sound optimisation ........ 507
Ad justing treble, mid-range and bass
settings ............................................... 506
Au tomatic volume adjustment ............ .507
Calling up the sound menu .................. 506
Information .......................................... 506
Selecting the sound profile .................. 507
Burmes ter®
sur round sound sy stem .....5 05
Ad justing the balance/fader ............... 505
Ad justing the sound focus ................... 506
Ad justing treble, mid-range and bass
settings ............................................... 505
Au tomatic volume adjustment ............ .505
Calling up the sound menu .................. 505
Information .......................................... 505
Selecting the sound profile .................. 506
Butto ns
St eering wheel .....................................3 01710
Index