2020 MERCEDES-BENZ C-CLASS ESTATE light
[x] Cancel search: lightPage 391 of 565
R
for car washes with a con veyo r sy stem:
- neutral iis engaged.
- Ifyo uwo uld like tolea vetheve hicle while
it is being washed, make sure theke y is
located in theve hicle. The park position
j isotherwise automatically engaged.
% If, af terth e car wash, youre mo vethewax
from the windscreen and wiper rubbers, this
will pr event smearing and reduce wiper
noise. Information on using a high-p
ressure cleaner &
WARNING Risk of an accident when
using high-pressure cleane rswith round-
spray nozzles
The wate r jet can cause extern ally invisible
damage.
Components damaged in this wa y may unex‐
pec tedly fail. #
Do not use a high-pressure cleaner with
round-spr aynozzles. #
Have damaged tyres or chassis parts
re placed immediatel y. To
avo id damage to yourvehicle, obser vethefo l‐
lowing when using a high-pressure cleaner:
R The key is at a minimum distance of 3 m
aw ay from theve hicle. Otherwise theta ilgate
could open unin tentional ly.
R Maintain a dis tance of at least 30 cm tothe
ve hicle.
R Vehicles with decora tivefoil: parts of your
ve hicle are co vered with a decorative foil.
Maintain a dis tance of at least 70 cm
between thefo il-c ove red parts of theve hicle
and the nozzle of the high-pressure cleaner.
Mo vethe high-pressure cleaner nozzle
around whilst cleaning. The waterte mp era‐
ture of the high-pressure cleaner must not
exc eed 60°C.
R Obser vethe information on the cor rect dis‐
tan ce in the equipment manufacturer's oper‐
ating instructions.
R Do not direct the nozzle of the high-pressure
cleaner directly at sensitive parts, e.g. tyres, ga
ps, elect rical components, batteries, light
sou rces and ventilation slits. Wa
shing theve hicle byhand *
NO
TEEngine damage duetowa ter
ing ress #
Take care not topoint thewate r jet
directly towa rdsth e air inlet grille below
th e bonn et. obser
vethe legal requ irements, e.g. in a number
of countries, washing byhand is only permitted
in specially designated wash ba ys. #
Use a mild cleaning agent, e.g. car shampoo. #
Washtheve hicle with luk ewarmwate r using
a soft car sponge. When doing so, do not
ex pose theve hicle todirect sunlight. #
Carefully hose theve hicle off with water and
dry using a chamois.
% Obse rveth e no tes on the care of car parts
(/ page 390). 388
Maintenance and care
Page 392 of 565
Note
s on paint work/matt finish paintwork
care Obse
rveth e no tes on cleaning and care toavo id
damaging the paintwor k.
Pa int
R Insect remains: soak with insect remo ver and
ri nse off the treated areas af terw ards.
R Bird droppings: soak with water and rinse off
af te rw ards.
R Tree resin, oils, fuels and greases: remo veby
ru bbing gently wi tha clo thsoaked in petro‐
leum ether or lighter fluid.
R Coolant and brake fluid: remo vewith a damp
clo thand clean water.
R Tarst ains: use tar remo ver.
R Wax: use silicone remo ver.
R Do not attach sticke rs,fi lms or similar mate‐
ri als.
R Remo vedirt immediately, where possible.
Matt finish
R Only use care products appr ovedfor
Mercedes-Benz. R
Do not polish theve hicle and light-alloy
wheels.
R Only use car washes that cor respond tothe
latest engineering standards.
R Do not use car wash programmes with a final
hot wax treatment.
R Do not use paint cleane rs, buf fing or polish‐
ing products, gloss preser vers, e.g. wax.
R Alw ays ha vepaintwork repairs car ried out at
a qu alified specialist workshop. Note
s on cleaning decorative foils Obser
vethe no tes on matt finish care in the
ch ap ter "No tes on paintwork/matt finish paint‐
wo rkcare" (/ page 389). They also apply to
matt decorative foils.
Obser vethe no tes on cleaning decorative foils to
av oid vehicle damage.
Cleaning
R For cleaning, use plenty of water and a mild
cleaning agent without additives or abrasive
subs tances, e.g. a car sha mpoo appr ovedfor
Mercedes-Benz. R
Remo vedirt immediatel y,where possible,
whilst avoiding rubbing too hard. There is
ot herwise a risk of damaging the decorative
fo il ir reparabl y.
R Ifth ere is dirt on thefinish or if the decora‐
tive foil is dull: use thePa int Cleaner recom‐
mended and appr oved for Mercedes-Benz.
R Insect remains: soak with insect remo ver and
ri nse off the treated areas af terw ards.
R Bird droppings: soak with water and rinse off
af te rw ards.
R Topreve ntwate rst ains, dry a foil-wrapped
ve hicle with a soft, absorbent clo thafter
eve rycar wash.
Av oiding dama getothe decorative foil
R The service life and colouring of decorative
foils are impaired by:
- sunlight
- temp erature, e.g. hot air blo wer
- weather conditions
- stone chippings and dirt
- chemical cleaning agents Maintenance and care
389
Page 394 of 565
Wi
per blades
R Movethe wiper arms into there placement
position (/ page144).
R With th e wiper arms folded out, clean the
wiper blades with a damp clo th.
R Do not clean the wiper blades too of ten.
Ex terior lighting
R Clean the lenses with a wet sponge and mild
cleaning agent, e.g. car sha mpoo.
R Only use cleaning agents or cleaning clo ths
th at are suitable for plast ic lenses.
Sensors
R Clean the sensors in the front and rear
bumpers with a soft clo thand car shampoo
(/ page 192).
R When using a high -pressure cleaner,maintain
a minimum dis tance of 30 cm.
Re versing camera and 360° Camera
R Open the camera co ver with the multimedia
sy stem (/ page 234).
R Use clean water and a soft clo thtoclean the
came ralens. R
Do not use a high-pressure cleaner.
Ta ilpipes
R Clean with a cleaning agent recommended
fo r Mercedes-Benz, especially inthe winter
and af terwa shing theve hicle.
R Do not use acidic cleaning agents.
Tr ailer hitch
R Obse rveth e no tes on care in the trailer hitch
manufacturer's operating instructions.
R Do not clean the ball neck with a high-pres‐
sure cleaner or solvent.
R Remo vetraces of rust on the ball, forex am‐
ple, with a wire brush.
R Remo vedirt with a lint-free clo th.
R After cleaning, lightly oil or grease the ball
head.
% Before using trailers with anti- torsional cou‐
pling, obser vethe manufacturer's operating
instructions. Note
s on care of the interior &
WARNING Risk of injury from plastic
parts breaking off af terth e use of sol‐
ve nt-based care products
Ca reand cleaning products con taining sol‐
ve nts can cause su rfaces in the cockpit to
become porous. When the airbags are
deplo yed, plastic parts may break away. #
Do not use any care or cleaning prod‐
ucts containing sol vents toclean the
cockpit. &
WARNING Risk of injury or death from
bleached seat belts
Bleaching or dyeing seat belts can se verely
we aken them.
This can, forex ample, cause seat belts to
te ar or fail in an accident. #
Never blea chor dye seat belts. To
avo id damage totheve hicle, obser vethefo l‐
lowing no tes on cleaning and care: Maintenance and care
391
Page 395 of 565
Seat belts
R Clean with luk ewarmand soapy water.
R Do not use chemical cleaning agents.
R Do not dry byheating them toove r 80°C or
ex posing them todirect sunlight.
Display
R Switch off the display and let it cool down.
R Clean the sur face carefully with a microfibre
clo thand a suitable display care product
(TF T-LC D).
R Do not use any other agents.
Plastic trim R Clean with a damp microfibre clo th.
R For heavy soiling: use a cleaner recommen‐
ded for Mercedes-Benz.
R Do not attach sticke rs,fi lms or similar mate‐
ri als.
R Do not allow cosmetics, insect repellent or
sun cream tocome in contact wi th the plas‐
tic trim.
Re alwo od and trim elements
R Clean with a mic rofibre clo th. R
Blackpiano-lac quer look: clean with a damp
clo thand soapy water.
R For heavy soiling: use a cleaner recommen‐
ded for Mercedes-Benz.
R Do not use sol vent-based cleaning agents,
polishes or waxes.
Ro of lining
R Clean with a brush or dry shampoo.
Carpet
R Use a carpet and textile cleaning agent rec‐
ommended for Mercedes-Benz.
St eering wheel made of genuine leather or
DINAMICA
* NO
TEDama gecaused bywrong cleaners #
Do not use solvent-based cleaning
agents such as tarre mo ver or wheel
cleaner; neither should you use pol‐
ishes or waxes. Otherwise you may
damage thefinish. R
Clean wi tha damp clo thand 1% soapy water
solution and then wipe with a dry clo th.R
For heavy soiling: use a cleaner recommen‐
ded for Mercedes-Benz.
R Leather care: use a leath er care agentthat
has been recommended for Mercedes-Benz.
R Do not allow the leather tobecome too
damp.
R Do not use a microfibre clo th.
% Leather is a natural product. It has natural
surface propert ies, such as dif fere nces in
st ru cture, mar kscaused bygrow thand
injury or subtle colour dif fere nces.
Genuine leather seat co vers
R Clean with a damp clo thand then wipe with a
dry clo th.
R Leather care: use a leath er care agentthat
has been recommended for Mercedes-Benz.
R Do not allow th e leathertobecome too
damp.
R Do not use a microfibre clo th.
DINAMICA seat co vers
R Clean with a damp clo th.
R Do not use a mic rofibre clo th. 392
Maintenance and care
Page 408 of 565
&
WARNING Risk ofexplosion from hydro‐
ge nga s igniting
There is a danger of hydrogen gas igniting
when charging the battery if there is a short
circuit or spar ksstart toform. #
Make sure that the positive term inal of
th e connected battery does not come
into conta ct withvehicle parts. #
Never place me tal objects or tools on a
batter y. #
The described order of the battery
clamps must be obser ved when con‐
necting and disconnecting the batter y. #
When giving starting assis tance, al ways
make sure that you on lyconnect bat‐
te ry term inals with identical polarity. #
During starting assis tance, you must
obse rveth e described order for con‐
necting and disconnecting the jump
lead. #
Do not connect or disconnect the bat‐
te ry cla mp s while the engine is running. &
WARNING Risk ofexplosion during
ch arging process and starting assis tance
During thech arging process and starting
assis tance, the battery may release an explo‐
sive gas mixture. #
Avoid fire , naked flames, creating
spar ksand smoking. #
Make sure there is suf ficient ventila‐
tion. #
Do not lean over a batter y. &
WARNING Risk ofexplosion from a fro‐
zen battery
A dischar ged battery may freeze at temp era‐
tures slightly abo veor below freezing point.
During starting assis tance or battery charg‐
ing, bat tery gas can be released. #
Alw ays allow a battery tothaw before
ch arging it or per form ing starting assis‐
ta nce. If
th e indicator/warning lamps in the instrument
clus ter do not light up at low temp eratures, it is
ve ry likely that the dischar ged battery has fro‐
zen. In this case you may neither jump-s tart the
ve hicle nor charge the batter y.
The service life of a battery that has been
th awe d may be dramatically shor tened. The
st arting characteristics may be impaired, espe‐
cially at low temp eratures.
It is recommended that you ha veathaw ed bat‐
te ry checked at a qualified specialist workshop.
Plug-in hybrid: be sure toobser vethe no tes in
th e Supplement. You could otherwise failto rec‐
ognise dangers.
All vehicles
* NO
TEDama gecaused bynumerous or
ex tended attempt sto start the engine Nume
rous or extended attempt sto start the
engine may damage the catalytic con verter
due tonon-combu sted fuel. #
Avoid numerous and extended attem pts
to start the engine. Breakdown assis
tance 405
Page 410 of 565
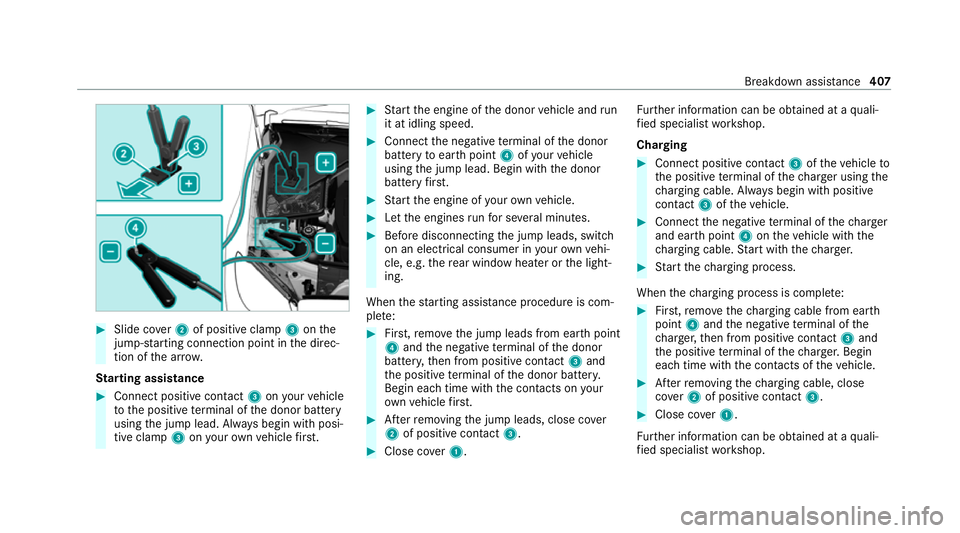
#
Slide co ver2 of positive clamp 3onthe
jump-s tarting connection point in the direc‐
tion of the ar row.
St arting assi stance #
Connect positive contact 3onyour vehicle
to the positive term inal of the donor battery
using the jump lead. Alw ays begin with posi‐
tive clamp 3onyour ow nve hicle firs t. #
Start the engine of the donor vehicle and run
it at idling speed. #
Connect the negative term inal of the donor
battery toear thpoint 4ofyour vehicle
using the jump lead. Begin with the donor
battery firs t. #
Start the engine of your ow nve hicle. #
Let the engines runfo r se veral minutes. #
Before disconnecting the jump leads, switch
on an electrical consumer in your ow nve hi‐
cle, e.g. there ar wind owheater or the light‐
ing.
When thest arting assis tance procedu reis com‐
ple te: #
First,re mo vethe jump leads from ear thpoint
4 and the negative term inal of the donor
batter y,then from positive conta ct3 and
th e positive term inal of the donor batter y.
Begin ea chtime wi th the conta cts onyour
ow nve hicle firs t. #
Afterre moving the jump leads, close co ver
2 of positive contact 3. #
Close co ver1. Fu
rther information can be obtained at a quali‐
fi ed specialist workshop.
Charging #
Connect positive contact 3oftheve hicle to
th e positive term inal of thech arge r using the
ch arging cable. Alw ays begin with positive
contact 3oftheve hicle. #
Connect the negative term inal of thech arger
and ear thpoint 4ontheve hicle with the
ch arging cable. Start with thech arge r. #
Start thech arging process.
When thech arging process is comple te: #
First,re mo vethech arging cable from ear th
point 4and the negative term inal of the
ch arge r,th en from positive conta ct3 and
th e positive term inal of thech arge r.Begin
ea ch time wi th the conta cts oftheve hicle. #
Afterre moving thech arging cable, close
co ver2 of positive contact 3. #
Close co ver1.
Fu rther information can be obtained at a quali‐
fi ed specialist workshop. Breakdown assis
tance 407
Page 422 of 565
not pe
rmit any reliable conclusion about the tyre
pressure.
Only cor rect tyre pressures when the tyres are
cold. Conditions for cold tyres:
R The vehicle has been par ked with the tyres
out of direct sunlight for at least thre e hours.
R The vehicle has tr avelled less than 1.6 km.
The vehicle's tyres heat up when driving. As the
te mp erature of the tyres increases, so too does
th e tyre pressure.
Ve hicles with a tyre pressure monitoring sys‐
te m: you can also check the tyre pressure using
th e on-board computer.
Note s on trailer operation
Alw ays inflate there ar axle tyres tothere com‐
mended tyre pressures on the tyre pressure
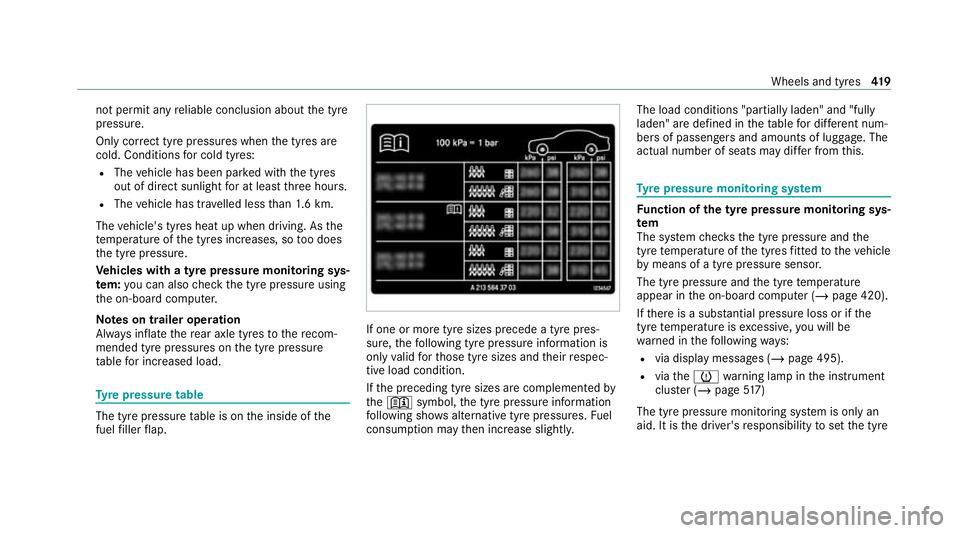
ta ble for increased load. Ty
re pressure table The tyre pressure
table is on the inside of the
fuel filler flap. If one or more tyre sizes precede a tyre pres‐
sure,
thefo llowing tyre pressure information is
only valid forth ose tyre sizes and their respec‐
tive load condition.
If th e preceding tyre sizes are complemented by
th e+ symbol, the tyre pressure information
fo llowing sho wsalternative tyre pressures. Fuel
consum ption may then increase slightl y.The load conditions "partially laden" and "fully
laden" are defined in
theta ble for dif fere nt num‐
be rs of passengers and amounts of luggage. The
actual number of seats may dif fer from this. Ty
re pressure moni toring sy stem Fu
nction of the ty repressure moni toring sys‐
tem
The sy stem checks the tyre pressure and the
tyre temp erature of the tyres fitted totheve hicle
by means of a tyre pressu resensor.
The tyre pressure and the tyre temp erature
appear in the on-board computer (/ page 420).
If th ere is a subs tantial pressure loss or if the
tyre temp erature is excessive, you will be
wa rned in thefo llowing ways:
R via display messa ges (/ page 495).
R viatheh warning lamp in the instrument
clus ter (/ page517)
The tyre pressu remonitoring sy stem is only an
aid. It is the driver's responsibility toset the tyre Wheels and tyres
419
Page 449 of 565
*
NO
TEOverheating at high outside tem‐
peratures If an inapp
ropriate coolant is used, the
engine cooling sy stem is not suf ficiently pro‐
te cted against overheating and cor rosion at
high outside temp eratures. #
Alw ays use coolant appr ovedby
Mercedes-Benz. #
Obser vethe instructions in the
Mercedes-Benz Specifications for Oper‐
ating Fluids 310.1. Ha
ve the coolant regularly replaced at a qualified
specialist workshop.
Proportion of antifreeze concentrate in the
engine cooling sy stem:
R a minimum of 50% (antifreeze pr otection
down toappr oximately -37°C)
R a maximum of 55% (antifreeze pr otection
down to-45°C) Note
s on windscreen washer fluid Obser
vethe no tes on operating fluids
(/ page 437). &
WARNING ‑ Risk of fire and injury due to
windscreen washer concentrate
Wi ndsc reen washer concentrate is highly
fl ammable. It could ignite if it comes into
con tact with hot engine component parts or
th eex haust sy stem. #
Make sure that no windscre enwasher
concentrate spills out next tothefiller
opening. *
NO
TEDama getotheex terior lighting
due tounsuitable windsc reen washer
fl uid Uns
uitable windsc reen washer fluids may
damage the plastic sur face of theex terior
lighting. #
Only use windscreen washer fluids
which are also suitable for use on plas‐ tic sur
faces, e.g. MB SummerFit or MB
Wi nterFit. *
NO
TEBlocked spr aynozzles caused by
mixing windscreen washer fluids #
Do not mix MB SummerFit and MB Win‐
te rFit with other windscreen washer flu‐
ids. Do not use distilled or de-ionised
water.Other‐
wise, thefill le vel sensor may be triggered er ro‐
neously.
Re commended windscreen washer fluid:
R abo vefreezing point: e.g. MB SummerFit
R below freezing point: e.g. MB WinterFit
Fo rth e cor rect mixing ratio, referto the informa‐
tion on the antif reeze conta iner.
Mix washer fluid with windsc reen washer fluid all
ye ar round. 446
Tech nical da ta