2020 MERCEDES-BENZ AMG GT R-ROADSTER ECU
[x] Cancel search: ECUPage 316 of 441
R
When connecting and disconnecting the bat‐
te ry, alw ays obser vethe sequence of battery
te rm inals desc ribed.
Obser vethe additional following points when
ch arging the battery:
R Only use battery charge rs tested and
appr ovedfo r Mercedes-Benz.
R Read the battery charge r's operating instruc‐
tions before charging the batter y.
Obser vethe additional following points during
st arting assis tance:
R Starting assis tance may only be pr ovided
using vehicles, batteries or other jump start
devices with a nominal voltage of 12V.
R The vehicles must not touch.
R Take care toconnect only battery term inals
of identical polarity.
R Obser vethe sequence described for con‐
necting and disconnecting the jumper
cables. R
Vehicles with a petrol engine: jump-start
th eve hicle only when the engine and exhaust
sy stem are cold. St
arting assi stance and charging the 12 V
battery Re
quirements:
R The vehicle is secured with the electric park‐
ing brake.
R Vehicles with automatic transmission: the
transmission is in position j.
R The ignition and all electrical consumers are
switched off.
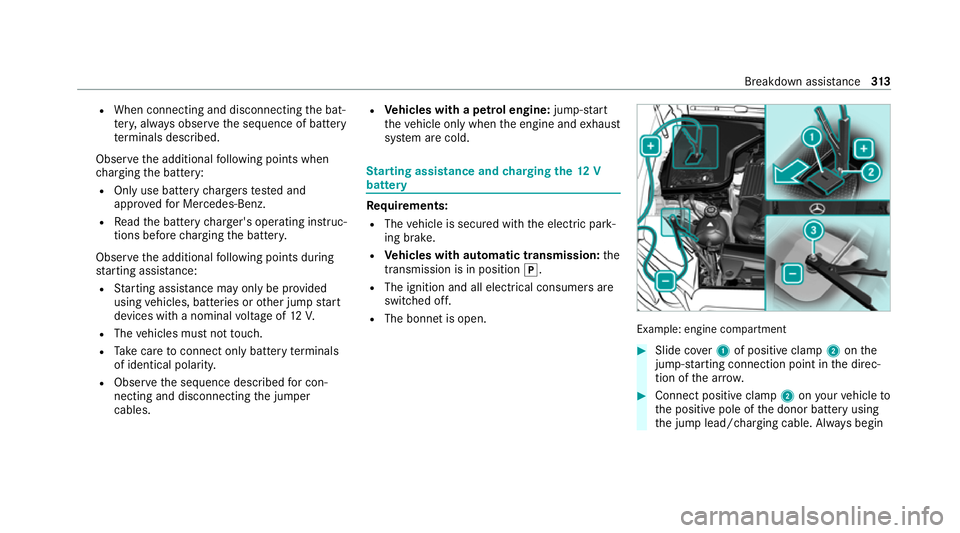
R The bonnet is open. Example: engine compartment
#
Slide co ver1 of positive clamp 2onthe
jump-s tarting connection point in the direc‐
tion of the ar row. #
Connect positive clamp 2onyour vehicle to
th e positive pole of the donor battery using
th e jump lead/charging cable. Alw ays begin Breakdown assis
tance 313
Page 320 of 441
&
WARNING Risk of accident due tolimi‐
te d saf ety-re lated functions during the
to wing process
Saf ety-re lated functions are limited or no lon‐
ge rav ailable in thefo llowing situations:
R the ignition is switched off.
R the brake sy stem or po werst eering sys‐
te m is malfunctioning.
R the energy supply or the on-board electri‐
cal sy stem is malfunctioning.
When your vehicle is then towe daw ay, signif‐
icantly more ef fort may be requ ired tosteer
and brake than is norm allyrequ ired. #
Use a tow bar. #
Make sure that thesteering wheel can
mo vefreely before towing theve hicle
aw ay. *
NO
TEDama gedue toexcessive tracti ve
po wer If
yo u pull away sharpl y,the tractive po wer
may be too high and theve hicles could be
damaged. #
Pull away slowly and smoo thly. Loading the
vehicle for transport #
Obser vethe no tes on towing away
( / page 315). #
Con nect theto w bar totheto wing eye in
order toload theve hicle. #
Shift the automatic transmission toposition
i.
% The automatic transmission may be loc ked
in position jintheeve nt of damage tothe
electrics. Toshift toi , pr ovide the on-
board electrical sy stem with po wer
( / page 313). #
Load theve hicle onto the transpor ter. #
Shift the automatic transmission toposition
j. #
Use the electric parking brake tosecure the
ve hicle against rolling away. #
Only secure theve hicle bythe wheels. #
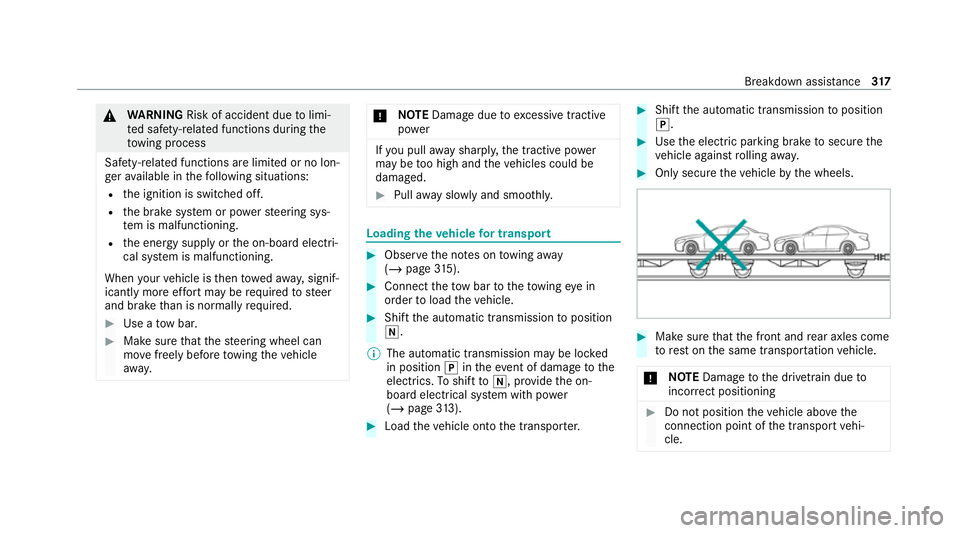
Make sure that the front and rear axles come
to rest on the same transpor tation vehicle.
* NO
TEDama getothe driv etra in due to
incor rect positioning #
Do not position theve hicle abo vethe
connection point of the transport vehi‐
cle. Breakdown assis
tance 317
Page 322 of 441

Electrical fuses
Note
s on electrical fuses &
WARNING Risk of accident and inju ry
due to ov erloaded lines
If yo u manipulate or bridge a faulty fuse or if
yo ure place it with a fuse with a higher
amperage, the electric line could be overloa‐
ded.
This could result in a fire. #
Alw aysre place faulty fuses with speci‐
fi ed new fuses conta iningthe cor rect
amperage. *
NO
TEDama gedue toincor rect fuses Electrical components or sy
stems may be
damaged byincor rect fuses, or their func‐
tionality may be significant lyimpaired. #
Only use fuses that ha vebeen appr oved
by Mercedes-Benz and which ha vethe
cor rect fuse rating. Blown fuses mu
stbe replaced with fuses of the
same rating, which you can recognise bythe col‐
our and fuse rating. The fuse ratings and fu rther
information tobe obser ved can be found in the
fuse assignment diagram.
Fu se assignment diag ram: onthe fuse box in
th e load compartment (/ page 320).
* NO
TEDama geor malfunctions caused
by moisture Moisture may cause dama
getothe electrical
sy stem or cause it tomalfunction. #
When the fuse box is open, make sure
th at no moisture can enter the fuse
box. #
When closing the fuse box, make sure
th at the seal of the lid is positioned cor‐
re ctly on the fuse box. If
th e newly inser ted fuse also blo ws, ha vethe
cause traced and rectified at a qualified special‐
ist workshop.
Ensure thefo llowing before replacing a fuse:
R The vehicle is secured against rolling away. R
All electrical consumers are switched off.
R The ignition is switched off.
The electrical fuses are located in various fuse
bo xes:
R Fuse box in the front passenger foot we ll
(/ page 319)
R Fuse box in the load compartment on the
left-hand side of theve hicle, when vie wed in
th e direction of tra vel (/ page 320) Opening and closing
the fuse box in the front
passenger foot we ll Obser
vethe no tes on electrical fuses
(/ page 319). Breakd
own assi stance 319
Page 353 of 441
Display messages
Possible causes/consequences and M MSolutions &
WARNING Risk of injury orfata l injury when using a child restra int sy stem while the front passenger airbag
is enabled
If yo u secure a child in a child restra int sy stem on the front passenger seat and the front passenger airbag is
enabled, the front passenger airbag may deploy in theeve nt of an accident.
The child could be stru ck bythe airbag. #
Both before and during the journe y,ensure that thest atus of the front passenger airbag is cor rect.
NEVER use a rear wa rdfacing child restra int on a seat pr otected byan ACTIVE AIRB AGin front of it, DE ATH or
SERIOUS INJU RYtothech ild can occur. #
Stop theve hicle immediately in accordance with the traf fic conditions. #
Check thest atus of the automatic front passenger airbag actuation (/ page44). #
If necessar y,consult a qualified specialist workshop immediatel y.
Child seat in wrong posi-
tion See Owner's Manual *T
hechild seat is positioned incor rectly. &
WARNING Risk of injury or death duetoincor rect ins tallation of thech ild restra int sy stem
The child can then not be pr otected or restra ined as intended. #
Be sure tocomply wi th the manufacturer's ins tallation instructions forth ech ild restra int sy stem and its
cor rect use. #
Makesure that the entire base of thech ild restra int sy stem alw aysre sts on the sitting sur face of the seat. 350
Display messages and warning/indicator lamps
Page 359 of 441
Ve
hicle Display messages
Possible causes/consequences and M MSolutions
d Vehicle is operational
Switch off ignition before
exiting *Y
ou are leaving theve hicle when it is in a ready-to-drive state. #
When you lea vetheve hicle, switch off the ignition, secure theve hicle against rolling away and take theke y with
yo u. #
Ifyo u do not lea vetheve hicle, switch off the electrical consumers, e.g. the seat heating. Otherwise, the12 V
battery may dischar geand it will then be possible tostart theve hicle only with the aid of a second battery
(s ta rting assis tance).
Ù Steering malfunction
Increased physical effort
See Owner's Manual *T
he po werst eering assis tance is malfunctioning. &
WARNING Risk of an accident due toaltered steering characteristics
If th e po wer assi stance of thesteering fails partially or comple tely, you will need touse more forc eto steer. #
If safe steering is possible, drive on carefully. #
Visit or consult a qualified specialist workshop immediatel y.Ù
Steering malfunction Stop
immediately See Owner's
Manual *T
hesteering is malfunctioning. Steering capability is significant lyimpaired. &
WARNING Risk of accident if steering capability is impaired
If th esteering does not function as intended, theve hicle's operating saf ety is jeopardised. 356
Display messages and warning/indicator lamps
Page 369 of 441
Display messages
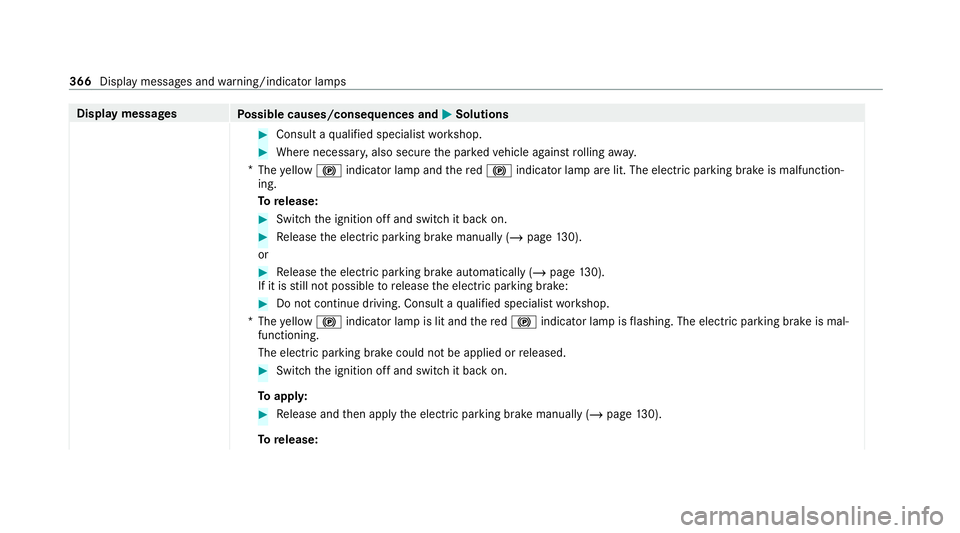
Possible causes/consequences and M MSolutions #
Consult a qualified specialist workshop. #
Where necessar y,also secure the par kedve hicle against rolling away.
* The yellow ! indicator lamp and there d! indicator lamp are lit. The elect ric pa rking brake is malfunction‐
ing.
To release: #
Swit chthe ignition off and switch it back on. #
Release the electric parking brake manually (/ page130).
or #
Release the electric parking brake automatically (/ page130).
If it is still not possible torelease the electric parking brake: #
Do not continue driving. Consult a qualified specialist workshop.
* The yellow ! indicator lamp is lit and there d! indicator lamp is flashing. The electric parking brake is mal‐
functioning.
The electric parking brake could not be applied or released. #
Swit chthe ignition off and switch it back on.
To appl y: #
Release and then apply the electric parking brake manually (/ page130).
To release: 366
Display messages and warning/indicator lamps
Page 370 of 441
Display messages
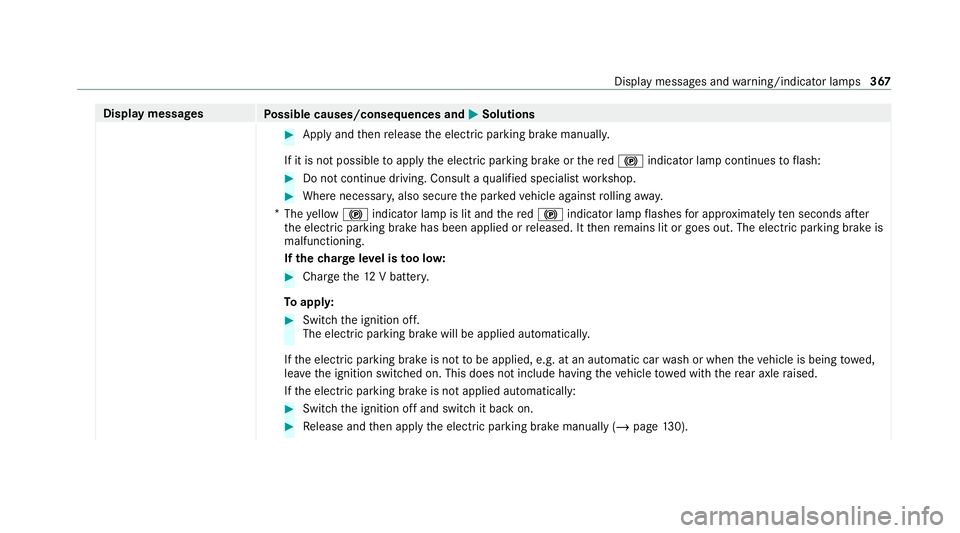
Possible causes/consequences and M MSolutions #
Apply and then release the electric parking brake manuall y.
If it is not possible toapply the electric parking brake or there d! indicator lamp continues toflash: #
Do not continue driving. Consult a qualified specialist workshop. #
Where necessar y,also secure the par kedve hicle against rolling away.
* The yellow ! indicator lamp is lit and there d! indicator lamp flashes for appro ximately ten seconds af ter
th e electric parking brake has been applied or released. It then remains lit or goes out. The electric parking brake is
malfunctioning.
If th ech arge leve l is too lo w: #
Char gethe12 V batter y.
To appl y: #
Switch the ignition off.
The electric parking brake will be applied automaticall y.
If th e electric parking brake is not tobe applied, e.g. at an automatic car wash or when theve hicle is being towe d,
lea vethe ignition switched on. This does not include having theve hicle towe d with there ar axle raised.
If th e electric parking brake is not applied automatically: #
Switch the ignition off and switch it back on. #
Release and then apply the electric parking brake manually (/ page130). Displ
aymessa ges and warning/indicator lamps 367
Page 371 of 441
Display messages
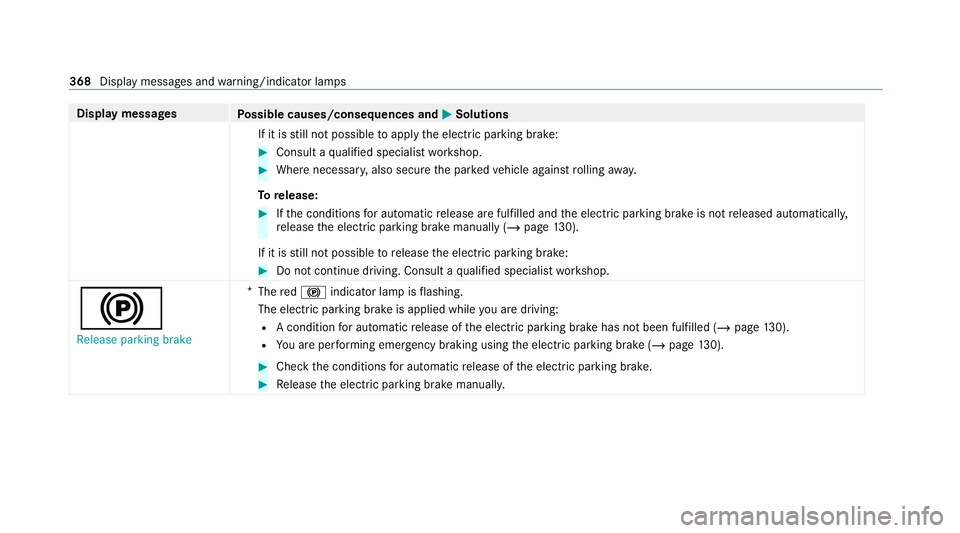
Possible causes/consequences and M MSolutions
If it is still not possible toapply the electric parking brake: #
Consult a qualified specialist workshop. #
Where necessar y,also secure the par kedve hicle against rolling away.
To release: #
Ifth e conditions for auto matic release are fulfilled and the electric parking brake is not released automaticall y,
re lease the electric parking brake manually (/ page130).
If it is still not possible torelease the electric parking brake: #
Do not continue driving. Consult a qualified specialist workshop.
! Release parking brake *
The red! indicator lamp is flashing.
The electric parking brake is applied while you are driving:
R A condition for auto matic release of the electric parking brake has not been fulfilled (/ page130).
R You are per form ing emer gency braking using the electric parking brake (/ page130). #
Che ckthe conditions for auto matic release of the electric parking brake. #
Release the electric parking brake manually. 368
Display messages and warning/indicator lamps