2020 HYUNDAI VELOSTER display
[x] Cancel search: displayPage 213 of 480
3-79
Convenient features of your vehicle
3
Head Up Display ON/OFF
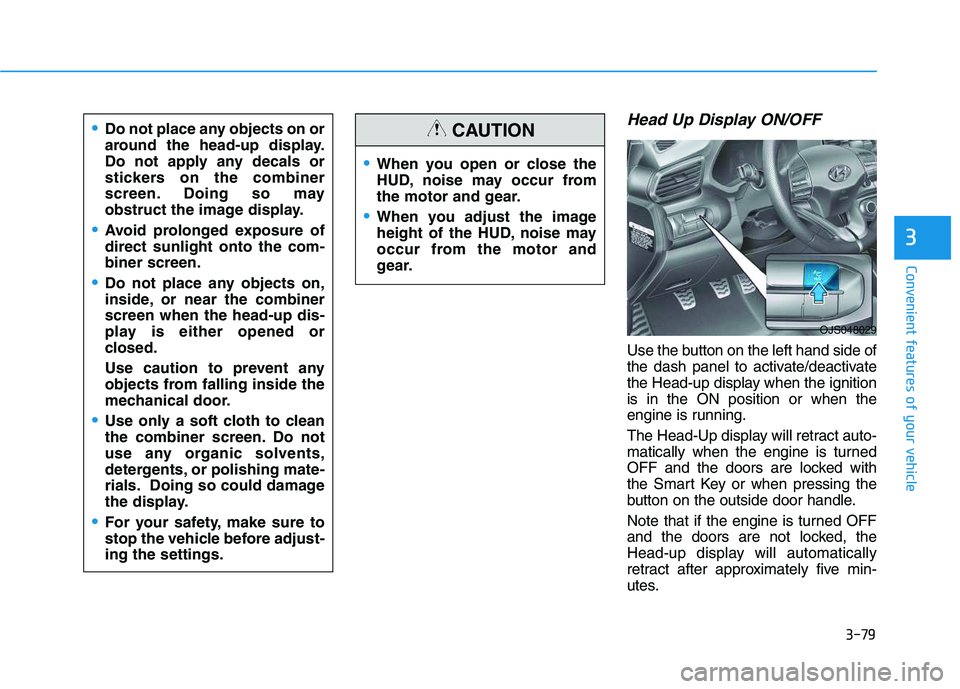
Use the button on the left hand side of
the dash panel to activate/deactivate
the Head-up display when the ignition
is in the ON position or when the
engine is running.
The Head-Up display will retract auto-
matically when the engine is turned
OFF and the doors are locked with
the Smart Key or when pressing the
button on the outside door handle.
Note that if the engine is turned OFF
and the doors are not locked, the
Head-up display will automatically
retract after approximately five min-
utes.
When you open or close the
HUD, noise may occur from
the motor and gear.
When you adjust the image
height of the HUD, noise may
occur from the motor and
gear.
CAUTIONDo not place any objects on or
around the head-up display.
Do not apply any decals or
stickers on the combiner
screen. Doing so may
obstruct the image display.
Avoid prolonged exposure of
direct sunlight onto the com-
biner screen.
Do not place any objects on,
inside, or near the combiner
screen when the head-up dis-
play is either opened or
closed.
Use caution to prevent any
objects from falling inside the
mechanical door.
Use only a soft cloth to clean
the combiner screen. Do not
use any organic solvents,
detergents, or polishing mate-
rials. Doing so could damage
the display.
For your safety, make sure to
stop the vehicle before adjust-
ing the settings.
OJS048029
Page 214 of 480
3-80
Convenient features of your vehicle
Head Up Display Information
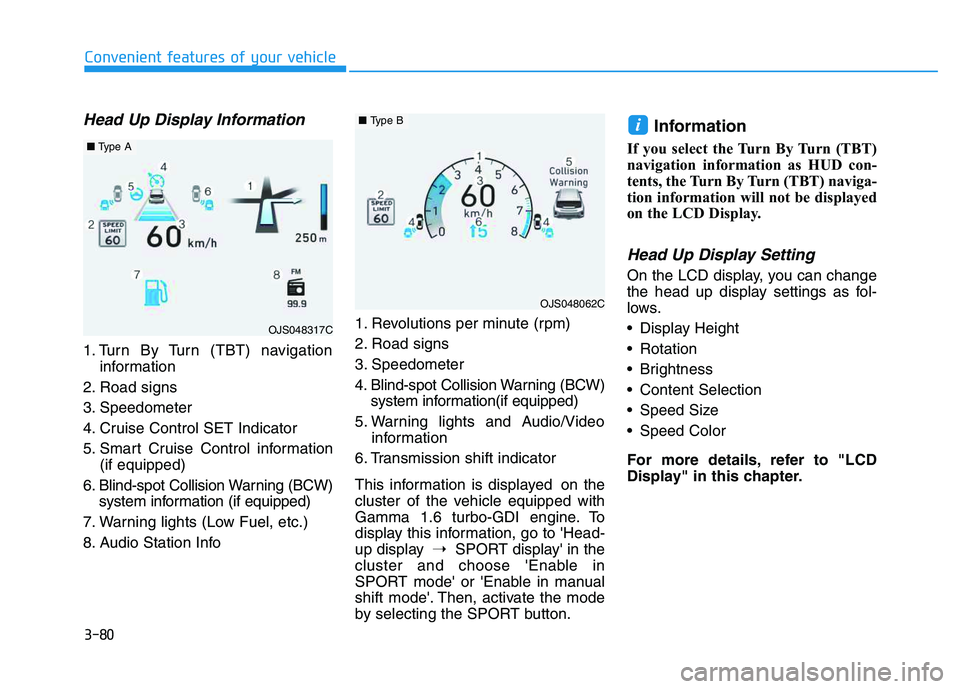
1. Turn By Turn (TBT) navigation
information
2. Road signs
3. Speedometer
4. Cruise Control SET Indicator
5. Smart Cruise Control information
(if equipped)
6. Blind-spot Collision Warning (BCW)
system information (if equipped)
7. Warning lights (Low Fuel, etc.)
8. Audio Station Info1. Revolutions per minute (rpm)
2. Road signs
3. Speedometer
4. Blind-spot Collision Warning (BCW)
system information(if equipped)
5. Warning lights and Audio/Video
information
6. Transmission shift indicator
This information is displayed on the
cluster of the vehicle equipped with
Gamma 1.6 turbo-GDI engine. To
display this information, go to 'Head-
up display➝SPORT display' in the
cluster and choose 'Enable in
SPORT mode' or 'Enable in manual
shift mode'. Then, activate the mode
by selecting the SPORT button.
Information
If you select the Turn By Turn (TBT)
navigation information as HUD con-
tents, the Turn By Turn (TBT) naviga-
tion information will not be displayed
on the LCD Display.
Head Up Display Setting
On the LCD display, you can change
the head up display settings as fol-
lows.
Display Height
Rotation
Brightness
Content Selection
Speed Size
Speed Color
For more details, refer to "LCD
Display" in this chapter.
i
OJS048317C
■Type A
OJS048062C
■Type B
Page 215 of 480

Multimedia System
Multimedia System.................................................4-2
AUX, USB and iPod®Port ...............................................4-2
Antenna ...............................................................................4-2
Steering Wheel Audio Controls ......................................4-3
Bluetooth®Wireless Technology Hands-Free ...........4-4
Audio (Display Audio) / Video /
Navigation System (AVN).................................................4-4
4
Page 218 of 480

4-4
Multimedia System
Bluetooth®Wireless
Technology Hands-Free
With the Bluetooth®Wireless
Technology in the vehicle, you can
use the phone wireless.(1) Call / Answer button
(2) Call end button
(3) Microphone
Detailed information for the
Bluetooth®
Wireless Technology hands-free is
described in the Car Multimedia
User's Manual.
Audio (Display Audio) / Video /
Navigation System (AVN)
(if equipped)
Detailed information for the AVN sys-
tem is described in the Car Multimedia
User's Manual.
OJS048053
OOS047076
Page 219 of 480
Driving your vehicle
5
Before driving.........................................................5-4
Before Entering the Vehicle ...........................................5-4
Before Starting ..................................................................5-4
Ignition switch ........................................................5-6
Key Ignition Switch ...........................................................5-6
Engine Start/Stop Button................................................5-9
Manual Transmission ...........................................5-18
Manual Transmission Operation ..................................5-18
Good Driving Practices ..................................................5-20
Automatic Transmission ......................................5-22
Automatic Transmission Operation .............................5-22
Good Driving Practices ..................................................5-27
Dual Clutch Transmission ....................................5-29
Dual Clutch Transmission Operation ..........................5-29
LCD display for transmission temperature
and warning message ....................................................5-31
Good Driving Practices ..................................................5-38
Braking System ....................................................5-40
Power Brakes ...................................................................5-40
Disc Brakes Wear Indicator ..........................................5-41
Parking Brake...................................................................5-41
Anti-lock Brake System (ABS) ....................................5-43
Electronic Stability Control (ESC)................................5-45
Vehicle Stability Management (VSM).........................5-47Hill-Start Assist Control (HAC) ....................................5-48
Good Braking Practices .................................................5-49
Drive Mode Integrated Control System ............5-51
DRIVE MODE (with Automatic Transmission/
Dual Clutch Transmission) .............................................5-51
SPORT MODE (with Manual Transmission) ..............5-55
Blind-Spot Collision Warning (BCW) System...5-56
BCW (Blind-Spot Collision Warning) ..........................5-57
RCCW (Rear Cross-Traffic Collision Warning) .........5-59
Blind Spot Collision Warning - Sensor Location .....5-61
Limitations of the System .............................................5-62
Forward Collision-Avoidance Assist (FCA)
System (Camera) ..................................................5-64
System Setting and Activation.....................................5-64
FCA Warning Message and System Control ............5-66
FCA Sensor .......................................................................5-68
System Malfunction .......................................................5-69
Limitations of the System .............................................5-71
Forward Collision-Avoidance Assist (FCA)
System (Fusion Sensor) ......................................5-76
System Setting and Activation.....................................5-76
FCA Warning Message and System Control ............5-78
FCA Sensor .......................................................................5-80
System Malfunction .......................................................5-81
Limitations of the System .............................................5-83
Page 222 of 480
5-4
Driving your vehicle
Before Entering the Vehicle
• Be sure all windows, outside mir-
ror(s), and outside lights are clean
and unobstructed.
Remove frost, snow, or ice.
Visually check the tires for uneven
wear and damage.
Check under the vehicle for any
sign of leaks.
Be sure there are no obstacles
behind you if you intend to back up.
Before Starting
Make sure the hood, the tailgate,
and the doors are securely closed
and locked.
Adjust the position of the seat and
steering wheel.
Adjust the inside and outside
rearview mirrors.
Verify all the lights work.
Fasten your seatbelt. Check that all
passengers have fastened their
seatbelts.
Check the gauges and indicators in
the instrument panel and the mes-
sages on the instrument display
when the ignition switch is in the
ON position.
Check that any items you are car-
rying are stored properly or fas-
tened down securely.
B BE
EF
FO
OR
RE
E
D
DR
RI
IV
VI
IN
NG
G
To reduce the risk of SERIOUS
INJURY or DEATH, take the fol-
lowing precautions:
•ALWAYS wear your seat belt.
All passengers must be prop-
erly belted whenever the vehi-
cle is moving. For more
details, refer to "Seat Belts" in
chapter 2.
Always drive defensively.
Assume other drivers or pedes-
trians may be careless and
make mistakes.
Stay focused on the task of
driving. Driver distraction can
cause accidents.
Leave plenty of space between
you and the vehicle in front of
you.
WARNING
Page 241 of 480
5-23
Driving your vehicle
5
Transmission ranges
The indicator in the instrument clus-
ter displays the shift lever position
when the ignition switch is in the ON
position.
P (Park)
Always come to a complete stop
before shifting into P (Park).
To shift from P (Park), you must
depress firmly on the brake pedal
and make sure your foot is off the
accelerator pedal.
If you have done all of the above and
still cannot shift the lever out of P
(Park), see "Shift-Lock Release" in
this section.
The shift lever must be in P (Park)
before turning the engine off.
R (Reverse)
Use this position to drive the vehicle
backward.
Always come to a complete stop
before shifting into or out of R
(Reverse); you may damage the
transmission if you shift into R
(Reverse) while the vehicle is in
motion.
N (Neutral)
The wheels and transmission are not
engaged.
Use N (Neutral) if you need to restart
a stalled engine.
Shift into P (Park) if you need to
leave your vehicle for any reason.
Always depress the brake pedal
when you are shifting from N
(Neutral) to another gear.
NOTICE
Shifting into P (Park) while the
vehicle is in motion may
cause you to lose control of
the vehicle.
After the vehicle has stopped,
always make sure the shift
lever is in P (Park), apply the
parking brake, and turn the
engine off.
When parking on an incline,
place the shift lever in P (Park)
and apply the parking brake to
prevent the vehicle from
rolling downhill.
WARNING
Page 249 of 480
5-31
Driving your vehicle
5
Always come to a complete stop
before shifting into D (Drive) or
R (Reverse).
Do not put the shift lever in N
(Neutral) while driving.
LCD display for transmission
temperature and warning mes-
sage
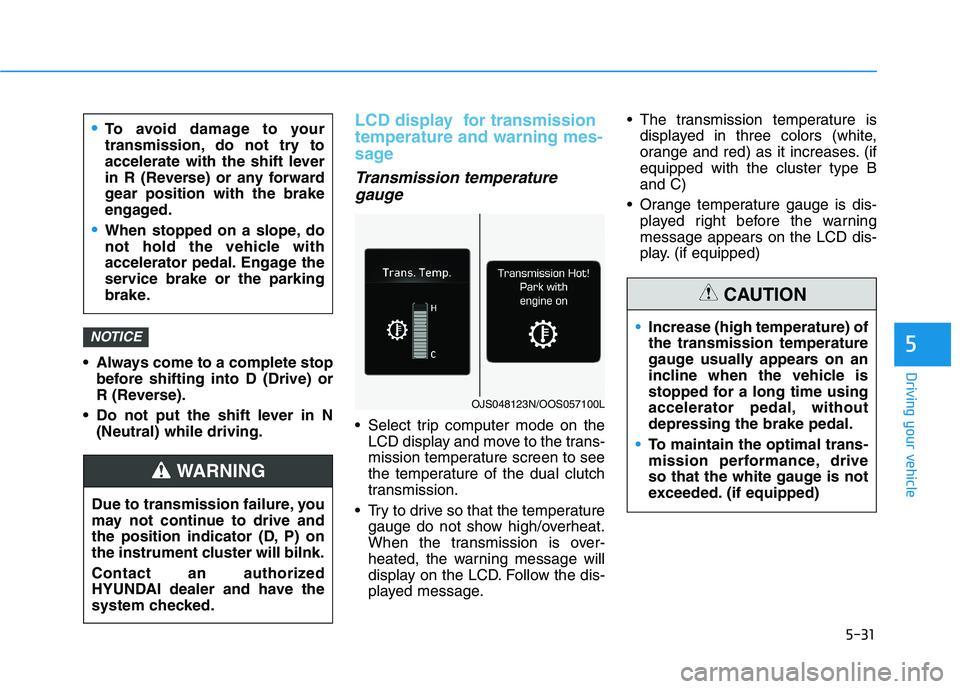
Transmission temperature
gauge
Select trip computer mode on the
LCD display and move to the trans-
mission temperature screen to see
the temperature of the dual clutch
transmission.
Try to drive so that the temperature
gauge do not show high/overheat.
When the transmission is over-
heated, the warning message will
display on the LCD. Follow the dis-
played message. The transmission temperature is
displayed in three colors (white,
orange and red) as it increases. (if
equipped with the cluster type B
and C)
Orange temperature gauge is dis-
played right before the warning
message appears on the LCD dis-
play. (if equipped)
NOTICE
To avoid damage to your
transmission, do not try to
accelerate with the shift lever
in R (Reverse) or any forward
gear position with the brake
engaged.
When stopped on a slope, do
not hold the vehicle with
accelerator pedal. Engage the
service brake or the parking
brake.
Due to transmission failure, you
may not continue to drive and
the position indicator (D, P) on
the instrument cluster will bilnk.
Contact an authorized
HYUNDAI dealer and have the
system checked.
WARNING
OJS048123N/OOS057100L
Increase (high temperature) of
the transmission temperature
gauge usually appears on an
incline when the vehicle is
stopped for a long time using
accelerator pedal, without
depressing the brake pedal.
To maintain the optimal trans-
mission performance, drive
so that the white gauge is not
exceeded. (if equipped)
CAUTION