2020 HYUNDAI VELOSTER display
[x] Cancel search: displayPage 15 of 480
1-4
Your vehicle at a glance
I
IN
N T
TE
ER
R I
IO
O R
R
O
O V
VE
ER
R V
V I
IE
E W
W
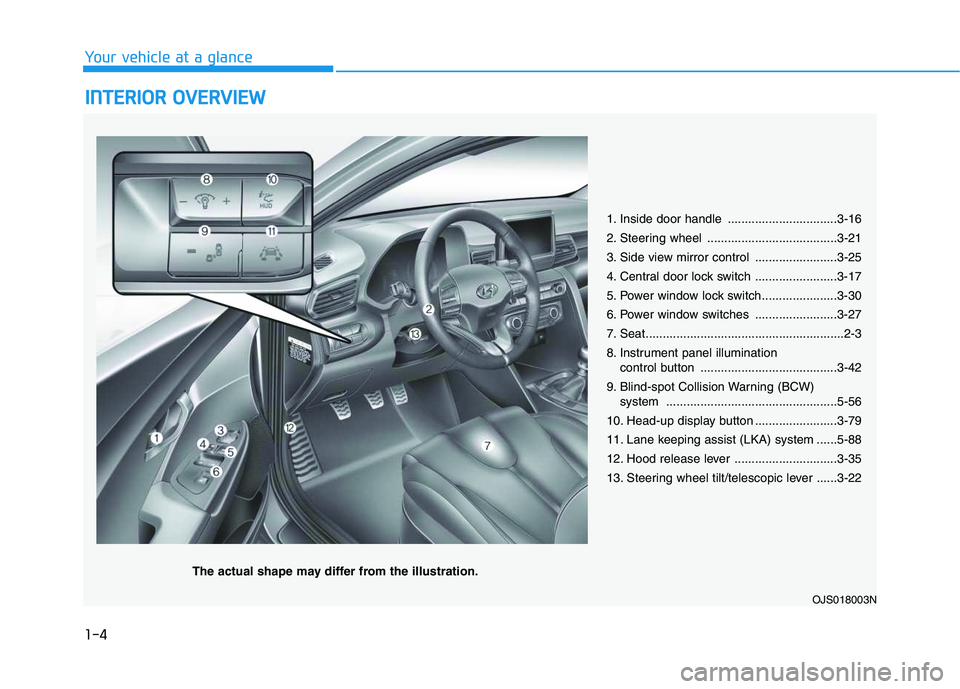
1. Inside door handle ................................3-16
2. Steering wheel ......................................3-21
3. Side view mirror control ........................3-25
4. Central door lock switch ........................3-17
5. Power window lock switch......................3-30
6. Power window switches ........................3-27
7. Seat..........................................................2-3
8. Instrument panel illumination
control button ........................................3-42
9. Blind-spot Collision Warning (BCW) system ..................................................5-56
10. Head-up display button ........................3-79
11. Lane keeping assist (LKA) system ......5-88
12. Hood release lever ..............................3-35
13. Steering wheel tilt/telescopic lever ......3-22
OJS018003N
The actual shape may differ from the illustration.
Page 64 of 480

2-47
Safety system of your vehicle
2
10. Side pressure sensors
11. Seat belt buckle sensor
12. Emergency Fastening Device
System
13. Occupant classification system
The SRSCM (Supplemental Restraint
System Control Module) continually
monitors all SRS components while
the ignition switch is in the ON position
to determine if a crash impact is
severe enough to require air bag
deployment or pre-tensioner seat belt
deployment.SRS warning light
The SRS (Supplement Restraint
System) air bag warning light on the
instrument panel displays the air bag
symbol depicted in the illustration.
The system checks the air bag elec-
trical system for malfunctions. The
light indicates that there is a potential
malfunction with your air bag system,
which could include your side and
curtain air bags used for rollover pro-
tection.
If your SRS malfunctions, the air
bag may not inflate properly dur-
ing an accident increasing the
risk of serious injury or death.
If any of the following condi-
tions occur, your SRS is mal-
functioning:
The light does not turn on for
approximately six seconds
when the Engine Start/Stop
button is in the ON position.
The light stays on after illumi-
nating for approximately six
seconds.
The light comes on while the
vehicle is in motion.
The light blinks when the
engine is running.
Have an authorized HYUNDAI
dealer inspect the SRS as soon
as possible if any of these con-
ditions occur.
WARNING
Page 86 of 480
3-86
Convenient features of your vehicle
Turn signals and lane change
signals
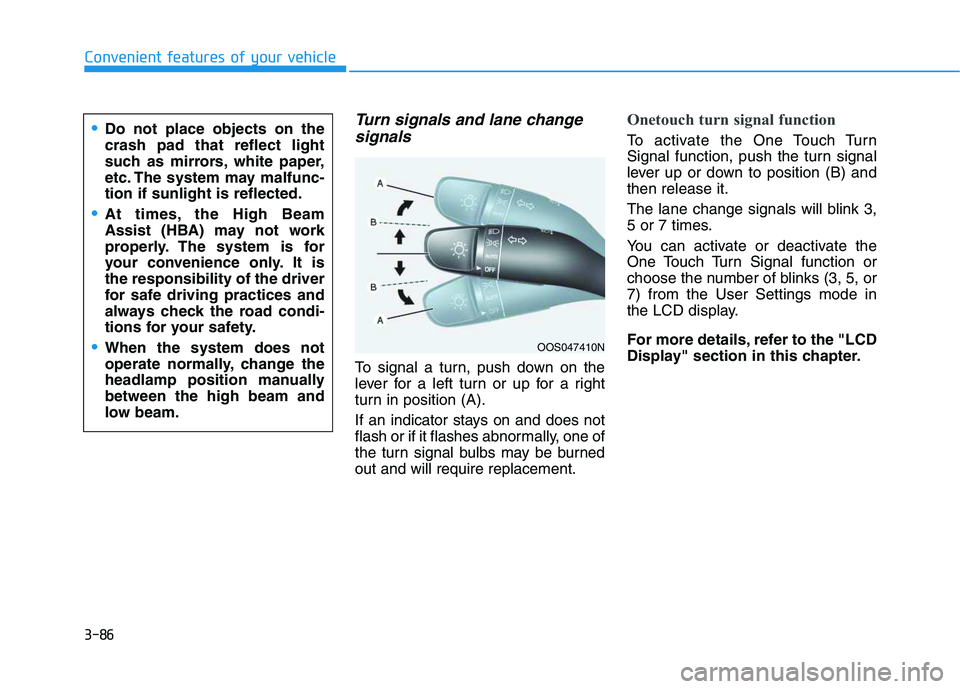
To signal a turn, push down on the
lever for a left turn or up for a right
turn in position (A).
If an indicator stays on and does not
flash or if it flashes abnormally, one of
the turn signal bulbs may be burned
out and will require replacement.
Onetouch turn signal function
To activate the One Touch Turn
Signal function, push the turn signal
lever up or down to position (B) and
then release it.
The lane change signals will blink 3,
5 or 7 times.
You can activate or deactivate the
One Touch Turn Signal function or
choose the number of blinks (3, 5, or
7) from the User Settings mode in
the LCD display.
For more details, refer to the "LCD
Display" section in this chapter.
OOS047410N
Do not place objects on the
crash pad that reflect light
such as mirrors, white paper,
etc. The system may malfunc-
tion if sunlight is reflected.
At times, the High Beam
Assist (HBA) may not work
properly. The system is for
your convenience only. It is
the responsibility of the driver
for safe driving practices and
always check the road condi-
tions for your safety.
When the system does not
operate normally, change the
headlamp position manually
between the high beam and
low beam.
Page 87 of 480
3-87
Convenient features of your vehicle
3
Battery saver function
The purpose of this feature is to pre-
vent the battery from being dis-
charged. The system automatically
turns off the parking lamp when the
driver turns the vehicle off and opens
the driver-side door.
With this feature, the parking lamps
will turn off automatically if the driver
parks on the side of road at night.
If necessary, to keep the lamps on
when the vehicle is turned off, perform
the following:
1) Open the driver-side door.
2) Turn the parking lamps OFF and
ON again using the headlamp
switch on the steering column.
Headlamp delay function
If the key is removed from the ignition
switch or placed in the ACC position
or the LOCK/OFF position with the
headlamps ON, the headlamps
(and/or parking lamps) remain on for
about 5 minutes. However, if the dri-
ver’s door is opened and closed, the
headlights are turned off after 15
seconds. Also, with the engine off if
the driver's door is opened and
closed, the headlamps (and/or park-
ing lamps) are turned off after 15
seconds.
The headlamps (and/or parking
lamps) can be turned off by pressing
the lock button on the remote key or
smart key twice or turning the head-
lamp switch to the OFF or AUTO
position.
You can activate or deactivate the
Headlamp Delay function from the
User Settings Mode in the LCD dis-
play.
For more details, refer to the "LCD
Display" section in this chapter.If the driver exits the vehicle
through another door besides the
driver door, the battery saver func-
tion does not operate and the
headlamp delay function does not
turn OFF automatically.
This may cause the battery to dis-
charge. To avoid battery dis-
charge, turn OFF the headlamps
manually from the headlamp
switch before exiting the vehicle.
NOTICE
Page 90 of 480
3-90
Convenient features of your vehicle
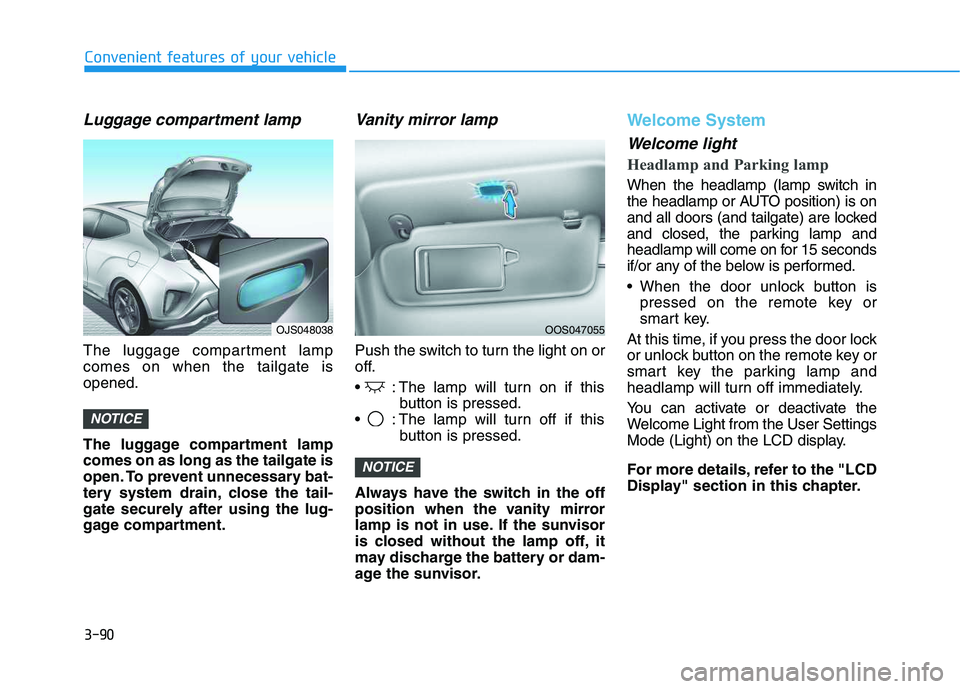
Luggage compartment lamp
The luggage compartment lamp
comes on when the tailgate is
opened.
The luggage compartment lamp
comes on as long as the tailgate is
open. To prevent unnecessary bat-
tery system drain, close the tail-
gate securely after using the lug-
gage compartment.
Vanity mirror lamp
Push the switch to turn the light on or
off.
: The lamp will turn on if this
button is pressed.
: The lamp will turn off if this
button is pressed.
Always have the switch in the off
position when the vanity mirror
lamp is not in use. If the sunvisor
is closed without the lamp off, it
may discharge the battery or dam-
age the sunvisor.
Welcome System
Welcome light
Headlamp and Parking lamp
When the headlamp (lamp switch in
the headlamp or AUTO position) is on
and all doors (and tailgate) are locked
and closed, the parking lamp and
headlamp will come on for 15 seconds
if/or any of the below is performed.
When the door unlock button is
pressed on the remote key or
smart key.
At this time, if you press the door lock
or unlock button on the remote key or
smart key the parking lamp and
headlamp will turn off immediately.
You can activate or deactivate the
Welcome Light from the User Settings
Mode (Light) on the LCD display.
For more details, refer to the "LCD
Display" section in this chapter.
NOTICE
NOTICE
OJS048038OOS047055
Page 95 of 480
3-95
Convenient features of your vehicle
3
To prevent possible damage to
the washer pump, do not oper-
ate the washer when the fluid
reservoir is empty.
To prevent possible damage to
the wipers or windshield, do not
operate the wipers when the
windshield is dry.
To prevent damage to the wiper
arms and other components, do
not attempt to move the wipers
manually.
To prevent possible damage to
the wipers and washer system,
use anti-freezing washer fluids
in the winter season or cold
weather.
Rear Window Wiper and Washer
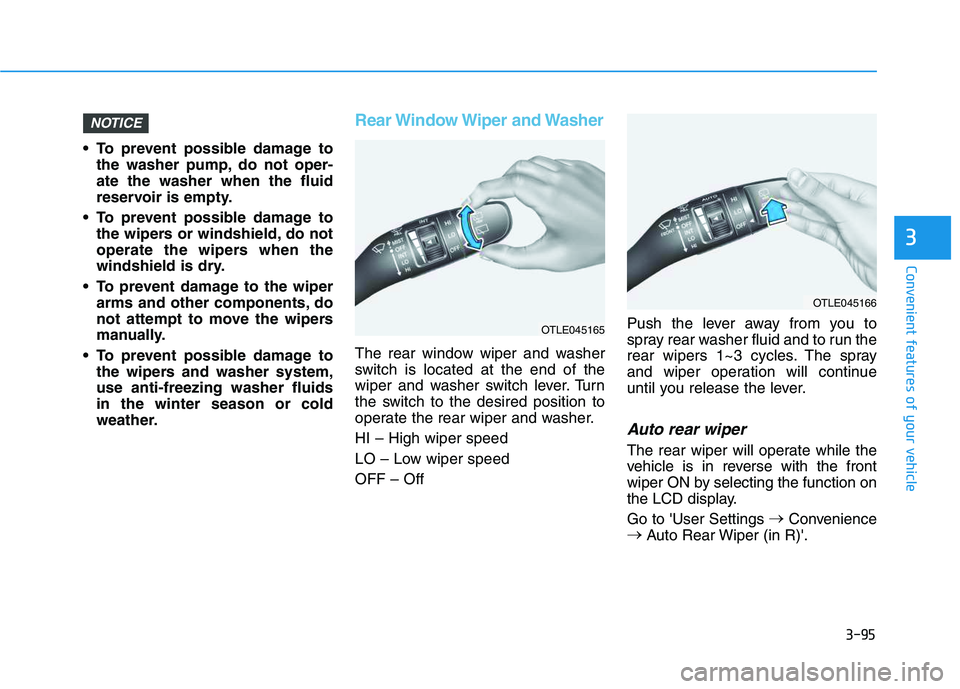
The rear window wiper and washer
switch is located at the end of the
wiper and washer switch lever. Turn
the switch to the desired position to
operate the rear wiper and washer.
HI – High wiper speed
LO – Low wiper speed
OFF – OffPush the lever away from you to
spray rear washer fluid and to run the
rear wipers 1~3 cycles. The spray
and wiper operation will continue
until you release the lever.
Auto rear wiper
The rear wiper will operate while the
vehicle is in reverse with the front
wiper ON by selecting the function on
the LCD display.
Go to 'User Settings →
Convenience
→
Auto Rear Wiper (in R)'.
NOTICE
OTLE045166
OTLE045165
Page 96 of 480
3-96
Convenient features of your vehicle
Rear view monitor
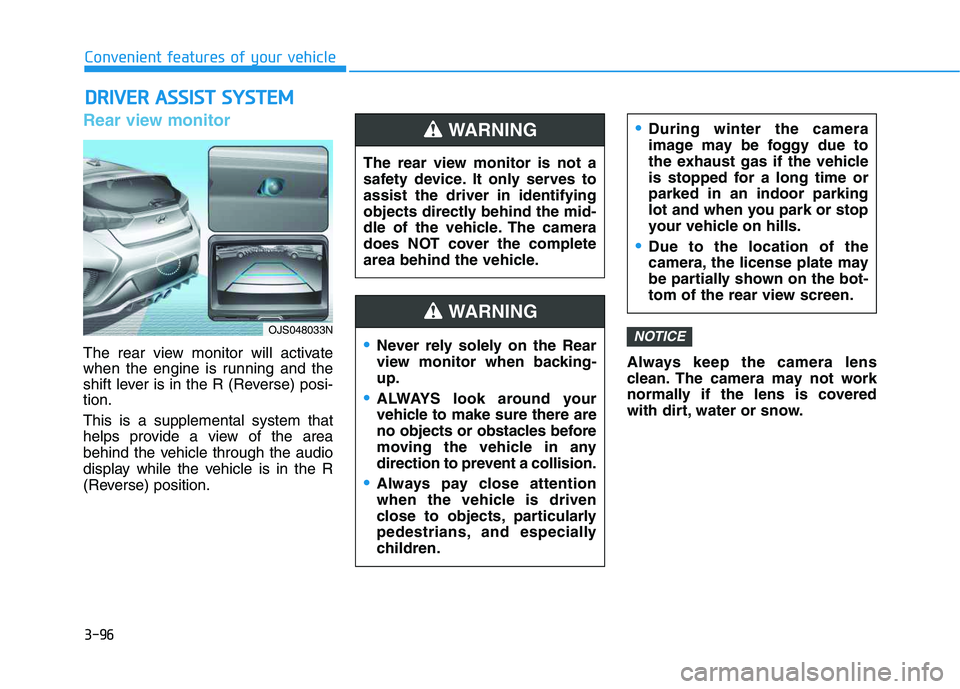
The rear view monitor will activate
when the engine is running and the
shift lever is in the R (Reverse) posi-
tion.
This is a supplemental system that
helps provide a view of the area
behind the vehicle through the audio
display while the vehicle is in the R
(Reverse) position.Always keep the camera lens
clean. The camera may not work
normally if the lens is covered
with dirt, water or snow.
NOTICE
D DR
RI
IV
VE
ER
R
A
AS
SS
SI
IS
ST
T
S
SY
YS
ST
TE
EM
M
The rear view monitor is not a
safety device. It only serves to
assist the driver in identifying
objects directly behind the mid-
dle of the vehicle. The camera
does NOT cover the complete
area behind the vehicle.
WARNING
Never rely solely on the Rear
view monitor when backing-
up.
ALWAYS look around your
vehicle to make sure there are
no objects or obstacles before
moving the vehicle in any
direction to prevent a collision.
Always pay close attention
when the vehicle is driven
close to objects, particularly
pedestrians, and especially
children.
During winter the camera
image may be foggy due to
the exhaust gas if the vehicle
is stopped for a long time or
parked in an indoor parking
lot and when you park or stop
your vehicle on hills.
Due to the location of the
camera, the license plate may
be partially shown on the bot-
tom of the rear view screen.
WARNING
OJS048033N
Page 110 of 480
3-110
Convenient features of your vehicle
Automatic Temperature
Control Mode
The Automatic Climate Control
System is controlled by setting the
desired temperature.
1. Press the AUTO button (3).
The modes, fan speeds, air intake
and air-conditioning will be con-
trolled automatically by the tem-
perature setting you select.
2. Turn the temperature control knob
(1) to the desired temperature. If
the temperature is set to the low-
est setting (Lo), the air condition-
ing system will operate continu-
ously. After the interior has cooled
sufficiently, adjust the knob to a
higher temperature set point
whenever possible.
To turn the automatic operation off,
select any button of the following:
- Mode selection button
- Front windshield defroster button
(Press the button one more time
to deselect the front windshield
defroster function. The 'AUTO'
sign will illuminate on the infor-
mation display once again.)
- Fan speed control buttonThe selected function will be con-
trolled manually while other functions
operate automatically.
For your convenience and to improve
the efficiency of the climate control,
use the AUTO button and set the
temperature to 22°C (72°F).
To change the temperature unit from
°C to °F or °F to °C:
Press and hold the AUTO and OFF
buttons on the climate control unit for
3 seconds.
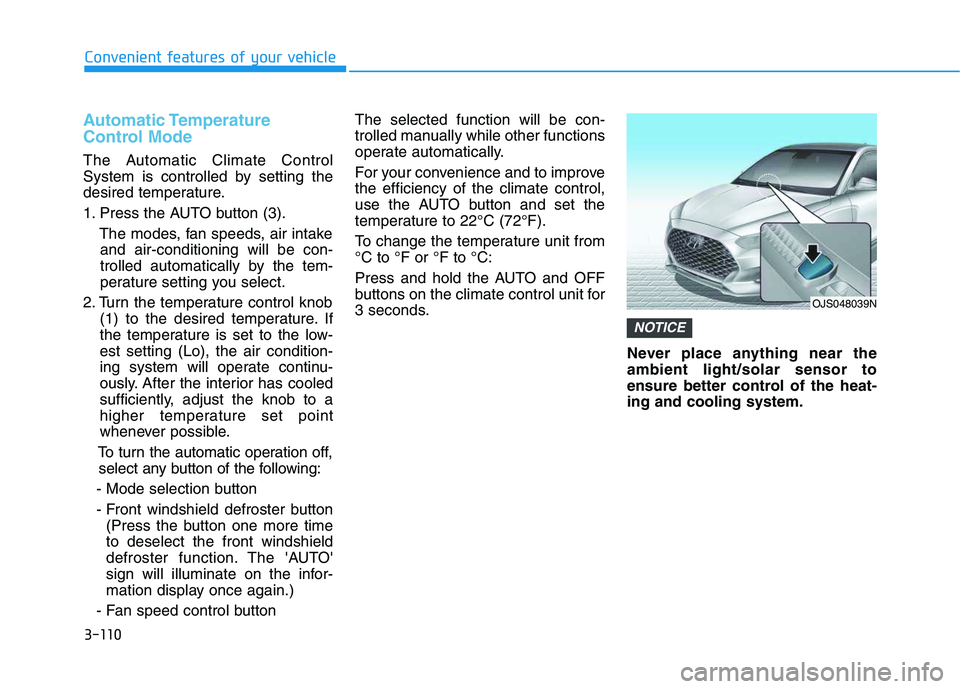
Never place anything near the
ambient light/solar sensor to
ensure better control of the heat-
ing and cooling system.
NOTICE
OJS048039N