2020 HYUNDAI VELOSTER display
[x] Cancel search: displayPage 121 of 480
3-121
Convenient features of your vehicle
3
When the Auto Defogging
System operates, the indi-
cator will illuminate.
If a high amount of humidity is
detected in the vehicle, the Auto
Defogging System will be enabled.
The following steps will be performed
automatically:
Step 1) The air intake control will
change to Fresh mode.
Step 2) The A/C button will turn ON.
Step 3) The mode will be changed to
defrost to direct airflow to the
windshield.
Step 4) The fan speed will be set to
MAX.
If the air conditioning is off or recircu-
lated air position is manually select-
ed while Auto Defogging System is
ON, the Auto Defogging System
Indicator will blink 3 times to signal
that the manual operation has been
canceled.To cancel or reset the
Auto Defogging System
Press the front windshield defroster
button for 3 seconds when the ignition
switch is in the ON position. When the
Auto Defogging System is canceled,
the ADS OFF symbol will blink 3 times
and ADS OFF will be displayed on the
climate control information screen.
When the Auto Defogging System is
reset, the ADS OFF symbol will blink
6 times without a signal.
Information
• When the air conditioning is turned
on by Auto defogging system, if you
try to turn off the air conditioning, the
indicator will blink 3 times and the air
conditioning will not be turned off.
• To maintain the effectiveness and
efficiency of the Auto Defogging
System, do not select Recirculation
mode while the system is operating.
• When the Auto Defogging System is
operating, the fan speed adjustment
knob, the temperature adjustment
knob, and the air intake control but-
ton are all disabled.Do not remove the sensor cover
located on the upper end of the
windshield glass.
Damage to system parts could
occur and may not be covered by
your vehicle warranty.
NOTICE
i
Page 129 of 480
3-129
Convenient features of your vehicle
3
A smart phone or a tablet PC may
get warmer during the re-charging
process. It does not indicate any
malfunction with the charging sys-
tem.
A smart phone or a tablet PC,
which adopts a different re-charg-
ing method, may not be properly
re-charged. In this case, use an
exclusive charger of your device.
The charging terminal is only to
recharge a device. Do not use the
charging terminal either to turn ON
an audio or to play media on the
AVN.Wireless Cellular Phone
Charging System (if equipped)
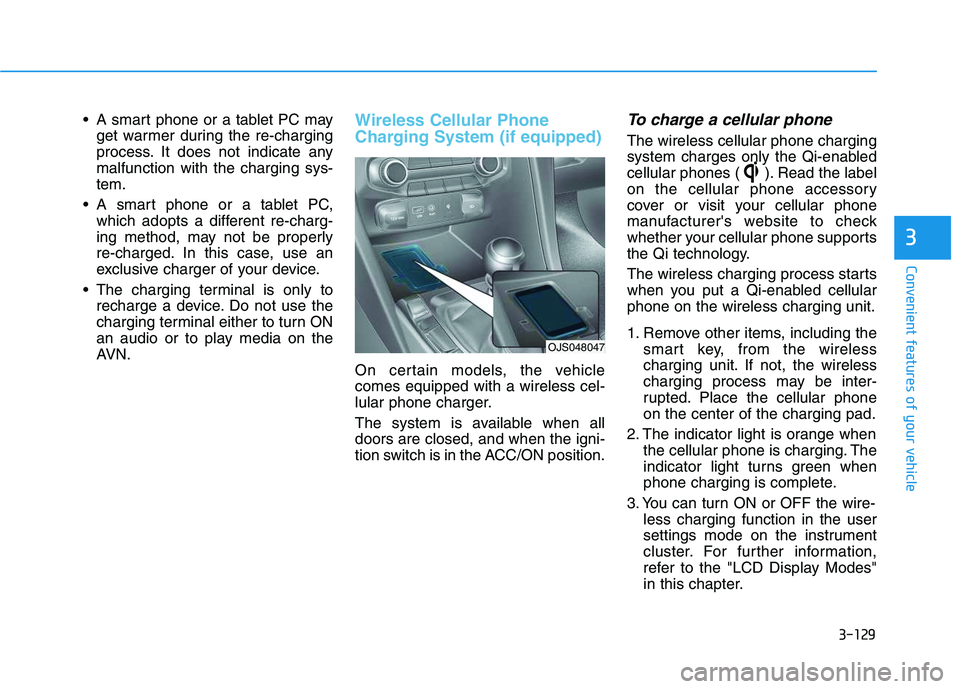
On certain models, the vehicle
comes equipped with a wireless cel-
lular phone charger.
The system is available when all
doors are closed, and when the igni-
tion switch is in the ACC/ON position.
To charge a cellular phone
The wireless cellular phone charging
system charges only the Qi-enabled
cellular phones ( ). Read the label
on the cellular phone accessory
cover or visit your cellular phone
manufacturer's website to check
whether your cellular phone supports
the Qi technology.
The wireless charging process starts
when you put a Qi-enabled cellular
phone on the wireless charging unit.
1. Remove other items, including the
smart key, from the wireless
charging unit. If not, the wireless
charging process may be inter-
rupted. Place the cellular phone
on the center of the charging pad.
2. The indicator light is orange when
the cellular phone is charging. The
indicator light turns green when
phone charging is complete.
3. You can turn ON or OFF the wire-
less charging function in the user
settings mode on the instrument
cluster. For further information,
refer to the "LCD Display Modes"
in this chapter.
OJS048047
Page 130 of 480
3-130
Convenient features of your vehicle
If your cellular phone is not charging:
- Slightly change the position of the
cellular phone on the charging pad.
- Make sure the indicator light is
orange.
The indicator light will blink orange
for 10 seconds if there is a malfunc-
tion in the wireless charging system.
In this case, temporarily stop the
charging process, and re-attempt to
charge your cellular phone again.
The system warns you with a mes-
sage on the LCD display if the cellular
phone is still on the wireless charging
unit after the engine is turned OFF
and the front door is opened.
Information
For some manufacturer's cellular
phones, the system may not warn you
even though the cellular phone is left
on the wireless charging unit. This is
due to the particular characteristic of
the cellular phone and not a malfunc-
tion of the wireless charging. The wireless cellular phone
charging system may not sup-
port certain cellular phones,
which are not verified for the Qi
specification ( ).
When placing your cellular
phone on the charging mat,
position the phone in the middle
of the mat for optimal charging
performance. If your cell phone
is off to the side, the charging
rate may be less and in some
cases the cell phone may experi-
ence higher heat conduction.
In some cases, the wireless
charging may stop temporarily
when the Smart Key is used,
either when starting the vehicle or
locking/unlocking the doors, etc.
When charging certain cellular
phones, the charging indicator
may not change to green when
the cell phone is fully charged. The wireless charging process
may temporarily stop due to the
"self-protection" function of the
cellular phone, when tempera-
ture abnormally increases inside
the wireless cellular phone
charging system. The wireless
charging process restarts, when
temperature falls to a certain
level.
The wireless charging process
may temporarily stop when
there is any metallic item, such
as a coin, between the wireless
cellular phone charging system
and cellular phone.
When charging some cell phones
with the case still applied, the
wireless charging speed may
decrease and the wireless charg-
ing may stop.
If the cellular phone has a thick
cover, the wireless charging may
not be possible.
If the cell phone is not complete-
ly contacting the charging pad,
wireless charging may not oper-
ate properly.
NOTICE
i
Page 131 of 480
3-131
Convenient features of your vehicle
3
Some magnetic items like credit
cards, phone cards or rail tickets
may be damaged if left with the
cellular phone during the charg-
ing process.
If the cellular phone without the
wireless charging function or
the metallic items are placed on
the charging pad, it may cause
slight noise. This noise does not
affect the cellular phone and the
vehicle, because this noise is an
operating sound during deter-
mining the item on the charging
pad.
If the ignition switch is OFF, the
charging also stops.Information
This device complies with Industry
Canada RSS-210 standard.
Operation is subject to the following
two conditions:
1. This device may not cause harmful
interference, and
2. This device must accept any inter-
ference received, including interfer-
ence that may cause undesired
operation.
Clock
Vehicles with Audio system
Select the [SETUP]button on the
audio system ➟Select [Date/Time].
Set time: Set the time displayed on
the audio screen.
Time format: Choose between 12-
hour and 24-hour time formats.
Vehicles with Navigation system
Select the Settings menu on the
Navigation system➟Select
[Date/Time].
GPS time: Displays time according
to the received GNSS time.
24-hour: Switches to 12 hour or 24
hour.
i
Do not attempt to adjust the
clock while driving. Doing so
may result in distracted driving
which may lead to an accident
involving personal injury or
death.
WARNING
Page 135 of 480
Convenient features of your vehicle
Accessing Your Vehicle .........................................3-3
Remote Key.........................................................................3-3
Smart Key ............................................................................3-7
Immobilizer System .........................................................3-12
Door Locks ............................................................3-15
Operating Door Locks from Outside the Vehicle ....3-15
Operating Door Locks from Inside the Vehicle .......3-16
Automatic Door Lock and Unlock Features .............3-19
Child-Protector Rear Door Locks ...............................3-19
Theft-Alarm System ............................................3-20
Steering Wheel .....................................................3-21
Electric Power Steering (EPS) .....................................3-21
Tilt Steering / Telescope Steering ..............................3-22
Horn ....................................................................................3-22
Heated Steering Wheel ..................................................3-23
Mirrors ...................................................................3-23
Inside Rearview Mirror ..................................................3-23
Side View Mirrors ...........................................................3-25
Windows ................................................................3-27
Power Windows ...............................................................3-28
Wide Sunroof........................................................3-31
Sunroof opening and closing .......................................3-32
Sliding the sunroof .........................................................3-32
Tilting the sunroof ..........................................................3-32
Sunshade ...........................................................................3-33Resetting the sunroof ....................................................3-33
Sunroof Open Warning ..................................................3-34
Exterior Features .................................................3-35
Hood ...................................................................................3-35
Tailgate...............................................................................3-36
Fuel Filler Door ................................................................3-38
Instrument Cluster ...............................................3-41
Instrument Cluster Control............................................3-42
Gauges and Meters ........................................................3-43
Transmission shift indicator .........................................3-46
Warning and Indicator Lights .......................................3-47
LCD Display Messages ...................................................3-58
LCD Display ...........................................................3-63
LCD Display Control ........................................................3-63
LCD Display Modes .........................................................3-64
Trip Computer .......................................................3-74
Head Up Display (HUD) .......................................3-78
Lighting..................................................................3-81
Exterior Lights .................................................................3-81
Interior Lights...................................................................3-88
Welcome System .............................................................3-90
3
Page 138 of 480
3-4
Unlocking your vehicle
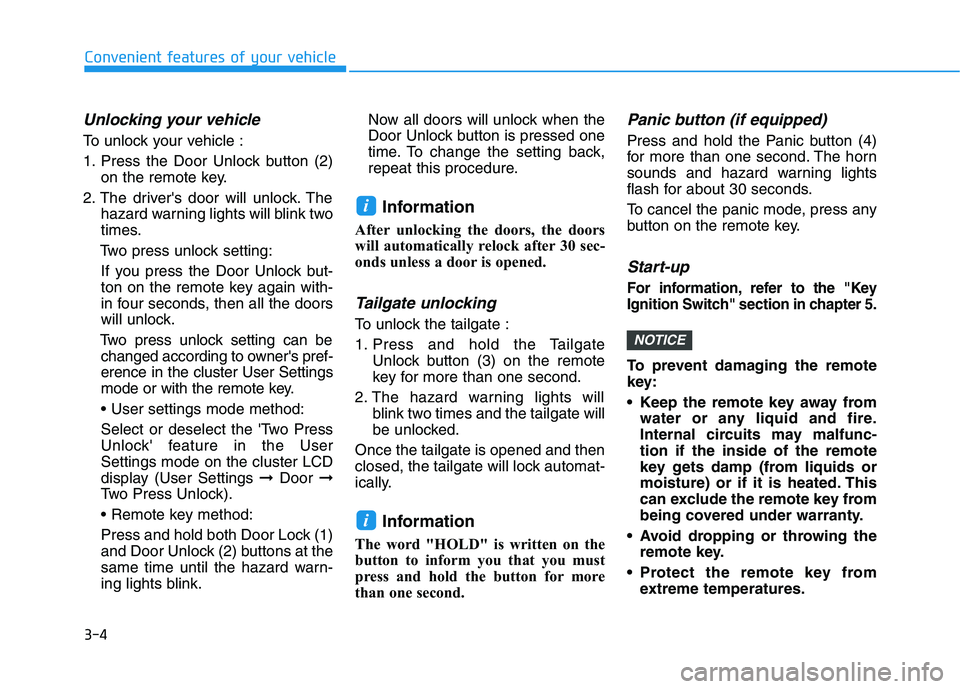
To unlock your vehicle :
1. Press the Door Unlock button (2)
on the remote key.
2. The driver's door will unlock. The
hazard warning lights will blink two
times.
Two press unlock setting:
If you press the Door Unlock but-
ton on the remote key again with-
in four seconds, then all the doors
will unlock.
Two press unlock setting can be
changed according to owner's pref-
erence in the cluster User Settings
mode or with the remote key.
• User settings mode method:
Select or deselect the 'Two Press
Unlock' feature in the User
Settings mode on the cluster LCD
display (User Settings ➞Door ➞
Two Press Unlock).
Press and hold both Door Lock (1)
and Door Unlock (2) buttons at the
same time until the hazard warn-
ing lights blink.Now all doors will unlock when the
Door Unlock button is pressed one
time. To change the setting back,
repeat this procedure.
Information
After unlocking the doors, the doors
will automatically relock after 30 sec-
onds unless a door is opened.
Tailgate unlocking
To unlock the tailgate :
1. Press and hold the Tailgate
Unlock button (3) on the remote
key for more than one second.
2. The hazard warning lights will
blink two times and the tailgate will
be unlocked.
Once the tailgate is opened and then
closed, the tailgate will lock automat-
ically.
Information
The word "HOLD" is written on the
button to inform you that you must
press and hold the button for more
than one second.
Panic button (if equipped)
Press and hold the Panic button (4)
for more than one second. The horn
sounds and hazard warning lights
flash for about 30 seconds.
To cancel the panic mode, press any
button on the remote key.
Start-up
For information, refer to the "Key
Ignition Switch" section in chapter 5.
To prevent damaging the remote
key:
• Keep the remote key away from
water or any liquid and fire.
Internal circuits may malfunc-
tion if the inside of the remote
key gets damp (from liquids or
moisture) or if it is heated. This
can exclude the remote key from
being covered under warranty.
Avoid dropping or throwing the
remote key.
Protect the remote key from
extreme temperatures.
NOTICE
i
i
Convenient features of your vehicle
Page 142 of 480
3-8
Convenient features of your vehicle
Unlocking your vehicle
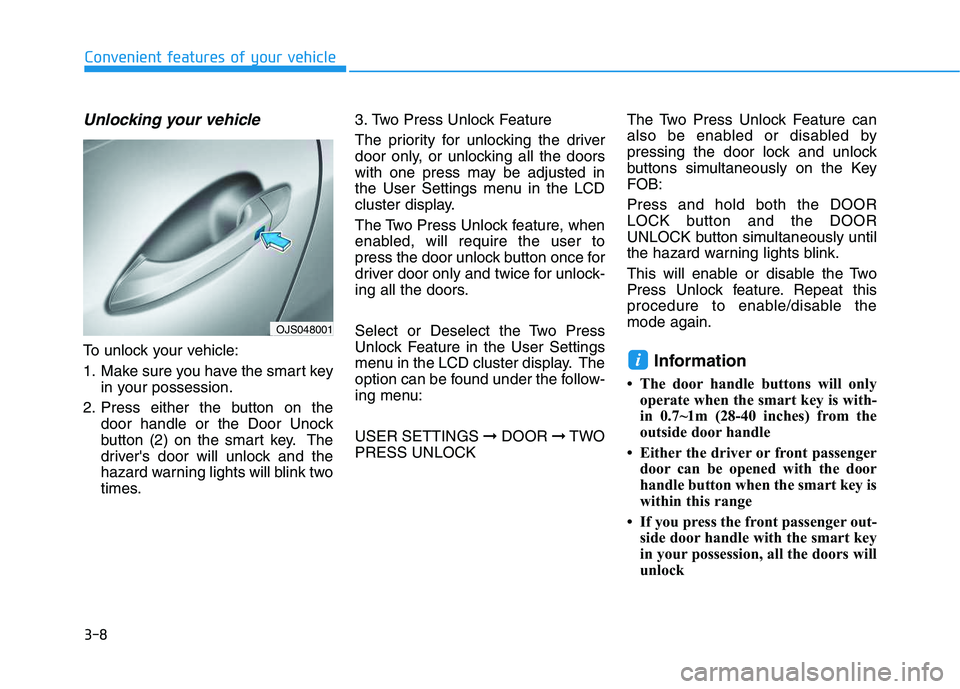
To unlock your vehicle:
1. Make sure you have the smart key
in your possession.
2. Press either the button on the
door handle or the Door Unock
button (2) on the smart key. The
driver's door will unlock and the
hazard warning lights will blink two
times.3. Two Press Unlock Feature
The priority for unlocking the driver
door only, or unlocking all the doors
with one press may be adjusted in
the User Settings menu in the LCD
cluster display.
The Two Press Unlock feature, when
enabled, will require the user to
press the door unlock button once for
driver door only and twice for unlock-
ing all the doors.
Select or Deselect the Two Press
Unlock Feature in the User Settings
menu in the LCD cluster display. The
option can be found under the follow-
ing menu:
USER SETTINGS ➞DOOR ➞TWO
PRESS UNLOCKThe Two Press Unlock Feature can
also be enabled or disabled by
pressing the door lock and unlock
buttons simultaneously on the Key
FOB:
Press and hold both the DOOR
LOCK button and the DOOR
UNLOCK button simultaneously until
the hazard warning lights blink.
This will enable or disable the Two
Press Unlock feature. Repeat this
procedure to enable/disable the
mode again.Information
• The door handle buttons will only
operate when the smart key is with-
in 0.7~1m (28-40 inches) from the
outside door handle
• Either the driver or front passenger
door can be opened with the door
handle button when the smart key is
within this range
• If you press the front passenger out-
side door handle with the smart key
in your possession, all the doors will
unlock
i
OJS048001
Page 153 of 480
3-19
Convenient features of your vehicle
Automatic Door Lock and
Unlock Features
Your vehicle is equipped with fea-
tures that will automatically lock or
unlock your vehicle based on set-
tings you select in the LCD cluster
display.
Auto LOCK - Enable on Speed
When this feature is set in the LCD
cluster display, all the doors will be
locked automatically when the vehi-
cle exceeds 15 kph (9 mph).
Auto LOCK - Enable on Shift
When this feature is set in the LCD
cluster display, all the doors will be
locked automatically when the vehi-
cle is shifted out of P (PARK) while
the engine is running.
Auto UNLOCK - Enable on Shift
When this feature is set in the LCD
cluster display, all the doors will be
unlocked automatically when the
vehicle is shifted back into P (PARK).
For more information on these
features, refer to the LCD Display
section later in this chapter.
Additional Unlock Safety
Feature - Air Bag Deployment
As an additional safety feature, all
doors will be automatically unlocked
when an impact causes the air bags
to deploy.
Child-Protector Rear Door Locks
The child safety lock is provided to
help prevent children seated in the
rear from accidentally opening the
rear doors. The rear door safety locks
should be used whenever children
are in the vehicle.
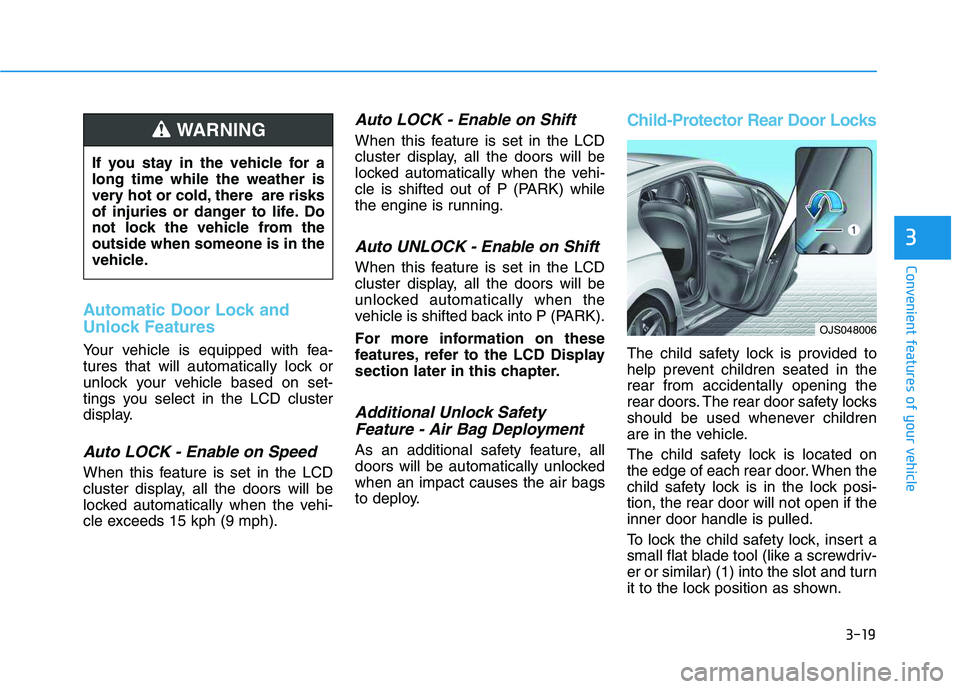
The child safety lock is located on
the edge of each rear door. When the
child safety lock is in the lock posi-
tion, the rear door will not open if the
inner door handle is pulled.
To lock the child safety lock, insert a
small flat blade tool (like a screwdriv-
er or similar) (1) into the slot and turn
it to the lock position as shown.
3
If you stay in the vehicle for a
long time while the weather is
very hot or cold, there are risks
of injuries or danger to life. Do
not lock the vehicle from the
outside when someone is in the
vehicle.
WARNING
OJS048006