2020 Hyundai Santa Fe AUTO START
[x] Cancel search: AUTO STARTPage 120 of 557

3-31
Convenient features of your vehicle
3
Make this adjustment before you
start driving and while the day/night
lever is in the day position.
Pull the day/night lever towards you
to reduce glare from the headlights
of the vehicles behind you during
night driving.
Remember that you lose some
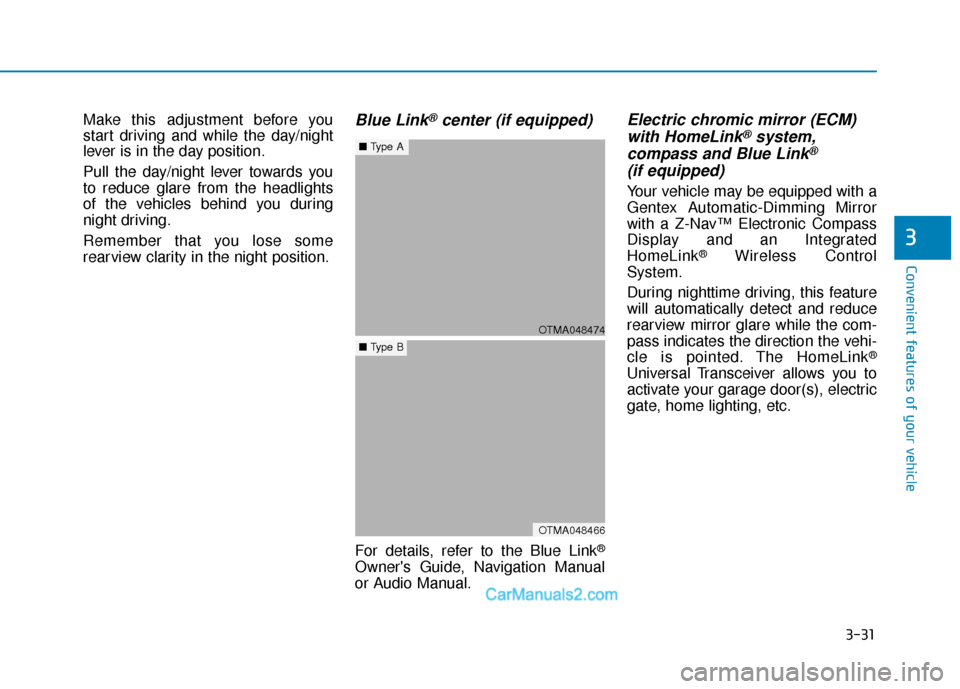
rearview clarity in the night position.Blue Link®center (if equipped)
For details, refer to the Blue Link®
Owner's Guide, Navigation Manual
or Audio Manual.
Electric chromic mirror (ECM)with HomeLink®system,
compass and Blue Link®
(if equipped)
Your vehicle may be equipped with a
Gentex Automatic-Dimming Mirror
with a Z-Nav™ Electronic Compass
Display and an Integrated
HomeLink
®Wireless Control
System.
During nighttime driving, this feature
will automatically detect and reduce
rearview mirror glare while the com-
pass indicates the direction the vehi-
cle is pointed. The HomeLink
®
Universal Transceiver allows you to
activate your garage door(s), electric
gate, home lighting, etc.
OTMA048474
■ Type A
OTMA048466
■Type B
Page 121 of 557

3-32
Convenient features of your vehicle
(1) Blue Link Center button
(2) Blue Link POI button
(3) Blue Link SOS button
(4) Compass control button & Dimming ON/OFF button
(5) Status indicator LED
(6) Channel 1 button
(7) Channel 2 button
(8) Channel 3 button
(9) Compass display
(10) Rear light sensor
Automatic-Dimming Night Vision
Safety™ (NVS®) Mirror
(if equipped)
The NVS®Mirror automatically
reduces glare by monitoring light lev-
els in the front and the rear of the
vehicle. Any object that obstructs
either light sensor will degrade the
automatic dimming control feature.
For more information regarding
NVS
®mirrors and other applica-
tions, please refer to the Gentex
website:
www.gentex.com Your mirror will automatically dim
upon detecting glare from the vehi-
cles traveling behind you. The auto-
dimming function can be controlled
by pressing the Dimming ON/OFF
button (4):
1. Pressing and holding the button
for 3 seconds turns the auto-dim-
ming function OFF which is indi-
cated by the green Status
Indicator LED turning off.
2. Pressing and holding the button for 3 seconds again turns the auto-
dimming function ON which is indi-
cated by the green Status Indicator
LED turning on.
The mirror defaults to the ON posi-
tion each time the vehicle is started.
Z-Nav™ Compass Display
The NVS™ Mirror in your vehicle is
also equipped with a Z-Nav™
Compass that shows the vehicle
Compass heading in the Display
Window using the 8 basic cardinal
headings (N, NE, E, SE, etc.).
OAD045045N
Page 149 of 557

3-60
Convenient features of your vehicle
Information
The Smart Liftgate will NOT operate
when:
• Any door is open, or all doors areclosed but not locked
• The smart key is detected within 15 seconds from when the doors were
closed and locked
• For vehicles equipped with illumi- nated exterior front door handles, if
the smart key is detected within 15
seconds from when the doors were
closed and locked or if the smart
key is within 60 inches (1.5m) from
the front door handles
• The smart key is in the vehicle. 1.Setting
To activate the Smart Liftgate, go to
User Settings mode and select
Smart Liftgate in the cluster LCD dis-
play.
For more details, refer to "LCD
Display" in this chapter.
2.Detect and Alert
The Smart Liftgate detecting area
extends approximately 20-40 in (50-
100 cm) behind the vehicle. If you
are positioned in the detecting area
and are carrying the smart key, the
hazard warning lights will blink and
the chime will sound to alert you that
the smart liftgate will open.
Information
Do not approach the detecting area if
you do not want the liftgate to open. If
you have unintentionally entered the
detecting area and the hazard warn-
ing lights and chime starts to operate,
move away from the area behind the
vehicle with the smart key. The lift-
gate will remain closed.3. Automatic opening
After the hazard warning lights blink
and the chime sounds 6 times, the
power liftgate will open.
i
i
Make certain that you close
the liftgate before driving your
vehicle.
Make sure there are no people
or objects around the liftgate
before opening or closing the
liftgate.
Make sure objects in the rear
cargo area do not come out
when opening the liftgate,
especially if the vehicle is
parked on a grade or incline.
If you keep your vehicle
parked and locked on your
driveway, you may want to
temporarily deactivate the
Smart Liftgate system.
Otherwise, standing at the
rear of the vehicle with the
smart key may cause the lift-
gate to open unintentionally.
WARNING
Page 169 of 557

3-80
Convenient features of your vehicle
Icy Road Warning Light(if equipped)
This warning light is to warn the driver
the road may be icy.
When the temperature on the out-
side temperature gauge is approxi-
mately below 40°F (4°C), the Icy
Road Warning Light and Outside
Temperature Gauge blinks and then
illuminates. Also, the warning chime
sounds 1 time.
You can activate or deactivate Icy
Road Warning function from the User
Settings mode in the cluster LCD dis-
play.
Information
If the icy road warning light appears
while driving, you should drive more
attentively and safely refraining from
over-speeding, rapid acceleration, sud-
den braking or sharp turning, etc.
AUTO STOP IndicatorLight
This indicator light illuminates:
When the engine enters the Idle
Stop mode of the ISG (Idle Stop and
Go) system.
This indicator light blinks:
When the automatic starting occurs,the AUTO STOP indicator on the
cluster will blink for 5 seconds.
For more details, refer to the "ISG
(Idle Stop and Go) system" in
chapter 5.
Information
When the engine automatically starts
by the ISG system, some warning
lights(ABS, ESC, ESC OFF, EPS or
Parking brake warning light) may
turn on for a few seconds.
This happens because of low battery
voltage. It does not mean the system
has malfunctioned.
Electronic Stability Control (ESC) IndicatorLight
This indicator light illuminates:
When you set the ignition switch
or the Engine Start/Stop button to
the ON position.
- The Electronic Stability Controlindicator light illuminates for
about 3 seconds and then goes
off.
Whenever there is a malfunction with the ESC system.
If this occurs, have the vehicle
inspected by an authorized
HYUNDAI dealer.
This indicator light blinks:
While the ESC is operating.
For more details, refer to
"Electronic Stability Control
(ESC)" in chapter 5.
ii
Page 189 of 557

3-100
Convenient features of your vehicle
ItemsExplanation
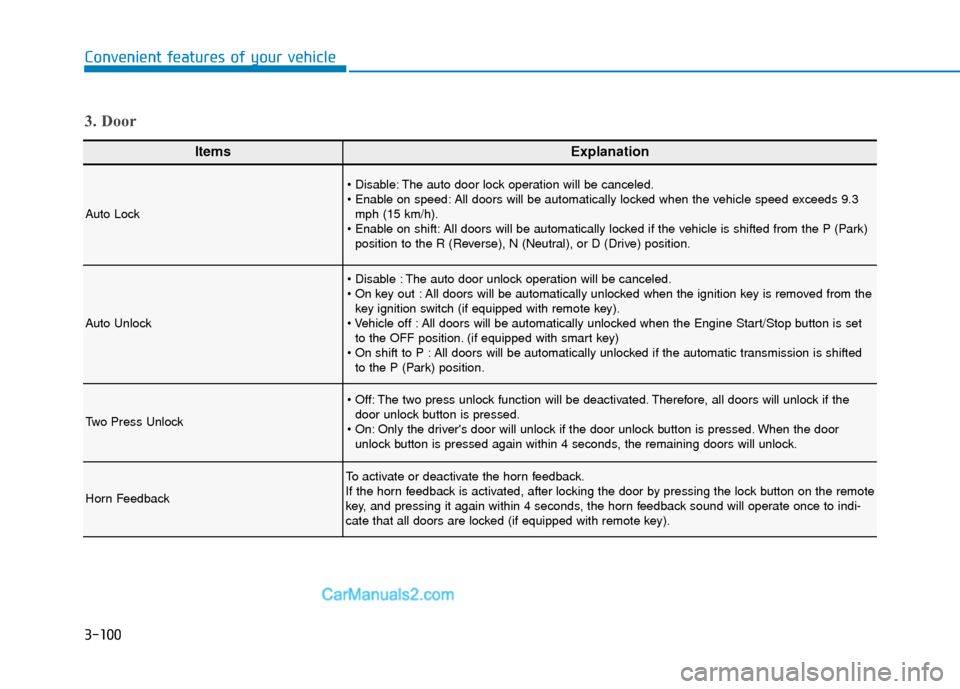
Auto Lock
The auto door lock operation will be canceled.
All doors will be automatically locked when the vehicle speed exceeds 9.3mph (15 km/h).
All doors will be automatically locked if the vehicle is shifted from the P (Park) position to the R (Reverse), N (Neutral), or D (Drive) position.
Auto Unlock
The auto door unlock operation will be canceled.
All doors will be automatically unlocked when the ignition key is removed from thekey ignition switch (if equipped with remote key).
All doors will be automatically unlocked when the Engine Start/Stop button is set to the OFF position. (if equipped with smart key)
All doors will be automatically unlocked if the automatic transmission is shifted to the P (Park) position.
Two Press Unlock
The two press unlock function will be deactivated. Therefore, all doors will unlock if thedoor unlock button is pressed.
Only the driver's door will unlock if the door unlock button is pressed. When the door unlock button is pressed again within 4 seconds, the remaining doors will unlock.
Horn Feedback
To activate or deactivate the horn feedback.
If the horn feedback is activated, after locking the door by pressing the lock button on the remote
key, and pressing it again within 4 seconds, the horn feedback sound will operate once to indi-
cate that all doors are locked (if equipped with remote key).
3. Door
Page 237 of 557

3-148
Convenient features of your vehicle
To turn the automatic operation off,
select any button of the following:
- Mode selection button
- Front windshield defroster button (Press the button one more time
to deselect the front windshield
defroster function. The 'AUTO'
sign will illuminate on the informa-
tion display once again.)
- Fan speed control button
The selected function will be con-
trolled manually while other functions
operate automatically.
For your convenience and to improve
the efficiency of the climate control,
use the AUTO button and set the
temperature to 72°F (22°C).
Never place anything near the
ambient light/solar sensor to
ensure better control of the heat-
ing and cooling system.
Manual Temperature Control
Mode
The heating and cooling system can
be controlled manually by pushing
buttons other than the AUTO button.
In this case, the system works
sequentially according to the order of
buttons selected.
When pressing any button except the
AUTO button while using automatic
operation, the functions not selected
will be controlled automatically.
1. Start the engine.
2. Set the mode to the desired posi-tion.
To improve the effectiveness of heating and cooling, select the
mode according to the following:
- Heating:
- Cooling:
3. Set the temperature control to the desired position.
4. Set the air intake control to Fresh mode.
5. Set the fan speed control to the desired speed.
NOTICE
OTMA048315
OTMA048478
■Type A
■Type B
Page 247 of 557

3-158
Convenient features of your vehicle For maximum defrost perform-ance, set the temperature control
knob to the highest temperature
setting (rotated all the way to the
right) and the fan speed control to
the highest setting.
If warm air to the floor is desired while defrosting or defogging, set
the mode to the floor-defrost posi-
tion.
Before driving, clear all snow and ice from the windshield, rear win-
dow, side view mirrors, and all
side windows.
Clear all snow and ice from the hood and air inlet in the cowl grill to
improve heater and defroster effi-
ciency and to reduce the probabili-
ty of fogging up the inside of the
windshield.
If the engine temperature is still
cold after starting, then a brief
engine warm up period may be
required for the vented air flow to
become warm or hot.
Manual Climate Control System
To defog inside windshield
1. Select any fan speed except "0" position.
2. Select the desired temperature.
3. Select the or position.
4. Fresh mode will be selected auto- matically. Additionally, the air condi-
tioning will automatically operate if
the mode is selected to the
position.
Check to make sure the A/C is ON. If
the A/C ON LED is not illuminated,
press the A/C button once to turn the
air conditioner ON.
NOTICE
W
W I
IN
N D
DS
SH
H I
IE
E L
LD
D
D
D E
EF
FR
R O
O S
ST
T I
IN
N G
G
A
A N
N D
D
D
D E
EF
FO
O G
GG
GI
IN
N G
G
Windshield heating
Do not use the or posi-
tion during cooling operation in
extremely humid weather. The
difference between the temper-
ature of the outside air and that
of the windshield could cause
the outer surface of the wind-
shield to fog up, causing loss of
visibility could cause an acci-
dent resulting in serious injury
or death. In this case, set the
mode selection knob or button
to the position and fan
speed control knob or button to
a lower speed.
WARNING
OTMA048324
Page 252 of 557

3-163
Convenient features of your vehicle
3
C
CL
LI
IM
M A
AT
TE
E
C
C O
O N
NT
TR
R O
O L
L
A
A D
DD
DI
IT
T I
IO
O N
NA
AL
L
F
F E
E A
A T
TU
U R
RE
ES
S
Cluster ionizer (if equipped)
When the ignition switch is in the ON
position, the clean air function turns
on automatically.
Also, the clean air function turns off
automatically, when the ignition
switch is in the OFF position.
Air recirculation of passenger
compartment while spraying
the washer fluid
While spraying the washer fluid on
the windshield, the air recirculation
mode and the air conditioning sys-
tem are automatically operated
according to the outside temperature
in order to prevent the outside air
intake. If you control the recirculation
mode manually during operation, it
will be controlled but will change
back after a while. (It may not work
under certain circumstances: in case
of the cold weather or the ignition
switch is in the OFF position.) To set up the air recirculation
1. Start the engine.
2. Set the air flow outlet direction to
the Floor Level Mode by
pressing the mode selection but-
ton.
3. While pressing the air condition- ing button, push the recirculation
mode button over 4 times within 2
seconds.
4. If the function is set, the recircula- tion button indicator will blink 6
times.
To release the air recirculation
1. Start the engine.
2. Set the air flow outlet direction to the Floor Level Mode by
pressing the mode selection but-
ton.
3. While pressing the air condition- ing button, push the recirculation
mode button indicator over 4
times within 2 seconds.
4. If the function is released, the recirculation button indicator will
blink 3 times.
Automatic Ventilation
(if equipped)
When the ignition switch is in the ON
position or when the engine is run-
ning and temperature is below 59°F
(15°C) with the recirculation mode
selected more than three to five min-
utes, the air intake position will auto-
matically change to fresh mode.
To cancel or reset the Automatic
Ventilation
When the air conditioning system is
on, select Face Level mode and
press the recirculation mode button
five times within three seconds while
pressing A/C button.
When the Automatic Ventilation fea-
ture is enabled, the recirculation but-
ton LED indicator will blink 6 times.
When the Automatic Ventilation fea-
ture is disabled, the recirculation but-
ton LED indicator will blink 3 times.