2020 HYUNDAI NEXO display
[x] Cancel search: displayPage 68 of 561

2-53
Safety system of your vehicle
2
10. Side pressure sensors
11. Seat belt buckle sensor
12. Emergency Fastening Device
System
13. Occupant classification system
The SRSCM (Supplemental Restraint
System Control Module) continually
monitors all SRS components while
the POWER button is placed to the
ON position to determine if a crash
impact is severe enough to require air
bag deployment or pre-tensioner seat
belt deployment.SRS warning light
The SRS (Supplement Restraint
System) air bag warning light on the
instrument panel displays the air bag
symbol depicted in the illustration.
The system checks the air bag elec-
trical system for malfunctions. The
light indicates that there is a potential
malfunction with your air bag system,
which could include your side and
curtain air bags used for rollover pro-
tection.
If your SRS malfunctions, the air
bag may not inflate properly dur-
ing an accident increasing the
risk of serious injury or death.
If any of the following condi-
tions occur, your SRS is mal-
functioning:
The light does not turn on for
approximately six seconds
when the POWER button is in
the ON position.
The light stays on after illumi-
nating for approximately six
seconds.
The light comes on when the
vehicle is ON.
The light blinks when the
vehicle is ON.
Have an authorized HYUNDAI
dealer inspect the SRS as soon
as possible if any of these con-
ditions occur.
WARNING
Page 87 of 561
2-72
Safety system of your vehicle
System malfunction
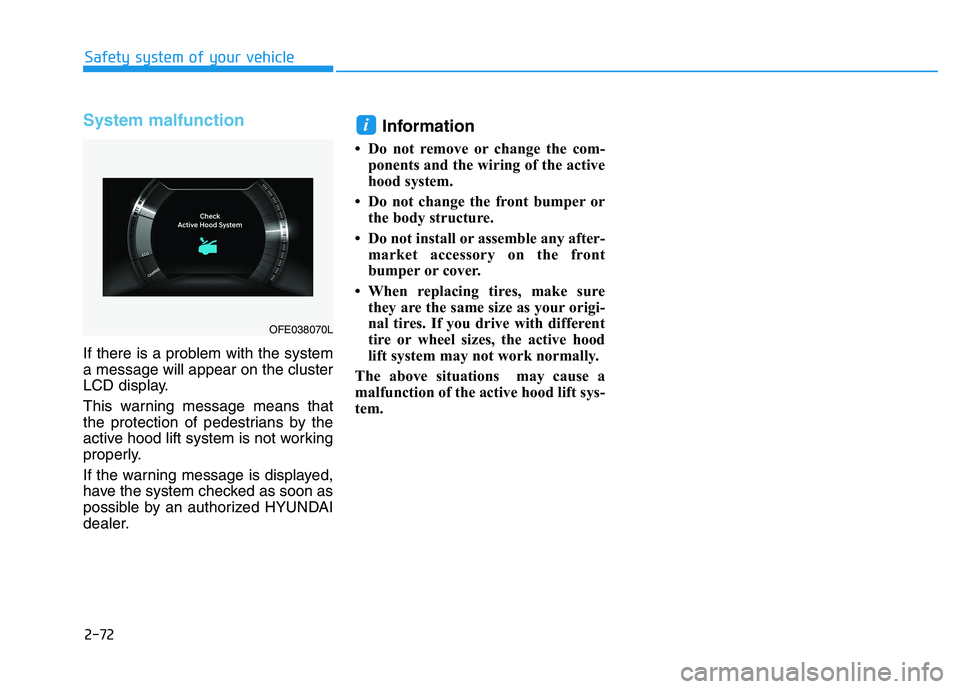
If there is a problem with the system
a message will appear on the cluster
LCD display.
This warning message means that
the protection of pedestrians by the
active hood lift system is not working
properly.
If the warning message is displayed,
have the system checked as soon as
possible by an authorized HYUNDAI
dealer.
Information
• Do not remove or change the com-
ponents and the wiring of the active
hood system.
• Do not change the front bumper or
the body structure.
• Do not install or assemble any after-
market accessory on the front
bumper or cover.
• When replacing tires, make sure
they are the same size as your origi-
nal tires. If you drive with different
tire or wheel sizes, the active hood
lift system may not work normally.
The above situations may cause a
malfunction of the active hood lift sys-
tem.
i
OFE038070L
Page 88 of 561
Convenient features of your vehicle
Accessing Your Vehicle .........................................3-3
Smart Key ............................................................................3-3
Immobilizer System ...........................................................3-9
Door Locks ............................................................3-11
Door unlocking from outside the vehicle .................3-11
Door locking from outside the vehicle ......................3-14
Operating Door Locks from Inside the Vehicle .......3-14
Automatic Door Lock and Unlock Features .............3-17
Child-Protector Rear Door Locks ...............................3-18
Theft-Alarm System ............................................3-19
Steering Wheel .....................................................3-20
Electric Power Steering (EPS) .....................................3-20
Tilt Steering/Telescope Steering.................................3-21
Horn ....................................................................................3-22
Heated Steering Wheel ..................................................3-22
Mirrors ...................................................................3-23
Inside Rearview Mirror ..................................................3-23
Side View Mirrors ...........................................................3-31
Windows ................................................................3-33
Power Windows ...............................................................3-34
Sunroof..................................................................3-37
Sunroof Opening and Closing ......................................3-38
Sliding the Sunroof .........................................................3-38
Tilting the Sunroof .........................................................3-39
Sunshade ...........................................................................3-39Resetting the Sunroof ...................................................3-40
Sunroof Open Warning ..................................................3-41
Exterior Features .................................................3-42
Hood ...................................................................................3-42
Non-Powered Liftgate ...................................................3-43
Power Liftgate .................................................................3-45
Smart Liftgate ..................................................................3-51
Fuel Filler Door ................................................................3-55
Emergency Fuel Filler Door Release..........................3-57
Instrument Cluster ...............................................3-58
Instrument Cluster Control............................................3-59
Gauges and Meters ........................................................3-59
Warning and Indicator Lights .......................................3-65
LCD Display Messages ...................................................3-76
LCD Display ...........................................................3-81
LCD Display Control ........................................................3-81
LCD Display Modes .........................................................3-82
Trip Computer .......................................................3-85
Lighting..................................................................3-89
Exterior Lights .................................................................3-89
Welcome System .............................................................3-99
Wipers and Washers..........................................3-101
Front Windshield Wipers .............................................3-101
Front Windshield Washers ..........................................3-103
Rear Window Wiper and Washer..............................3-104
3
Page 91 of 561
3-4
Convenient features of your vehicle
Information
The door handle button will only
operate when the smart key is within
28~40 inches (0.7~1 m) from the out-
side door handle.
Note that you cannot lock your vehi-
cle using the door handle button if
any of the following occur:
• The Smart Key is in the vehicle.
The POWER button is in ACC or
ON position.
Any of the doors are open except
for the liftgate.
Unlocking your vehicle
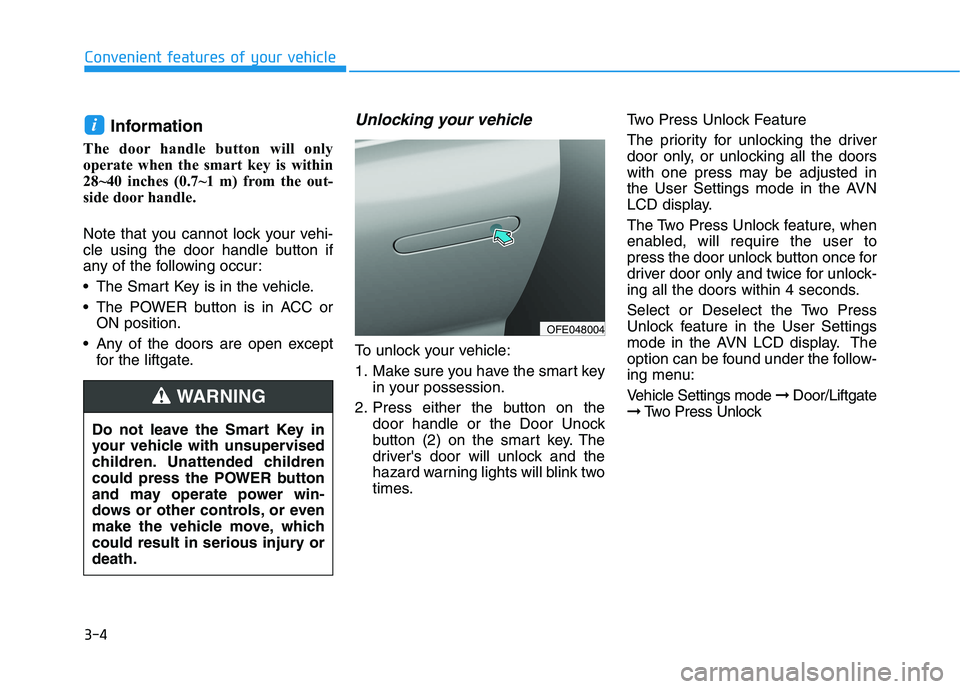
To unlock your vehicle:
1. Make sure you have the smart key
in your possession.
2. Press either the button on the
door handle or the Door Unock
button (2) on the smart key. The
driver's door will unlock and the
hazard warning lights will blink two
times.Two Press Unlock Feature
The priority for unlocking the driver
door only, or unlocking all the doors
with one press may be adjusted in
the User Settings mode in the AVN
LCD display.
The Two Press Unlock feature, when
enabled, will require the user to
press the door unlock button once for
driver door only and twice for unlock-
ing all the doors within 4 seconds.
Select or Deselect the Two Press
Unlock feature in the User Settings
mode in the AVN LCD display. The
option can be found under the follow-
ing menu:
Vehicle Settings mode ➞Door/Liftgate
➞Two Press Unlock
i
Do not leave the Smart Key in
your vehicle with unsupervised
children. Unattended children
could press the POWER button
and may operate power win-
dows or other controls, or even
make the vehicle move, which
could result in serious injury or
death.
WARNING
OFE048004
Page 104 of 561
3-17
Convenient features of your vehicle
3
Automatic Door Lock and
Unlock Features
Your vehicle is equipped with fea-
tures that will automatically lock or
unlock your vehicle based on set-
tings you select in the AVN LCD dis-
play.
Auto LOCK - Enable on Speed
When this feature is set in the AVN
LCD display, all the doors will be
locked automatically when the vehi-
cle exceeds 9 mph (15 kph).
Auto LOCK - Enable on Shift
When this feature is set in the AVN
LCD display, all the doors will be
locked automatically when the vehi-
cle is shifted out of P (Park) while the
vehicle is ON.
Auto UNLOCK - On shift to P
When this feature is set in the AVN
LCD display, all the doors will be
unlocked automatically when the
vehicle is shifted back into P (Park).
For more information on these
features, refer to the LCD Display
section later in this chapter.
Auto UNLOCK – On vehicle Off
When this feature is set in the AVN
LCD display, all the doors will be
unlocked automatically when the
vehicle is off.
Additional Unlock Safety
Feature - Air Bag Deployment
As an additional safety feature, all
doors will be automatically unlocked
when an impact causes the air bags
to deploy. Opening a door when something
is approaching may cause dam-
age or injury. Be careful when
opening doors and watch for
vehicles, motorcycles, bicycles
or pedestrians approaching the
vehicle in the path of the door.
CAUTION
If you stay in the vehicle for a
long time while the weather is
very hot or cold, there are risks
of injuries or danger to life. Do
not lock the vehicle from the
outside when someone is in the
vehicle.
WARNING
Page 110 of 561
3-23
Convenient features of your vehicle
3
M MI
IR
RR
RO
OR
RS
S
Inside Rearview Mirror
Before driving your vehicle, check to
see that your inside rearview mirror
is properly positioned. Adjust the
rearview mirror so that the view
through the rear window is properly
centered.
When cleaning the mirror, use a
paper towel or similar material
dampened with glass cleaner. Do
not spray glass cleaner directly on
the mirror as this may cause the
liquid cleaner to enter the mirror
housing.
Electric chromic mirror (ECM)
with compass and HomeLink®
system
Your vehicle may be equipped with a
Gentex Automatic-Dimming Mirror
with a Z-Nav™ Electronic Compass
Display and an Integrated HomeLink
®
Wireless Control System.
During nighttime driving, this feature
will automatically detect and reduce
rearview mirror glare while the com-
pass indicates the direction the vehi-
cle is pointed. The HomeLink
®
Universal Transceiver allows you to
activate your garage door(s), electric
gate, home lighting, etc.
NOTICE
Make sure your line of sight is
not obstructed. Do not place
objects in the rear seat, cargo
area, or behind the rear head-
rests which could interfere with
your vision through the rear
window.
WARNING
To prevent serious injury during
an accident or deployment of
the air bag, do not modify the
rearview mirror and do not
install a wide mirror.
WARNING
NEVER adjust the mirror while
driving. This may cause loss of
vehicle control resulting in an
accident.
WARNING
Page 111 of 561
3-24
Convenient features of your vehicle
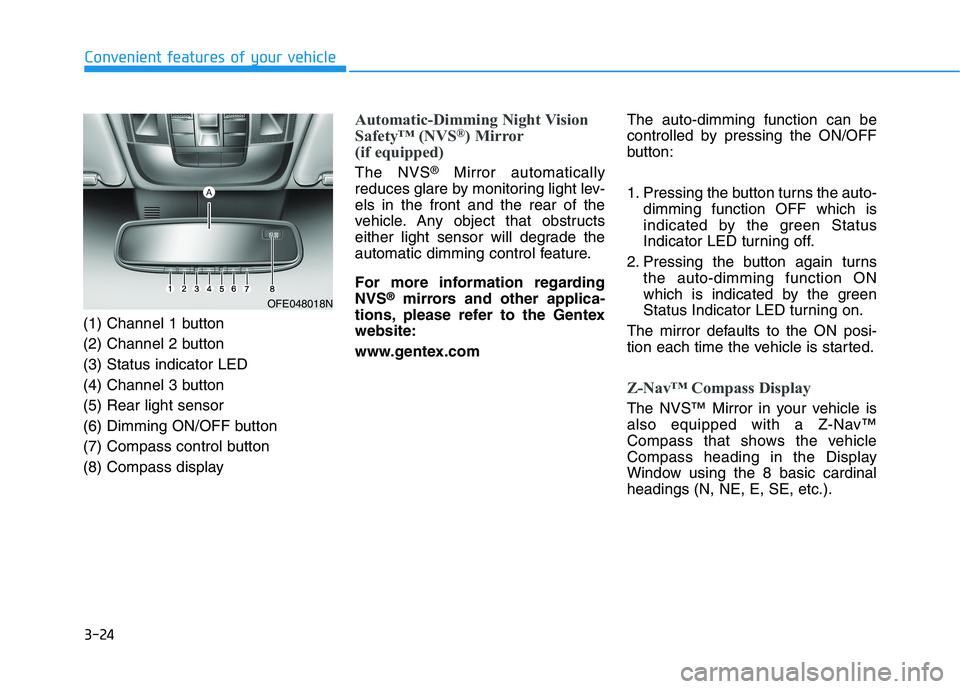
(1) Channel 1 button
(2) Channel 2 button
(3) Status indicator LED
(4) Channel 3 button
(5) Rear light sensor
(6) Dimming ON/OFF button
(7) Compass control button
(8) Compass display
Automatic-Dimming Night Vision
Safety™ (NVS®) Mirror
(if equipped)
The NVS®Mirror automatically
reduces glare by monitoring light lev-
els in the front and the rear of the
vehicle. Any object that obstructs
either light sensor will degrade the
automatic dimming control feature.
For more information regarding
NVS
®mirrors and other applica-
tions, please refer to the Gentex
website:
www.gentex.comThe auto-dimming function can be
controlled by pressing the ON/OFF
button:
1. Pressing the button turns the auto-
dimming function OFF which is
indicated by the green Status
Indicator LED turning off.
2. Pressing the button again turns
the auto-dimming function ON
which is indicated by the green
Status Indicator LED turning on.
The mirror defaults to the ON posi-
tion each time the vehicle is started.
Z-Nav™ Compass Display
The NVS™ Mirror in your vehicle is
also equipped with a Z-Nav™
Compass that shows the vehicle
Compass heading in the Display
Window using the 8 basic cardinal
headings (N, NE, E, SE, etc.).
OFE048018N
Page 112 of 561
3-25
Convenient features of your vehicle
3
Compass function
The Compass can be turned ON and
OFF and will remember the last state
when the ignition is cycled. To turn
the display feature ON/OFF:
1. Press and release the button to
turn the display feature OFF.
2. Press and release the button
again to turn the display back ON.
Additional options can be set with
press and hold sequences of the but-
ton and are detailed below.
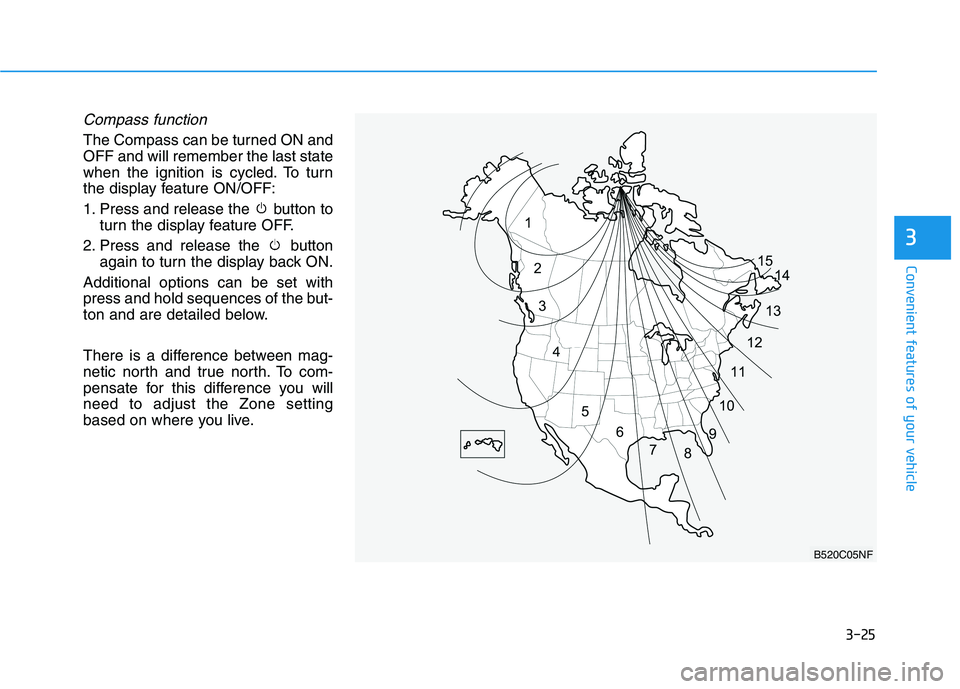
There is a difference between mag-
netic north and true north. To com-
pensate for this difference you will
need to adjust the Zone setting
based on where you live.
B520C05NF