Page 496 of 613
6-23
What to do in an emergency
6
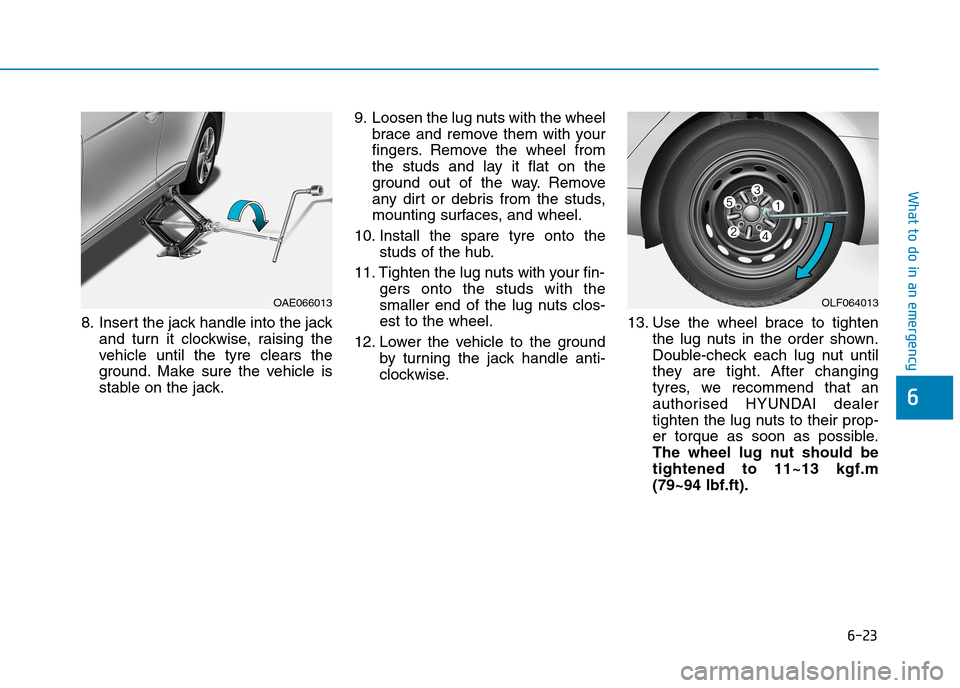
8. Insert the jack handle into the jack
and turn it clockwise, raising the
vehicle until the tyre clears the
ground. Make sure the vehicle is
stable on the jack.9. Loosen the lug nuts with the wheel
brace and remove them with your
fingers. Remove the wheel from
the studs and lay it flat on the
ground out of the way. Remove
any dirt or debris from the studs,
mounting surfaces, and wheel.
10. Install the spare tyre onto the
studs of the hub.
11. Tighten the lug nuts with your fin-
gers onto the studs with the
smaller end of the lug nuts clos-
est to the wheel.
12. Lower the vehicle to the ground
by turning the jack handle anti-
clockwise.13. Use the wheel brace to tighten
the lug nuts in the order shown.
Double-check each lug nut until
they are tight. After changing
tyres, we recommend that an
authorised HYUNDAI dealer
tighten the lug nuts to their prop-
er torque as soon as possible.
The wheel lug nut should be
tightened to 11~13 kgf.m
(79~94 lbf.ft).
OAE066013OLF064013
Page 516 of 613
6-43
What to do in an emergency
6
When towing your vehicle in an
emergency without wheel dollies:
1. Place the ignition switch in the
ACC position.
2. Place the shift lever in N (Neutral).
3. Release the parking brake.Removable towing hook
1. Open the tailgate, and remove the
towing hook from the tool case.
2. Remove the hole cover by press-
ing the lower part of the cover on
the bumper.
3. Install the towing hook by turning it
clockwise into the hole until it is
fully secured.
4. Remove the towing hook and
install the cover after use. Failure to place the shift lever in
N (Neutral) may cause internal
damage to the transmission.
CAUTION
OAE066021
OAE066022
OAE066028
■Front
■Rear
Page 538 of 613
7-20
Maintenance
Information
The engine coolant and/or inverter
coolant level is influenced by the
hybrid system temperature. Before
checking or refilling the engine
coolant and/or inverter coolant, turn
the hybrid vehicle off.
i
Never remove the
engine coolant cap
and/or inverter coolant
cap or the drain plug
whilst the engine and
radiator are hot. Hot coolant and
steam may blow out under pres-
sure, causing serious injury.
Turn the hybrid system off and
wait until the engine cools down.
Use extreme care when remov-
ing the engine coolant cap
and/or inverter coolant cap.
Wrap a thick towel around it, and
turn it anticlockwise slowly to
the first stop. Step back whilst
the pressure is released from the
cooling system. When you are
sure all the pressure has been
released, press down on the cap,
using a thick towel, and continue
turning anticlockwise to remove
it.
WARNING
OAE076006
OAEPH07800
■Engine coolant cap
■Inverter coolant cap
Page 553 of 613
7-35
7
Maintenance
By jump starting
After a jump start from a good bat-
tery, drive the vehicle for 20-30 min-
utes before it is shutoff. The vehicle
may not restart if you shut it off
before the battery had a chance to
adequately recharge. See “Jump
Starting” in chapter 6 for more infor-
mation on jump starting procedures.
Information
An inappropriately disposed
battery can be harmful to
the environment and human
health. Dispose of the bat-
tery according to your local
law(s) or regulations.
Reset features
The following items need to be reset
after the battery has been dis-
charged or the battery has been dis-
connected.
See chapter 3 or 4 for:
Power Windows
Trip Computer
Climate Control System
Clock
Audio System
Sunroof
Driver Position Memory System
i
(Continued)
Watch the battery during
charging, and stop or reduce
the charging rate if the battery
cells begin boiling violently.
The negative battery cable
must be removed first and
installed last when the battery
is disconnected. Disconnect
the battery charger in the fol-
lowing order:
(1) Turn off the battery charger
main switch.
(2) Unhook the negative
clamp from the negative
battery terminal.
(3) Unhook the positive clamp
from the positive battery
terminal.
Always use a genuine HYUNDAI
approved battery when you
replace the battery.
Page 567 of 613
7-49
7
Maintenance
Fuse switch
Always, place the fuse switch to the
ON position.
If you move the switch to the OFF
position, some items such as the
audio system and digital clock must
be reset and the smart key may not
work properly.
Information
If the fuse switch is OFF, “Turn on
FUSE SWITCH” message will appear.
Always place the fuse switch in
the ON position whilst driving
the vehicle.
Do not move the transportation
fuse switch repeatedly. The fuse
switch may be damaged.
Engine compartment panel
fuse replacement
1. Turn the vehicle off.
2. Turn all other switches off.
3. Remove the fuse panel cover by
pressing the tap and pulling up.
NOTICE
i
OAEPH078023
OAEPH078024
■Blade type fuse
■Cartridge type fuseOAE076019ROIK05165L
Page 581 of 613
7-63
7
Maintenance
Headlamp and position lamp
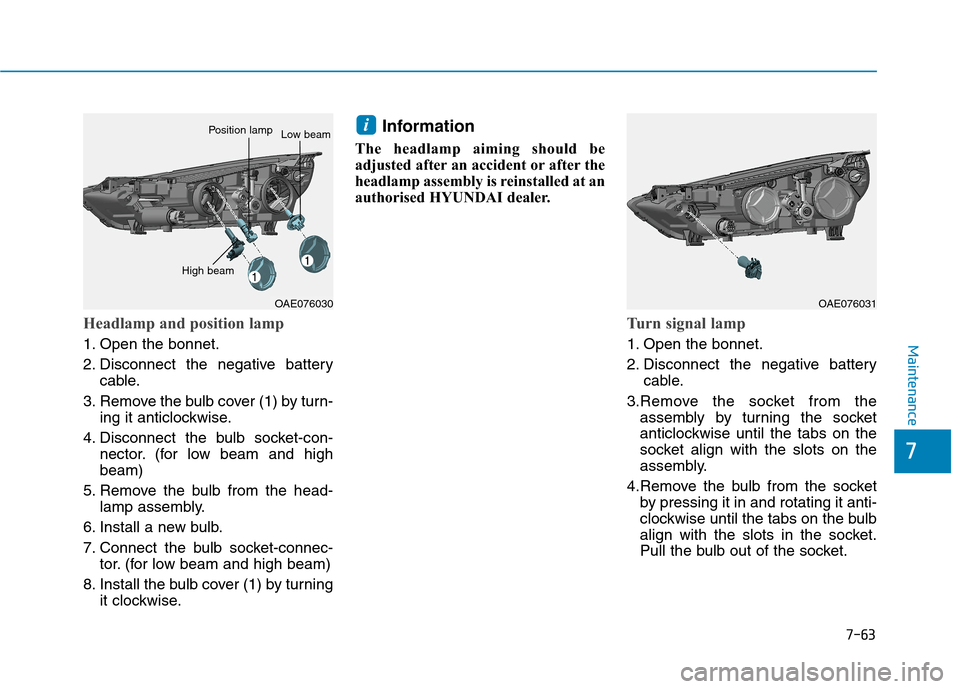
1. Open the bonnet.
2. Disconnect the negative battery
cable.
3. Remove the bulb cover (1) by turn-
ing it anticlockwise.
4. Disconnect the bulb socket-con-
nector. (for low beam and high
beam)
5. Remove the bulb from the head-
lamp assembly.
6. Install a new bulb.
7. Connect the bulb socket-connec-
tor. (for low beam and high beam)
8. Install the bulb cover (1) by turning
it clockwise.
Information
The headlamp aiming should be
adjusted after an accident or after the
headlamp assembly is reinstalled at an
authorised HYUNDAI dealer.
Turn signal lamp
1. Open the bonnet.
2. Disconnect the negative battery
cable.
3.Remove the socket from the
assembly by turning the socket
anticlockwise until the tabs on the
socket align with the slots on the
assembly.
4.Remove the bulb from the socket
by pressing it in and rotating it anti-
clockwise until the tabs on the bulb
align with the slots in the socket.
Pull the bulb out of the socket.
i
OAE076030
High beam
Position lampLow beam
OAE076031
Page 582 of 613
7-64
Maintenance
5.Insert a new bulb by inserting it into
the socket and rotating it until it
locks into place.
6.Install the socket into the assembly
by aligning the tabs on the socket
with the slots in the assembly.
7.Push the socket into the assembly
and turn the socket clockwise.
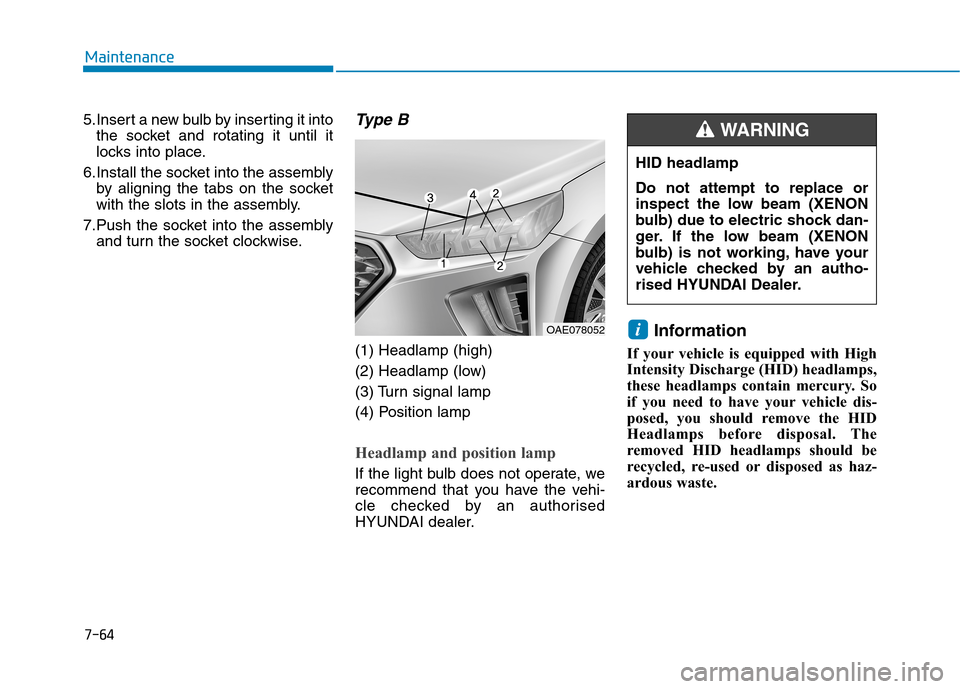
Type B
(1) Headlamp (high)
(2) Headlamp (low)
(3) Turn signal lamp
(4) Position lamp
Headlamp and position lamp
If the light bulb does not operate, we
recommend that you have the vehi-
cle checked by an authorised
HYUNDAI dealer.
Information
If your vehicle is equipped with High
Intensity Discharge (HID) headlamps,
these headlamps contain mercury. So
if you need to have your vehicle dis-
posed, you should remove the HID
Headlamps before disposal. The
removed HID headlamps should be
recycled, re-used or disposed as haz-
ardous waste.
i
HID headlamp
Do not attempt to replace or
inspect the low beam (XENON
bulb) due to electric shock dan-
ger. If the low beam (XENON
bulb) is not working, have your
vehicle checked by an autho-
rised HYUNDAI Dealer.
WARNING
OAE078052
Page 583 of 613
7-65
7
Maintenance
Information
HID lamps have superior perform-
ance vs. halogen bulbs.
HID lamps are estimated by the man-
ufacturer to last twice as long or
longer than halogen bulbs depending
on their frequency of use. They will
probably require replacement at some
point in the life of the vehicle. Cycling
the headlamps on and off more than
typical use will shorten HID lamps
life. HID lamps do not fail in the same
manner as halogen incandescent
lamps. If a headlamp goes out after a
period of operation but will immedi-
ately relight when the headlamp
switch is cycled it is likely the HID
lamp needs to be replaced. HID light-
ing components are more complex
than conventional halogen bulbs thus
have higher replacement cost.
Information
The headlamp aiming should be
adjusted after an accident or after the
headlamp assembly is reinstalled at an
authorised HYUNDAI dealer.
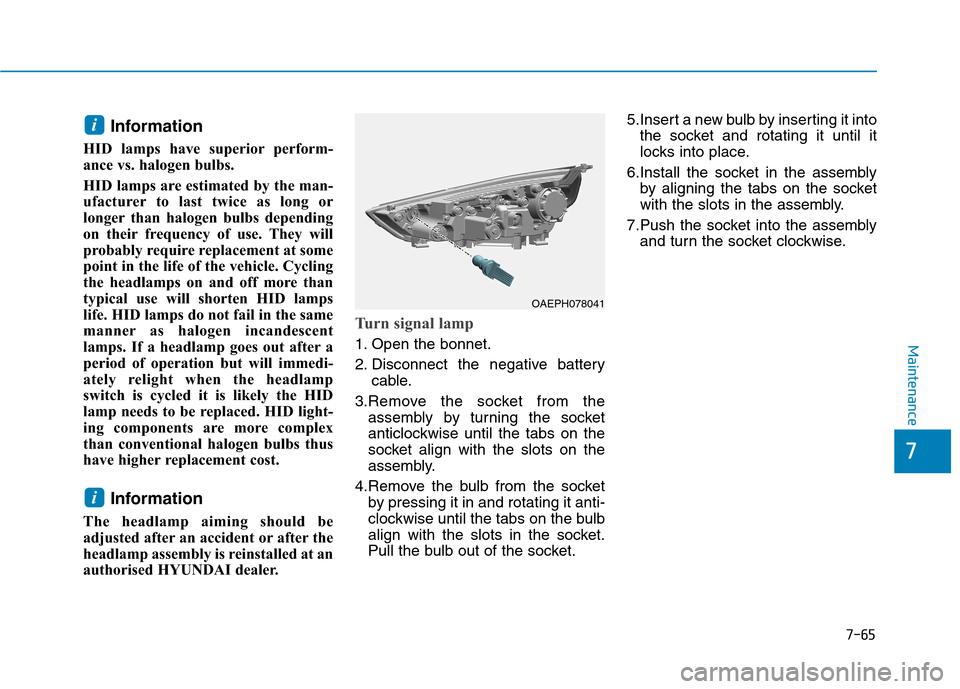
Turn signal lamp
1. Open the bonnet.
2. Disconnect the negative battery
cable.
3.Remove the socket from the
assembly by turning the socket
anticlockwise until the tabs on the
socket align with the slots on the
assembly.
4.Remove the bulb from the socket
by pressing it in and rotating it anti-
clockwise until the tabs on the bulb
align with the slots in the socket.
Pull the bulb out of the socket.5.Insert a new bulb by inserting it into
the socket and rotating it until it
locks into place.
6.Install the socket in the assembly
by aligning the tabs on the socket
with the slots in the assembly.
7.Push the socket into the assembly
and turn the socket clockwise.
i
i
OAEPH078041