Page 307 of 613
3-160
Convenient features of your vehicle
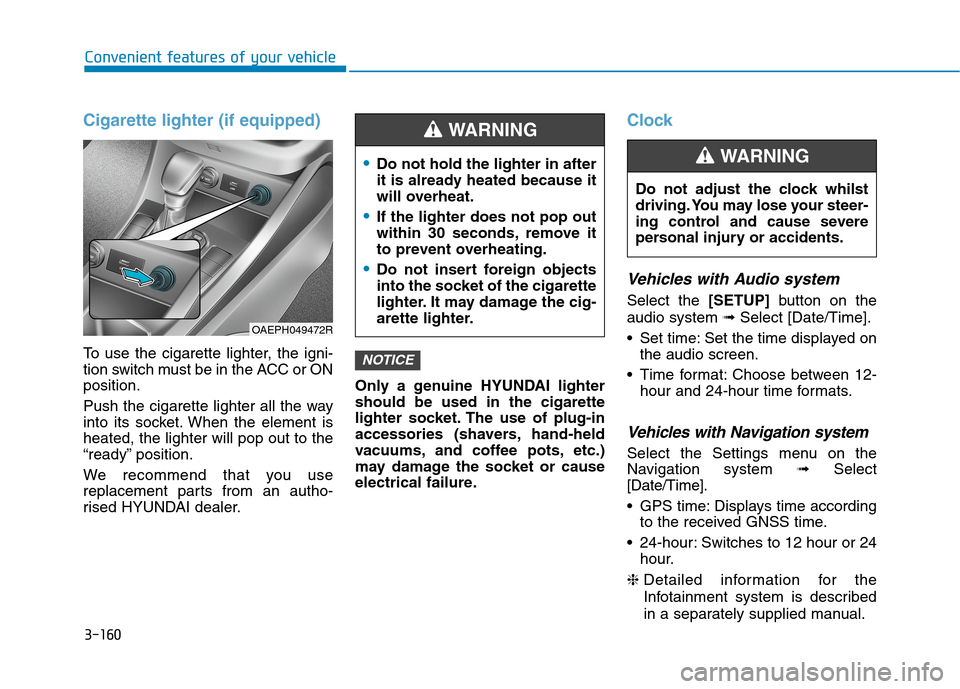
Cigarette lighter (if equipped)
To use the cigarette lighter, the igni-
tion switch must be in the ACC or ON
position.
Push the cigarette lighter all the way
into its socket. When the element is
heated, the lighter will pop out to the
“ready” position.
We recommend that you use
replacement parts from an autho-
rised HYUNDAI dealer.Only a genuine HYUNDAI lighter
should be used in the cigarette
lighter socket. The use of plug-in
accessories (shavers, hand-held
vacuums, and coffee pots, etc.)
may damage the socket or cause
electrical failure.
Clock
Vehicles with Audio system
Select the [SETUP]button on the
audio system ➟Select [Date/Time].
Set time: Set the time displayed on
the audio screen.
Time format: Choose between 12-
hour and 24-hour time formats.
Vehicles with Navigation system
Select the Settings menu on the
Navigation system➟Select
[Date/Time].
GPS time: Displays time according
to the received GNSS time.
24-hour: Switches to 12 hour or 24
hour.
❈Detailed information for the
Infotainment system is described
in a separately supplied manual.
NOTICE
Do not adjust the clock whilst
driving. You may lose your steer-
ing control and cause severe
personal injury or accidents.
WARNING Do not hold the lighter in after
it is already heated because it
will overheat.
If the lighter does not pop out
within 30 seconds, remove it
to prevent overheating.
Do not insert foreign objects
into the socket of the cigarette
lighter. It may damage the cig-
arette lighter.
WARNING
OAEPH049472R
Page 311 of 613
4-2
Infotainment System
Information
• If you install an aftermarket HID
headlamp, your vehicle’s audio and
electronic devices may malfunction.
• Prevent chemicals such as perfume,
cosmetic oil, sun cream, hand clean-
er, and air freshener from contacting
the interior parts because they may
cause damage or discolouration.
USB and iPod®port
You can use an USB port to plug in an
USB and an iPod®port.
Information
When using a portable audio device
connected to the power outlet, noise
may occur during playback. If this
happens, use the power source of the
portable audio device.
❈iPod
®is a trademark of Apple Inc.
Antenna
Roof antenna (Type A)
The roof antenna receives both AM
and FM broadcast signals.
Rotate the roof antenna in a anti-
clockwise direction to remove it.
Rotate it in a clockwise direction to
reinstall it.
i
OAEPH049439R
i
I IN
NF
FO
OT
TA
AI
IN
NM
ME
EN
NT
T
S
SY
YS
ST
TE
EM
M
OAEPH049481L
Page 312 of 613
4-3
Infotainment System
4
Before entering a place with a low
height clearance or a car wash,
remove the antenna by rotating it
anticlockwise. If not, the antenna
may be damaged.
When reinstalling your antenna,
it is important that it is fully
tightened and adjusted to the
upright position to ensure prop-
er reception.
Shark fin antenna (Type B)
The shark fin antenna receives
transmitted data. (for example:
AM/FM, DAB, GPS/ GNSS)
Avoid adding metallic coatings
such as Ni, Cd, and so on. These
can degrade the received AM and
FM broadcast signals.
Steering wheel audio controls
(if equipped)
The steering wheel audio control
switches are installed for your con-
venience.
OAE046437
OAE046474L
NOTICE
NOTICE
■Type A
■Type B
■Type C
OAE049436
Page 479 of 613
6-6
The following items may need to be
reset after the battery has been dis-
charged or the battery has been dis-
connected.
See chapter 3 or 4 for:
Power Windows
Trip Computer
Climate Control System
Clock
Audio System
Sunroof
Driver Position Memory System
External power source using 12V
battery
The use of external power acces-
sories may reduce performance
and function of the vehicle.
Especially, the use of dash cam-
eras may shut off the power of the
vehicle prior to the dash camera's
automatic shut-down.
If the power of the vehicle is shut
off, start the vehicle as explained.
(refer to "Using the 12V Battery
Reset Switch")Jump starting
In the event vehicle still does not
have a functional 12V battery (check
if interior lights will not turn on) then
you can try a jump start to the engine
compartment jumper terminals using
a 12V booster pack or jumper cables
from another vehicle's 12V battery
according to the following instruc-
tions.1. Position the vehicles close enough
that the jumper cables will reach,
but do not allow the vehicles to
touch.
2. Avoid fans or any moving parts in
the engine compartment at all
times, even when the vehicles are
turned off.
3. Turn off all electrical devices such
as radios, lights, air conditioning,
etc. Put the vehicles in P (Park)
and set the parking brake. Turn
both vehicles OFF.
NOTICE
What to do in an emergency
Jump starting can be danger-
ous if done incorrectly. Follow
the jump starting procedure in
this section to avoid serious
injury or damage to your vehi-
cle. If in doubt about how to
properly jump start your vehi-
cle, we strongly recommend
that you have a service techni-
cian or towing service do it for
you.
CAUTION
Page 486 of 613
6-13
What to do in an emergency
6
7. If you cannot find the cause of the
overheating, wait until the engine
temperature has returned to nor-
mal. Then, if coolant has been
lost, carefully add coolant to the
reservoir to bring the fluid level in
the reservoir up to the halfway
mark.
8. Proceed with caution, keeping
alert for further signs of overheat-
ing. If overheating happens again,
we recommend that you call an
authorised HYUNDAI dealer for
assistance.
Serious loss of coolant indi-
cates a leak in the cooling
system and we recommend
the system be checked by an
authorised HYUNDAI dealer.
When the engine overheats
from low engine coolant, sud-
denly adding engine coolant
may cause cracks in the
engine. To prevent damage,
add engine coolant slowly in
small quantities.
CAUTION
Never remove the
engine coolant cap
and/or inverter coolant
cap or the drain plug
whilst the engine and
radiator are hot. Hot coolant and
steam may blow out under pres-
sure, causing serious injury.
Turn the hybrid system off and
wait until the engine cools down.
Use extreme care when remov-
ing the engine coolant cap
and/or inverter coolant cap.
Wrap a thick towel around it, and
turn it anticlockwise slowly to
the first stop. Step back whilst
the pressure is released from the
cooling system. When you are
sure all the pressure has been
released, press down on the cap,
using a thick towel, and continue
turning anticlockwise to remove
it.
WARNING
Page 493 of 613
6-20
What to do in an emergency
Jack and tools
(1) Jack handle
(2) Jack
(3) Wheel brace
The jack, jack handle, and wheel
brace are stored in the luggage com-
partment under the luggage box
cover.
The jack is provided for emergency
tyre changing only.Turn the winged hold down bolt anti-
clockwise to remove the spare tyre.
Store the spare tyre in the same
compartment by turning the winged
hold down bolt clockwise.
To prevent the spare tyre and tools
from "rattling", store them in their
proper location.
I IF
F
Y
YO
OU
U
H
HA
AV
VE
E
A
A
F
FL
LA
AT
T
T
TY
YR
RE
E
(
(W
WI
IT
TH
H
S
SP
PA
AR
RE
E
T
TY
YR
RE
E)
)
OAD065027
OAD065026
Changing a tyre can be danger-
ous. Follow the instructions in
this section when changing a
tyre to reduce the risk of seri-
ous injury or death.
WARNING
Be careful as you use the jack
handle to stay clear of the flat
end. The flat end has sharp
edges that could cause cuts.
CAUTION
Page 494 of 613
6-21
What to do in an emergency
6
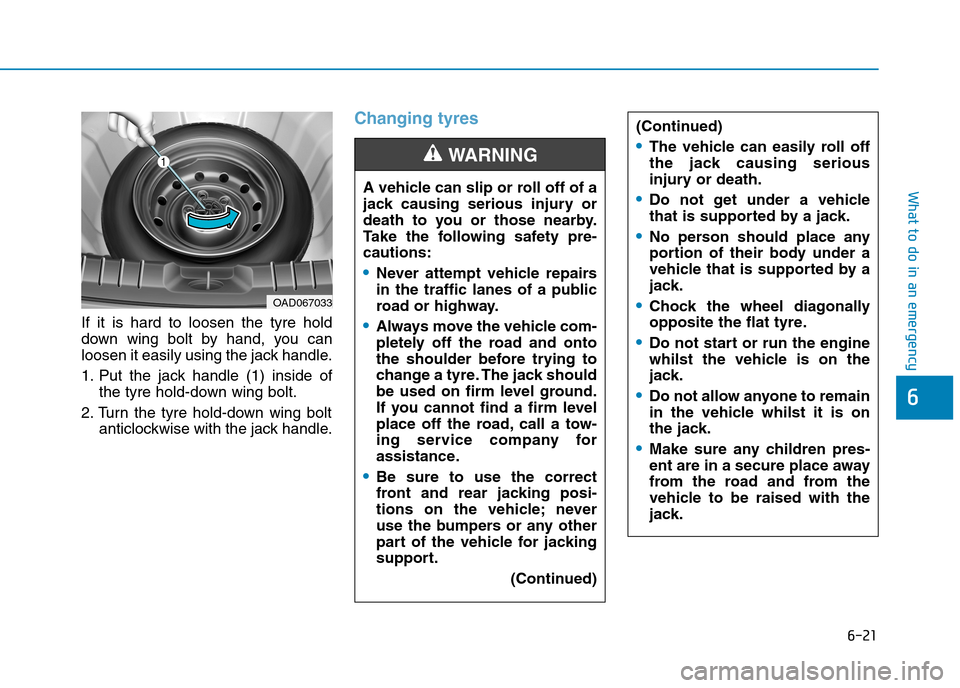
If it is hard to loosen the tyre hold
down wing bolt by hand, you can
loosen it easily using the jack handle.
1. Put the jack handle (1) inside of
the tyre hold-down wing bolt.
2. Turn the tyre hold-down wing bolt
anticlockwise with the jack handle.
Changing tyres
A vehicle can slip or roll off of a
jack causing serious injury or
death to you or those nearby.
Take the following safety pre-
cautions:
Never attempt vehicle repairs
in the traffic lanes of a public
road or highway.
Always move the vehicle com-
pletely off the road and onto
the shoulder before trying to
change a tyre. The jack should
be used on firm level ground.
If you cannot find a firm level
place off the road, call a tow-
ing service company for
assistance.
Be sure to use the correct
front and rear jacking posi-
tions on the vehicle; never
use the bumpers or any other
part of the vehicle for jacking
support.
(Continued)
WARNING
(Continued)
The vehicle can easily roll off
the jack causing serious
injury or death.
Do not get under a vehicle
that is supported by a jack.
No person should place any
portion of their body under a
vehicle that is supported by a
jack.
Chock the wheel diagonally
opposite the flat tyre.
Do not start or run the engine
whilst the vehicle is on the
jack.
Do not allow anyone to remain
in the vehicle whilst it is on
the jack.
Make sure any children pres-
ent are in a secure place away
from the road and from the
vehicle to be raised with the
jack.
OAD067033
Page 495 of 613
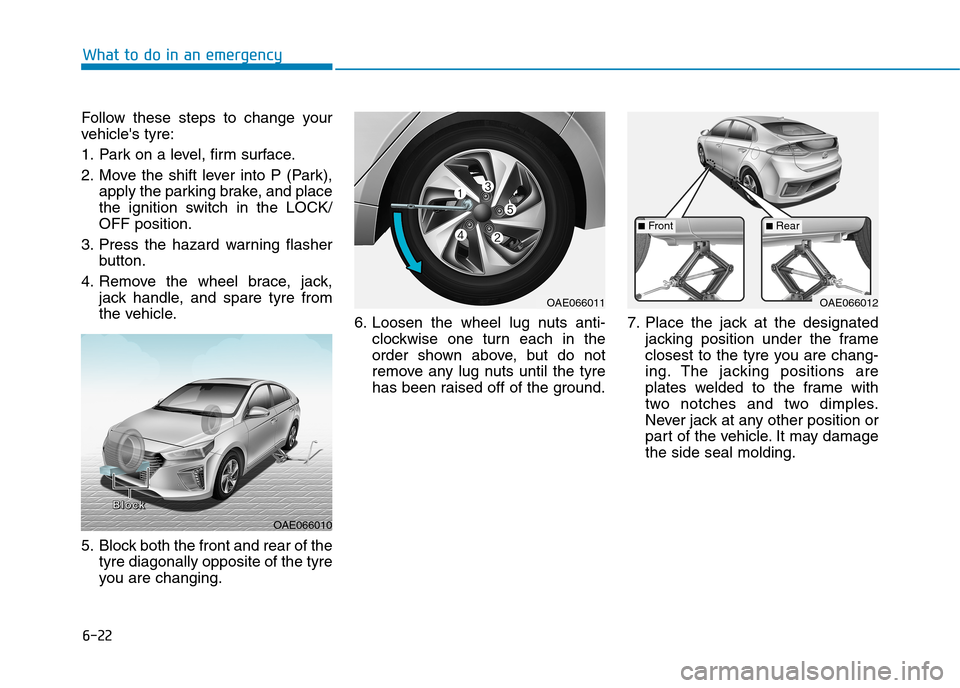
6-22
What to do in an emergency
Follow these steps to change your
vehicle's tyre:
1. Park on a level, firm surface.
2. Move the shift lever into P (Park),
apply the parking brake, and place
the ignition switch in the LOCK/
OFF position.
3. Press the hazard warning flasher
button.
4. Remove the wheel brace, jack,
jack handle, and spare tyre from
the vehicle.
5. Block both the front and rear of the
tyre diagonally opposite of the tyre
you are changing.6. Loosen the wheel lug nuts anti-
clockwise one turn each in the
order shown above, but do not
remove any lug nuts until the tyre
has been raised off of the ground.7. Place the jack at the designated
jacking position under the frame
closest to the tyre you are chang-
ing. The jacking positions are
plates welded to the frame with
two notches and two dimples.
Never jack at any other position or
part of the vehicle. It may damage
the side seal molding.
OAE066010
B B B B
l l l l
o o o o
c c c c
k k k k
OAE066011OAE066012
■Front■Rear