2020 Hyundai Ioniq Electric Connector
[x] Cancel search: ConnectorPage 456 of 561

7-50
Maintenance
Motor compartment fuse panel
Fuse NameFuse RatingProtected Component
B/UP LAMP10AE/R Junction Block (B/UP Lamp Relay), Multipurpose Check Connector
POWER
OUTLET140AE/R Junction Block (Power Outlet Relay)
H/LAMP HI10AE/R Junction Block (Head Lamp (HI) Relay)
AHB130AIBAU, Multipurpose Check Connector
AHB240AIBAU, Multipurpose Check Connector
EPB130AElectric Parking Brake Unit
EPB230AElectric Parking Brake Unit
B+140AIGPM (Fuse - BRAKE SWITCH, MODULE1, DOOR LOCK, PDM1, PDM2,
Fuse Switch, Leak Current Autocut Device)
BATT C/FAN25AE/R Junction Block (Battery C/Fan Relay)
Page 460 of 561

7-54
Maintenance
Headlamp and parking lamp
1. Open the hood.
2. Disconnect the negative battery
cable.
3. Remove the headlamp bulb cover
(1) by turning it counterclockwise.
4. Disconnect the headlamp bulb
socket-connector. (for low beam
and high beam)
5. Remove the bulb from the head-
lamp assembly.
6. Install a new bulb.7. Connect the headlamp bulb sock-
et-connector. (for low beam and
high beam)
8. Install the headlamp bulb cover (1)
by turning it clockwise.
Information
The headlamp aiming should be
adjusted after an accident or after the
headlamp assembly is reinstalled at an
authorized HYUNDAI dealer.
Turn signal
1. Open the hood.
2. Disconnect the negative battery
cable.
3. Remove the socket from the
assembly by turning the socket
counterclockwise until the tabs on
the socket align with the slots on
the assembly.
4. Remove the bulb from the socket
by pressing it in and rotating it
counterclockwise until the tabs on
the bulb align with the slots in the
socket. Pull the bulb out of the
socket.
i
OAE076030
Parking lampLow beam
OAE076031
High beam
Page 466 of 561
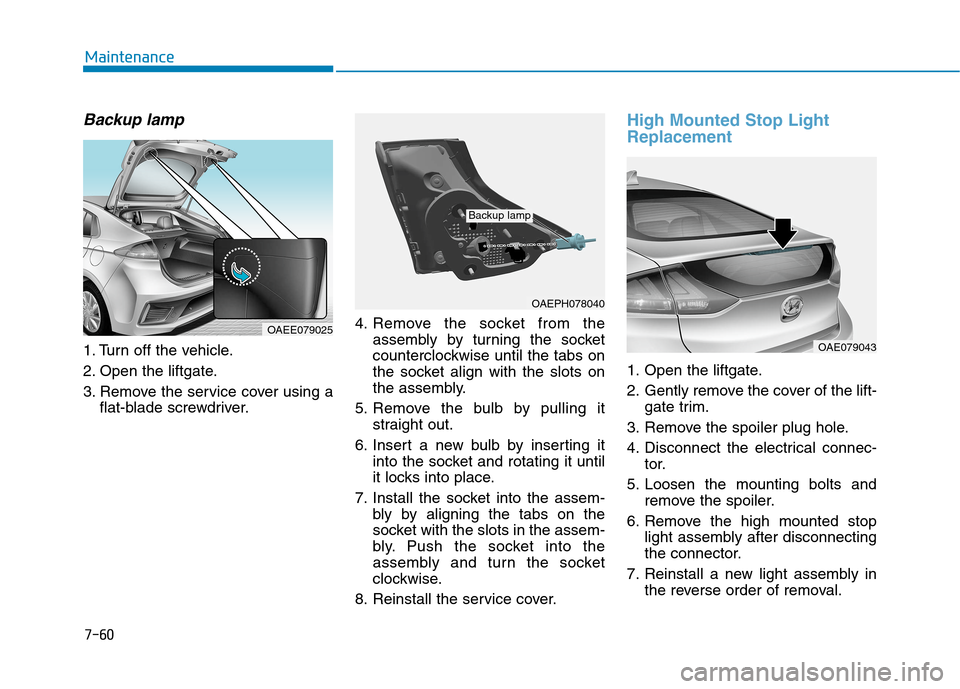
Backup lamp
1. Turn off the vehicle.
2. Open the liftgate.
3. Remove the service cover using a
flat-blade screwdriver.4. Remove the socket from the
assembly by turning the socket
counterclockwise until the tabs on
the socket align with the slots on
the assembly.
5. Remove the bulb by pulling it
straight out.
6. Insert a new bulb by inserting it
into the socket and rotating it until
it locks into place.
7. Install the socket into the assem-
bly by aligning the tabs on the
socket with the slots in the assem-
bly. Push the socket into the
assembly and turn the socket
clockwise.
8. Reinstall the service cover.
High Mounted Stop Light
Replacement
1. Open the liftgate.
2. Gently remove the cover of the lift-
gate trim.
3. Remove the spoiler plug hole.
4. Disconnect the electrical connec-
tor.
5. Loosen the mounting bolts and
remove the spoiler.
6. Remove the high mounted stop
light assembly after disconnecting
the connector.
7. Reinstall a new light assembly in
the reverse order of removal.
7-60
Maintenance
OAEPH078040
Backup lamp
OAE079043
OAEE079025
Page 470 of 561

7-64
Maintenance
Do not use strong soap, chemi-
cal detergents or hot water, and
do not wash the vehicle in direct
sunlight or when the body of the
vehicle is warm.
Be careful when washing the
side windows of your vehicle.
Especially, with high-pressure
water, water may leak through
the windows and wet the interi-
or.
To prevent damage to the plastic
parts, do not clean with chemi-
cal solvents or strong deter-
gents.
To prevent damage to the charg-
ing door, make sure to close and
lock the vehicle doors when
washing (high-pressure wash-
ing, automatic car washing, etc.)
the vehicle.
High-pressure washing
When using high-pressure wash-
ers, make sure to maintain suffi-
cient distance from the vehicle.
Insufficient clearance or excessive
pressure can lead to component
damage or water penetration.
Do not spray the camera, sensors
or its surrounding area directly with
a high pressure washer. Shock
applied from high pressure water
may cause the device to not oper-
ate normally.
Do not bring the nozzle tip close to
boots (rubber or plastic covers) or
connectors as they may be dam-
aged if they come into contact with
high pressure water. Water washing in the motor
compartment including high
pressure water washing may
cause the failure of electrical cir-
cuits located in the motor com-
partment.
Never allow water or other liquids
to come in contact with electri-
cal/electronic components inside
the vehicle as this may damage
them.
NOTICE
NOTICE
OAEE079046L
Page 489 of 561
E El
le
ec
ct
tr
ri
ic
c
V
Ve
eh
hi
ic
cl
le
e
S
Sy
ys
st
te
em
m
O
Ov
ve
er
rv
vi
ie
ew
w
Electric Vehicle ........................................................H3
Characteristics of Electric Vehicles ......................H3
Battery Information ................................................H3
Main Components ....................................................H4
High Voltage Battery (lithium-ion polymer)........H5
High Voltage Battery Warmer System .................H6
Nearby Stations .......................................................H7
Energy Information .................................................H8
Battery information ............................................................H8
Energy consumption .........................................................H8
Charge Management ...............................................H9
Charging and climate..........................................................H9
Charging location ..............................................................H10
Charging limit .....................................................................H11
Charging current ...............................................................H11
ECO Driving ............................................................H11
CO2 reduction ....................................................................H12
Driving history ...................................................................H12
EV Settings .............................................................H12
Winter mode for the EV Battery ..................................H12
Warning ...............................................................................H13
EV route ..............................................................................H13
Charging Information ............................................H14
Charging Time Information ..................................H14
Charging Types ......................................................H15
Charging Status .....................................................H16
Locking Charging Cable ........................................H17
When the Charging Connector is Locked ...................H17
Scheduled Charging...............................................H18
Charging Precautions............................................H19
AC Charge ...............................................................H21
How to Connect AC Charger ..........................................H21
Unlock Charging Door in Emergency ..........................H24
Checking Charging Status ...............................................H25
How to Disconnect AC Charger.....................................H26
Unlock Charging Connector in Emergency ................H27
DC Charge ..............................................................H28
How to Connect DC Charger ..........................................H28
Unlock Charging Door in Emergency ..........................H30
Checking Charging Status ...............................................H31
How to Disconnect DC Charger.....................................H32
Trickle Charge ........................................................H33
How to set the charge level of the portable
charger ................................................................................H33
How to Connect Portable Charger
(ICCB: In-Cable Control Box) ..........................................H34
Page 490 of 561
Unlock Charging Door in Emergency ..........................H38
Checking Charging Status ...............................................H39
Charging Status Indicator Lamp for Portable
Charger ................................................................................H40
How to Disconnect Portable Charger
(ICCB: In-Cable Control Box) ..........................................H43
Unlock Charging Connector in Emergency ................H44
Precautions for Portable Charger
(ICCB: In-Cable Control Box) ..........................................H44
EV Charging Troubleshooting
- Steps to Consider ...............................................H45
How to Start the Vehicle ......................................H46
How to Stop the Vehicle.......................................H46
Virtual Engine Sound System ..............................H47
Distance to Empty .................................................H47
When destination is not set ...........................................H48
When destination is set...................................................H48
Tips for Improving Distance to Empty ...............H49
Power/Charge Gauge............................................H49
State of Charge (SOC) Gauge for High Voltage
Battery ...................................................................H49
Warning and Indicator Lights
(related to electric vehicle) .................................H50
Ready Indicator ................................................................H50
Service Warning Light .....................................................H51
This warning light illuminates : ......................................H51
Power Down Warning Light ...........................................H51
Charging Indicator Light..................................................H52
High Voltage Battery Level Warning Light .................H52
Regenerative Brake Warning Light ..............................H52
LCD Display Messages ..........................................H52
Shift to P to charge .........................................................H52
Remaining Time .................................................................H53
Charging Door Open ........................................................H53
Charging Stopped. Check the AC/DC charger ...........H53
Charging Stopped. Check the cable connection .......H54
Check regenerative brakes/
Stop vehicle and check regenerative brakes ............H55
Low Battery........................................................................H55
Charge immediately. Power limited ..............................H55
Low outside temperature may limit power output.
Charge EV battery/Low EV battery temperature.
Power limited .....................................................................H56
Battery Overheated! Stop safety .................................H56
Power limited .....................................................................H57
Stop vehicle and check power supply .........................H57
Check virtual engine sound System .............................H58
Check electric vehicle system .......................................H58
Energy Flow ..........................................................H58
Vehicle Stop........................................................................H59
EV Propulsion ....................................................................H59
Regeneration ......................................................................H59
Aux. Battery Saver+ .............................................H60
Mode ....................................................................................H60
System Setting...................................................................H61
Utility Mode ............................................................H61
System Setting and Activation ......................................H62
System Deactivation .........................................................H62
If an Accident Occurs ...........................................H63
Other Precautions for Electric Vehicle ..............H65
Service Plug ...........................................................H65
Page 494 of 561

H6
High Voltage Battery Warmer
System
The high voltage battery warmer
system prevents reduction of battery
output when battery temperature is
low. If the charging connector is con-
nected, the warmer system automat-
ically operate according to the bat-
tery temperature.
Charging time may shorten compare
to vehicles without the high voltage
battery warmer system. But, electric-
ity charge may increase because of
high voltage battery warmer system
operation.The high voltage battery warmer
system operates when the charg-
ing connector is connected to
the vehicle.
However, the high voltage
warmer system may not operate
when battery temperature drops
below -31°F (-35°C).
CAUTION
M MA
AI
IN
N
C
CO
OM
MP
PO
ON
NE
EN
NT
TS
S
O
OF
F
E
EL
LE
EC
CT
TR
RI
IC
C
V
VE
EH
HI
IC
CL
LE
E
(
(C
CO
ON
NT
T.
.)
)
Page 503 of 561

H15
Charging Types
CategoryCharging Inlet
(Vehicle)Charging ConnectorCharging OutletHow to ChargeCharging Time
AC Charge
Use AC charger
installed in homes
or public charging
stationApprox. 6 hours 5
minutes (to fully
charge, 100%)
DC Charge
(if equipped)Use the DC
charger at public
charging station50 kw : approx. 57 min.
100 kw : approx. 54
min. (to charge 80%)
Trickle
Charge Use household
current
Approx. 35 hours 30
minutes (120V-12A,
to fully charge,
100%)
Depending on the condition and durability of the high voltage battery, charger specifications, and ambient
temperature, the time required for charging the high voltage battery may vary.
Actual charger image and charging method may vary in accordance with the charger manufacturer.
OLFP0Q5006K OAEEQ016020N
OAEEQ016021N
OAEEQ016020NOAEEQ016079NOAEEQ016023
OAEEQ016024OLFP0Q4057N
OLFP0Q5006K