2020 Hyundai Ioniq Electric turn signal
[x] Cancel search: turn signalPage 14 of 561
I IN
NS
ST
TR
RU
UM
ME
EN
NT
T
P
PA
AN
NE
EL
L
O
OV
VE
ER
RV
VI
IE
EW
W
The actual shape may differ from the illustration.
1-5
Your vehicle at a glance
1
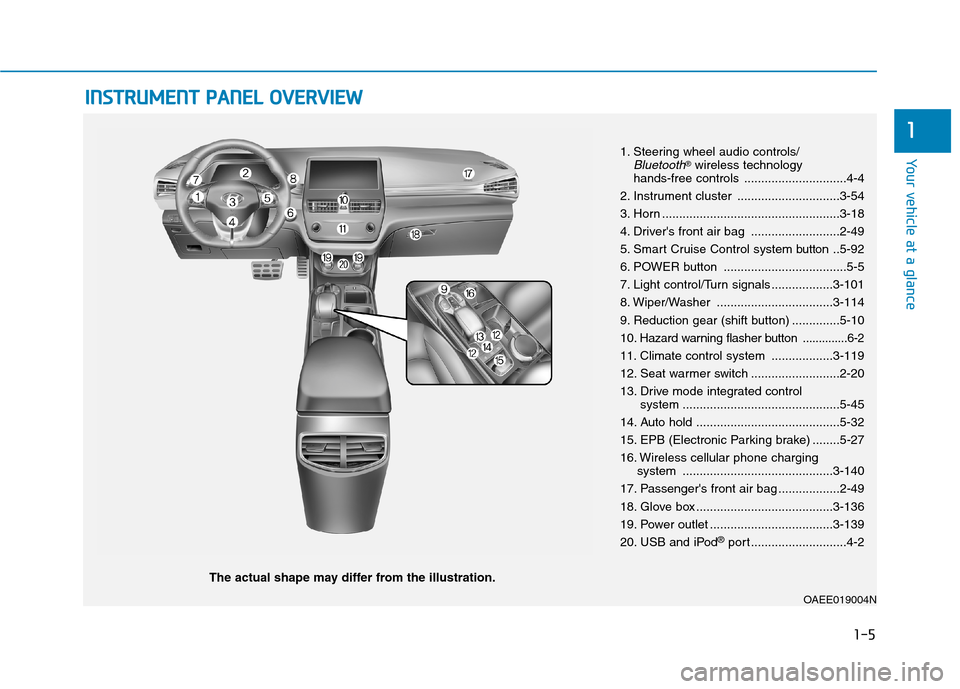
1. Steering wheel audio controls/Bluetooth®wireless technology
hands-free controls ..............................4-4
2. Instrument cluster ..............................3-54
3. Horn ....................................................3-18
4. Driver's front air bag ..........................2-49
5. Smart Cruise Control system
button..5-92
6. POWER button ....................................5-5
7. Light control/Turn signals ..................3-101
8. Wiper/Washer ..................................3-114
9. Reduction gear (shift button) ..............5-10
10
. Hazard warning flasher button ..............6-2
11. Climate control system ..................3-119
12. Seat warmer switch ..........................2-20
13. Drive mode integrated control
system ..............................................5-45
14. Auto hold ..........................................5-32
15. EPB (Electronic Parking brake) ........5-27
16. Wireless cellular phone charging
system ............................................3-140
17. Passenger's front air bag ..................2-49
18. Glove box ........................................3-136
19. Power outlet ....................................3-139
20. USB and iPod
®port ............................4-2
OAEE019004N
Page 69 of 561

2-54
Safety system of your vehicle
During a frontal collision, sensors will
detect the vehicle's deceleration. If
the rate of deceleration is high
enough, the control unit will inflate
the front air bags.
The front air bags help protect the
driver and front passenger by
responding to frontal impacts in
which seat belts alone cannot pro-
vide adequate restraint. When need-
ed, the side air bags help provide
protection in the event of a side
impact or rollover.
Air bags are activated (able to
inflate if necessary) only when the
POWER button is in the ON posi-
tion.
Air bags inflate in the event of cer-
tain frontal or side collisions to help
protect the occupants from serious
physical injury.
Generally, air bags are designed to
inflate based upon the severity of a
collision, its direction, etc. These
two factors determine whether the
sensors produce an electronic
deployment/inflation signal. Air bag deployment depends on a
number of factors including vehicle
speed, angles of impact and the
density and stiffness of the vehicles
or objects which your vehicle
impacts during a collision. The
determining factors are not limited
to those mentioned above.
The front air bags will completely
inflate and deflate in an instant. It is
virtually impossible for you to see
the air bags inflate during an acci-
dent. It is much more likely that you
will simply see the deflated air bags
hanging out of their storage com-
partments after the collision.
In addition to inflating in certain
side collisions, vehicles equipped
with a rollover sensor, side and
curtain air bags will inflate if the
sensing system detects a rollover.
When a rollover is detected, side
and curtain air bags will remain
inflated longer to help provide pro-
tection from ejection, especially
when used in conjunction with the
seat belts. If your SRS malfunctions, the air
bag may not inflate properly dur-
ing an accident increasing the
risk of serious injury or death.
If any of the following condi-
tions occur, your SRS is mal-
functioning:
The light does not turn on for
approximately six seconds
when the POWER button is in
the ON position.
The light stays on after illumi-
nating for approximately six
seconds.
The light comes on while the
vehicle is in motion.
The light blinks when the
vehicle is in the ready ( )
mode.
Have an authorized HYUNDAI
dealer inspect the SRS as soon
as possible if any of these con-
ditions occur.
WARNING
Page 109 of 561
3-24
Convenient features of your vehicle
Programming HomeLink®
Please note the following:
When programming a garage door
opener, it is advised to park the
vehicle outside of the garage.
It is recommended that a new bat-
tery be placed in the hand-held
transmitter of the device being pro-
grammed to HomeLink
®for quicker
training and accurate transmission
of the radio-frequency signal.
Some vehicles may require the
ignition switch to be placed in the
ACC (or "Accessories") position for
programming and/or operation of
HomeLink
®.
In the event that there are still pro-
gramming difficulties or questions
after following the programming
steps listed below, contact
HomeLink
®at: www.homelink.com,
www.youtube.com/HomeLinkGentex
or by calling 1-800-355-3515.
Programming
To program most devices, follow
these instructions:
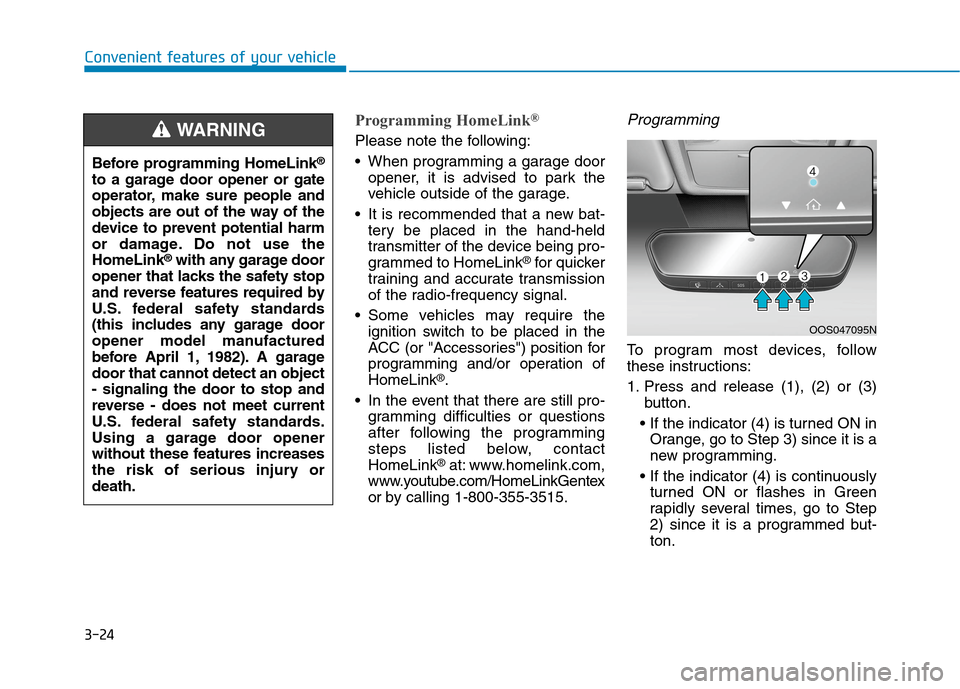
1. Press and release (1), (2) or (3)
button.
Orange, go to Step 3) since it is a
new programming.
turned ON or flashes in Green
rapidly several times, go to Step
2) since it is a programmed but-
ton.
OOS047095N
Before programming HomeLink®
to a garage door opener or gate
operator, make sure people and
objects are out of the way of the
device to prevent potential harm
or damage. Do not use the
HomeLink
®with any garage door
opener that lacks the safety stop
and reverse features required by
U.S. federal safety standards
(this includes any garage door
opener model manufactured
before April 1, 1982). A garage
door that cannot detect an object
- signaling the door to stop and
reverse - does not meet current
U.S. federal safety standards.
Using a garage door opener
without these features increases
the risk of serious injury or
death.
WARNING
Page 111 of 561
3-26
Convenient features of your vehicle
7. Return to the vehicle and firmly
press, hold for two seconds and
release the HomeLink button up to
three times. Do not press the
HomeLink button rapidly. At this
point programming is complete
and your device should operate
when the HomeLink button is
pressed and released.
Information
• Some garage door openers require
to press the programmed button on
the mirror up to three times right
after the programming is just com-
pleted to operate the garage door.
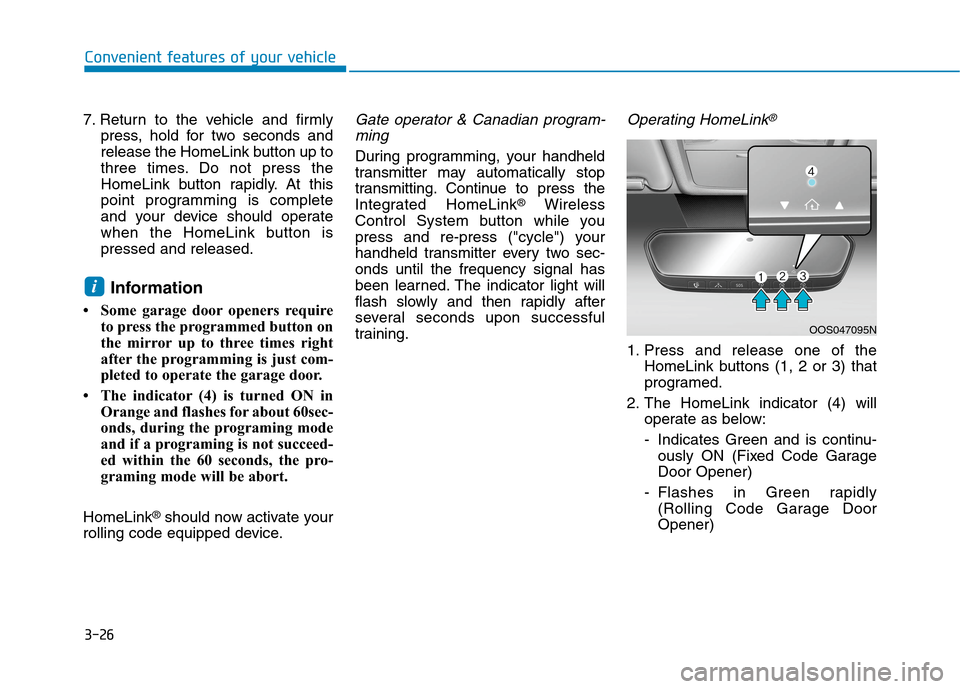
• The indicator (4) is turned ON in
Orange and flashes for about 60sec-
onds, during the programing mode
and if a programing is not succeed-
ed within the 60 seconds, the pro-
graming mode will be abort.
HomeLink
®should now activate your
rolling code equipped device.
Gate operator & Canadian program-
ming
During programming, your handheld
transmitter may automatically stop
transmitting. Continue to press the
Integrated HomeLink
®Wireless
Control System button while you
press and re-press ("cycle") your
handheld transmitter every two sec-
onds until the frequency signal has
been learned. The indicator light will
flash slowly and then rapidly after
several seconds upon successful
training.
Operating HomeLink®
1. Press and release one of the
HomeLink buttons (1, 2 or 3) that
programed.
2. The HomeLink indicator (4) will
operate as below:
- Indicates Green and is continu-
ously ON (Fixed Code Garage
Door Opener)
- Flashes in Green rapidly
(Rolling Code Garage Door
Opener)
i
OOS047095N
Page 119 of 561
3-34
Convenient features of your vehicle
Programming HomeLink®
Please note the following:
When programming a garage door
opener, it is advised to park the
vehicle outside of the garage.
It is recommended that a new bat-
tery be placed in the hand-held
transmitter of the device being pro-
grammed to HomeLink
®for quicker
training and accurate transmission
of the radio-frequency signal.
Some vehicles may require the
POWER button to be placed in the
ACC (or "Accessories") position for
programming and/or operation of
HomeLink
®.
In the event that there are still pro-
gramming difficulties or questions
after following the programming
steps listed below, contact
HomeLink
®at: www.homelink.com
or by calling 1-800-355-3515.
Rolling code programming
Rolling code devices which are
"code-protected" and manufactured
after 1996 may be determined by the
following:
Reference the device owner's
manual for verification.
The handheld transmitter appears to
program the HomeLink
®Universal
Transceiver but does not activate the
device.
Press and hold the trained
HomeLink button. The device has
the rolling code feature if the indi-
cator light flashes rapidly and then
turns solid after 2 seconds.To train rolling code devices, follow
these instructions:
1. At the garage door opener receiv-
er (motor-head unit) in the garage,
locate the "learn" or "smart" but-
ton. This can usually be found
where the hanging antenna wire is
attached to the motor-head unit.
Exact location and color of the but-
ton may vary by garage door
opener brand. If there is difficulty
locating the training button, refer-
ence the device owner’s manual or
please visit our Web site at
www.homelink.com.
2. Firmly press and release the
"learn" or "smart" button (which
activates the "training light"). You
will have 30 seconds to initiate
step 3.
3. Return to the vehicle and firmly
press, hold for two seconds and
then release the desired
HomeLink
®button. Repeat the
"press/hold/release" sequence a
second time to complete the pro-
gramming. (Some devices may
require you to repeat this
sequence a third time to complete
the programming.)
Page 155 of 561
3-70
Convenient features of your vehicle
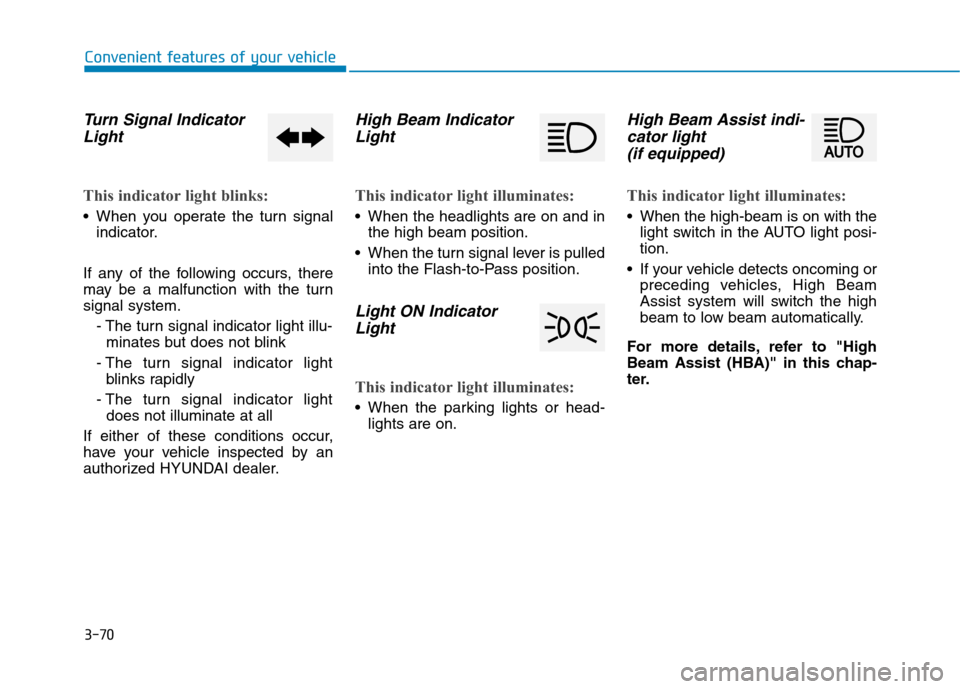
Turn Signal Indicator
Light
This indicator light blinks:
When you operate the turn signal
indicator.
If any of the following occurs, there
may be a malfunction with the turn
signal system.
- The turn signal indicator light illu-
minates but does not blink
- The turn signal indicator light
blinks rapidly
- The turn signal indicator light
does not illuminate at all
If either of these conditions occur,
have your vehicle inspected by an
authorized HYUNDAI dealer.
High Beam Indicator
Light
This indicator light illuminates:
When the headlights are on and in
the high beam position.
When the turn signal lever is pulled
into the Flash-to-Pass position.
Light ON Indicator
Light
This indicator light illuminates:
When the parking lights or head-
lights are on.
High Beam Assist indi-
cator light
(if equipped)
This indicator light illuminates:
When the high-beam is on with the
light switch in the AUTO light posi-
tion.
If your vehicle detects oncoming or
preceding vehicles, High Beam
Assist system will switch the high
beam to low beam automatically.
For more details, refer to "High
Beam Assist (HBA)" in this chap-
ter.
Page 161 of 561
3-76
Convenient features of your vehicle
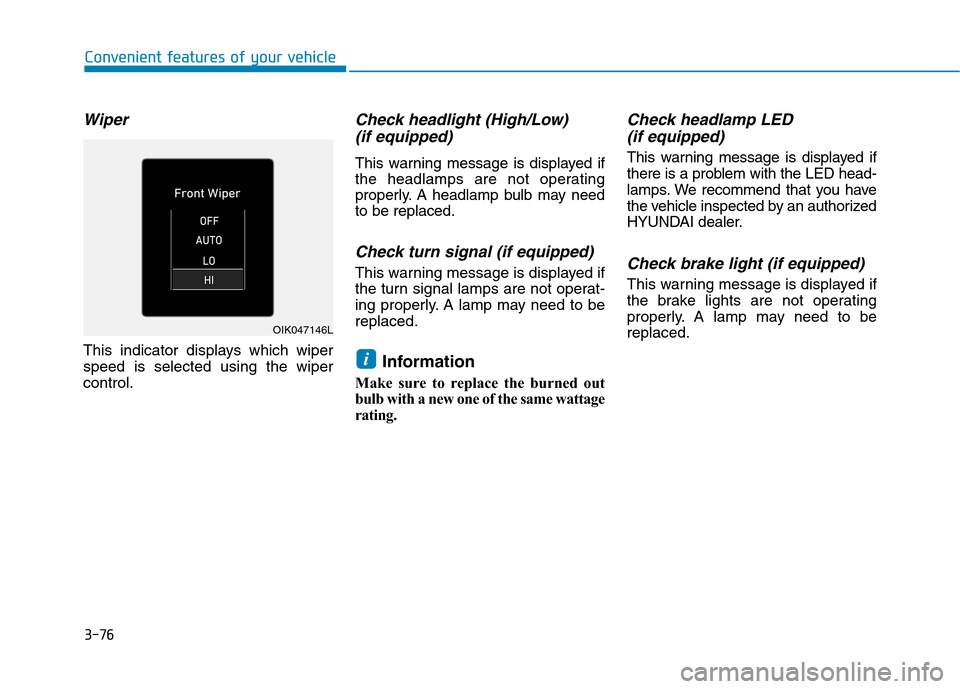
Wiper
This indicator displays which wiper
speed is selected using the wiper
control.
Check headlight (High/Low)
(if equipped)
This warning message is displayed if
the headlamps are not operating
properly. A headlamp bulb may need
to be replaced.
Check turn signal (if equipped)
This warning message is displayed if
the turn signal lamps are not operat-
ing properly. A lamp may need to be
replaced.
Information
Make sure to replace the burned out
bulb with a new one of the same wattage
rating.
Check headlamp LED
(if equipped)
This warning message is displayed if
there is a problem with the LED head-
lamps. We recommend that you have
the vehicle inspected by an authorized
HYUNDAI dealer.
Check brake light (if equipped)
This warning message is displayed if
the brake lights are not operating
properly. A lamp may need to be
replaced.
i
OIK047146L
Page 176 of 561
3-91
Convenient features of your vehicle
3
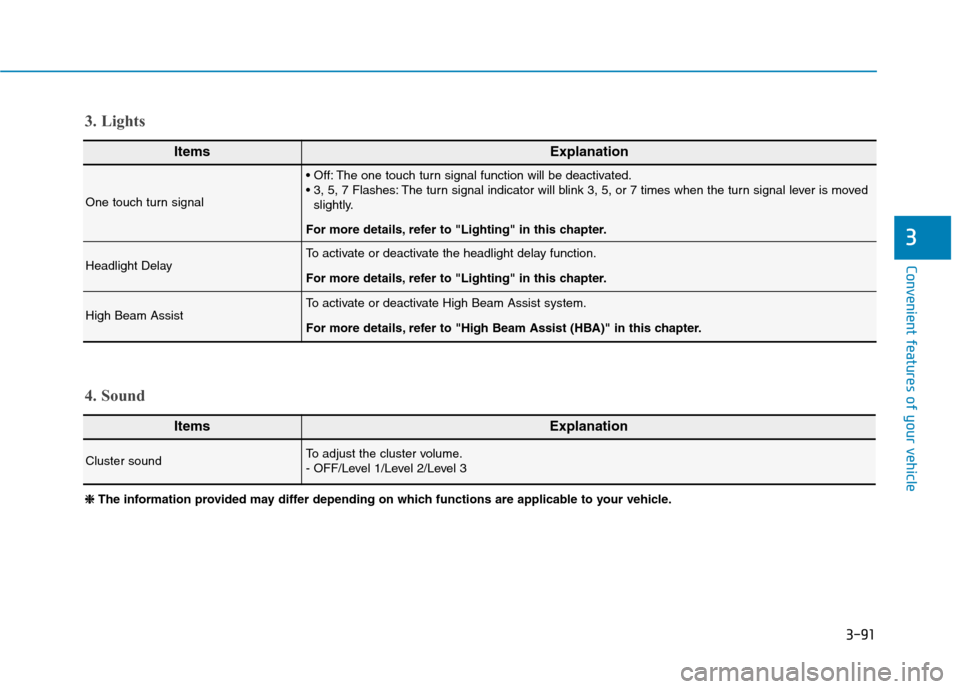
ItemsExplanation
One touch turn signal
The one touch turn signal function will be deactivated.
The turn signal indicator will blink 3, 5, or 7 times when the turn signal lever is moved
slightly.
For more details, refer to "Lighting" in this chapter.
Headlight DelayTo activate or deactivate the headlight delay function.
For more details, refer to "Lighting" in this chapter.
High Beam Assist To activate or deactivate High Beam Assist system.
For more details, refer to "High Beam Assist (HBA)" in this chapter.
ItemsExplanation
Cluster soundTo adjust the cluster volume.
- OFF/Level 1/Level 2/Level 3
4. Sound 3. Lights
❈ ❈
The information provided may differ depending on which functions are applicable to your vehicle.