Page 41 of 116
 (GMNA-Localizing-U.S./Canada-
13583174) - 2020 - CRC - 4/15/19
40 Rear Seat Infotainment
Headphones
1. Power Button
2. Volume Control
3. Channel 1 or 2 Switch")
GMC Infotainment System (U.S./Canada 2.6) (GMNA-Localizing-U.S./Canada-
13583174) - 2020 - CRC - 4/15/19
40 Rear Seat Infotainment
Headphones
1. Power Button
2. Volume Control
3. Channel 1 or 2 Switch
RSI includes two or four 2-channel
new digital wireless headphones
depending on the vehicle model.
The headphones are used to listen
to various multimedia. The wireless
headphones have a power icon,
Channel 1 or 2 switch, and a volume
control. The digital headphones
cannot be interchanged with
previous models of GM
headphones.
Press the power button to turn on
the headphones. A light on the
headphones comes on. A flashinglight indicates the headphones are
not in range. Move them closer to
the forward overhead screen until
the light stops flashing. If the light
does not come on, check the
batteries. Intermittent sound or static
can also indicate weak batteries.
See
“Battery Replacement” later in
this section.
Turn the headphones off when not
in use.
Move the channel switch to
channel 1 or channel 2. Channel 1
will play audio from screen 1 and
channel 2 will play audio from
screen 2. When a third row screen is
available, the screen will display the
selection related to 1 on the remote
control. If 1 is not available, press 2
on the remote control. Channel 2 will
provide audio based on its setting.
. Screen 1 is overhead in the
second row.
. Screen 2 is overhead in the
third row.
Infrared transmitters are on the top
of the second row video screen. The
headphones shut off automatically if the RSI system is off or if the
headphones are out of range of the
transmitters for more than
three minutes. Moving too far
forward or stepping out of the
vehicle can cause the headphones
to lose the signal or have static.
Use the volume control on the
headphones to adjust the volume.
For best audio performance, wear
the headphones as indicated with
L (Left) and R (Right) on the ear
pads. Do not let anything cover the
ear pads.
Caution
Do not store the headphones in
heat or direct sunlight. This could
damage the headphones and
repairs will not be covered by the
warranty. Storage in extreme cold
can weaken the batteries. Keep
the headphones stored in a cool,
dry place.
Page 42 of 116
 (GMNA-Localizing-U.S./Canada-
13583174) - 2020 - CRC - 4/15/19
Rear Seat Infotainment 41
If the foam ear pads become worn
or damaged, the pads can be
replaced")
GMC Infotainment System (U.S./Canada 2.6) (GMNA-Localizing-U.S./Canada-
13583174) - 2020 - CRC - 4/15/19
Rear Seat Infotainment 41
If the foam ear pads become worn
or damaged, the pads can be
replaced separately. To purchase
replacement ear pads, contact your
dealer.
Battery Replacement
To change the batteries:1. Loosen the screw to the battery door on the left side of the
headphones.
2. Slide the battery door open.
3. Replace the two AAA batteries.
4. Replace the battery door and tighten the screw.
Remove the batteries if the
headphones will not be used for a
long time.
Rear Seat Infotainment (RSI)
Wi-Fi (If Equipped)
The RSI Wi-Fi allows the user to
access music, videos and pictures
that are saved or taken with a smart
device to the RSI system through
Digital Living Network Alliance (DLNA) applications. Only one
smart device can be connected to
the RSI at one time.
Placement for Optimal
Performance
The RSI Wi-Fi antenna is near the
RSI disc player. The smart device
connection is stronger when it is
near the Wi-Fi antenna.
If the network is not operating at its
maximum effectiveness, try the
following:
.
Disconnect the smart device
from any other connected
network to improve the audio/
video performance.
. Switch the band. While in any
Wi-Fi screen, select Menu, then
select Switch Band to access a
band that is available. Some
marketing regions will only
support 2.4 GHz.
Digital Living Network Alliance
(DLNA) (If Equipped)
To establish an initial connection:
1. From the RSI Wireless Display menu, select DLNA. The RSI
screen will display a Wi-Fi
network name, such as
“DIRECT-xx-Rear Seat”, as
well as the required password
necessary to complete the
connection.
2. Make sure the smart device’s Wi-Fi is enabled, and open the
device’s Wi-Fi menu.
3. From the smart device’s Wi-Fi menu, select the network.
If this network is not shown at
the smart device, it will be
necessary to re-scan for
available networks.
4. Enter the RSI Password at the smart device to complete the
connection. Once entered, the
selected network will display as
connected.
Page 43 of 116
 (GMNA-Localizing-U.S./Canada-
13583174) - 2020 - CRC - 4/15/19
42 Rear Seat Infotainment
5. From the smart device’s DLNAapplication, select Rear Seat 1
or 2")
GMC Infotainment System (U.S./Canada 2.6) (GMNA-Localizing-U.S./Canada-
13583174) - 2020 - CRC - 4/15/19
42 Rear Seat Infotainment
5. From the smart device’s DLNAapplication, select Rear Seat 1
or 2 as the screen to display
the desired video, audio,
or picture files on the RSI.
Once the connection process is
done for the first time, the Wi-Fi
connection will be made whenever
the device is within Wi-Fi range or
the smart device Wi-Fi is turned on.
Select Menu from the remote control
to access the options to switch
Wi-Fi band, disconnect the smart
device from the RSI Wi-Fi, or to
remove all DLNA passwords that
have been saved.
Supported DLNA media types are:
. Video: .mp4 and .mpg
. Audio: .mp3 and .aac
. Picture: .jpeg and .jpg
Viewing the Other Display
While the left or right screen is
connected by DLNA, the other
screen can access the same source by selecting View Screen 1 or View
Screen 2 in the Wireless
Display menu.
Connecting Wireless Android
Devices
Many Android devices come with
pre-installed audio and video
players that support WiFi streaming;
consult your smart device manual
for more information. Android
devices will also support various
DLNA applications to allow the
device to connect to the RSI
wirelessly. Search the Google Play
store for DLNA applications to install
on the Android device.
Connecting Wireless Apple
Devices
Apple will support various DLNA
apps to allow the device to connect
to the RSI wirelessly. Search the
App Store for DLNA applications to
install on the Apple device.Auxiliary Inputs
Rear Media Connections
1. Volume Control for Wired
Headphones
2. Wired Headphone Jack
3. USB Ports
4. HDMI Input
If equipped with RSI, the features
above will be in the rear of the
center console. These ports are for
the primary use of the rear
passengers and not all media is
available to the front passengers.
Page 44 of 116
 (GMNA-Localizing-U.S./Canada-
13583174) - 2020 - CRC - 4/15/19
Rear Seat Infotainment 43
HDMI Input
An HDMI cable is required to
connect an HDMI device to the")
GMC Infotainment System (U.S./Canada 2.6) (GMNA-Localizing-U.S./Canada-
13583174) - 2020 - CRC - 4/15/19
Rear Seat Infotainment 43
HDMI Input
An HDMI cable is required to
connect an HDMI device to the RSI
hub. The RSI HDMI input allows
connection to:
.Video games, disc players,
cameras, smartphones, tablets,
and A/V dongles that have HDMI
(version 1.4a) outputs.
. Smart devices that support
Mobile High-Definition Link
(MHL) version 2.0.
. Apple devices. A supporting
HDMI cable from Apple is
required.
For certain HDMI devices that
support USB charging, the USB
ports can be used as a power
source.
To use the HDMI input of the RSI
system: 1. Connect the auxiliary device with an HDMI cable.
2. Power on both the auxiliary device and the RSI video
screen. 3. Press MEDIA on the remote
control and use the arrows to
change the source to HDMI.
USB
There are two USB ports to provide
the RSI system audio/video from
supported devices, as well as to
provide device charging.
Audio from these ports can only be
heard and controlled by the rear
seat passengers. Video can be
heard, shown, and controlled by the
rear and front passengers.
To use the USB: 1. Insert the device into one of the two ports.
2. Select the source (USB 1 or USB 2) through the rear screen
menu using MEDIA on the
remote control.
3. Select the source via the front by touching the Video icon on
the Home Page.Audio Output
Audio from a Blu-ray/DVD/CD
player or HDMI inputs can be heard
through:
.Wireless headphones: Available
for any source depending on the
selected channel.
. Vehicle speakers: Touch the
Video icon on the Home Page.
Select any other source to stop
the speaker audio; rear audio
will continue to play.
. Vehicle wired headphone jack:
See “Wired Headphone Jack”
following.
The RSI system transmits the audio
signal to the wireless headphones if
an audio signal is available. See
“Headphones” earlier in this section.
Front seat passengers can listen to
playback from the attached rear
device through the vehicle speakers
by selecting that source from the
Video Application on the front
display Home Page.
Page 45 of 116
 (GMNA-Localizing-U.S./Canada-
13583174) - 2020 - CRC - 4/15/19
44 Rear Seat Infotainment
Wired Headphone Jack
Select MENU on the remote control,
then select S")
GMC Infotainment System (U.S./Canada 2.6) (GMNA-Localizing-U.S./Canada-
13583174) - 2020 - CRC - 4/15/19
44 Rear Seat Infotainment
Wired Headphone Jack
Select MENU on the remote control,
then select Settings and then Wired
Headphones to listen to audio on
the wired headphones. The
headphone audio plays depending
on which screen is selected. The
default is screen 1 audio.
Remote Control
Remote Control Buttons1.
7(Previous/Reverse)
. Radio: Press to seek the
previous radio station.
. CD: Press to seek the
previous track. .
Blu-ray/DVD: Press to seek
the previous chapter.
. Press and hold for fast
reverse.
2. MEDIA .Press to scroll through the
menus including: BD/DVD/
CD, USB 1, USB 2, HDMI.
3.
J(Play/Pause)
. Press to start playing.
Press to pause. Press
again to continue playing.
4.
6(Next/Fast Forward)
. Radio: Press to seek the
next radio station.
. CD: Press to seek the next
track.
. Blu-ray/DVD: Press to seek
the next chapter.
. Press and hold to fast
forward. 5. SCREEN 1
.For single overhead
screens:
Press to change the source
displayed on the overhead
screen to SCREEN 1
selected source. Select
audio sources. Only one
video can be played on the
screen at a time. Audio for
both sources will continue
on the headphones. Once
pressed, all remote control
commands will correspond
to SCREEN 1.
. For dual overhead screens:
Press to select the second
row overhead screen. Once
pressed, all remote control
commands will correspond
to SCREEN 1.
6.
O(Power)
. Press to turn the video
screens on and off.
Page 46 of 116
 (GMNA-Localizing-U.S./Canada-
13583174) - 2020 - CRC - 4/15/19
Rear Seat Infotainment 45
7. SCREEN 2.For single overhead
screens:
Press to change the source
d")
GMC Infotainment System (U.S./Canada 2.6) (GMNA-Localizing-U.S./Canada-
13583174) - 2020 - CRC - 4/15/19
Rear Seat Infotainment 45
7. SCREEN 2.For single overhead
screens:
Press to change the source
displayed on the overhead
screen to SCREEN 2
selected source. Only one
video can be played on the
screen at a time. Audio for
both sources will continue
on the headphones. Once
pressed, all remote control
commands will correspond
to SCREEN 2.
. For dual overhead screens:
Press to select the optional
third row overhead screen.
Once pressed, all remote
control commands will
correspond to SCREEN 2.
8.
o(Previous/Reverse/
Decrease)
. Radio and CD: Press to go
to the previous station or
track.
. Press to go to the
previous menu. .
Press to decrease the
brightness of the RSI
screen.
9.
w(Up Arrow)
. Press to scroll up a list.
10.
r/ENTER
. Press to select the
highlighted choice in
any menu.
. Press and hold for
quick play.
11.
p(Next/Forward/Increase)
. Radio and CD: Press to go
to the next station or track.
. Press to go to the
next menu.
. Press to increase the
brightness of the RSI
screen.
12.
x(Down Arrow)
. Press to go down a list. 13.
0(Back)
. Press to go back to the
previous menu.
. Press and hold to go back
to the now playing screen.
14. MENU .Press to go to the menu of
the now playing screen.
15. RADIO .Press to scroll through the
radio sources including AM,
FM, and SXM (if equipped).
To use the remote control, aim it at
the receiver window at the forward
overhead screen and press firmly.
Direct sunlight or very bright light
could affect the ability of the RSI
receiver to receive signals from the
remote control. Check the batteries
if the remote control does not seem
to be working. See “Battery
Replacement” following. Objects
blocking the line of sight could also
affect the function of the remote
control.
Page 47 of 116
 (GMNA-Localizing-U.S./Canada-
13583174) - 2020 - CRC - 4/15/19
46 Rear Seat Infotainment
If a CD, Blu-ray/DVD, or MP3 disc is
in the CD slot, the remote contr")
GMC Infotainment System (U.S./Canada 2.6) (GMNA-Localizing-U.S./Canada-
13583174) - 2020 - CRC - 4/15/19
46 Rear Seat Infotainment
If a CD, Blu-ray/DVD, or MP3 disc is
in the CD slot, the remote control
O
power button can be used to turn on
the video screen display and start
the disc. The infotainment system
can also turn on the video screen
display.
Caution
Storing the remote controls in a
hot area or in direct sunlight can
damage them, and the repairs
would not be covered by the
vehicle warranty. Storage in
extreme cold can weaken the
batteries. Keep the remote
controls stored in a cool, dry
place.
Battery Replacement
To change the remote control
batteries: 1. Insert a coin or key to pull up the rear cover on the remote
control. 2. Replace the two AAA batteries
in the compartment.
3. Replace the battery cover.
Remove the batteries from the
remote control if it will not be used
for an extended period of time.
Video Voice Over
If equipped, the RSI system has a
Video Voice Over feature to benefit
the visually and hearing impaired.
When activated, the RSI will read
aloud menu titles, menu listings,
pop-ups, alerts, and file titles from
audio and video media. Titles with
gibberish, special characters,
or foreign text may not be read
aloud.
Use one of the following to turn
Video Voice Over on or off:
. Select Video Voice Over from
the Front Display menu.
. Select Video Voice Over from
the RSI menu.
. Press and hold the remote
control MENU and Play/Pause
for five seconds. Video Voice Over will remain active
over ignition cycles until it is
turned off.
RSI Troubleshooting
No power :
The ignition might not
be in ON/RUN or ACC/
ACCESSORY.
The picture does not fill the
screen. There are black borders
on the top and bottom or on both
sides, or it looks stretched out :
Press MENU on the remote control
to change the display mode setting.
The remote control does not
work : Check to make sure the
remote control is programmed to the
correct screen. Make sure there is
no obstruction between the remote
control and the transmitter window
and check the batteries to make
sure they are not dead or installed
incorrectly.
There is no sound from the
headphones with the indicator
light on : If the batteries are good,
make sure the headphones are
Page 48 of 116
 (GMNA-Localizing-U.S./Canada-
13583174) - 2020 - CRC - 4/15/19
Rear Seat Infotainment 47
programmed to the correct screen
and on the correct channel for the
s")
GMC Infotainment System (U.S./Canada 2.6) (GMNA-Localizing-U.S./Canada-
13583174) - 2020 - CRC - 4/15/19
Rear Seat Infotainment 47
programmed to the correct screen
and on the correct channel for the
screen being viewed.
The HDMI source is running but
there is no picture or sound :
Check that the RSI video screen is
in the HDMI mode by pressing
MEDIA on the remote control.
Check the HDMI connections at
both devices.
Sometimes the wireless
headphone audio cuts out or
buzzes :Check for obstructions,
low batteries, reception range, and
interference from cell phone towers
or from cellular telephone use in the
vehicle. Check that the headphones
are on correctly using the L (Left)
and R (Right) on the headphones.
Check that the headphones are
positioned properly with the
headband across the top of
the head.
I lost the remote and/or the
headphones : See your dealer for
assistance. The Blu-ray/DVD is playing, but
there is no picture or sound :
Check that the RSI video screen is
sourced to the Blu-ray/DVD player
by pressing MEDIA on the remote
control.
Videos from my phone are played
back sideways or upside-down
when the phone is connected via
DLNA :
This cannot be corrected by
the RSI system. While playing
through DLNA, the RSI will only play
back videos in the orientation in
which they were recorded.
Video Display Error Messages
The video screen may display one
of the following:
Disc Error : There are disc load or
eject problems, the disc is inserted
with the disc label wrong side up,
the disc is damaged, or the disc is
not from the correct region. No Disc Inserted :
No disc is
present.
Disc Player Error : The
temperature is outside the operating
range of the RSI system. If the
temperature is within range, see
your dealer.
Video Distortion
Video distortion can occur when
operating cellular phones, scanners,
CB radios, Global Positioning
Systems (GPSs), two-way radios,
mobile faxes, or walkie talkies.
It might be necessary to turn off the
video player when operating one of
these devices in or near the vehicle.
 1
1 2
2 3
3 4
4 5
5 6
6 7
7 8
8 9
9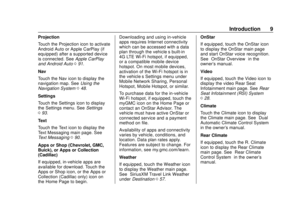 10
10 11
11 12
12 13
13 14
14 15
15 16
16 17
17 18
18 19
19 20
20 21
21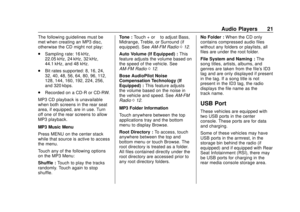 22
22 23
23 24
24 25
25 26
26 27
27 28
28 29
29 30
30 31
31 32
32 33
33 34
34 35
35 36
36 37
37 38
38 39
39 40
40 41
41 42
42 43
43 44
44 45
45 46
46 47
47 48
48 49
49 50
50 51
51 52
52 53
53 54
54 55
55 56
56 57
57 58
58 59
59 60
60 61
61 62
62 63
63 64
64 65
65 66
66 67
67 68
68 69
69 70
70 71
71 72
72 73
73 74
74 75
75 76
76 77
77 78
78 79
79 80
80 81
81 82
82 83
83 84
84 85
85 86
86 87
87 88
88 89
89 90
90 91
91 92
92 93
93 94
94 95
95 96
96 97
97 98
98 99
99 100
100 101
101 102
102 103
103 104
104 105
105 106
106 107
107 108
108 109
109 110
110 111
111 112
112 113
113 114
114 115
115