Page 45 of 116

GMC Infotainment System (U.S./Canada 2.6) (GMNA-Localizing-U.S./Canada-
13583174) - 2020 - CRC - 4/15/19
44 Rear Seat Infotainment
Wired Headphone Jack
Select MENU on the remote control,
then select Settings and then Wired
Headphones to listen to audio on
the wired headphones. The
headphone audio plays depending
on which screen is selected. The
default is screen 1 audio.
Remote Control
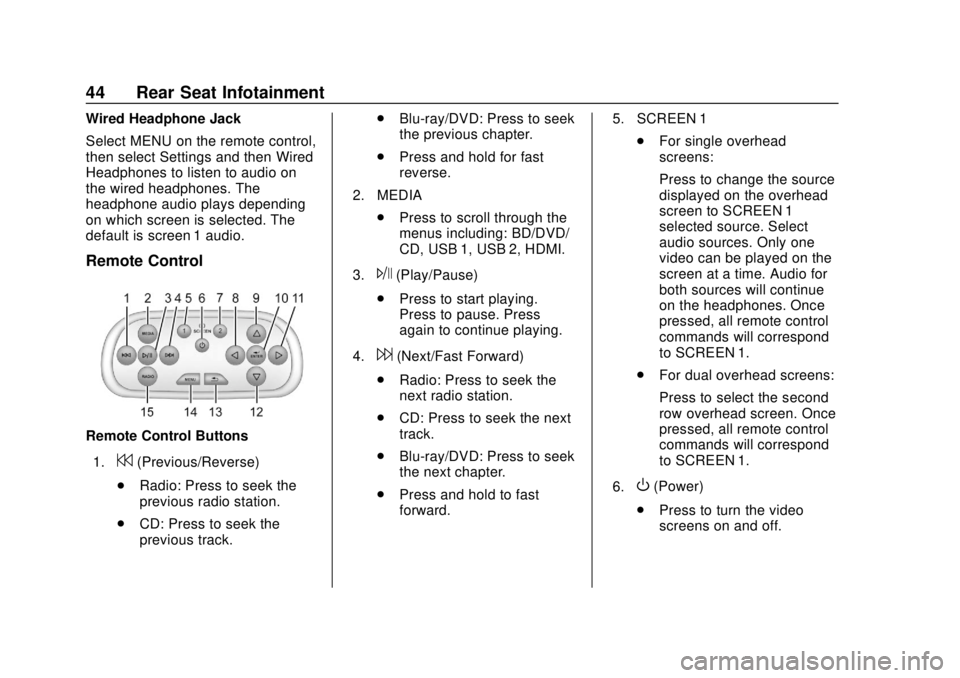
Remote Control Buttons1.
7(Previous/Reverse)
. Radio: Press to seek the
previous radio station.
. CD: Press to seek the
previous track. .
Blu-ray/DVD: Press to seek
the previous chapter.
. Press and hold for fast
reverse.
2. MEDIA .Press to scroll through the
menus including: BD/DVD/
CD, USB 1, USB 2, HDMI.
3.
J(Play/Pause)
. Press to start playing.
Press to pause. Press
again to continue playing.
4.
6(Next/Fast Forward)
. Radio: Press to seek the
next radio station.
. CD: Press to seek the next
track.
. Blu-ray/DVD: Press to seek
the next chapter.
. Press and hold to fast
forward. 5. SCREEN 1
.For single overhead
screens:
Press to change the source
displayed on the overhead
screen to SCREEN 1
selected source. Select
audio sources. Only one
video can be played on the
screen at a time. Audio for
both sources will continue
on the headphones. Once
pressed, all remote control
commands will correspond
to SCREEN 1.
. For dual overhead screens:
Press to select the second
row overhead screen. Once
pressed, all remote control
commands will correspond
to SCREEN 1.
6.
O(Power)
. Press to turn the video
screens on and off.
Page 47 of 116

GMC Infotainment System (U.S./Canada 2.6) (GMNA-Localizing-U.S./Canada-
13583174) - 2020 - CRC - 4/15/19
46 Rear Seat Infotainment
If a CD, Blu-ray/DVD, or MP3 disc is
in the CD slot, the remote control
O
power button can be used to turn on
the video screen display and start
the disc. The infotainment system
can also turn on the video screen
display.
Caution
Storing the remote controls in a
hot area or in direct sunlight can
damage them, and the repairs
would not be covered by the
vehicle warranty. Storage in
extreme cold can weaken the
batteries. Keep the remote
controls stored in a cool, dry
place.
Battery Replacement
To change the remote control
batteries: 1. Insert a coin or key to pull up the rear cover on the remote
control. 2. Replace the two AAA batteries
in the compartment.
3. Replace the battery cover.
Remove the batteries from the
remote control if it will not be used
for an extended period of time.
Video Voice Over
If equipped, the RSI system has a
Video Voice Over feature to benefit
the visually and hearing impaired.
When activated, the RSI will read
aloud menu titles, menu listings,
pop-ups, alerts, and file titles from
audio and video media. Titles with
gibberish, special characters,
or foreign text may not be read
aloud.
Use one of the following to turn
Video Voice Over on or off:
. Select Video Voice Over from
the Front Display menu.
. Select Video Voice Over from
the RSI menu.
. Press and hold the remote
control MENU and Play/Pause
for five seconds. Video Voice Over will remain active
over ignition cycles until it is
turned off.
RSI Troubleshooting
No power :
The ignition might not
be in ON/RUN or ACC/
ACCESSORY.
The picture does not fill the
screen. There are black borders
on the top and bottom or on both
sides, or it looks stretched out :
Press MENU on the remote control
to change the display mode setting.
The remote control does not
work : Check to make sure the
remote control is programmed to the
correct screen. Make sure there is
no obstruction between the remote
control and the transmitter window
and check the batteries to make
sure they are not dead or installed
incorrectly.
There is no sound from the
headphones with the indicator
light on : If the batteries are good,
make sure the headphones are
Page 97 of 116

GMC Infotainment System (U.S./Canada 2.6) (GMNA-Localizing-U.S./Canada-
13583174) - 2020 - CRC - 4/15/19
96 Settings
To connect the infotainment system
to a secured mobile device hotspot,
home hotspot, or a public hotspot,
touch SETTINGS on the Home
Page, followed by Wi-Fi, and then
Manage Wi-Fi Networks. Select the
appropriate Wi-Fi network, and
follow the on-screen prompts.
Download speeds may vary.
On most compatible mobile devices,
activation of the Wi-Fi hotspot is in
the Settings menu under Mobile
Network Sharing, Personal Hotspot,
Mobile Hotspot or similar.
Availability of Over-the-Air software
updates varies by vehicle and
country. Features are subject to
change. For more information on
this feature, see my.gmc.com/learn.
English and Metric Unit
Conversion
To change the display units between
English and metric units, see
“Instrument Cluster”in the owner's
manual.
Teen Driver
If equipped, this allows multiple
keys to be registered for beginner
drivers to encourage safe driving
habits. When the vehicle is started
with a Teen Driver key, it will
automatically activate certain safety
systems, allow setting of some
features, and limit the use of others.
The Report Card will record vehicle
data about driving behavior that can
be viewed later. When the vehicle is
started with a registered key, the
Driver Information Center (DIC)
displays a message that Teen Driver
is active.
To access:
1. Touch Settings on the Home Page, then touch Teen Driver.
2. Create a Personal Identification Number (PIN) by choosing a
four-digit PIN. Re-enter the PIN
to confirm. To change the PIN,
touch Change PIN.
The PIN is required to:
. Register or unregister keys. .
Change Teen Driver settings.
. Change or clear the Teen
Driver PIN.
. Access or delete Report
Card data.
Register keys to activate Teen
Driver:
Any vehicle key can be registered,
up to a maximum of eight keys.
Label the key to tell it apart from the
other keys.
For a pushbutton start system: 1. Start the engine.
2. For automatic transmissions, the vehicle must be in P (Park).
For manual transmissions, the
vehicle must be stopped with
the parking brake set.
3. From the Settings menu, touch Teen Driver.
4. Enter the PIN.
5. Place the Remote Keyless Entry (RKE) transmitter key in
the transmitter pocket. See
“Remote Keyless Entry (RKE)