2020 FORD EXPLORER parking brake
[x] Cancel search: parking brakePage 205 of 555
AUTOMATIC TRANSMISSION
WARNING: Always fully apply the
parking brake and make sure you shift
into park (P). Failure to follow this
instruction could result in personal injury
or death. WARNING:
Do not apply the brake
pedal and accelerator pedal
simultaneously. Applying both pedals
simultaneously for more than a few
seconds will limit engine performance,
which may result in difficulty maintaining
speed in traffic and could lead to serious
injury.
Note: You may not be able to shift out of
park (P) unless the intelligent access key is
inside your vehicle.
Understanding Your Transmission
Selector Positions
Your vehicle has an electronic transmission
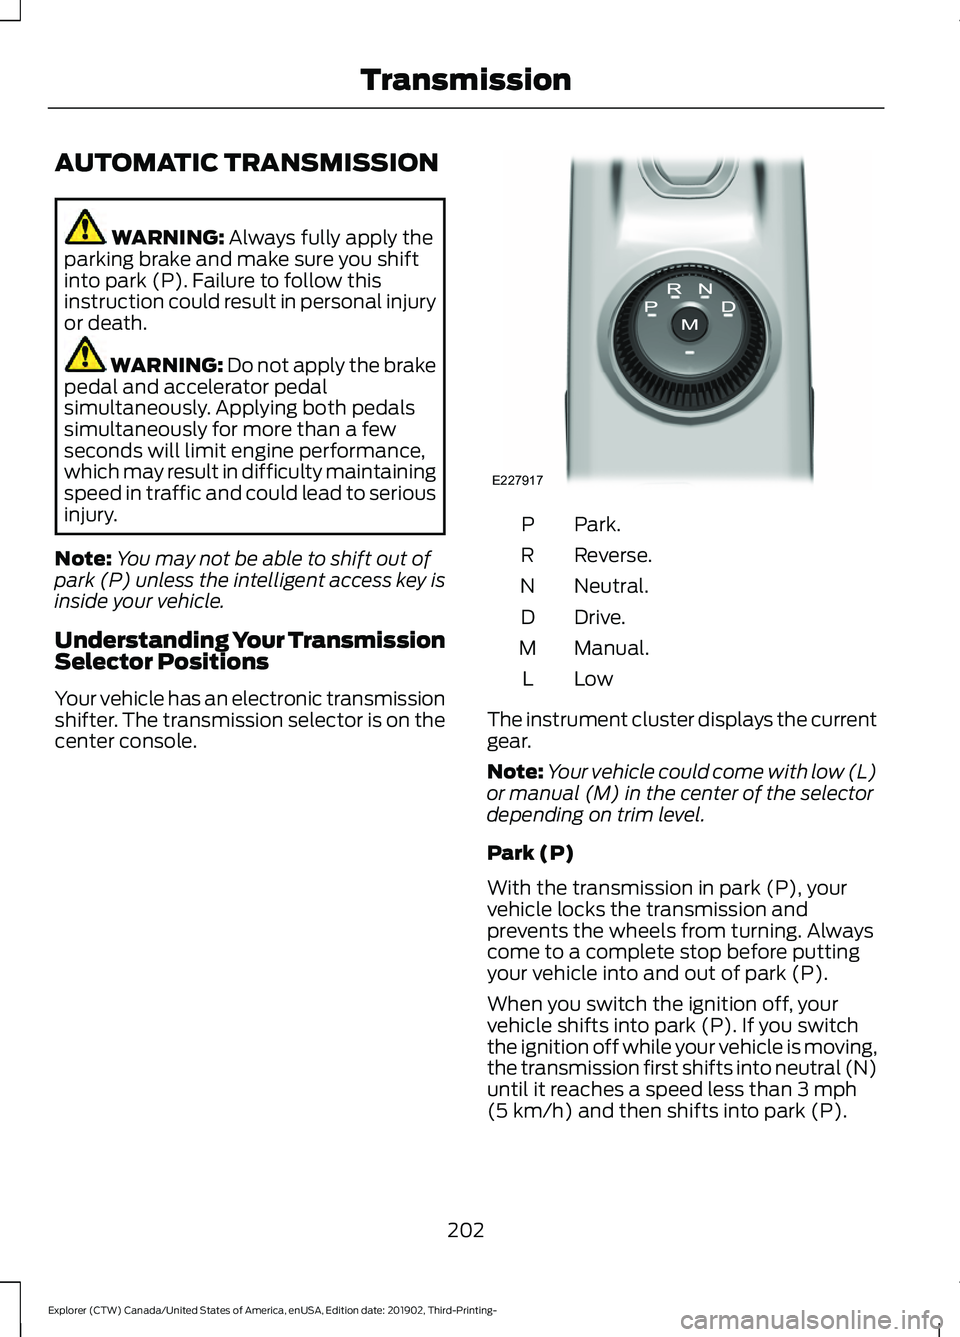
shifter. The transmission selector is on the
center console. Park.
P
Reverse.
R
Neutral.
N
Drive.
D
Manual.
M
LowL
The instrument cluster displays the current
gear.
Note: Your vehicle could come with low (L)
or manual (M) in the center of the selector
depending on trim level.
Park (P)
With the transmission in park (P), your
vehicle locks the transmission and
prevents the wheels from turning. Always
come to a complete stop before putting
your vehicle into and out of park (P).
When you switch the ignition off, your
vehicle shifts into park (P). If you switch
the ignition off while your vehicle is moving,
the transmission first shifts into neutral (N)
until it reaches a speed less than
3 mph
(5 km/h) and then shifts into park (P).
202
Explorer (CTW) Canada/United States of America, enUSA, Edition date: 201902, Third-Printing- TransmissionE227917
Page 206 of 555
The electric parking brake may apply when
you shift to park (P) without the brake
pedal fully pressed. The electric parking
brake applies when you shift to park (P)
on large slopes. The electric parking brake
releases with the drive away release
function or manually as described in the
Releasing the Electric Parking Brake
section. See Electric Parking Brake
(page 215).
Note: A warning tone sounds if you open
the driver door and you have not shifted the
transmission selector to park (P).
Reverse (R)
With the transmission selector in reverse
(R), your vehicle moves backward. Always
come to a complete stop before shifting
into and out of reverse (R).
Neutral (N)
With the transmission selector in neutral
(N), you can start your vehicle and it is free
to roll. Hold the brake pedal down when in
this position.
Drive (D)
Drive (D) is the normal driving position for
the best fuel economy and smoothness.
Shift the transmission selector to drive (D)
to allow your vehicle to move forward and
shift automatically through the forward
gears.
The transmission shifts to the appropriate
gear for optimum performance based on
ambient temperature, road slope, vehicle
load and your input. Manual Mode (M) - Vehicles with
Paddle Shifters
With the transmission selector in manual
(M), the driver can change gears up or
down. After selecting the Manual (M)
button while the transmission range
selector is in Drive (D) position you now
have control of selecting the gear you
desire using shift buttons on the steering
wheel. See Understanding your SelectShift
Automatic
™ transmission later in this
section.
To exit manual mode, push the manual
(M) button on your transmission selector.
Low (L) - Vehicles without Paddle
Shifters
With the transmission selector in low (L),
your vehicle provides maximum engine
braking. You can shift the transmission into
low (L) at any vehicle speed. The intent is
not for use under extended or normal
driving conditions, and results in lower fuel
economy.
Automatic Return to Park
Note: This feature does not operate when
your vehicle is in Stay in Neutral mode or
neutral tow.
The transmission returns to park (P) if any
of the following occur:
• You switch the ignition off.
• Your seatbelt is not fastened, and you
open the driver door.
• The driver door is open, and you
unfasten your seatbelt.
If you switch the ignition off when your
vehicle is moving, your vehicle shifts into
neutral (N) until it slows down enough to
shift into park (P).
203
Explorer (CTW) Canada/United States of America, enUSA, Edition date: 201902, Third-Printing- Transmission
Page 208 of 555
SelectShift Automatic
™
Transmission (If Equipped)
Your vehicle has a SelectShift Automatic
transmission, which gives you the ability
to change gears up or down, without a
clutch, as preferred.
To prevent the engine from running at too
low an RPM, which may cause it to stall,
SelectShift still automatically makes some
downshifts if it has determined that you
have not downshifted in time. Although
SelectShift makes some downshifts for
you, it still allows you to downshift at any
time if SelectShift determines that
damage to the engine from over-revving
does not occur.
Note: Engine damage may occur if you
maintain excessive engine revving without
shifting.
Note: Vehicles may have either steering
wheel controls or gearshift lever controls.
SelectShift could upshift if the engine
reaches its RPM limit. It may also be
upshifted by pressing the + button on the
steering wheel or shift lever control.
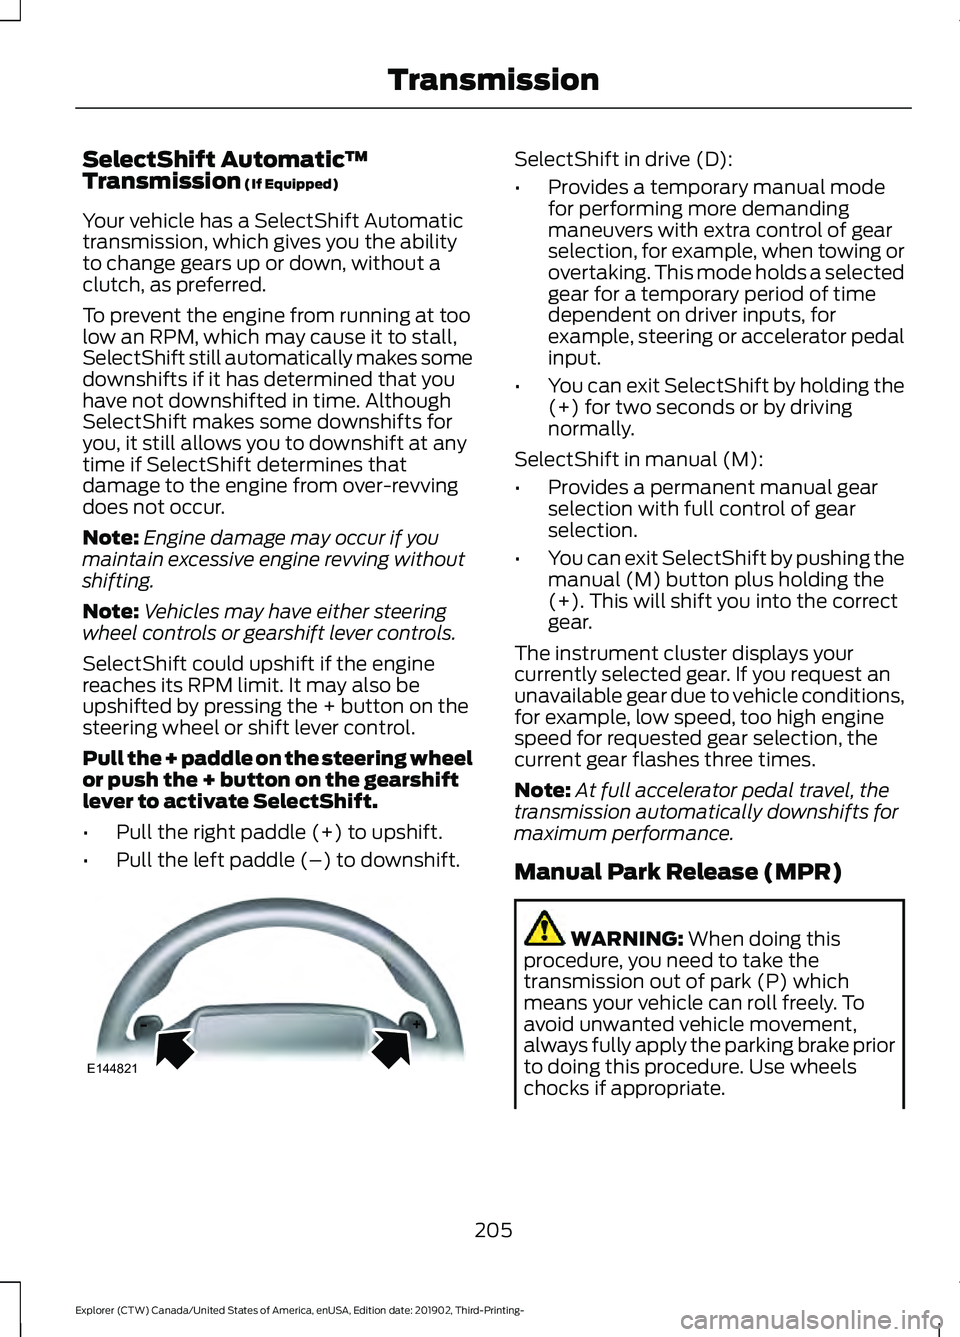
Pull the + paddle on the steering wheel
or push the + button on the gearshift
lever to activate SelectShift.
• Pull the right paddle (+) to upshift.
• Pull the left paddle (–) to downshift. SelectShift in drive (D):
•
Provides a temporary manual mode
for performing more demanding
maneuvers with extra control of gear
selection, for example, when towing or
overtaking. This mode holds a selected
gear for a temporary period of time
dependent on driver inputs, for
example, steering or accelerator pedal
input.
• You can exit SelectShift by holding the
(+) for two seconds or by driving
normally.
SelectShift in manual (M):
• Provides a permanent manual gear
selection with full control of gear
selection.
• You can exit SelectShift by pushing the
manual (M) button plus holding the
(+). This will shift you into the correct
gear.
The instrument cluster displays your
currently selected gear. If you request an
unavailable gear due to vehicle conditions,
for example, low speed, too high engine
speed for requested gear selection, the
current gear flashes three times.
Note: At full accelerator pedal travel, the
transmission automatically downshifts for
maximum performance.
Manual Park Release (MPR) WARNING:
When doing this
procedure, you need to take the
transmission out of park (P) which
means your vehicle can roll freely. To
avoid unwanted vehicle movement,
always fully apply the parking brake prior
to doing this procedure. Use wheels
chocks if appropriate.
205
Explorer (CTW) Canada/United States of America, enUSA, Edition date: 201902, Third-Printing- TransmissionE144821
Page 209 of 555
WARNING: If the parking brake is
fully released, but the brake warning
lamp remains illuminated, the brakes
may not be working properly. Have your
vehicle checked as soon as possible. WARNING:
Do not drive your
vehicle until you verify that the
stoplamps are working.
Use the manual park release to move your
transmission from the park (P) position in
the event of an electrical malfunction or
emergency.
Activating the Manual Park Release
Cable 1.
Apply the parking brake. See Electric
Parking Brake
(page 215).
Note: If the vehicle battery is dead, for
example, no electrical power is available,
you require an external power to apply the
parking brake.
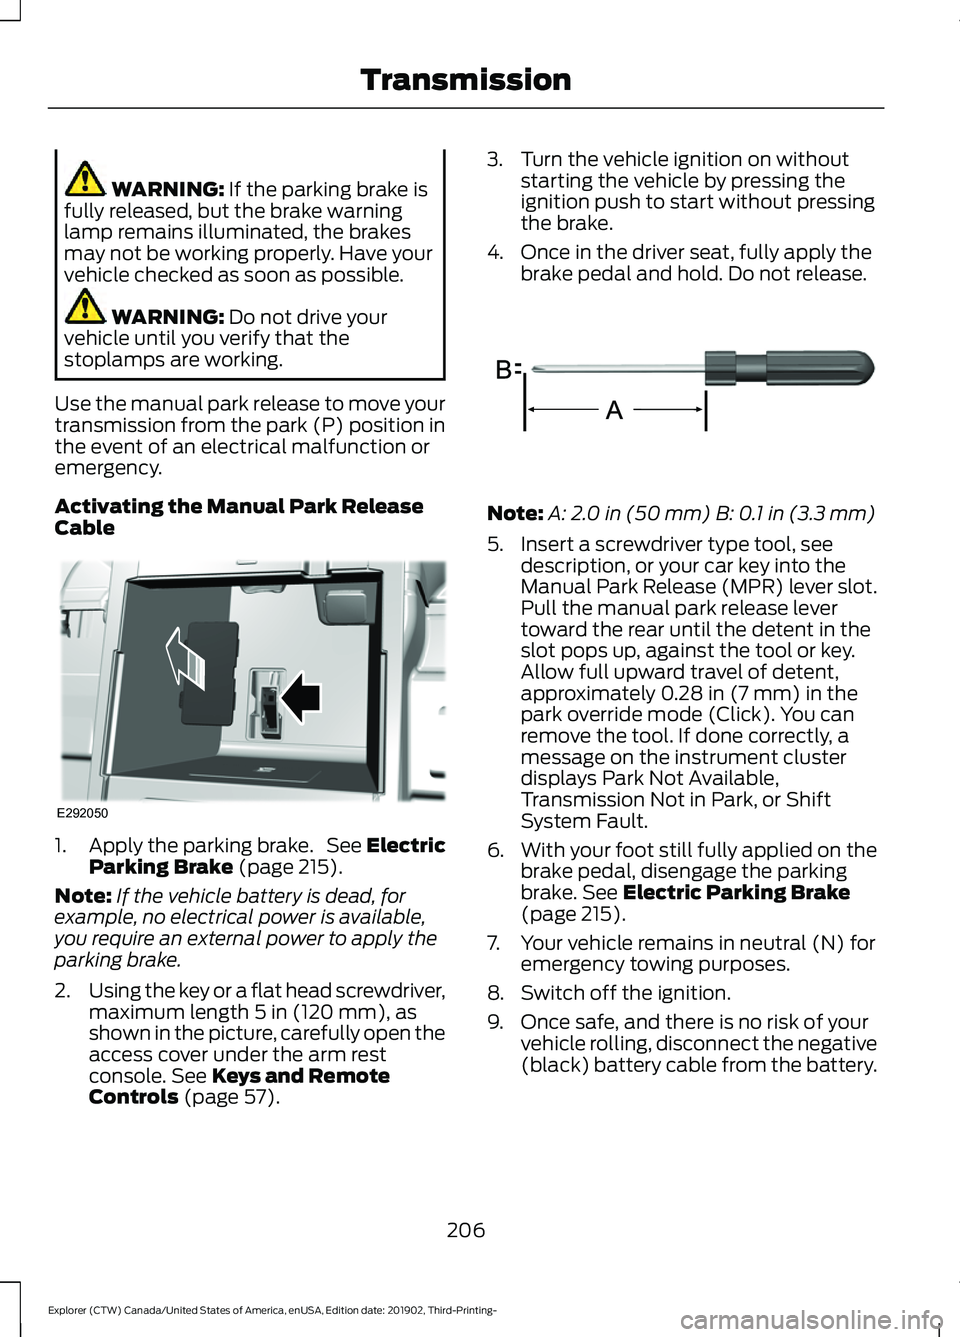
2. Using the key or a flat head screwdriver,
maximum length
5 in (120 mm), as
shown in the picture, carefully open the
access cover under the arm rest
console.
See Keys and Remote
Controls (page 57). 3. Turn the vehicle ignition on without
starting the vehicle by pressing the
ignition push to start without pressing
the brake.
4. Once in the driver seat, fully apply the brake pedal and hold. Do not release. Note:
A:
2.0 in (50 mm) B: 0.1 in (3.3 mm)
5. Insert a screwdriver type tool, see description, or your car key into the
Manual Park Release (MPR) lever slot.
Pull the manual park release lever
toward the rear until the detent in the
slot pops up, against the tool or key.
Allow full upward travel of detent,
approximately
0.28 in (7 mm) in the
park override mode (Click). You can
remove the tool. If done correctly, a
message on the instrument cluster
displays Park Not Available,
Transmission Not in Park, or Shift
System Fault.
6. With your foot still fully applied on the
brake pedal, disengage the parking
brake.
See Electric Parking Brake
(page 215).
7. Your vehicle remains in neutral (N) for emergency towing purposes.
8. Switch off the ignition.
9. Once safe, and there is no risk of your vehicle rolling, disconnect the negative
(black) battery cable from the battery.
206
Explorer (CTW) Canada/United States of America, enUSA, Edition date: 201902, Third-Printing- TransmissionE292050 E317360
Page 210 of 555

Returning Your Vehicle to Normal
Mode
1.
Reconnect the negative (black) battery
cable to the battery.
2. Apply the parking brake. See Electric
Parking Brake (page 215).
Note: If the vehicle battery is dead, for
example, no electrical power is available,
you require an external power to apply the
parking brake.
3. Fully apply the brake pedal and hold, do not release.
4. Insert the screwdriver tool or car key fully into the manual park release lever
slot. Push the tool downwards. The
system detent releases and the manual
park release lever moves forward,
allowing the vehicle to go back into
park (P). Remove the tool or car key.
5. Install the access cover.
6. With your foot fully applied on the brake pedal, start your vehicle. Confirm
that your vehicle is in the park (P)
position and that the instrument
cluster indicates park (P). 7. If the instrument cluster does not
display the park (P) position or there
is a message stating park (P) is not
available, transmission not in park (P)
or a shift system fault, apply the
parking brake before exiting your
vehicle and contact an authorized
dealer for service.
If Your Vehicle Gets Stuck in Mud
or Snow
Note: Do not rock the vehicle if the engine
is not at normal operating temperature or
damage to the transmission may occur.
Note: Do not rock the vehicle for more than
a minute or damage to the transmission and
tires may occur, or the engine may overheat.
If your vehicle gets stuck in mud or snow,
rock it out by shifting between forward and
reverse gears, stopping between shifts in
a steady pattern. Press lightly on the
accelerator in each gear.
207
Explorer (CTW) Canada/United States of America, enUSA, Edition date: 201902, Third-Printing- TransmissionE297270
Page 213 of 555
Driving in Special Conditions With
Four-Wheel drive (4WD)
Note:
Use of the 4WD system in slippery,
deep snow, and sand drive modes on dry
surfaces could produce some vibration,
driveline bind up, or excessive tire wear as
these drive modes are intended for slippery
and loose surfaces.
Note: The design of 4WD vehicles are for
driving on sand, snow, mud and rough roads
and have operating characteristics that are
somewhat different from conventional
vehicles, both on and off the highway.
Basic Operating Principles in Special
Conditions
• Drive slower in strong crosswinds which
can affect the normal steering
characteristics of your vehicle.
• Be extremely careful when driving on
pavement made slippery by loose sand,
water, gravel, snow or ice. If Your Vehicle Goes Off the Edge of the
Pavement
•
If your vehicle goes off the edge of the
pavement, slow down, but avoid severe
brake application, ease the vehicle
back onto the pavement only after
reducing your speed. Do not turn the
steering wheel too sharply while
returning to the road surface.
• It could be safer to stay on the apron
or shoulder of the road and slow down
gradually before returning to the
pavement. You could lose control if you
do not slow down or if you turn the
steering wheel too sharply or abruptly.
• It often could be less risky to strike
small objects, such as highway
reflectors, with minor damage to your
vehicle rather than attempt a sudden
return to the pavement which could
cause the vehicle to slide sideways out
of control or rollover. Remember, your
safety and the safety of others should
be your primary concern.
If Your Vehicle Gets Stuck WARNING: Apply the parking
brake, shift into park (P), switch the
ignition off and remove the key before
you leave your vehicle. Failure to follow
this instruction could result in personal
injury or death. WARNING:
If the parking brake is
fully released, but the brake warning
lamp remains illuminated, the brakes
may not be working properly. Have your
vehicle checked as soon as possible. WARNING:
Do not spin the wheels
at over 34 mph (55 km/h). The tires may
fail and injure a passenger or bystander.
210
Explorer (CTW) Canada/United States of America, enUSA, Edition date: 201902, Third-Printing- Four-Wheel Drive
(If Equipped)
Page 217 of 555

GENERAL INFORMATION
Note:
Occasional brake noise is normal. If
a metal-to-metal, continuous grinding or
continuous squeal sound is present, the
brake linings may be worn-out and an
authorized dealer should check them. If the
vehicle has continuous vibration or shudder
in the steering wheel while braking, an
authorized dealer should check your vehicle.
Note: Brake dust may accumulate on the
wheels, even under normal driving
conditions. Some dust is inevitable as the
brakes wear and does not contribute to
brake noise. See Cleaning the Wheels
(page 350).
Wet brakes result in reduced braking
efficiency. Gently press the brake pedal a
few times when driving from a car wash or
standing water to dry the brakes.
Brake Over Accelerator
In the event the accelerator pedal
becomes stuck or entrapped, apply steady
and firm pressure to the brake pedal to
slow the vehicle and reduce engine power.
If you experience this condition, apply the
brakes and bring your vehicle to a safe
stop. Switch the engine off, move the
transmission to park (P) and apply the
parking brake. Inspect the accelerator
pedal and the area around it for any items
or debris that may be obstructing its
movement. If none are found and the
condition persists, have your vehicle towed
to the nearest authorized dealer.
Emergency Brake Assist
Emergency brake assist detects when you
brake heavily by measuring the rate at
which you press the brake pedal. It
provides maximum braking efficiency as
long as you press the pedal. Emergency
brake assist can reduce stopping distances
in critical situations. Anti-lock Brake System
This system helps you maintain steering
control during emergency stops by keeping
the brakes from locking. This lamp momentarily
illuminates when you switch the
ignition on. If the light does not
illuminate during start up, remains on or
flashes, the anti-lock braking system may
be disabled. Have the system checked by
an authorized dealer. If the anti-lock brake
system is disabled, normal braking is still
effective.
See Warning Lamps and
Indicators (page 107).
Note: Indicators vary depending on region. This lamp also illuminates
momentarily when you switch
the ignition on to confirm the
lamp is functional. If it does not
illuminate when you switch the
ignition on, or begins to flash at
any time, have the system checked by an
authorized dealer. If the brake warning
lamp illuminates with the parking brake
released, have the system checked
immediately.
Regenerative Braking System
This feature is used to simulate the engine
braking of an internal combustion engine
and assist the standard brake system while
recovering some of the energy of motion
and storing it in the battery to improve fuel
economy. The standard brake system is
designed to fully stop the car if
regenerative braking is not available.
During regenerative braking, the motor is
spun as a generator to create electrical
current. This recharges the battery and
slows the vehicle. In effect, once the
accelerator pedal is released, the motor
changes from an energy user to an energy
producer.
214
Explorer (CTW) Canada/United States of America, enUSA, Edition date: 201902, Third-Printing- Brakes E270480
Page 218 of 555
When you release the accelerator pedal or
press the brake pedal, the brake controller
automatically detects the amount of
deceleration requested and optimizes how
much of the deceleration will be produced
by regenerative braking. The remaining
portion is generated by standard friction
braking. When the battery is almost fully
charged, the amount of regenerative
braking is limited to avoid overcharging,
and the requested deceleration is
produced by standard friction braking
alone.
Regenerative braking does not take the
place of the standard friction brakes; it only
assists them. Regenerative braking has
also been designed to interact with the
anti-lock brake system. Regenerative
braking is disabled when the anti-lock
brake system is activated or the battery is
fully charged.
HINTS ON DRIVING WITH
ANTI-LOCK BRAKES
The anti-lock braking system does not
eliminate the risks when:
•
You drive too closely to the vehicle in
front of you.
• Your vehicle is hydroplaning.
• You take corners too fast.
• The road surface is poor.
Note: If the system activates, the brake
pedal may pulse and may travel further.
Maintain pressure on the brake pedal. You
may also hear a noise from the system. This
is normal. ELECTRIC PARKING BRAKE WARNING: Always fully apply the
parking brake and make sure you shift
into park (P). Failure to follow this
instruction could result in personal injury
or death. WARNING:
If you drive extended
distances with the parking brake applied,
you could cause damage to the brake
system. WARNING:
The electric parking
brake does not operate if the vehicle
battery is running out of charge.
Your vehicle has an electric parking brake.
You operate it with a switch instead of a
lever. The switch is on the center console
or to the left-hand side of the steering
wheel, on the lower part of the instrument
panel.
Note: The electric parking brake makes
noises during operation. This is normal.
Applying the Electric Parking
Brake Pull the switch upward.
The red warning lamp flashes
during operation and illuminates
when the parking brake is
applied. Note:
It remains illuminated for a short
period of time after you switch the ignition
off.
215
Explorer (CTW) Canada/United States of America, enUSA, Edition date: 201902, Third-Printing- BrakesE267156 E270480