2020 FORD EXPLORER length
[x] Cancel search: lengthPage 43 of 555

Pregnant women should always wear their
seatbelt. Position the lap belt portion of a
combination lap and shoulder belt low
across the hips below the belly and worn
as tight as comfort allows. Position the
shoulder belt to cross the middle of the
shoulder and the center of the chest.
Seatbelt Locking Modes
WARNING: If your vehicle is
involved in a crash, have the seatbelts
and associated components inspected
as soon as possible. Failure to follow this
instruction could result in personal injury
or death.
All safety restraints in the vehicle are
combination lap and shoulder belts. The
driver seatbelt has the first type of locking
mode, and the front outboard passenger
and rear seat seatbelts have both types of
locking modes described as follows:
Vehicle Sensitive Mode
This is the normal retractor mode, which
allows free shoulder belt length
adjustment to your movements and
locking in response to vehicle movement.
For example, if the driver brakes suddenly
or turns a corner sharply, or the vehicle
receives an impact of about
5 mph
(8 km/h) or more, the combination
seatbelts lock to help reduce forward
movement of the driver and passengers.
In addition, the design of the retractor is to
lock if you pull the webbing out too quickly.
If the seatbelt retractor locks, slowly lower
the height adjuster to allow the seatbelt
to retract. If the retractor does not unlock,
pull the seatbelt out slowly then feed a small length of webbing back toward the
stowed position. For rear seatbelts, recline
the rear seat backrest or push the seat
backrest cushion away from the seatbelt.
Feed a small length of webbing back
toward the stowed position.
Automatic Locking Mode
In this mode, the shoulder belt
automatically pre-locks. The belt retracts
to remove any slack in the shoulder belt.
The automatic locking mode is not
available on the driver seatbelt.
When to Use the Automatic Locking
Mode
Use this mode any time you install a child
safety seat, except a booster, in passenger
front or rear seating positions. Properly
restrain children 12 years old and under in
a rear seating position whenever possible.
See
Child Safety (page 23).
How to Use the Automatic Locking
Mode 1. Buckle the combination lap and
shoulder belt.
2. Grasp the shoulder portion and pull downward until you pull the entire belt
out. Allow the belt to retract. As the
belt retracts, you will hear a clicking
sound. This indicates the seatbelt is
now in the automatic locking mode.
40
Explorer (CTW) Canada/United States of America, enUSA, Edition date: 201902, Third-Printing- SeatbeltsE142591
Page 176 of 555

Ignition Modes
The keyless starting system has three
modes:
Off: Turns the ignition off.
• Without applying the brake pedal,
press and release the button once
when the ignition is in the on mode, or
when your vehicle is running but is not
moving.
On:
All electrical circuits are operational
and the warning lamps and indicators
illuminate.
• Without applying the brake pedal,
press and release the button once.
Start:
Starts your vehicle. The engine may
not start when your vehicle starts.
• Press the brake pedal, and then press
the button for any length of time. An
indicator light on the button illuminates
when the ignition is on and when your
vehicle starts.
STARTING A GASOLINE
ENGINE
When you start the engine, the idle speed
increases. This helps to warm up the
engine. If the engine idle speed does not
slow down automatically, have your
vehicle checked by an authorized dealer. Note:
You can crank the engine for a total
of 60 seconds without the engine starting
before the starting system temporarily
disables. The 60 seconds does not have to
be all at once. For example, if you crank the
engine three times for 20 seconds each
time, without the engine starting, you
reached the 60-second time limit. A
message appears in the information display
alerting you that you exceeded the cranking
time. You cannot attempt to start the
engine for at least 15 minutes. After 15
minutes, you are limited to a 15-second
engine cranking time. You need to wait 60
minutes before you can crank the engine for
60 seconds again.
Before starting your vehicle, check the
following:
• Make sure all occupants have fastened
their seatbelt.
• Make sure the headlamps and
electrical accessories are off.
• Make sure the parking brake is on.
• Make sure the transmission is in park
(P).
• Switch the ignition on. For vehicles with
a keyless ignition, see the following
instructions.
Vehicles with an Ignition Key
Note: Do not touch the accelerator pedal.
1. Fully depress the brake pedal.
2. Turn the key to the start position to start the engine.
Note: The engine may continue cranking
for up to 15 seconds or until it starts.
Note: If you cannot start the engine on the
first try, wait for a short period and try again.
Vehicles with Keyless Start
Note: Do not touch the accelerator pedal.
173
Explorer (CTW) Canada/United States of America, enUSA, Edition date: 201902, Third-Printing- Starting and Stopping the EngineE144447
Page 209 of 555
WARNING: If the parking brake is
fully released, but the brake warning
lamp remains illuminated, the brakes
may not be working properly. Have your
vehicle checked as soon as possible. WARNING:
Do not drive your
vehicle until you verify that the
stoplamps are working.
Use the manual park release to move your
transmission from the park (P) position in
the event of an electrical malfunction or
emergency.
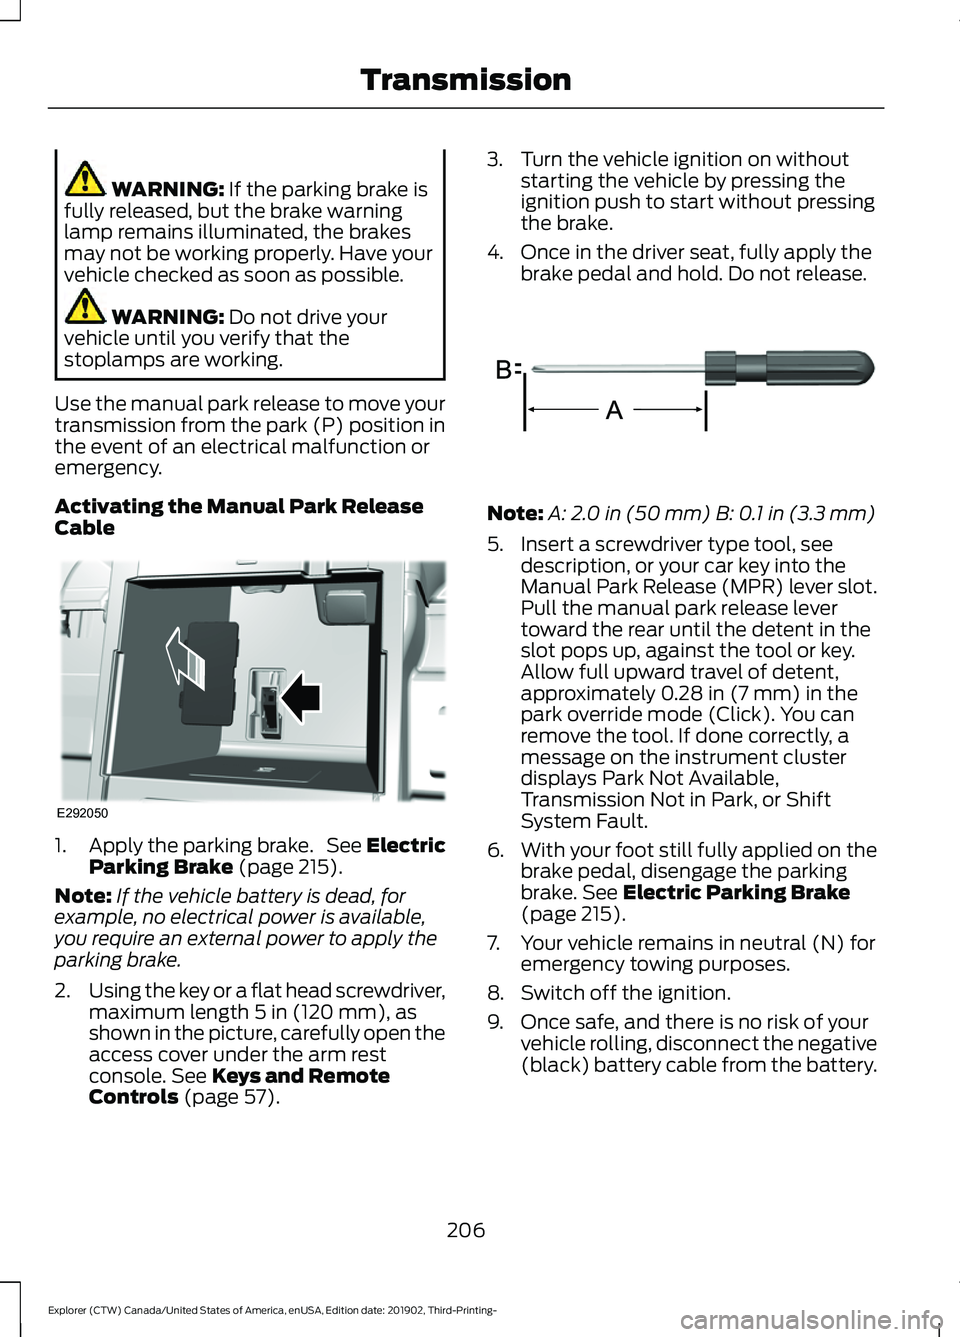
Activating the Manual Park Release
Cable 1.
Apply the parking brake. See Electric
Parking Brake
(page 215).
Note: If the vehicle battery is dead, for
example, no electrical power is available,
you require an external power to apply the
parking brake.
2. Using the key or a flat head screwdriver,
maximum length
5 in (120 mm), as
shown in the picture, carefully open the
access cover under the arm rest
console.
See Keys and Remote
Controls (page 57). 3. Turn the vehicle ignition on without
starting the vehicle by pressing the
ignition push to start without pressing
the brake.
4. Once in the driver seat, fully apply the brake pedal and hold. Do not release. Note:
A:
2.0 in (50 mm) B: 0.1 in (3.3 mm)
5. Insert a screwdriver type tool, see description, or your car key into the
Manual Park Release (MPR) lever slot.
Pull the manual park release lever
toward the rear until the detent in the
slot pops up, against the tool or key.
Allow full upward travel of detent,
approximately
0.28 in (7 mm) in the
park override mode (Click). You can
remove the tool. If done correctly, a
message on the instrument cluster
displays Park Not Available,
Transmission Not in Park, or Shift
System Fault.
6. With your foot still fully applied on the
brake pedal, disengage the parking
brake.
See Electric Parking Brake
(page 215).
7. Your vehicle remains in neutral (N) for emergency towing purposes.
8. Switch off the ignition.
9. Once safe, and there is no risk of your vehicle rolling, disconnect the negative
(black) battery cable from the battery.
206
Explorer (CTW) Canada/United States of America, enUSA, Edition date: 201902, Third-Printing- TransmissionE292050 E317360
Page 241 of 555
Possible Cause
Symptom
You recently disconnected or replaced the battery. After
you reconnect the battery you must drive your vehicle
on a straight road for a short period of time.
An irregular curb along the parking space prevents the
system from correctly aligning your vehicle.
The system does not correctly
position your vehicle in a
parking space.
Vehicles or objects bordering the space may not be
correctly parked.
Your vehicle stopped too far past the parking space.
The tires may not be correctly installed or maintained.
For example, not inflated correctly, improper size, or of
different sizes.
A repair or alteration changes the detection capabilities.
A parked vehicle has a high attachment. For example,
a salt sprayer, snowplow or moving truck bed.
The parking space length or position of parked objects
changes after your vehicle passes the space.
You are using a spare tire or a tire that is significantly
worn more than the other tires.
The temperature around your vehicle quickly changes.
For example, driving from a heated garage into cold
outside temperature, or after leaving a car wash.
REAR VIEW CAMERA WARNING: The rear view camera
system is a reverse aid supplement
device that still requires the driver to use
it in conjunction with the interior and
exterior mirrors for maximum coverage. WARNING:
Objects that are close
to either corner of the bumper or under
the bumper, might not be seen on the
screen due to the limited coverage of the
camera system. WARNING:
Reverse your vehicle
slowly. Failure to follow this instruction
could result in the loss of control of your
vehicle, personal injury or death. WARNING:
Use caution when the
rear cargo door is ajar. If the rear cargo
door is ajar, the camera will be out of
position and the video image may be
incorrect. All guidelines disappear when
the rear cargo door is ajar. Failure to
follow this instruction could result in
personal injury.
238
Explorer (CTW) Canada/United States of America, enUSA, Edition date: 201902, Third-Printing- Parking Aids
Page 270 of 555
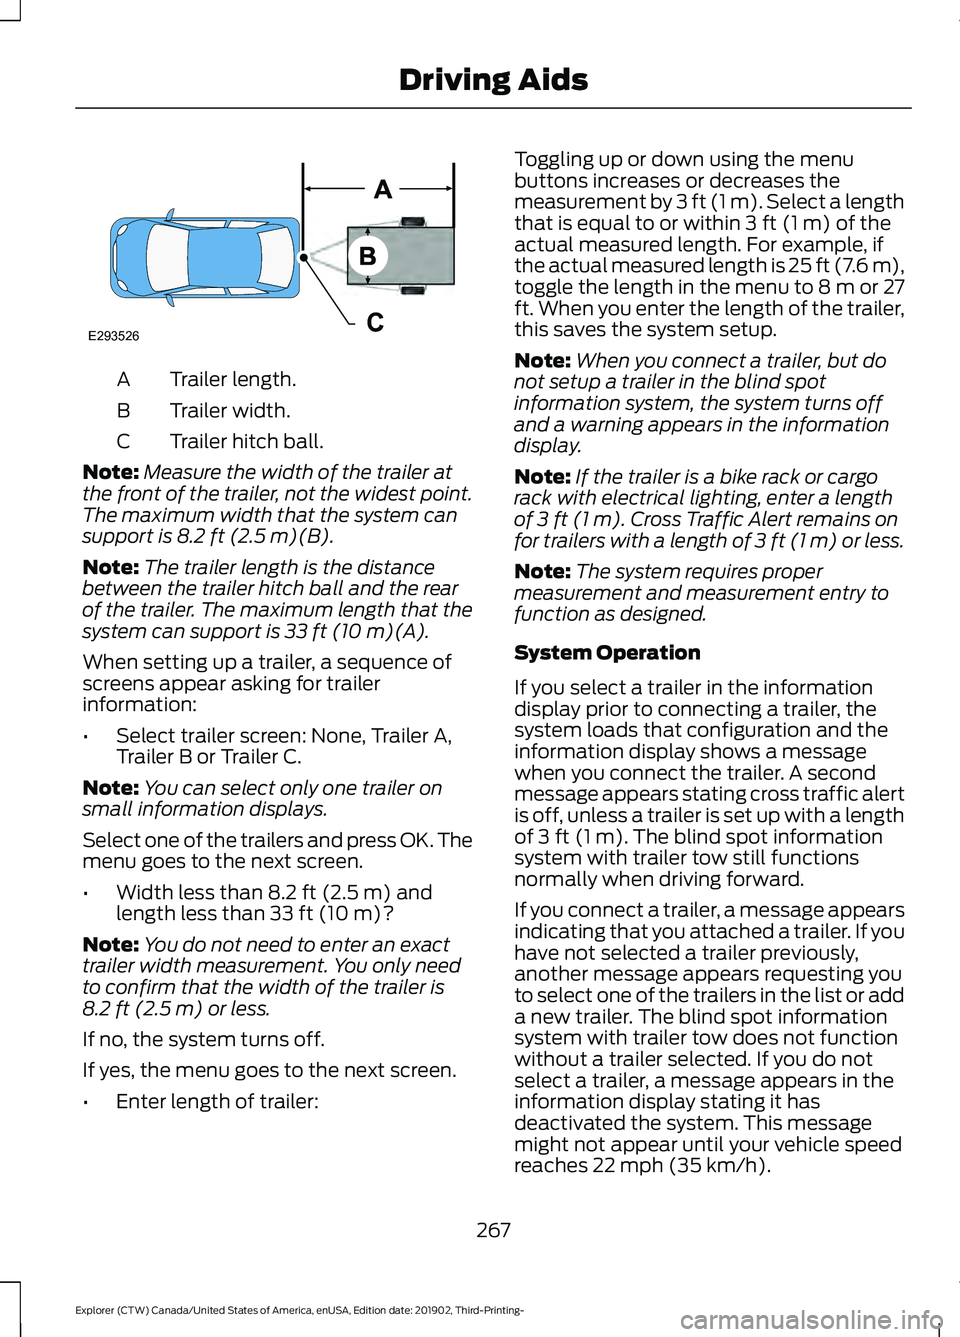
Trailer length.
A
Trailer width.
B
Trailer hitch ball.
C
Note: Measure the width of the trailer at
the front of the trailer, not the widest point.
The maximum width that the system can
support is 8.2 ft (2.5 m)(B).
Note: The trailer length is the distance
between the trailer hitch ball and the rear
of the trailer. The maximum length that the
system can support is
33 ft (10 m)(A).
When setting up a trailer, a sequence of
screens appear asking for trailer
information:
• Select trailer screen: None, Trailer A,
Trailer B or Trailer C.
Note: You can select only one trailer on
small information displays.
Select one of the trailers and press OK. The
menu goes to the next screen.
• Width less than
8.2 ft (2.5 m) and
length less than 33 ft (10 m)?
Note: You do not need to enter an exact
trailer width measurement. You only need
to confirm that the width of the trailer is
8.2 ft (2.5 m)
or less.
If no, the system turns off.
If yes, the menu goes to the next screen.
• Enter length of trailer: Toggling up or down using the menu
buttons increases or decreases the
measurement by
3 ft (1 m). Select a length
that is equal to or within 3 ft (1 m) of the
actual measured length. For example, if
the actual measured length is 25 ft (7.6 m),
toggle the length in the menu to 8 m or 27
ft. When you enter the length of the trailer,
this saves the system setup.
Note: When you connect a trailer, but do
not setup a trailer in the blind spot
information system, the system turns off
and a warning appears in the information
display.
Note: If the trailer is a bike rack or cargo
rack with electrical lighting, enter a length
of
3 ft (1 m). Cross Traffic Alert remains on
for trailers with a length of 3 ft (1 m) or less.
Note: The system requires proper
measurement and measurement entry to
function as designed.
System Operation
If you select a trailer in the information
display prior to connecting a trailer, the
system loads that configuration and the
information display shows a message
when you connect the trailer. A second
message appears stating cross traffic alert
is off, unless a trailer is set up with a length
of
3 ft (1 m). The blind spot information
system with trailer tow still functions
normally when driving forward.
If you connect a trailer, a message appears
indicating that you attached a trailer. If you
have not selected a trailer previously,
another message appears requesting you
to select one of the trailers in the list or add
a new trailer. The blind spot information
system with trailer tow does not function
without a trailer selected. If you do not
select a trailer, a message appears in the
information display stating it has
deactivated the system. This message
might not appear until your vehicle speed
reaches
22 mph (35 km/h).
267
Explorer (CTW) Canada/United States of America, enUSA, Edition date: 201902, Third-Printing- Driving AidsE293526
Page 271 of 555
The blind spot information system with
trailer tow activates when driving forward
for that particular trailer set up. If you cycle
the ignition, the blind spot information
system with trailer tow continues to
function using the last trailer you selected.
Trailer Considerations
The system works with a trailer with a front
width of 8.2 ft (2.5 m) or less, and a total
length from the trailer hitch ball to the rear
of the trailer of
33 ft (10 m) or less.
Some trailers could cause a slight change
in system performance:
• Wide box trailers, especially those
wider than the towing vehicle, could
cause false alerts to occur when driving
next to infrastructure or near parked
cars. A false alert could also occur
while making a 90-degree turn or
driving through a roundabout.
• Wide trailers that have a total length
greater than
20 ft (6 m) could cause
delayed alerts when a vehicle is
passing at high speeds.
• Box trailers that have a width greater
than
8.2 ft (2.5 m) could cause early
alerts when you pass a vehicle.
• Clam shell or V-Nose box trailers with
a width greater than
8.2 ft (2.5 m)
could cause delayed alerts when a
vehicle traveling the same speed as
your vehicle merges lanes.
System Errors
If the system detects a fault, a warning
lamp illuminates and a message displays.
See
Information Messages (page 120). Switching the System On and Off
You can switch the blind spot information
system with trailer tow off by not selecting
a trailer the information display.
See
General Information (page 112). In this
case, the system turns off as long as a
trailer is attached to your vehicle. As soon
as you disconnect the trailer, the blind spot
information system becomes active.
When you switch the system off, a warning
lamp illuminates and the alert indicators
flash twice.
Note: The system remembers the last
trailer setting when you start your vehicle.
You cannot switch off the blind spot
information system with trailer tow when
using MyKey, but you can still change the
trailer settings.
See MyKey ™ (page 64).
To permanently switch the system off,
contact an authorized dealer.
CROSS TRAFFIC ALERT WARNING:
Do not use the cross
traffic alert system as a replacement for
using the interior and exterior mirrors or
looking over your shoulder before
reversing out of a parking space. The
cross traffic alert system is not a
replacement for careful driving. WARNING:
The system may not
operate properly during severe weather
conditions, for example snow, ice, heavy
rain and spray. Always drive with due
care and attention. Failure to take care
may result in a crash.
The system alerts you of vehicles
approaching from the sides behind your
vehicle when you shift into reverse (R).
268
Explorer (CTW) Canada/United States of America, enUSA, Edition date: 201902, Third-Printing- Driving Aids
Page 274 of 555

Cross Traffic Alert Behavior When
Trailer is Attached
Note:
The system may not correctly operate
when towing a trailer. For vehicles with an
approved trailer tow module and tow bar,
the system turns off when you attach a
trailer. For vehicles with an aftermarket
trailer tow module or tow bar, we
recommend that you switch the system off
when you attach a trailer.
Cross traffic alert remains on when you
attach a trailer in vehicles that come with
blind spot information system with trailer
tow under the following conditions:
• You connect a trailer.
• The trailer is a bike rack or cargo rack
with a maximum length of 3 ft (1 m).
• You set the trailer length to
3 ft (1 m)
in the information display.
See
Blind Spot Information System
(page 264).
Switching the System On and Off
To switch the system on or off, adjust the
setting. Depending on your vehicle options,
the setting could be in the following: •
Information display.
See General
Information (page 112).
• Touchscreen. See Settings (page
469).
Note: The system turns on every time you
switch the ignition on. To permanently
switch the system off, contact an authorized
dealer.
Cross Traffic Alert Indicator When the system detects an
approaching vehicle, a tone
sounds, a warning lamp
illuminates in the relevant exterior mirror
and arrows appear in the information
display to show which side the
approaching vehicle is coming from.
Note: If arrows do not display, a message
appears in the information display.
If the system malfunctions, a warning lamp
illuminates in the instrument cluster and
a message appears in the information
display. Have your vehicle checked as soon
as possible.
Note: In exceptional conditions, the system
could alert you, even when there is nothing
in the detection zone, for example a vehicle
passing further away from your vehicle.
Cross Traffic Alert Information Messages Action
Message
Displays instead of indication arrows when the system
detects a vehicle. Check for approaching traffic.
Cross Traffic Alert
Indicates blocked cross traffic alert system sensors. Clean
the sensors. If the message continues to appear, have your
vehicle checked as soon as possible.
Cross Traffic Not Avail-
able Sensor Blocked See
Manual
The system has malfunctioned. Have your vehicle checked
as soon as possible.
Cross Traffic System
Fault
Displays if you attach a trailer to your vehicle.
Cross Traffic Alert Deac-
tivated Trailer Attached
271
Explorer (CTW) Canada/United States of America, enUSA, Edition date: 201902, Third-Printing- Driving AidsE268294
Page 312 of 555
UTILIZING THE
MEDIATION/ARBITRATION
PROGRAM (CANADA ONLY)
For vehicles delivered to authorized
Canadian dealers. In those cases where
you continue to feel that the efforts by Ford
of Canada and the authorized dealer to
resolve a factory-related vehicle service
concern have been unsatisfactory, Ford of
Canada participates in an impartial third
party mediation/arbitration program
administered by the Canadian Motor
Vehicle Arbitration Plan (CAMVAP).
The CAMVAP program is a straight forward
and relatively speedy alternative to resolve
a disagreement when all other efforts to
produce a settlement have failed. This
procedure is without cost to you and is
designed to eliminate the need for lengthy
and expensive legal proceedings.
In the CAMVAP program, impartial
third-party arbitrators conduct hearings at
mutually convenient times and places in
an informal environment. These impartial
arbitrators review the positions of the
parties, make decisions and, when
appropriate, render awards to resolve
disputes. CAMVAP decisions are fast, fair,
and final as the arbitrator
’s award is
binding on both you and Ford of Canada.
CAMVAP services are available in all
Canadian territories and provinces. For
more information, without charge or
obligation, call your CAMVAP Provincial
Administrator directly at 1-800-207-0685
or visit www.camvap.ca. GETTING ASSISTANCE
OUTSIDE THE U.S. AND
CANADA
Before exporting your vehicle to a foreign
country, contact the appropriate foreign
embassy or consulate. These officials can
inform you of local vehicle registration
regulations and where to find unleaded
fuel or petrol/gas engines or the proper
sulfur fuel for diesel engines.
If you cannot find the proper fuel
recommended for your vehicle, contact
our Customer Relationship Center.
The use of improper fuels in your vehicle
without proper conversion may damage
the effectiveness of your emission control
system and may cause engine knocking or
serious engine damage. Ford Motor
Company or Ford of Canada is not
responsible for any damage caused by use
of improper fuel. Using improper fuels may
also result in difficulty importing your
vehicle back into the United States.
If your vehicle must be serviced while you
are traveling or living in Asia-Pacific Region,
Sub-Saharan Africa, U.S. Virgin Islands
and/or Puerto Rico, Central America, the
Caribbean, and Israel and the Middle East,
contact the nearest authorized dealer. If
the authorized dealer cannot help you,
contact the corresponding Ford Customer
Assistance Center:
FORD MOTOR COMPANY
Customer Relationship Centers in:
309
Explorer (CTW) Canada/United States of America, enUSA, Edition date: 201902, Third-Printing- Customer Assistance