2020 DODGE CHARGER ignition
[x] Cancel search: ignitionPage 282 of 412
280SERVICING AND MAINTENANCE
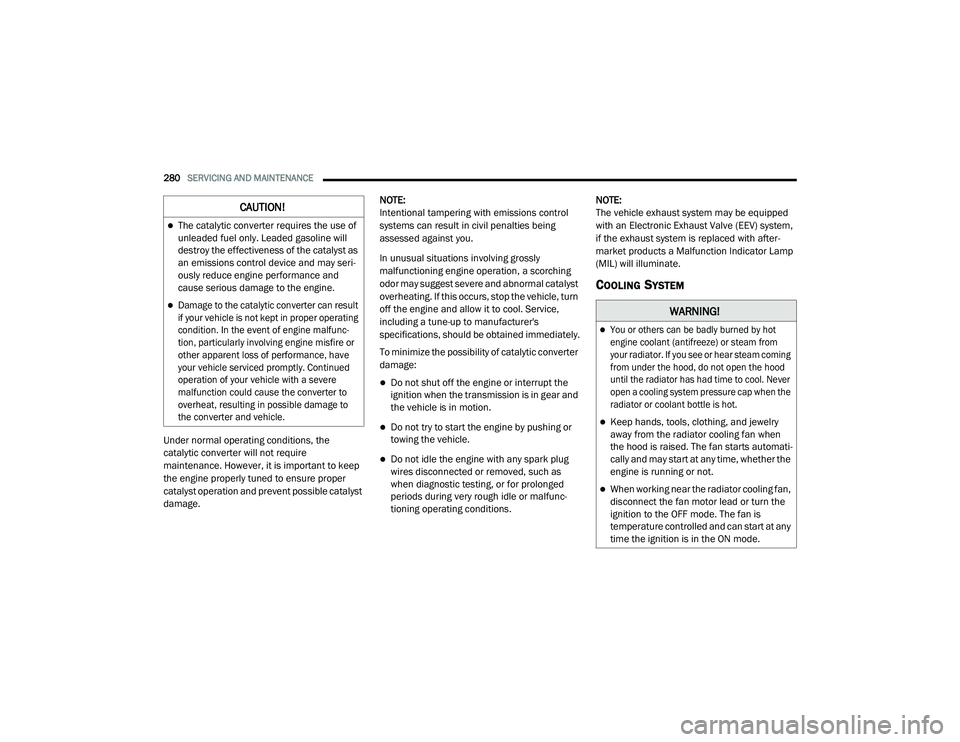
Under normal operating conditions, the
catalytic converter will not require
maintenance. However, it is important to keep
the engine properly tuned to ensure proper
catalyst operation and prevent possible catalyst
damage. NOTE:
Intentional tampering with emissions control
systems can result in civil penalties being
assessed against you.
In unusual situations involving grossly
malfunctioning engine operation, a scorching
odor may suggest severe and abnormal catalyst
overheating. If this occurs, stop the vehicle, turn
off the engine and allow it to cool. Service,
including a tune-up to manufacturer's
specifications, should be obtained immediately.
To minimize the possibility of catalytic converter
damage:
Do not shut off the engine or interrupt the
ignition when the transmission is in gear and
the vehicle is in motion.
Do not try to start the engine by pushing or
towing the vehicle.
Do not idle the engine with any spark plug
wires disconnected or removed, such as
when diagnostic testing, or for prolonged
periods during very rough idle or malfunc
-
tioning operating conditions. NOTE:
The vehicle exhaust system may be equipped
with an Electronic Exhaust Valve (EEV) system,
if the exhaust system is replaced with after
-
market products a Malfunction Indicator Lamp
(MIL) will illuminate.
COOLING SYSTEM
CAUTION!
The catalytic converter requires the use of
unleaded fuel only. Leaded gasoline will
destroy the effectiveness of the catalyst as
an emissions control device and may seri -
ously reduce engine performance and
cause serious damage to the engine.
Damage to the catalytic converter can result
if your vehicle is not kept in proper operating
condition. In the event of engine malfunc -
tion, particularly involving engine misfire or
other apparent loss of performance, have
your vehicle serviced promptly. Continued
operation of your vehicle with a severe
malfunction could cause the converter to
overheat, resulting in possible damage to
the converter and vehicle.
WARNING!
You or others can be badly burned by hot
engine coolant (antifreeze) or steam from
your radiator. If you see or hear steam coming
from under the hood, do not open the hood
until the radiator has had time to cool. Never
open a cooling system pressure cap when the
radiator or coolant bottle is hot.
Keep hands, tools, clothing, and jewelry
away from the radiator cooling fan when
the hood is raised. The fan starts automati -
cally and may start at any time, whether the
engine is running or not.
When working near the radiator cooling fan,
disconnect the fan motor lead or turn the
ignition to the OFF mode. The fan is
temperature controlled and can start at any
time the ignition is in the ON mode.
20_LD_OM_EN_USC_t.book Page 280
Page 328 of 412

326MULTIMEDIA
Clock
After pressing the Clock button on the touchscreen, the following settings will be available:
Camera
After pressing the Camera button on the touchscreen, the following settings will be available:
Setting Name Selectable Options
Sync Time With GPS — If Equipped OnOff
NOTE:
The “Sync Time With GPS” feature will allow you to automatically have the radio set the time. Set Time +–
Set Time Minutes +–
Time Format 12 hrs24 hrs
Show Time In Status Bar — If Equipped OnOff
NOTE:
The “Show Time In Status Bar” feature will allow you to turn on or shut off the digital clock in the status bar.
Setting Name Selectable Options
ParkView Backup Camera Delay OnOff
NOTE:
The “ParkView Backup Camera Delay” setting determines whether or not the screen will display the rear view image with dynamic grid lines for up to
10 seconds after the vehicle is shifted out of REVERSE. This delay will be canceled if the vehicle’s speed exceeds 8 mph (13 km/h), the transmission
is shifted into PARK, or the ignition is switched to the OFF position.
20_LD_OM_EN_USC_t.book Page 326
Page 330 of 412
328MULTIMEDIA
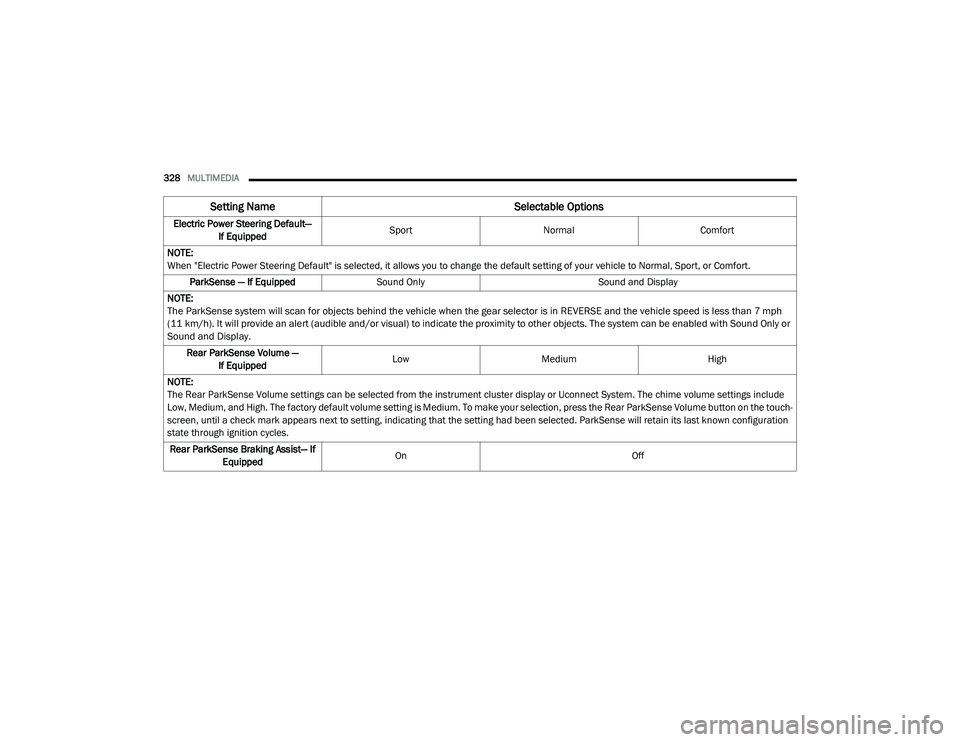
Electric Power Steering Default—
If Equipped Sport
Normal Comfort
NOTE:
When "Electric Power Steering Default" is selected, it allows you to change the default setting of your vehicle to Normal, Sport, or Comfort. ParkSense — If Equipped Sound Only Sound and Display
NOTE:
The ParkSense system will scan for objects behind the vehicle when the gear selector is in REVERSE and the vehicle speed is less than 7 mph
(11 km/h). It will provide an alert (audible and/or visual) to indicate the proximity to other objects. The system can be enabled with Sound Only or
Sound and Display.
Rear ParkSense Volume — If Equipped Low
Medium High
NOTE:
The Rear ParkSense Volume settings can be selected from the instrument cluster display or Uconnect System. The chime volume settings include
Low, Medium, and High. The factory default volume setting is Medium. To make your selection, press the Rear ParkSense Volume button on the touch -
screen, until a check mark appears next to setting, indicating that the setting had been selected. ParkSense will retain its last known configuration
state through ignition cycles.
Rear ParkSense Braking Assist— If Equipped On
Off
Setting Name Selectable Options
20_LD_OM_EN_USC_t.book Page 328
Page 331 of 412
MULTIMEDIA329
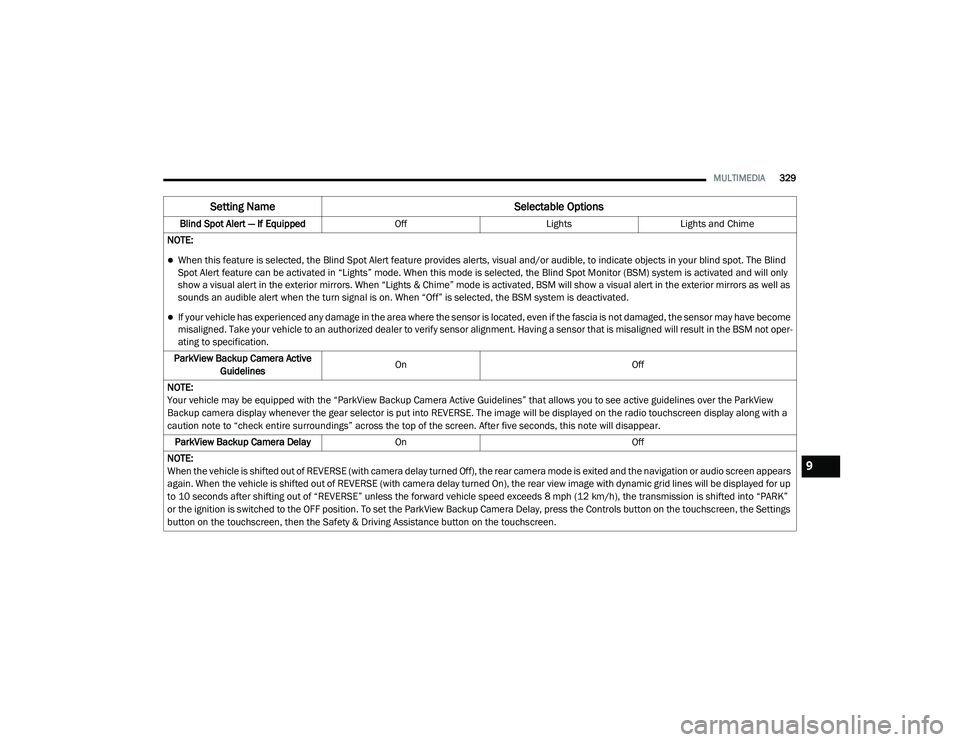
Blind Spot Alert — If Equipped OffLightsLights and Chime
NOTE:
When this feature is selected, the Blind Spot Alert feature provides alerts, visual and/or audible, to indicate objects in your blind spot. The Blind
Spot Alert feature can be activated in “Lights” mode. When this mode is selected, the Blind Spot Monitor (BSM) system is activated and will only
show a visual alert in the exterior mirrors. When “Lights & Chime” mode is activated, BSM will show a visual alert in the exterior mirrors as well as
sounds an audible alert when the turn signal is on. When “Off” is selected, the BSM system is deactivated.
If your vehicle has experienced any damage in the area where the sensor is located, even if the fascia is not damaged, the sensor may have become
misaligned. Take your vehicle to an authorized dealer to verify sensor alignment. Having a sensor that is misaligned will result in the BSM not oper -
ating to specification.
ParkView Backup Camera Active Guidelines On
Off
NOTE:
Your vehicle may be equipped with the “ParkView Backup Camera Active Guidelines” that allows you to see active guidelines over the ParkView
Backup camera display whenever the gear selector is put into REVERSE. The image will be displayed on the radio touchscreen display along with a
caution note to “check entire surroundings” across the top of the screen. After five seconds, this note will disappear. ParkView Backup Camera Delay On Off
NOTE:
When the vehicle is shifted out of REVERSE (with camera delay turned Off), the rear camera mode is exited and the navigation or audio screen appears
again. When the vehicle is shifted out of REVERSE (with camera delay turned On), the rear view image with dynamic grid lines will be displayed for up
to 10 seconds after shifting out of “REVERSE” unless the forward vehicle speed exceeds 8 mph (12 km/h), the transmission is shifted into “PARK”
or the ignition is switched to the OFF position. To set the ParkView Backup Camera Delay, press the Controls button on the touchscreen, the Settings
button on the touchscreen, then the Safety & Driving Assistance button on the touchscreen.
Setting Name Selectable Options
9
20_LD_OM_EN_USC_t.book Page 329
Page 335 of 412
MULTIMEDIA333
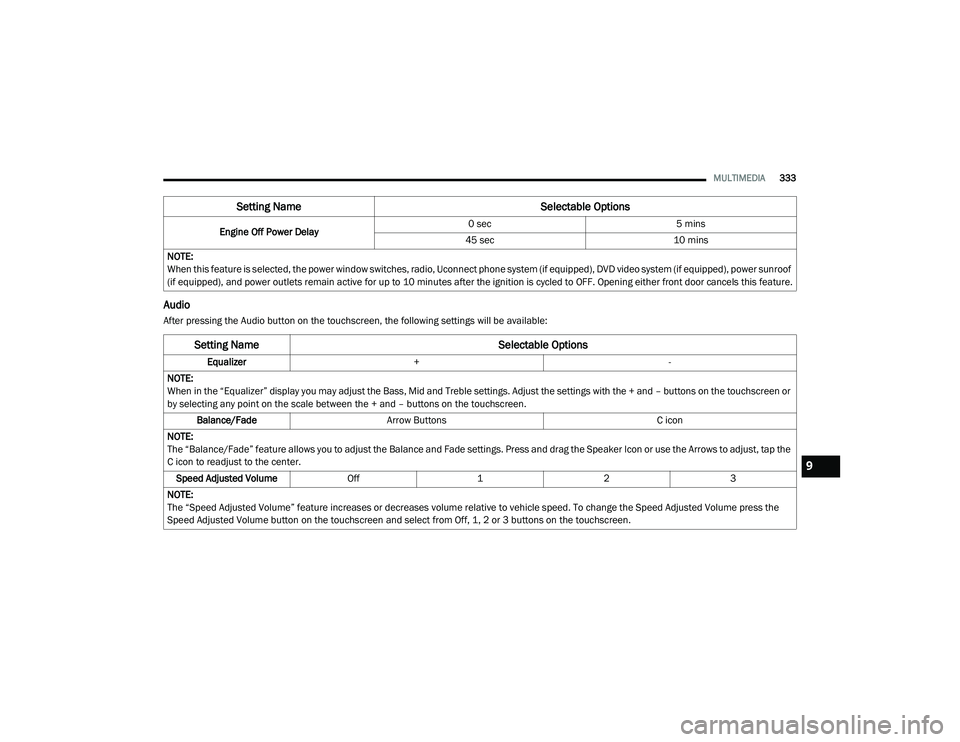
Audio
After pressing the Audio button on the touchscreen, the following settings will be available:Engine Off Power Delay
0 sec
5 mins
45 sec 10 mins
NOTE:
When this feature is selected, the power window switches, radio, Uconnect phone system (if equipped), DVD video system (if equipped), power sunroof
(if equipped), and power outlets remain active for up to 10 minutes after the ignition is cycled to OFF. Opening either front door cancels this feature.
Setting Name Selectable Options
Setting NameSelectable Options
Equalizer+ -
NOTE:
When in the “Equalizer” display you may adjust the Bass, Mid and Treble settings. Adjust the settings with the + and – buttons on the touchscreen or
by selecting any point on the scale between the + and – buttons on the touchscreen. Balance/Fade Arrow Buttons C icon
NOTE:
The “Balance/Fade” feature allows you to adjust the Balance and Fade settings. Press and drag the Speaker Icon or use the Arrows to adjust, tap the
C icon to readjust to the center. Speed Adjusted Volume Off123
NOTE:
The “Speed Adjusted Volume” feature increases or decreases volume relative to vehicle speed. To change the Speed Adjusted Volume press the
Speed Adjusted Volume button on the touchscreen and select from Off, 1, 2 or 3 buttons on the touchscreen.
9
20_LD_OM_EN_USC_t.book Page 333
Page 343 of 412

MULTIMEDIA341
Clock & Date
After pressing the Clock & Date button on the touchscreen, the following settings will be available:
Camera
After pressing the Camera button on the touchscreen, the following settings will be available:
Setting Name Selectable Options
Sync Time With GPS — If Equipped OnOff
NOTE:
The “Sync Time With GPS” feature will allow you to automatically have the radio set the time. Set Time Hours +–
Set Time Minutes +–
Time Format 12 hrs24 hrs
Show Time In Status Bar — If Equipped OnOff
NOTE:
The “Show Time In Status Bar” feature will allow you to turn on or shut off the digital clock in the status bar.
Setting Name Selectable Options
ParkView Backup Camera Delay OnOff
NOTE:
The “ParkView Backup Camera Delay” setting determines whether or not the screen will display the rear view image with dynamic grid lines for up to
10 seconds after the vehicle is shifted out of REVERSE. This delay will be canceled if the vehicle’s speed exceeds 8 mph (13 km/h), the transmission
is shifted into PARK, or the ignition is switched to the OFF position.9
20_LD_OM_EN_USC_t.book Page 341
Page 344 of 412

342MULTIMEDIA
Safety & Driving Assistance
After pressing the Safety & Driving Assistance button on the touchscreen, the following settings will be available:Active ParkView Backup Camera Guidelines —
If Equipped On
Off
NOTE:
The “Active ParkView Backup Camera Guidelines” feature overlays the Rear Backup Camera image with active, or dynamic, grid lines to help illustrate
the width of the vehicle and its projected backup path, based on the steering wheel position when the option is checked. A dashed center line overlay
indicates the center of the vehicle to assist with parking or aligning to a hitch/receiver.
Setting Name Selectable Options
Setting NameSelectable Options
Forward Collision Warning
Sensitivity — If Equipped Near
Far
NOTE:
The “Forward Collision Warning Sensitivity” setting determines at what relative distance the vehicle directly in front of you needs to be at, before the
system will warn you of a possible collision, based on the option selected. “Far” will give you the most amount of reaction time, whereas “Near” will
give you the least amount of reaction time, based on the distance between the two vehicles. Forward Collision Warning — If Equipped On
Off
NOTE:
Changing the FCW status to “Off” prevents the system from warning you of a possible collision with the vehicle in front of you.
The FCW system state is kept in memory from one ignition cycle to the next. If the system is turned Off, it will remain off when the vehicle is restarted.
20_LD_OM_EN_USC_t.book Page 342
Page 345 of 412
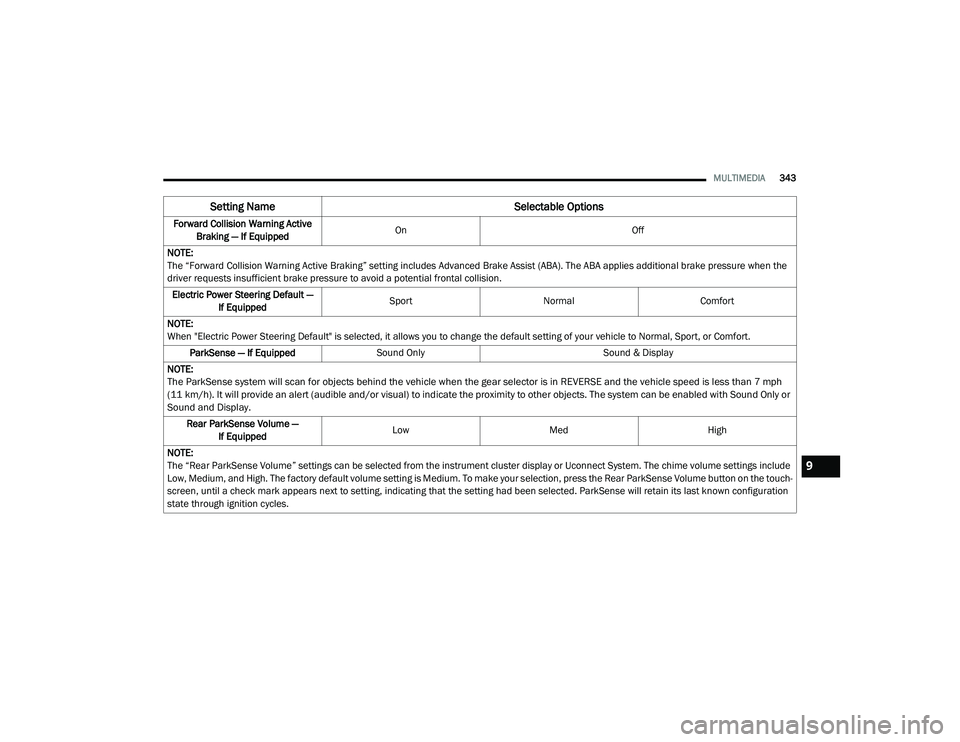
MULTIMEDIA343
Forward Collision Warning Active
Braking — If Equipped On
Off
NOTE:
The “Forward Collision Warning Active Braking” setting includes Advanced Brake Assist (ABA). The ABA applies additional brake pressure when the
driver requests insufficient brake pressure to avoid a potential frontal collision. Electric Power Steering Default — If Equipped Sport
Normal Comfort
NOTE:
When "Electric Power Steering Default" is selected, it allows you to change the default setting of your vehicle to Normal, Sport, or Comfort. ParkSense — If Equipped Sound Only Sound & Display
NOTE:
The ParkSense system will scan for objects behind the vehicle when the gear selector is in REVERSE and the vehicle speed is less than 7 mph
(11 km/h). It will provide an alert (audible and/or visual) to indicate the proximity to other objects. The system can be enabled with Sound Only or
Sound and Display.
Rear ParkSense Volume — If Equipped Low
Med High
NOTE:
The “Rear ParkSense Volume” settings can be selected from the instrument cluster display or Uconnect System. The chime volume settings include
Low, Medium, and High. The factory default volume setting is Medium. To make your selection, press the Rear ParkSense Volume button on the touch -
screen, until a check mark appears next to setting, indicating that the setting had been selected. ParkSense will retain its last known configuration
state through ignition cycles.
Setting Name Selectable Options
9
20_LD_OM_EN_USC_t.book Page 343