2020 DODGE CHARGER ignition
[x] Cancel search: ignitionPage 347 of 412

MULTIMEDIA345
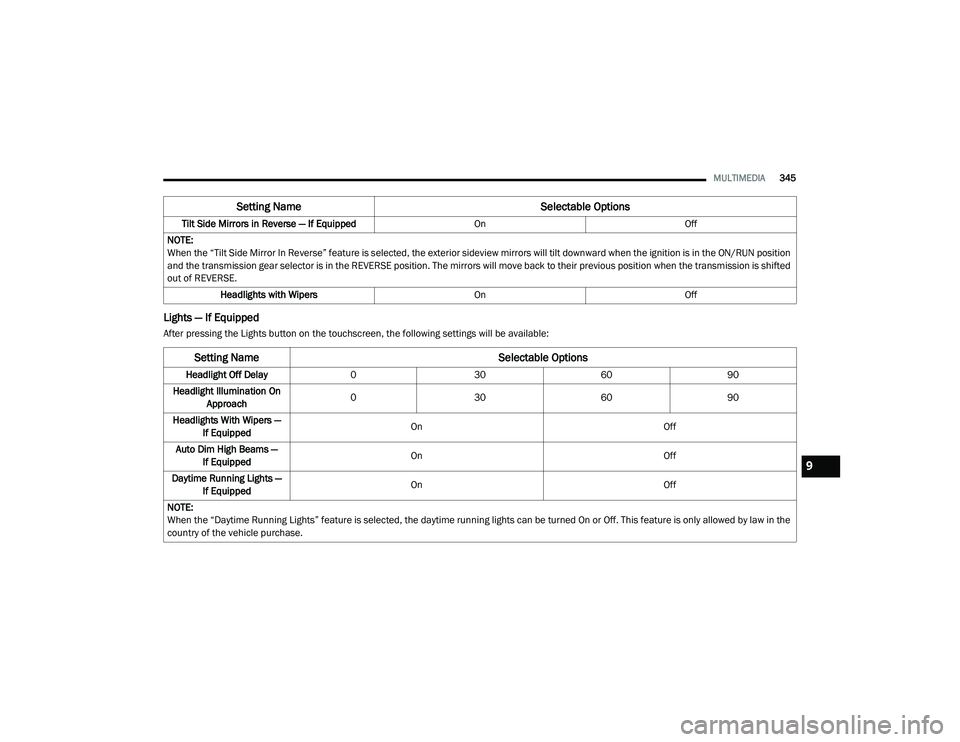
Lights — If Equipped
After pressing the Lights button on the touchscreen, the following settings will be available:Tilt Side Mirrors in Reverse — If Equipped
OnOff
NOTE:
When the “Tilt Side Mirror In Reverse” feature is selected, the exterior sideview mirrors will tilt downward when the ignition is in the ON/RUN position
and the transmission gear selector is in the REVERSE position. The mirrors will move back to their previous position when the transmission is shifted
out of REVERSE. Headlights with Wipers OnOff
Setting Name Selectable Options
Setting NameSelectable Options
Headlight Off Delay 0 30 6090
Headlight Illumination On Approach 0
30 6090
Headlights With Wipers — If Equipped On
Off
Auto Dim High Beams — If Equipped On
Off
Daytime Running Lights — If Equipped On
Off
NOTE:
When the “Daytime Running Lights” feature is selected, the daytime running lights can be turned On or Off. This feature is only allowed by law in the
country of the vehicle purchase.
9
20_LD_OM_EN_USC_t.book Page 345
Page 350 of 412

348MULTIMEDIA
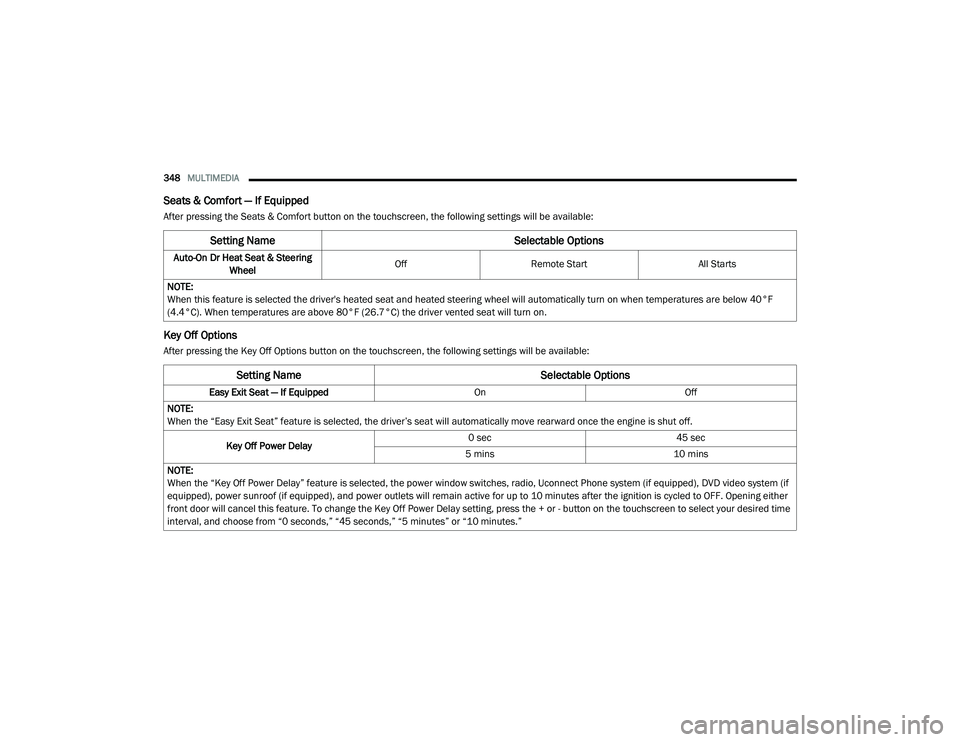
Seats & Comfort — If Equipped
After pressing the Seats & Comfort button on the touchscreen, the following settings will be available:
Key Off Options
After pressing the Key Off Options button on the touchscreen, the following settings will be available:
Setting Name Selectable Options
Auto-On Dr Heat Seat & Steering
Wheel Off
Remote Start All Starts
NOTE:
When this feature is selected the driver's heated seat and heated steering wheel will automatically turn on when temperatures are below 40°F
(4.4°C). When temperatures are above 80°F (26.7°C) the driver vented seat will turn on.
Setting Name Selectable Options
Easy Exit Seat — If EquippedOnOff
NOTE:
When the “Easy Exit Seat” feature is selected, the driver’s seat will automatically move rearward once the engine is shut off.
Key Off Power Delay 0 sec
45 sec
5 mins 10 mins
NOTE:
When the “Key Off Power Delay” feature is selected, the power window switches, radio, Uconnect Phone system (if equipped), DVD video system (if
equipped), power sunroof (if equipped), and power outlets will remain active for up to 10 minutes after the ignition is cycled to OFF. Opening either
front door will cancel this feature. To change the Key Off Power Delay setting, press the + or - button on the touchscreen to select your desired time
interval, and choose from “0 seconds,” “45 seconds,” “5 minutes” or “10 minutes.”
20_LD_OM_EN_USC_t.book Page 348
Page 367 of 412

MULTIMEDIA365
Browse
Press the Browse button on the touchscreen to
display the browse window. The left side of the
browse window displays a list of ways you can
browse through the contents of the USB device/
iPod®. If supported by the device, you can
browse by Folders, Artists, Playlists, Albums,
Songs, etc. Press the desired button on the left
side of the screen. The center of the browse
window shows items and its sub-functions,
which can be scrolled by pressing the Up and
Down buttons to the right. The Tune/Scroll knob
can also be used to scroll.
Media Mode
Press the Media button on the touchscreen to
select the desired audio source: USB.
Repeat
Press the Repeat button on the touchscreen to
toggle the repeat functionality. The Repeat
button on the touchscreen is highlighted when
active. The Radio will continue to play the current
track, repeatedly, as long as the repeat is active.
Press the Repeat button on the touchscreen a
second time to turn this feature off.
Shuffle
Press the Shuffle button on the touchscreen to
play the selections on the USB/iPod® device in
random order to provide an interesting change of
pace. Press the Shuffle button on the touchscreen
a second time to turn this feature off.
Info
Press the Info button on the touchscreen to
display the current track information. Press the
Info button on the touchscreen a second time to
cancel this feature.
Tracks
Press the Tracks button on the touchscreen to
display a pop-up with the Song List. The
currently playing song is indicated by an arrow
and lines above and below the song title. When
in the Tracks List screen, you can rotate the
Tune/Scroll knob to highlight a track (indicated
by the line above and below the track name)
and then push the Enter/Browse knob to start
playing that track.
Pressing the Tracks button on the touchscreen
while the pop-up is displayed will close the
pop-up.Audio
Refer to “Radio Mode” for adjusting the audio
settings.
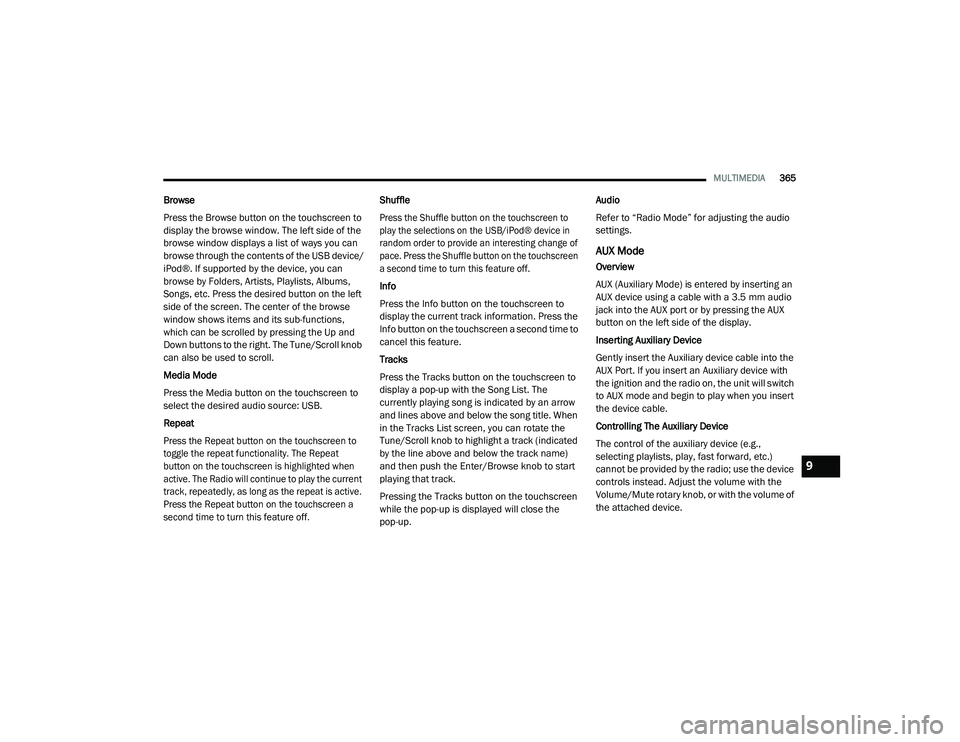
AUX Mode
Overview
AUX (Auxiliary Mode) is entered by inserting an
AUX device using a cable with a 3.5 mm audio
jack into the AUX port or by pressing the AUX
button on the left side of the display.
Inserting Auxiliary Device
Gently insert the Auxiliary device cable into the
AUX Port. If you insert an Auxiliary device with
the ignition and the radio on, the unit will switch
to AUX mode and begin to play when you insert
the device cable.
Controlling The Auxiliary Device
The control of the auxiliary device (e.g.,
selecting playlists, play, fast forward, etc.)
cannot be provided by the radio; use the device
controls instead. Adjust the volume with the
Volume/Mute rotary knob, or with the volume of
the attached device.
9
20_LD_OM_EN_USC_t.book Page 365
Page 376 of 412

374MULTIMEDIA
The system utilizes continuous dialog; when the
system requires more information from the user
it will ask a question to which the user can
respond without pushing the Voice Command
button on your steering wheel.
Help Command
If you need assistance at any prompt, or if you
want to know your options at any prompt, say
“Help” following the beep.
To activate the Uconnect Phone from idle,
simply push the Phone button (if active) on your
steering wheel and say a command or say
“Help.” All Uconnect Phone sessions begin with
a push of the VR button or the Phone button (if
active) on the radio control head.
Cancel Command
At any prompt, after the beep, you can say
“Cancel” and you will be returned to the main
menu.
You can also push the VR button or Phone
button (if active) on your steering wheel when
the system is listening for a command and be
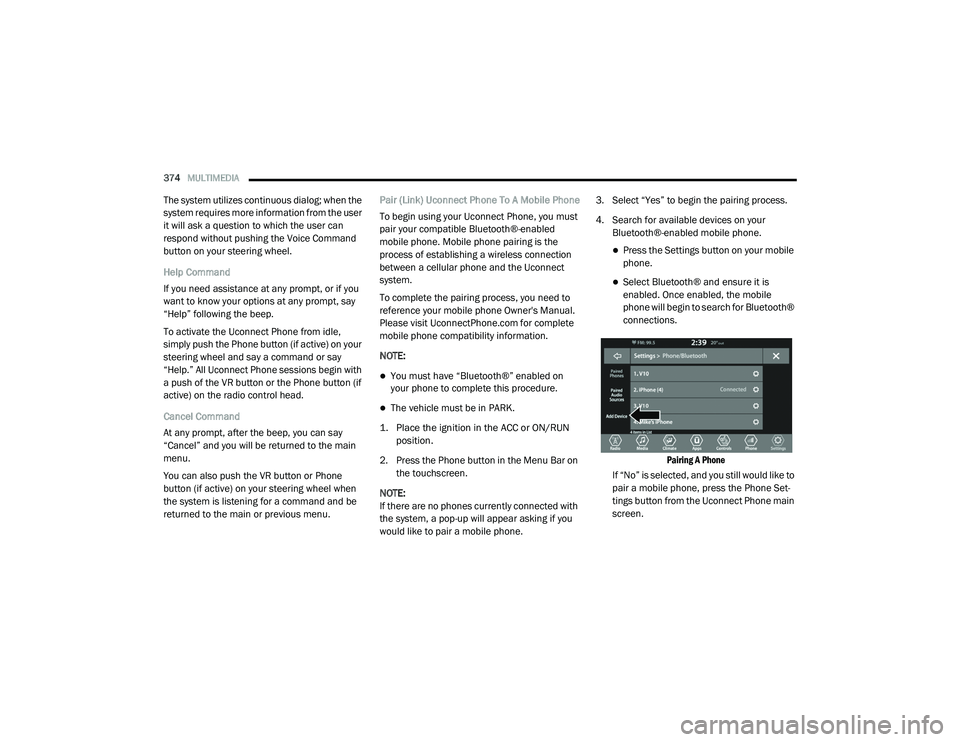
returned to the main or previous menu. Pair (Link) Uconnect Phone To A Mobile Phone
To begin using your Uconnect Phone, you must
pair your compatible Bluetooth®-enabled
mobile phone. Mobile phone pairing is the
process of establishing a wireless connection
between a cellular phone and the Uconnect
system.
To complete the pairing process, you need to
reference your mobile phone Owner's Manual.
Please visit UconnectPhone.com for complete
mobile phone compatibility information.
NOTE:
You must have “Bluetooth®” enabled on
your phone to complete this procedure.
The vehicle must be in PARK.
1. Place the ignition in the ACC or ON/RUN position.
2. Press the Phone button in the Menu Bar on the touchscreen.
NOTE:
If there are no phones currently connected with
the system, a pop-up will appear asking if you
would like to pair a mobile phone. 3. Select “Yes” to begin the pairing process.
4. Search for available devices on your
Bluetooth®-enabled mobile phone.
Press the Settings button on your mobile
phone.
Select Bluetooth® and ensure it is
enabled. Once enabled, the mobile
phone will begin to search for Bluetooth®
connections.
Pairing A Phone
If “No” is selected, and you still would like to
pair a mobile phone, press the Phone Set-
tings button from the Uconnect Phone main
screen.
20_LD_OM_EN_USC_t.book Page 374
Page 382 of 412

380MULTIMEDIA
NOTE:
Only the first 25 characters can be seen on the
touchscreen while typing a custom message.
While in Do Not Disturb, Conference Call can be
selected so you can still place a second call
without being interrupted by incoming calls.
NOTE:
Reply with text message is not compatible
with iPhones®.
Auto reply with text message is only available
on phones that support Bluetooth® MAP.
Place/Retrieve A Call From Hold
During an active call, press the Hold button on
the Phone main screen.
Making A Second Call While Current Call Is In
Progress
You can place a call on hold by pressing the
Hold button on the Phone main screen, then
dial a number from the dialpad, recent calls,
SMS Inbox or from the phonebooks. To go back
to the first call, refer to “Toggling Between Calls”
in this section. To combine two calls, refer to
“Join Calls” in this section. Toggling Between Calls
If two calls are in progress (one active and one
on hold), press the Swap button on the Phone
main screen. Only one call can be placed on
hold at a time.
You can also push the Phone button to toggle
between the active and held phone call.
Join Calls
When two calls are in progress (one active and
one on hold), press the Join Calls button on the
Phone main screen to combine all calls into a
Conference Call.
Call Termination
To end a call in progress, momentarily press the
Phone End button on the touchscreen or the
Phone End button on the steering wheel. Only
the active call(s) will be terminated and if there
is a call on hold, it will become the new active
call.
Redial
Press the Redial button on the touchscreen, or
push the VR button and after the “Listening”
prompt and the following beep, say “Redial.”
The Uconnect Phone will call the last number
that was dialed from your mobile phone.
Call Continuation
Call continuation is the progression of a phone
call on the Uconnect Phone after the vehicle
ignition has been switched to OFF.
NOTE:
The call will remain within the vehicle audio
system until the phone becomes out of range
for the Bluetooth® connection. It is recom
-
mended to press the Transfer button on the
touchscreen when leaving the vehicle.
Browsing SMS
Using the steering wheel commands, you can
view and manage the last 10 SMS messages
received on the instrument panel. To use this
function, the mobile phone must support the
SMS exchange function through Bluetooth®.
Select the PHONE button on the instrument
panel menu, and then select “SMS Reader”
using the arrow keys on the steering wheel
controls.
The “SMS Reader” submenu allows the last 10
SMS messages to be displayed.
20_LD_OM_EN_USC_t.book Page 380
Page 384 of 412

382MULTIMEDIA
Fully Closed Windows
Dry Weather Conditions
Operation From The Driver's Seat
Performance such as audio clarity, echo, and
loudness to a large degree rely on the phone
and network, and not the Uconnect Phone.
Echo at the far end can sometimes be reduced
by lowering the in-vehicle audio volume.
Bluetooth® Communication Link
Mobile phones have been found to lose
connection to the Uconnect Phone. When this
happens, the connection can generally be
re-established by switching the mobile phone
OFF/ON. Your mobile phone is recommended to
remain in Bluetooth® ON mode.
Power-Up
After switching the ignition key from OFF to
either the ON/RUN or ACC position, or after a
language change, you must wait at least 15
seconds prior to using the system.
STEERING WHEEL AUDIO CONTROLS —
IF EQUIPPED
The remote sound system controls are located
on the rear surface of the steering wheel. Reach
behind the wheel to access the switches.
Steering Wheel Audio Controls (Back View Of Steering Wheel)
The right-hand control is a rocker-type switch
with a push button in the center and controls
the volume and mode of the sound system.
Pushing the top of the rocker switch will
increase the volume, and pushing the bottom of
the rocker switch will decrease the volume.
Pushing the center button will make the radio
switch between the various modes available
(AM/FM/SAT/AUX, etc.). The left-hand control is a rocker-type switch with
a push button in the center. The function of the
left-hand control is different depending on
which mode you are in.
The following describes the left-hand control
operation in each mode.
RADIO OPERATION
Pushing the top of the switch will “Seek” up for
the next listenable station and pushing the
bottom of the switch will “Seek” down for the
next listenable station.
The button located in the center of the left-hand
control will tune to the next preset station that
you have programmed in the radio preset button.
MEDIA MODE
Pushing the top of the switch once goes to the
next track on the selected media (AUX/USB/
Bluetooth®). Pushing the bottom of the switch
once goes to the beginning of the current track,
or to the beginning of the previous track if it is
within eight seconds after the current track
begins to play.
NOTE:
While In Media Mode, the center button on the
left rocker switch is nonfunctional.
20_LD_OM_EN_USC_t.book Page 382
Page 401 of 412

399
I
Ignition
............................................................ 18Switch......................................................... 18In Vehicle Help Vehicle User Guide...................................... 11Information Center, Vehicle............................. 86Inside Rearview Mirror..................... 41, 42, 212Instrument Cluster............................. 80, 82, 84Descriptions.............................................. 103Display................................................. 85, 88Instrument Panel Lens Cleaning.................... 306Interior Appearance Care............................... 306Interior Lights.................................................. 48Intermittent Wipers (Delay Wipers).................. 51Introduction....................................................... 8iPod/USB/MP3 Control................................. 364
J
Jack Location................................................. 230Jack Operation............................................... 286Jump Starting...................................... 240, 241
K
Key FobArm The System
.......................................... 24Panic Alarm................................................. 15Programming Additional Key Fobs....... 17, 23Unlatch The Trunk....................................... 14
Key Fob Battery Service (Remote
Keyless Entry).................................................... 15
Key Fob Programming (Remote
Keyless Entry).................................................. 17Key-In Reminder.............................................. 19Keyless Enter-N-Go.................................26, 162Enter The Trunk........................................... 14Passive Entry............................................... 26Passive Entry Programming......................... 26Keys................................................................. 12Replacement........................................ 17, 23
L
Lane Change And Turn Signals........................ 48Lane Change Assist......................................... 48LaneSense.................................................... 196Lap/Shoulder Belts....................................... 127Latches......................................................... 158Hood............................................................ 68Lead Free Gasoline....................................... 309Leaks, Fluid.................................................. 158Life Of Tires................................................... 296Light Bulbs........................................... 157, 217Lights............................................................ 157Air Bag...................................... 95, 134, 156Automatic Headlights.................................. 47Brake Assist Warning............................... 111Brake Warning....................................95, 308Bulb Replacement.................................... 217
Cruise.............................................. 102, 103Daytime Running.........................................45Dimmer Switch, Headlight.................... 45, 46Exterior.............................................. 45, 157Fog...............................................................48Hazard Warning Flasher........................... 212Headlight Switch..........................................45Headlights............................................ 45, 47Headlights On With Wipers..........................47High Beam...................................................46High Beam/Low Beam Select......................46Instrument Cluster.......................................45Intensity Control..........................................50Interior.........................................................48License..................................................... 220Lights On Reminder.....................................47Malfunction Indicator (Check Engine)..........98Park................................................... 47, 102Passing........................................................46Reading.......................................................49Seat Belt Reminder.....................................97Security Alarm.............................................98Service...................................................... 217Traction Control........................................ 111Turn Signals....................... 45, 48, 103, 157Vanity Mirror................................................44Warning Instrument Cluster Descriptions.................................. 97, 10311
20_LD_OM_EN_USC_t.book Page 399