2020 DODGE CHARGER ignition
[x] Cancel search: ignitionPage 174 of 412

172STARTING AND OPERATING
3. Push and hold the ignition switch until the
engine turns off.
4. Wait approximately 30 seconds.
5. Restart the engine.
6. Shift into the desired gear range. If the problem is no longer detected, the
transmission will return to normal
operation.
NOTE:
Even if the transmission can be reset, we
recommend that you visit an authorized dealer
at your earliest possible convenience. An autho -
rized dealer has diagnostic equipment to
assess the condition of your transmission.
If the transmission cannot be reset, authorized
dealer service is required.
AutoStick — If Equipped
AutoStick is a driver-interactive transmission
feature providing manual shift control, giving
you more control of the vehicle. AutoStick
allows you to maximize engine braking,
eliminate undesirable upshifts and downshifts,
and improve overall vehicle performance. This system can also provide you with more
control during passing, city driving, cold slippery
conditions, mountain driving, trailer towing, and
many other situations.
Operation
When the gear selector is in the DRIVE (D)
position, the transmission will operate
automatically, shifting between the eight
available gears. To activate AutoStick, move the
gear selector into the MANUAL (M) position
(beside the DRIVE position). The current
transmission gear will be displayed in the
instrument cluster, along with a highlighted "M"
(Manual) indication. When the gear selector is
in the MANUAL (M) position, tap the gear
selector forward (-) or tap the (-) shift paddle on
the steering wheel (if equipped) to downshift
the transmission to the next lower gear, or tap
the lever rearward (+) or tap the (+) shift paddle
(if equipped) to command an upshift.
Paddle Shifters
NOTE:
Tapping one of the steering wheel-mounted
shift paddles (+/-) (if equipped) while the gear
selector is in DRIVE, will activate a temporary
AutoStick mode. Tapping (-) to enter AutoStick
mode will downshift the transmission to the
next lower gear, while tapping (+) to enter
AutoStick mode will retain the current gear.
The current gear will be displayed in the instru -
ment cluster, but the "M" will not be high -
lighted. The transmission will revert back to
normal operation (if the gear selector remains
in DRIVE) after a period of time, depending on
accelerator pedal activity.
1 — Shift Paddle Downshift
2 — Shift Paddle Upshift
20_LD_OM_EN_USC_t.book Page 172
Page 179 of 412

STARTING AND OPERATING177
TO ACCELERATE FOR PASSING
Press the accelerator as you would normally.
When the pedal is released, the vehicle will
return to the set speed.
Using Speed Control On Hills
The transmission may downshift on hills to
maintain the vehicle set speed.
NOTE:
The Speed Control system maintains speed up
and down hills. A slight speed change on
moderate hills is normal.
On steep hills, a greater speed loss or gain may
occur so it may be preferable to drive without
Speed Control.
TO RESUME SPEED
To resume a previously set speed, push the RES
button and release. Resume can be used at any
speed above 20 mph (32 km/h).
TO DEACTIVATE
A soft tap on the brake pedal, pushing the CANC
button, or normal brake pressure while slowing
the vehicle will deactivate the Speed Control
without erasing the set speed from memory.
Pushing the on/off button or placing the ignition
in the OFF position erases the set speed from
memory.
The following conditions will also deactivate the
Speed Control without erasing the set speed
from memory:
Vehicle parking brake is applied
Stability event occurs
Gear selector is moved out of DRIVE
Engine overspeed occurs
ADAPTIVE CRUISE CONTROL (ACC) —
IF EQUIPPED
Adaptive Cruise Control (ACC) increases the
driving convenience provided by cruise control
while traveling on highways and major
roadways. However, it is not a safety system
and not designed to prevent collisions. Speed
Control function performs differently. Please
refer to the proper section within this chapter.
ACC will allow you to keep cruise control
engaged in light to moderate traffic conditions
without the constant need to reset your cruise
control. ACC utilizes a radar sensor and a
forward facing camera designed to detect a
vehicle directly ahead of you.
NOTE:
If the sensor does not detect a vehicle ahead
of you, ACC will maintain a fixed set speed.
If the ACC sensor detects a vehicle ahead,
ACC will apply limited braking or accelerate
(not to exceed the original set speed) auto -
matically to maintain a preset following
distance, while matching the speed of the
vehicle ahead.
WARNING!
Speed Control can be dangerous where the
system cannot maintain a constant speed.
Your vehicle could go too fast for the
conditions, and you could lose control and
have an accident. Do not use Speed Control
in heavy traffic or on roads that are winding,
icy, snow-covered or slippery.
5
20_LD_OM_EN_USC_t.book Page 177
Page 183 of 412
STARTING AND OPERATING181
Remove your foot from the accelerator pedal. If
you do not, the vehicle may continue to
accelerate beyond the set speed. If this occurs:
The message “DRIVER OVERRIDE” will
display in the instrument cluster display.
The system will not be controlling the
distance between your vehicle and the
vehicle ahead. The vehicle speed will only be
determined by the position of the accelerator
pedal.
TO CANCEL
The following conditions cancel the system:
The brake pedal is applied.
The CANC button is pushed.
An Anti-Lock Brake System (ABS) event
occurs.
The gear selector is removed from the DRIVE
position.
The braking temperature exceeds normal
range (overheated).
The Electronic Stability Control/Traction
Control System (ESC/TCS) activates.
The vehicle parking brake is applied.
Driver seat belt is unbuckled at low speeds.
Driver door is opened at low speeds.
The driver switches ESC to Full Off mode.
NOTE:
If your vehicle stays at standstill for longer than
two seconds, then the system will cancel and
the brake force will be ramped-out. The driver
will have to apply the brakes to keep the vehicle
at a standstill.
TO TURN OFF
The system will turn off and clear the set speed
in memory if:
The Adaptive Cruise Control (ACC) on/off
button is pushed.
The Normal (Fixed Speed) Cruise Control on/
off button is pushed.
The ignition is placed in the OFF position.
TO RESUME
If there is a set speed in memory push the RES
(resume) button and then remove your foot
from the accelerator pedal. The instrument
cluster display will display the last set speed.
NOTE:
ACC cannot be resumed if there is a stationary
vehicle in front of your vehicle in close proximity.
TO VARY THE ACC SPEED
To Increase Speed
While ACC is set, you can increase the set speed
by pushing the SET (+) button.
WARNING!
The Resume function should only be used if
traffic and road conditions permit. Resuming
a set speed that is too high or too low for
prevailing traffic and road conditions could
cause the vehicle to accelerate or decelerate
too sharply for safe operation. Failure to
follow these warnings can result in a collision
and death or serious personal injury.5
20_LD_OM_EN_USC_t.book Page 181
Page 189 of 412
STARTING AND OPERATING187
Service ACC/FCW Warning
If the system turns off, and the instrument
cluster displays “ACC/FCW Unavailable Service
Required” or “Cruise/FCW Unavailable Service
Required”, there may be an internal system
fault or a temporary malfunction that limits ACC
functionality. Although the vehicle is still
drivable under normal conditions, ACC will be
temporarily unavailable. If this occurs, try
activating ACC again later, following an ignition
cycle. If the problem persists, see an authorized
dealer.
PRECAUTIONS WHILE DRIVING WITH
ACC
In certain driving situations, ACC may have
detection issues. In these cases, ACC may
brake late or unexpectedly. The driver needs to
stay alert and may need to intervene.
Towing A Trailer
Towing a trailer is not advised when using ACC.
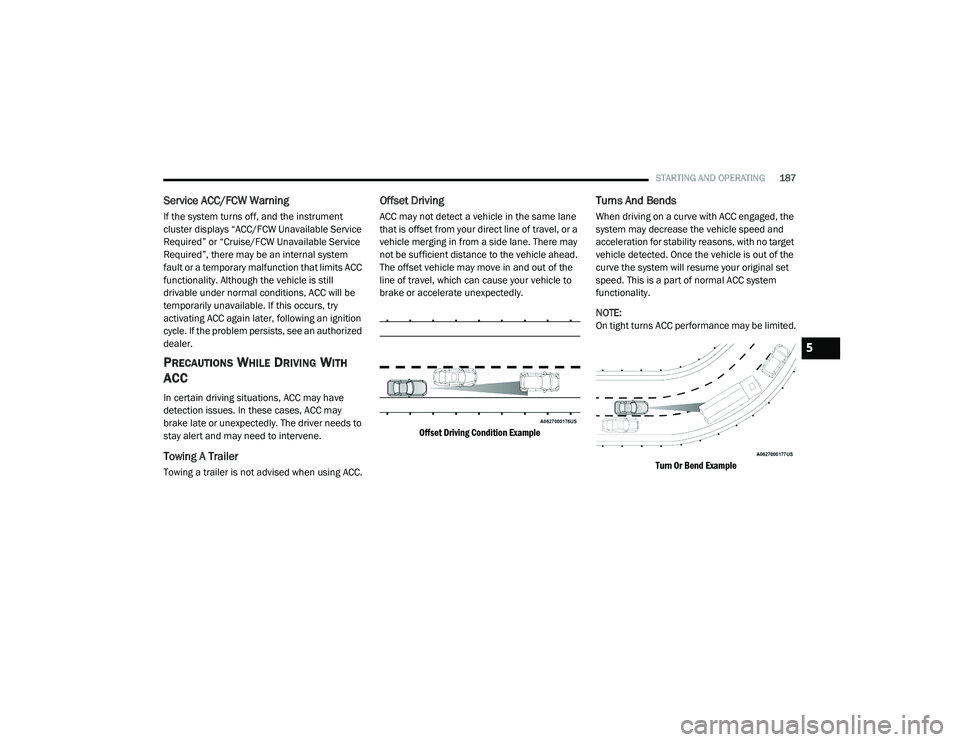
Offset Driving
ACC may not detect a vehicle in the same lane
that is offset from your direct line of travel, or a
vehicle merging in from a side lane. There may
not be sufficient distance to the vehicle ahead.
The offset vehicle may move in and out of the
line of travel, which can cause your vehicle to
brake or accelerate unexpectedly.
Offset Driving Condition Example
Turns And Bends
When driving on a curve with ACC engaged, the
system may decrease the vehicle speed and
acceleration for stability reasons, with no target
vehicle detected. Once the vehicle is out of the
curve the system will resume your original set
speed. This is a part of normal ACC system
functionality.
NOTE:
On tight turns ACC performance may be limited.
Turn Or Bend Example
5
20_LD_OM_EN_USC_t.book Page 187
Page 193 of 412
STARTING AND OPERATING191
If the button is continually pushed, the set
speed will continue to decrease in 5 mph
decrements until the button is released. The
decrease in set speed is reflected in the
instrument cluster display.
Metric Speed (km/h)
Pushing the SET (-) button once will result in
a 1 km/h decrease in set speed. Each subse -
quent tap of the button results in a decrease
of 1 km/h.
If the button is continually pushed, the set
speed will continue to decrease in 10 km/h
decrements until the button is released. The
decrease in set speed is reflected in the
instrument cluster display.
To Cancel
The following conditions will cancel the Normal
(Fixed Speed) Cruise Control without clearing
the memory:
The brake pedal is applied.
The CANC button is pushed.
The Electronic Stability Control/Traction
Control System (ESC/TCS) activates.
The vehicle parking brake is applied.
The braking temperature exceeds normal
range (overheated).
The gear selector is removed from the DRIVE
position.
The driver switches ESC to Full Off mode.
To Resume Speed
To resume a previously set speed, push the RES
button and release. Resume can be used at any
speed above 20 mph (32 km/h).
To Turn Off
The system will turn off and erase the set speed
in memory if:
The Normal (Fixed Speed) Cruise Control on/
off button is pushed.
The ignition is placed in the OFF position.
The Adaptive Cruise Control (ACC) on/off
button is pushed.
PARKSENSE REAR PARK ASSIST —
IF EQUIPPED
The ParkSense Rear Park Assist system
provides visual and audible indications of the
distance between the rear fascia and a
detected obstacle when backing up (e.g. during
a parking maneuver).
Refer to “ParkSense System Usage
Precautions” in this section for limitations of
this system and recommendations.
ParkSense will retain the system state (enabled
or disabled) from the previous ignition cycle
when the ignition is changed to the ON/RUN
position.
ParkSense can be active only when the gear
selector is in REVERSE. If ParkSense is enabled
at this gear selector position, the system will
remain active until the vehicle speed is
increased to approximately 7 mph (11 km/h) or
above. The system will become active again if
the vehicle speed is decreased to speeds less
than approximately 6 mph (9 km/h).
5
20_LD_OM_EN_USC_t.book Page 191
Page 197 of 412

STARTING AND OPERATING195
SERVICE THE PARKSENSE REAR PARK
A
SSIST SYSTEM
During vehicle start up, when the ParkSense
Rear Park Assist System has detected a faulted
condition, the instrument cluster display will
actuate a single chime, once per ignition cycle,
and it will display the “PARKSENSE
UNAVAILABLE WIPE REAR SENSORS” or the
“PARKSENSE UNAVAILABLE SERVICE
REQUIRED” message. Refer to “Instrument
Cluster Display” in “Getting To Know Your
Instrument Panel” for further information.
When the gear selector is moved to REVERSE
and the system has detected a faulted
condition, the instrument cluster display will
show the "PARKSENSE UNAVAILABLE WIPE
REAR SENSORS" or "PARKSENSE UNAVAILABLE
SERVICE REQUIRED" message for as long as the
vehicle is in REVERSE. Under this condition,
ParkSense will not operate.
If “PARKSENSE UNAVAILABLE WIPE REAR
SENSORS” appears in the instrument cluster
display, make sure the outer surface and the
underside of the rear fascia/bumper is clean
and clear of snow, ice, mud, dirt or other
obstruction and then cycle the ignition. If the message continues to appear, see an
authorized dealer.
If “PARKSENSE UNAVAILABLE SERVICE
REQUIRED” appears in the instrument cluster
display, see an authorized dealer.
CLEANING THE PARKSENSE SYSTEM
Clean the Rear Park Assist sensors with water,
car wash soap and a soft cloth. Do not use
rough or hard cloths. In washing stations, clean
sensors quickly keeping the vapor jet/high
pressure washing nozzles at least 4 inches
(10 cm) from the sensors. Do not scratch or
poke the sensors. Otherwise, you could
damage the sensors.
PARKSENSE SYSTEM USAGE
P
RECAUTIONS
NOTE:
Ensure that the rear bumper is free of snow, ice,
mud, dirt and debris to keep the ParkSense
system operating properly.
Jackhammers, large trucks, and other vibrations
could affect the performance of ParkSense or
render the system temporarily unavailable.
When you turn ParkSense off in DRIVE, the
instrument cluster will display "PARKSENSE
OFF" for five seconds. Furthermore, once you
turn ParkSense off, it remains off until you
turn it on again, even if you cycle the ignition.
When you move the gear selector to the
REVERSE position and ParkSense is turned
off, the instrument cluster display will show
the “PARKSENSE OFF” message for as long
as the vehicle is in REVERSE.
ParkSense will reduce the volume of the
radio when it is sounding an audio tone.
Clean the ParkSense sensors regularly,
taking care not to scratch or damage them.
The sensors must not be covered with ice,
snow, slush, mud, dirt or debris. Failure to do
so can result in the system not working prop -
erly. The ParkSense system might not detect
an obstacle behind the fascia/bumper, or it
could provide a false indication that an
obstacle is behind the fascia/bumper.
Ensure the ParkSense system is off if objects
such as bicycle carriers, trailer hitches, etc.,
are placed within 12 inches (30 cm) from the
rear fascia/bumper. Failure to do so can
result in the system misinterpreting a close
5
20_LD_OM_EN_USC_t.book Page 195
Page 199 of 412
STARTING AND OPERATING197
To turn the LaneSense system on,
push the LaneSense button (LED
turns off). A “LaneSense On”
message is shown in the instrument
cluster display.
To turn the LaneSense system off, push the
LaneSense button once (LED turns on).
NOTE:
The LaneSense system will retain the last
system state, on or off, from the last ignition
cycle when the ignition is changed to the ON/
RUN position.
LANESENSE WARNING MESSAGE
The LaneSense system will indicate the current
lane drift condition through the instrument
cluster display.
Premium Instrument Cluster Display Screen —
If Equipped
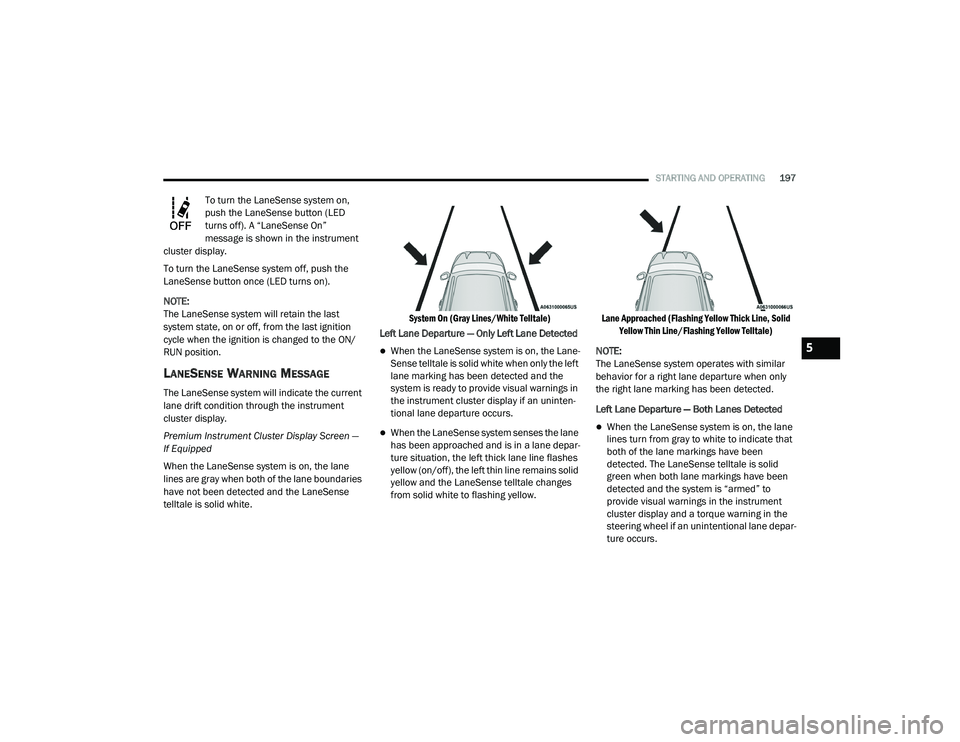
When the LaneSense system is on, the lane
lines are gray when both of the lane boundaries
have not been detected and the LaneSense
telltale is solid white.
System On (Gray Lines/White Telltale)
Left Lane Departure — Only Left Lane Detected
When the LaneSense system is on, the Lane-
Sense telltale is solid white when only the left
lane marking has been detected and the
system is ready to provide visual warnings in
the instrument cluster display if an uninten -
tional lane departure occurs.
When the LaneSense system senses the lane
has been approached and is in a lane depar -
ture situation, the left thick lane line flashes
yellow (on/off), the left thin line remains solid
yellow and the LaneSense telltale changes
from solid white to flashing yellow.
Lane Approached (Flashing Yellow Thick Line, Solid
Yellow Thin Line/Flashing Yellow Telltale)
NOTE:
The LaneSense system operates with similar
behavior for a right lane departure when only
the right lane marking has been detected.
Left Lane Departure — Both Lanes Detected When the LaneSense system is on, the lane
lines turn from gray to white to indicate that
both of the lane markings have been
detected. The LaneSense telltale is solid
green when both lane markings have been
detected and the system is “armed” to
provide visual warnings in the instrument
cluster display and a torque warning in the
steering wheel if an unintentional lane depar -
ture occurs.
5
20_LD_OM_EN_USC_t.book Page 197
Page 201 of 412
STARTING AND OPERATING199
CHANGING LANESENSE STATUS
The LaneSense system settings can be
configured through the Uconnect system
screen.
Follow these steps to change the LaneSense
settings:
1. Press the “Controls” button located on the
bottom of the Uconnect touchscreen
display.
2. Press the “Settings” button.
3. Press the “Safety & Driving Assistance” button.
When in the Safety & Driving Assistance screen,
you can configure the intensity of the torque
warning and the warning zone sensitivity (early/
late) through the personalization settings.
NOTE:
When enabled the system operates above
37 mph (60 km/h) and below 112 mph (180 km/h).
Use of the turn signal suppresses the warn -
ings.
The system will not apply torque to the
steering wheel whenever a safety system
engages. (Anti-Lock Brakes, Traction Control
System, Electronic Stability Control, Forward
Collision Warning, etc.)
PARKVIEW REAR BACK UP CAMERA
Your vehicle is equipped with the ParkView Rear
Back Up Camera that allows you to see an
on-screen image of the rear surroundings of
your vehicle whenever the gear selector is put
into REVERSE. The ParkView camera is located
on the rear of the vehicle above the rear license
plate. The image will be displayed in the
touchscreen display along with a caution note
to “Check Entire Surroundings” across the top
of the screen. After five seconds, this note will
disappear.
NOTE:
The ParkView Rear Back Up Camera has
programmable modes of operation that may be
selected through the Uconnect system. Refer to
“Uconnect Settings” in “Multimedia” for further
information. If your vehicle is equipped with the Camera
Delay feature and it is turned on, the rear
camera image will be displayed for up to 10
seconds when the vehicle is shifted out of
REVERSE. However, this feature is canceled if
the forward vehicle speed exceeds 8 mph
(13 km/h), the transmission is shifted into
PARK, the vehicle's ignition is placed in the OFF
position, or by pressing the image defeat “X”
button.
If your vehicle is not equipped with the Camera
Delay feature, or it is turned off, when the
vehicle is shifted out of REVERSE the rear
camera mode is exited and the previous
touchscreen display appears again.
When enabled, active guidelines are overlaid on
the image to illustrate the width of the vehicle
and its projected backup path based on the
steering wheel position. The active guidelines
will show separate zones that will help indicate
the distance to the rear of the vehicle.
5
20_LD_OM_EN_USC_t.book Page 199