Page 25 of 244

23
Instruments01
– Audio system and telephone controls and
display of related information.
–
V
ehicle function and equipment setting menus.
–
Air c
onditioning system controls (depending on
version).
For safety reasons, always stop the
vehicle before performing operations that
require sustained attention.
Some functions are not accessible while
driving.
Recommendations
Do not use pointed objects on the touch screen.
Do not touch the touch screen with wet hands.
Use a soft, clean cloth to clean the touch screen.
Main commands
With the ignition off: system start-up.
With the engine running: mute.
Left thumbwheel: volume adjustment
(rotation)/direct access to the Media
menu (press).
Right thumbwheel: air flow adjustment (rotation)/
direct access to the Air conditioning menu
(press).
Access to menus.
Return to the previous screen or confirm.
After a few moments with no action on
the second page, the first page is
displayed automatically.
Menus
Radio
See the "Audio equipment and telematics"
section.
Media
See the "Audio equipment and telematics"
section.
Air conditioning
Settings for temperature, air flow, etc.
For more information on the Manual air
conditioning, refer to the corresponding section.
Telephone
See the "Audio equipment and telematics"
section.
Driving
Activation, deactivation and settings of
certain functions.
Settings
Main system settings.
7-inch or 10-inch touch
screen
This system gives access to the following
elements:
–
Permanen
t display of the time and the exterior
temperature (a blue warning lamp appears if
there is a risk of ice).
–
Hea
ting/air conditioning controls.
–
V
ehicle functions and equipment setting
menus.
–
Audio s
ystem and telephone controls and
display of related information.
–
Displa
y of visual manoeuvring aid functions
(visual parking sensor information, Park Assist,
etc.).
–
In
ternet services and display of related
information.
–
Na
vigation system controls and
display of related information (depending on
version).
For safety reasons, always stop the
vehicle before performing operations that
require sustained attention.
Some functions are not accessible while
driving.
Recommendations
This screen is of the capacitive type.
Do not use pointed objects on the touch screen.
Do not touch the touch screen with wet hands.
Page 26 of 244

24
Instruments01
Use a soft, clean cloth to clean the touch screen.
Principles
► Use the buttons arranged below the touch
screen for access to the menus, then press the
virtual buttons on the touch screen.
Some menus may display across two pages: press
the "OPTIONS" button to access the second page.
After a few moments with no action on
the second page, the first page is
displayed automatically.
To deactivate/activate a function, select "OFF"
or "ON".
Settings for a function
Access to additional information on the
function
Confirm
Return to the previous page or confirm
* The TomTom Traffic logo displayed on the map confirms the availability of connected navigation services. For more information, refer to the connected
navigation section.
**
Depending on equipmen
t.
Menus
Press with three fingers on the touch
screen to show all menu buttons.
Radio / Media
See "Audio and telematics" section..
Climate
Settings for temperature, air flow, etc.
For more information on Automatic air
conditioning, refer to the corresponding section.
Connected Navigation*
See "Audio and telematics" section.
Driving or Vehicle**
Activation, deactivation and settings for
certain functions.
The functions are organised in 2 tabs : "Driving
functions" and "Vehicle settings".
Telephone See "Audio and telematics" section..
Applications
Access to certain configurable equipment.
Electric / Energy
Access the specific Electric functions
(energy flow, consumption statistics, deferred
charge) organised in the corresponding 3 tabs.
Settings
Main settings for the audio system, touch
screen and digital instrument panel.
Audio system on/off.
See "Audio and telematics" section.
Volume adjustment.
See "Audio and telematics" section.
Information banner(s)
Certain information is displayed permanently in
the touch screen banner(s).
Upper banner of the DS CONNECT RADIO
– Time and e xterior temperature (a blue warning
lamp appears when there is a risk of ice).
–
R
eminder of the air conditioning information,
and direct access to the corresponding menu.
–
R
eminder of the RadioMedia and Telephone
menus information.
–
Notifications.
Page 27 of 244
.
Side banners of the DS CONNECT NAV
– Exterior temperature (a blue")
25
Instruments01
– Access to the Settings of the touch screen and
digital instrument panel (date/time, languages,
units, etc.).
Side banners of the DS CONNECT NAV
– Exterior temperature (a blue warning lamp
appears when there is a risk of ice).
–
Ac
cess to the Settings of the touch screen and
digital instrument panel (date/time, languages,
units, etc.).
–
Notifications.
–
R
eminder of the air conditioning information,
and direct access to the corresponding menu.
–
Ac
cess to the heated seat settings.
–
Time.
Electric / Energy menu
Depending on version, this is accessible either:– directly, by pressing the button near the
touch screen.
– via the Applications menu.
Energy flows
The Flow tab provides a real-time representation
of the electric drive train’s operation.
1.Active driving mode
2. Electric motor
3. Traction battery charge level
4. Energy flows
The energy flows have a specific colour for each
type of driving:
A. Blue: energy consumption
B. Green: energy recovery
Consumption statistics
The Statistics tab shows electrical energy
consumption statistics.
– Blue bar chart: directly c onsumed energy
supplied by the traction battery.
–
G
reen bar chart: energy recovered during
deceleration and braking, used to recharge the
battery. The average result for the current trip is stated in
kWh/100 km.
►
You can change the displayed time scale by
pressing the - or + buttons.
Deferred charge
By default, charging begins immediately when
the nozzle is plugged in. The system can be
programmed to defer charging.
Settings
► In the Electric / Energy touch screen menu,
select the Charge tab.
► Set the charging start time.
► Press OK.
The settings are saved in the system.
You can also program the deferred charge
function using a smartphone, via the
MyDS application.
For more information on Remotely operable
features, refer to the corresponding section.
Activation
► Connect the vehicle to the desired charging
equipment.
► Press this button within one minute to
activate the system (confirmed by the
charging indicator lamp coming on in blue).
Page 28 of 244
26
Instruments01
Remotely operable
features (Electric)
These features are accessible
using a smartphone, via the
MyDS application:
–
Ba
ttery charge management.
–
Programmed hea
ting management.
–
Consumption
, charge status and driving range
statistics.
Installation procedure
► Download the MyDS app from the appropriate
online store for your smartphone.
► Create your user account.
► Enter your vehicle’s VIN number (code
beginning with "VF" on the vehicle registration
document).
For more information on Identification markings,
refer to the corresponding section.
Network coverage
In order to be able to use the various
remotely operable features, ensure that your
vehicle is located in an area covered by the
mobile network.
A lack of network coverage may prevent
communication with the vehicle (for example,
if it is in an underground car park). In such
cases, the application will display a message
indicating that the connection with the vehicle
could not be established.
Page 29 of 244

27
Access02
Electronic key with remote
control function and
built-in key,
Remote control function
The remote control can be used for the following
remote functions, depending on version:
–
U
nlocking / Locking / Deadlocking the vehicle.
–
U
nlocking / Locking the boot.
–
Folding / U
nfolding the door mirrors.
–
Folding / U
nfolding the exterior door handles.
–
Activ
ating / Deactivating the alarm.
–
Loc
ating the vehicle.
–
O
pening / Closing the windows.
–
Activ
ating the vehicle’s electronic immobiliser.
Integral key
The key built into the remote control can be
used for the following operations, depending on
version:
–
Activ
ation/Deactivation of the manual child
lock. –
Activ
ation/Deactivation of the front passenger
airbag.
–
Back
-up Unlocking/Locking of the doors.
►
To eject the key or put it back in place, pull and
hold the button.
Unlocking the vehicle
The selective unlocking (driver’s door,
boot) is set via the Driving / Vehicle touch
screen menu.
Complete unlocking
► Press the unlocking button.
The vehicle's door handles, and depending on
version, the door mirrors, unfold.
Selective unlocking
Driver’s door and fuel/charging flap
► Press the unlocking button.
► Press it again to unlock the other doors and
the boot.
Complete or selective unlocking, and alarm
deactivation depending on version, is confirmed
by the flashing of the direction indicators and the
lighting of the daytime running lamps.
Selective unlocking of the boot
When selective unlocking of the boot is activated :► Press this button to unlock the boot.
The doors remain locked.
Depending on version, pressing and holding this
button causes the boot to open slightly.
If selective unlocking of the boot is deactivated,
pressing this button also unlocks the doors.
Do not forget to lock the boot again by
pressing the locking button.
Locking the vehicle
Normal locking
► Press the locking button.
The locking, and the activation of the alarm
depending on version, is confirmed by the lighting
of the direction indicators and the daytime
running lamps.
The vehicle's handles retract and, depending on
version, the door mirrors fold.
Page 30 of 244
 is
configured in the Driving/Vehicle touch
screen menu.
Selective unlocking is deactivated by default.
Complete unlo")
28
Access02
Unlocking the vehicle
Selective unlocking (driver’s door, boot) is
configured in the Driving/Vehicle touch
screen menu.
Selective unlocking is deactivated by default.
Complete unlocking
The vehicle (doors and boot) unlocks:
► either automatically when the driver is
approaching (zone C), if the automatic functions
are activated;
► or by a light press on a handle.
The unlocking, and the deactivation of the
alarm depending on version, is confirmed by
flashing of the direction indicators and lighting of
the daytime running lamps.
The vehicle door handles, and depending on
version, the door mirrors, unfold.
If the key remains in zone B for more than
15 minutes without any action on the
vehicle doors, the automatic functions are
An access (door or boot) that is not
properly closed prevents locking of the
vehicle. However, if the vehicle has an alarm, it
will be activated after 45 seconds.
If the vehicle is unlocked and there is no
action at the doors or boot, the vehicle will
automatically lock itself again after about
30 seconds. If the vehicle has an alarm, it will
also be reactivated automatically.
Deadlocking
► Press the locking button again within
3 seconds to deadlock the vehicle (confirmed by
the temporary lighting of the direction indicators).
Deadlocking renders the interior door
controls inoperative. It also deactivates
the central locking button.
The horn remains operational.
Never leave anyone inside the vehicle when it
is deadlocked.
Closing the windows
Holding the locking button pressed for
more than 3 seconds closes the windows.
When closing the windows, ensure that
no person or object could prevent their
correct closure.
To leave the windows partly open on versions
with alarm, you must first deactivate the
interior volumetric alarm protection.
For more information on the Alarm, refer to the
corresponding section.
Locating the vehicle
This function helps you to spot your vehicle from a
distance, with the vehicle locked:
–
The direction indic
ators flash for approximately
10 seconds.
–
The door mirror spo
tlamps come on.
–
The c
ourtesy lamps come on.
► Press this button.
Proximity Keyless Entry
and Start
This Keyless Entry and Starting system enables
automatic vehicle locking/unlocking simply by
detection of the electronic key.
As long as the driver has the electronic key on
their person, the vehicle unlocks as they approach
and locks when they walk away.
Key recognition zones:
Zone A: welcome lighting on approaching the
vehicle (between 3 and 5 metres from the
vehicle).
Zone B: automatic locking on leaving the vehicle
(about 2 metres from the vehicle).
Zone C: automatic unlocking on approaching the
vehicle (between 1 and 2 metres from the vehicle).
The automatic functions are configured
via the Driving / Vehicle touch screen
menu.
With the electronic key on their person, the driver
can also lock and unlock their vehicle by pressing
the retractable handles.
For more information on Retractable handles,
refer to the corresponding section.
Page 31 of 244
 is
configured in the Driving/Vehicle touch
screen menu.
Selective unlocking is deactivated by default.
Complete unlo")
29
Access02
Unlocking the vehicle
Selective unlocking (driver’s door, boot) is
configured in the Driving/Vehicle touch
screen menu.
Selective unlocking is deactivated by default.
Complete unlocking
The vehicle (doors and boot) unlocks:
► either automatically when the driver is
approaching (zone C), if the automatic functions
are activated;
► or by a light press on a handle.
The unlocking, and the deactivation of the
alarm depending on version, is confirmed by
flashing of the direction indicators and lighting of
the daytime running lamps.
The vehicle door handles, and depending on
version, the door mirrors, unfold.
If the key remains in zone B for more than
15 minutes without any action on the
vehicle doors, the automatic functions are
deactivated and the vehicle locks (as
confirmed by an audible signal).
To unlock the vehicle, use the remote control or
press on one of the handles.
Selective unlocking
Driver’s door and fuel filler flap
They unlock:
► either automatically when approaching the
driver’s door, if the automatic functions are
activated;
► or by a light press on the handle.
The driver's door handle unfolds.
► Once inside the vehicle, to unlock all accesses,
press the central locking button or pull the
opening control of any door.
If the user is outside zone A and presses
once on the unlocking button of their
electronic key, only the driver's door and the
fuel filler flap will unlock if selectivity is
activated. Pressing the button again unlocks
the rest of the vehicle.
Selective unlocking of the boot
The boot unlocks automatically as you approach
the rear of the vehicle.
► Press the tailgate control to open the boot.
The doors remain locked.
Locking the vehicle
Normal locking
With the doors and boot closed, the vehicle locks:
► either automatically when leaving recognition
zone B, if the automatic functions are activated;
► or by a light press on one of the front door
handles;
The locking is confirmed by the illumination of
the direction indicators and the daytime running
lamps as well as an audible signal for the locking
on moving away from the vehicle.
It is not possible to lock the vehicle if the
electronic key is left inside.
If the vehicle is unlocked with the handles
retracted, a first press on one of the front
handles unfolds the handle. The vehicle
remains unlocked.
Press the handle again to lock it.
Page 32 of 244
 from inside the vehicle.
The indicator lamp comes on to confirm central
locking of the vehicle.
The central l")
30
Access02
Manual
► Press this button to lock/unlock the vehicle
(doors and boot) from inside the vehicle.
The indicator lamp comes on to confirm central
locking of the vehicle.
The central locking does not take place if
one of the doors is open.
To unfold the exterior handles, press the
button once when the vehicle is locked or
twice when it is unlocked.
When locking / deadlocking from the
outside
When the vehicle is locked or deadlocked from
the outside, the indicator lamp flashes and the
button is inoperative.
► After normal locking, pull one of the interior
door controls to unlock the vehicle.
► After deadlocking, it is necessary to use
the remote control, the “Keyless Entry and
Starting” system or the integral key to unlock
the vehicle.
Deadlocking
► Press one of the front handles lightly to lock
the vehicle.
► Press it again within 3 seconds to deadlock
the vehicle (confirmed by the temporary lighting
of the direction indicators).
If the vehicle is unlocked with the handles
retracted, a first press on one of the front
handles unfolds the handle. The vehicle
remains unlocked.
Press the handle again to lock it.
Deadlocking renders the interior door
controls inoperative. It also deactivates
the central locking button.
The horn remains operational.
Never leave anyone inside the vehicle when it
is deadlocked.
If one of the doors or the boot is still open
or if the electronic key for the Keyless
Entry and Starting s ystem has been left inside
the vehicle, central locking will be disabled.
If the vehicle is unlocked but the doors or
boot are not subsequently opened, the
vehicle will automatically lock itself again
after about 30 seconds. If the vehicle is fitted
with an alarm, it will also be reactivated
automatically.
The automatic door mirror folding/
unfolding function is configured via the
touch screen’s Driving / Vehicle menu.
As a safety measure, never leave the
vehicle, even for a short time, without
taking the Keyless Entry and Starting system’s
electronic key with you.
Be aware of the risk of theft of the vehicle if
the key is present in one of the defined areas
while the vehicle is unlocked.
In order to preserve the battery in the
electronic key and the vehicle's battery:
–
The unlocking on approach function (z
one C)
automatically goes into standby after several
days of non-use (approximately one week). To
unlock the vehicle, use the remote control or
press on one of the front door handles. At the
next vehicle start, the automatic unlocking
and locking functions will be reactivated.
– After the welcome lighting is triggered
several times in succession without starting
the vehicle, it will be deactivated.
–
All o
f the "hands-free" functions go into
extended stand-by after 21 days of non-use.
To restore these functions, unlock the vehicle
using the remote control and start the engine.
Electrical interference
The electronic key may not operate if
close to certain electronic devices: telephone
(switched on or on standby), laptop computer,
strong magnetic fields, etc.
DS SMART ACCESS
After activation by the customer, this function
makes it possible, via the MyDS application, to
access the vehicle, to start it and to delegate its
use to people of their choice.
For more information on DS SMART ACCESS and
its activation, install the MyDS application and
refer to the corresponding section.
Central locking
 1
1 2
2 3
3 4
4 5
5 6
6 7
7 8
8 9
9 10
10 11
11 12
12 13
13 14
14 15
15 16
16 17
17 18
18 19
19 20
20 21
21 22
22 23
23 24
24 25
25 26
26 27
27 28
28 29
29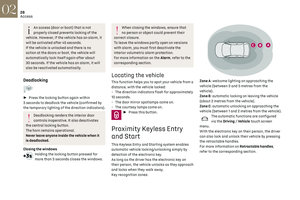 30
30 31
31 32
32 33
33 34
34 35
35 36
36 37
37 38
38 39
39 40
40 41
41 42
42 43
43 44
44 45
45 46
46 47
47 48
48 49
49 50
50 51
51 52
52 53
53 54
54 55
55 56
56 57
57 58
58 59
59 60
60 61
61 62
62 63
63 64
64 65
65 66
66 67
67 68
68 69
69 70
70 71
71 72
72 73
73 74
74 75
75 76
76 77
77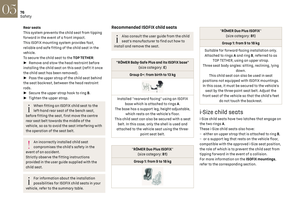 78
78 79
79 80
80 81
81 82
82 83
83 84
84 85
85 86
86 87
87 88
88 89
89 90
90 91
91 92
92 93
93 94
94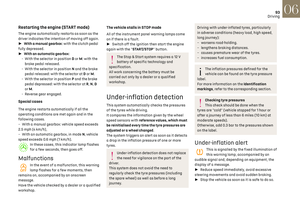 95
95 96
96 97
97 98
98 99
99 100
100 101
101 102
102 103
103 104
104 105
105 106
106 107
107 108
108 109
109 110
110 111
111 112
112 113
113 114
114 115
115 116
116 117
117 118
118 119
119 120
120 121
121 122
122 123
123 124
124 125
125 126
126 127
127 128
128 129
129 130
130 131
131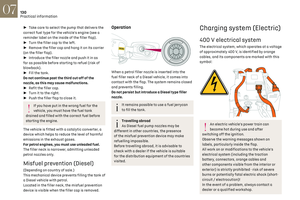 132
132 133
133 134
134 135
135 136
136 137
137 138
138 139
139 140
140 141
141 142
142 143
143 144
144 145
145 146
146 147
147 148
148 149
149 150
150 151
151 152
152 153
153 154
154 155
155 156
156 157
157 158
158 159
159 160
160 161
161 162
162 163
163 164
164 165
165 166
166 167
167 168
168 169
169 170
170 171
171 172
172 173
173 174
174 175
175 176
176 177
177 178
178 179
179 180
180 181
181 182
182 183
183 184
184 185
185 186
186 187
187 188
188 189
189 190
190 191
191 192
192 193
193 194
194 195
195 196
196 197
197 198
198 199
199 200
200 201
201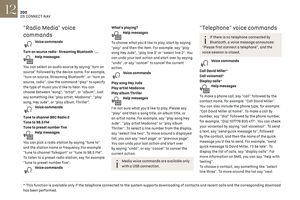 202
202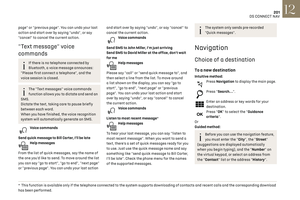 203
203 204
204 205
205 206
206 207
207 208
208 209
209 210
210 211
211 212
212 213
213 214
214 215
215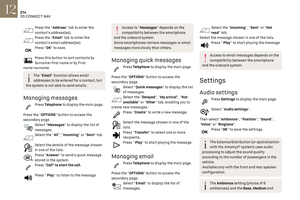 216
216 217
217 218
218 219
219 220
220 221
221 222
222 223
223 224
224 225
225 226
226 227
227 228
228 229
229 230
230 231
231 232
232 233
233 234
234 235
235 236
236 237
237 238
238 239
239 240
240 241
241 242
242 243
243
These features are accessible
using a smartphone, via the
MyDS application:
–
Ba
ttery charge management.
–
Programmed hea
ting")