Page 185 of 316
183
This indicator lamp comes on in
the instrument panel to confirm the
activation of the system.
F Limit the speed of the vehicle to a maximum of 12 mph (20 km/h)
and select " Enter parallel parking
space " on the touch screen.
To enter a parking space, the system does
n ot identify spaces that are clearly smaller
or larger than the vehicle. F
O
perate the direction indicator on the
parking side chosen to activate the
measurement function. You should drive at
a distance of between 0.5 m and 1.5 m from
the row of parked vehicles.
F
D
rive slowly following the instructions until
the system finds a
free space.F
M
ove for wards slowly until a message is
displayed, accompanied by an audible
signal, asking you to engage reverse gear.
F
S
elect reverse, release the steering wheel
and start moving without exceeding 4
mph
(7
km/h).
6
Driving
Page 186 of 316

184
F The assisted parking manoeuvre is in progress.
Without exceeding 4
mph (7 km/h), move
for wards and backwards, aided by the
warnings from the "Parking sensors"
system, until the end of the manoeuvre is
indicated.
Assistance in exiting a parallel
p arking space
F When you want to leave a parallel parking
space, start the engine.
F
W
ith the vehicle stationary,
press this button.
This indicator lamp comes on in
the instrument panel to confirm the
activation of the system.
F
P
ress "Exit parking space " on
the touch screen.
F
A
t the end of the manoeuvre, the indicator
lamp in the instrument panel goes off,
accompanied by a
message and an audible
signal.
The assistance is deactivated: you can take
over control. F
T
he assisted parking manoeuvre is in
progress. Without exceeding 3
mph
(5
km/h), move for wards and backwards,
aided by the warnings from the "Parking
sensors" system, until the indication of the
end of the manoeuvre.
F
O
perate the direction indicator for the exit
side chosen. F
E
ngage reverse or forward gear and release
the steering wheel.
The manoeuvre is complete when the vehicle's
front wheels are clear of the parking space.
Driving
Page 187 of 316

185
Assistance with bay parking
manoeuvres
F Once you have found a parking
area, press this button.
This indicator lamp comes on in
the instrument panel to confirm the
activation of the system.
F
L
imit the speed of the vehicle to
a
maximum of 12 mph (20 km/h)
and select " Enter bay parking
space " on the touch screen.
F
D
rive slowly following the instructions until
the system finds a
free space.
At the end of the manoeuvre, the indicator lamp
in the instrument panel goes off, accompanied
by a
message and an audible signal.
The assistance is deactivated: you can take
over control.
F
O
perate the direction indicator on the
parking side chosen to activate the
measurement function. You should drive at
a distance of between 0.5 m and 1.5 m from
the row of parked vehicles.
When several successive bays are found,
the vehicle will be directed towards the
last one. F
M
ove for wards slowly until a message is
displayed, accompanied by an audible
signal, asking you to engage reverse gear.
F
S
elect reverse, release the steering wheel
and start moving without exceeding 4
mph
(7
km/h).
6
Driving
Page 188 of 316

186
F The assisted parking manoeuvre is in progress.
Without exceeding 4
mph (7 km/h), follow
the instructions displayed in the instrument
panel, aided by the warnings from the
"Parking sensors" system, until the end of
the manoeuvre is indicated. During a
bay parking manoeuvre, the Park
Assist system is automatically deactivated
once the rear of the vehicle is within
20 inches (50 cm) of an obstacle.
During parking and exit from parking
manoeuvres, the reversing camera
function may come into operation. It
facilitates monitoring of the surroundings
of the vehicle, by displaying additional
information in the instrument panel.
For more information on the Reversing
camera , refer to the corresponding
section.
Deactivation
- if the speed of the vehicle exceeds the stated limit,
-
w
hen the driver interrupts movement of the
steering wheel,
-
a
fter 4 manoeuvre cycles,
-
o
n opening the driver's door,
-
i
f one of the front wheels encounters an
obstacle.
The indicator lamp in the instrument panel goes
off and a
message is displayed accompanied
by an audible signal.
The driver should then take back control of the
vehicle's steering.
If the system is deactivated during
a
manoeuvre, the driver should reactivate
it to repeat the measurement.
Switching off
The system is switched off automatically:
- w hen towing a trailer, connected electrically,
-
i
f the driver's door is opened,
-
i
f the speed of the vehicle is above 43 mph
(70
km/h).
To switch the system off for a
prolonged period,
contact a
CITROËN dealer or a qualified
workshop.
At the end of the manoeuvre, the indicator lamp
in the instrument panel goes off, accompanied
by a
message and an audible signal.
The assistance is deactivated: you can take
over control. The system is deactivated by pressing the
control.
The system is deactivated automatically:
-
o
n switching off the ignition,
-
i
f the engine stalls,
-
i
f no manoeuvre is per formed within
5
minutes of selecting the type of
manoeuvre
-
a
fter a
prolonged stop of the vehicle during
a
manoeuvre,
-
i
f the wheel anti-slip regulation (ASR) is
triggered,
Driving
Page 189 of 316

187
Operating faults
In the event of a fault, this warning
l amp flashes for a few seconds,
accompanied by an audible signal.
In the event of a
fault with the
power steering, this warning lamp
is displayed in the instrument panel,
accompanied by a
message.
If the lateral distance between your vehicle
and the space is too great, the system may
not be able to measure the space.
Any object projecting beyond the dimensions
of the vehicle (e.g. a ladder on the roof or
a towball) will not be taken into account by
the Park Assist system during a
manoeuvre.
In bad weather or in winter, ensure that
the sensors are not covered by dirt, ice or
snow.
In the event of a fault, have the system
checked by a
CITROËN dealer or
a
qualified workshop. High pressure jet washing
When washing your vehicle, keep the lance at
least 12
inches (30 cm) away from the sensors.
If the fault occurs during the use of the system,
the warning lamp goes off.
Contact a CITROËN dealer or a qualified
workshop.
6
Driving
Page 190 of 316
WITH TOTAL QUARTZ
LUBRICANTSFor more than 45 years, TOTAL
and CITROËN have shared common
values: excellence, creativity and
technological innovation.
It is in this same spirit that TOTAL has
developed a
range
of TOTAL QUARTZ
lubricants adapted to CITROËN
engines, making them even more
fuel efficient and protective of the
environment.
TOTAL and CITROËN test the
reliability and the performance of their
products during motorsport races in
extreme conditions.
Choose TOTAL QUARTZ lubricants
to maintain your vehicle, this is your
assurance of optimum durability and
performance from your engine.
FILL UP WITH
CONFIDENCE
Page 191 of 316

189
Compatibility of fuels
Fuel used for petrol engines
The petrol engines are compatible with biofuels
that conform to current and future European
standards and which can be obtained from
filling stations:Petrol that meets standard EN228,
mixed with a
biofuel that meets
standard EN15376.
The only petrol additives authorised
for use are those that meet the
B715001
standard.
Fuel used for Diesel
engines
The Diesel engines are compatible with
biofuels that conform to current and future
European standards and which can be
obtained from filling stations: Diesel fuel that meets standard
EN16734
mixed with a biofuel that
meets standard EN14214 (possibly
containing up to 10% Fatty Acid Methyl
Ester).
Paraffinic Diesel fuel that meets
standard EN15940 mixed with a biofuel
that meets standard EN14214 (possibly
containing up to 7% Fatty Acid Methyl
Ester).
B20 or B30 fuel meeting standard
EN16709 can be used in your Diesel
engine. However, this use, even
occasional, requires strict application of
the special servicing conditions referred
to as "Arduous conditions".
For more information, contact a CITROËN
dealer or a qualified workshop.
Diesel fuel that meets standard
EN590 mixed with a biofuel that meets
standard EN14214 (possibly containing
up to 7% Fatty Acid Methyl Ester). The use of any other type of (bio) fuel
(vegetable or animal oils, pure or diluted,
domestic fuel, etc.) is strictly prohibited
(risk of damage to the engine and fuel
syste m). The only Diesel additives authorised
for use are those that meet the
B715000
standard.
Diesel at low temperature
At temperatures below 0°C (+32°F), the
formation of paraffins in summer-type Diesel
fuels could result in an abnormal operation
of the fuel supply circuit. To avoid this, we
recommend using winter-type Diesel fuel and
keeping the fuel tank more than 50% full.
If, despite this, at temperatures below -15°C
(+5°F) the engine has problems starting,
just leave the vehicle in a
garage or heated
workshop for a
little while.
Travelling abroad
Certain fuels could damage your vehicle's
engine.
In certain countries, the use of a particular
fuel may be required (specific octane rating,
specific trade name, etc.) to ensure correct
operation of the engine.
For any additional information, contact a
dealer.
7
Practical information
Page 192 of 316

190
Fuel
Fuel tank capacity: approximately 57 litres
(petrol) or 55 litres (Diesel).
Low fuel level
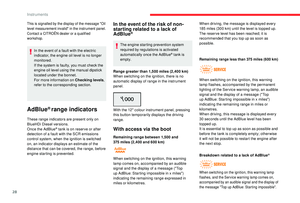
When the low fuel level is reached,
this warning lamp in the instrument
panel comes on, accompanied by
an audible warning, a message and
the last bar of the fuel gauge lights
up orange.
When it first comes on there remains
approximately 6
litres of fuel in the tank.
Until sufficient fuel has been added, this
warning lamp appears every time the ignition
is switched on, accompanied by an audible
warning and a
message. This audible warning
and this message are repeated with increasing
frequency as the fuel level drops towards " 0".
Refuel as soon as possible to avoid running
out.
Refilling
A self-adhesive label on the inner face of the
filler flap reminds you of the type of fuel to use,
depending on your engine.
Additions of fuel must be of at least 5
litres, in
order to be registered by the fuel gauge. To refuel in complete safety:
F
Y
ou must switch off the engine.
F
W
ith the vehicle unlocked, press the rear
edge of the flap to open it (the filler cap is
a part of it).
F T ake care to select the pump that delivers
the correct type of fuel for your vehicle.
F
I
nsert the nozzle so as to push in the metal
non-return flap.
F
M
ake sure that the nozzle is pushed in as
far as possible before starting to refuel (risk
of blowback). If you are filling your tank to the top, do not
continue after the 3
rd cut- off of the nozzle;
this could cause malfunctions.
Your vehicle is fitted with a
catalytic converter,
a device which helps to reduce the level of
harmful emissions in the exhaust gases.
For petrol engines, you must use unleaded
fuel.
The filler neck is narrower, allowing only
unleaded petrol nozzles to be introduced.
If you have put in the wrong fuel for
your vehicle, you must have the fuel
tank drained and filled with the correct
fuel before star ting the engine.
Fuel cut- of f
Your vehicle is fitted with a safety system that
c uts off the supply of fuel in the event of an
impact.
Opening the filler flap may create a
noise
caused by an inrush of air. This is entirely
normal and results from the sealing of the fuel
system. F
H
old it in this position throughout the filling
operation.
F
P
ush the filler flap to close it.
With Stop & Start, never refuel with the
engine in STOP mode; you must switch
off the ignition with the "START/STOP"
button.
Practical information