2020 CHRYSLER 300 seat memory
[x] Cancel search: seat memoryPage 4 of 328

2
INTRODUCTION
HOW TO USE THIS MANUAL .................................. 9
Essential Information .................................... 9
Symbols .......................................................... 9
WARNINGS AND CAUTIONS ................................. 9
VEHICLE MODIFICATIONS/ALTERATIONS ........... 9
GETTING TO KNOW YOUR VEHICLE
VEHICLE USER GUIDE — IF EQUIPPED ...............10
KEYS ......................................................................11
Key Fob......................................................... 11
IGNITION SWITCH .................................................16
Keyless Push Button Ignition ...................... 16
Vehicle On Message ................................... 17
REMOTE START — IF EQUIPPED .........................18
How To Use Remote Start — If Equipped ... 18
Remote Start Abort Message On The
Instrument Cluster Display — If Equipped .. 19 To Enter Remote Start Mode ...................... 19
To Exit Remote Start Mode Without
Driving The Vehicle ..................................... 19 To Exit Remote Start Mode And Drive
The Vehicle ................................................... 19 Remote Start Comfort Systems —
If Equipped ................................................... 20 General Information .................................... 20 SENTRY KEY.......................................................... 21
Key Programming ....................................... 21
Replacement Keys....................................... 21
General Information .................................... 22
VEHICLE SECURITY ALARM — IF EQUIPPED .... 22
To Arm The System ...................................... 22
To Disarm The System ................................ 23
Rearming Of The System............................. 23
Tamper Alert................................................. 23
DOORS .................................................................. 23
Manual Door Locks...................................... 23
Power Door Locks ....................................... 24
Keyless Enter-N-Go — Passive Entry .......... 24
Automatic Unlock Doors On Exit ................. 27
Automatic Door Locks — If Equipped ......... 28
Child-Protection Door Lock System —
Rear Doors .................................................. 28
DRIVER MEMORY SETTINGS — IF EQUIPPED ... 28
Programming The Memory Feature............ 29
Linking And Unlinking The Remote Keyless
Entry Key Fob To Memory ........................... 29 Memory Position Recall............................... 30
SEATS ................................................................... 30
Manual Adjustment (Rear Seats) ............... 30
Power Seats ................................................ 31
Heated Seats — If Equipped ....................... 33
Front Ventilated Seats — If Equipped ........ 35 HEAD RESTRAINTS ..............................................35
Reactive Head Restraints — Front Seats .. 35
Rear Head Restraints ................................. 36
Front Head Restraint Removal ................... 37
STEERING WHEEL.................................................37
Manual Tilt/Telescoping Steering Column —
If Equipped .................................................. 37 Power Tilt/Telescoping Steering Column —
If Equipped .................................................. 38 Heated Steering Wheel — If Equipped ...... 38
MIRRORS ..............................................................39
Automatic Dimming Mirror — If Equipped . 39
Outside Mirrors ............................................ 39
Driver's Outside Automatic Dimming Mirror —
If Equipped ................................................... 39 Outside Mirrors With Turn Signal And
Approach Lighting — If Equipped ................ 40 Power Mirrors............................................... 40
Power Folding Outside Mirrors —
If Equipped ................................................... 40 Heated Mirrors — If Equipped ..................... 41
Tilt Side Mirrors In Reverse —
If Equipped ................................................... 41 Illuminated Vanity Mirrors —
If Equipped .................................................. 42
20_LX_OM_EN_USC_t.book Page 2
Page 30 of 328

28GETTING TO KNOW YOUR VEHICLE
AUTOMATIC DOOR LOCKS — IF
E
QUIPPED
The auto door lock feature default condition is
enabled. When enabled, the door locks will lock
automatically when the vehicle's speed exceeds
15 mph (24 km/h). The auto door lock feature
can be enabled or disabled by an authorized
dealer per written request of the customer.
Please see an authorized dealer for service.
CHILD-PROTECTION DOOR LOCK
S
YSTEM — REAR DOORS
To provide a safer environment for small
children riding in the rear seats, the rear doors
are equipped with Child-Protection Door Lock
system.
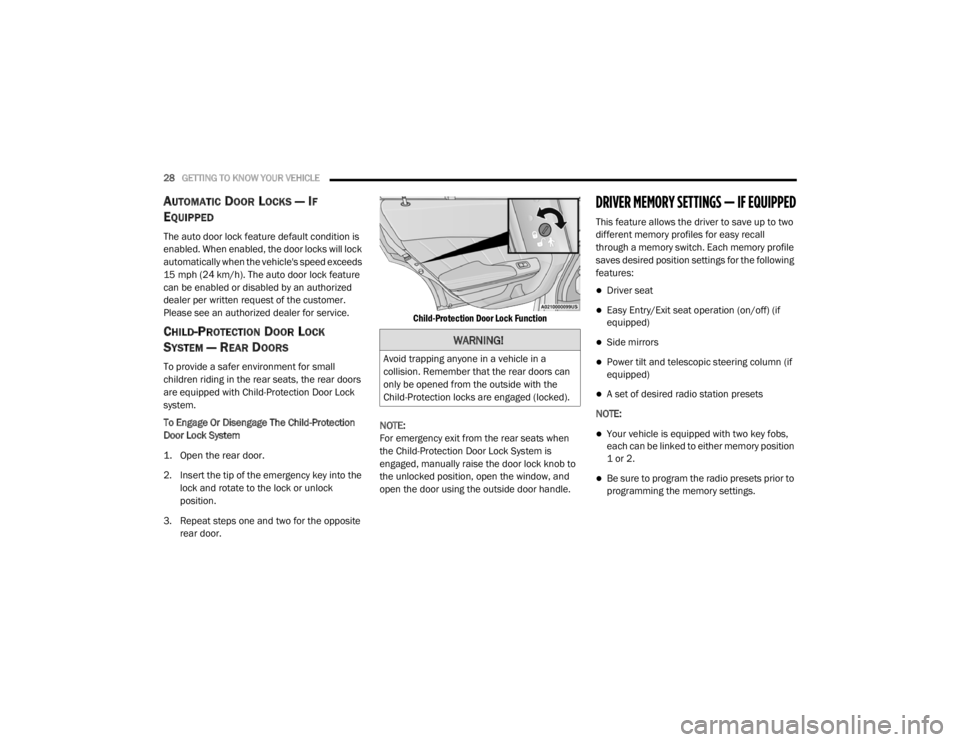
To Engage Or Disengage The Child-Protection
Door Lock System
1. Open the rear door.
2. Insert the tip of the emergency key into the
lock and rotate to the lock or unlock
position.
3. Repeat steps one and two for the opposite rear door.
Child-Protection Door Lock Function
NOTE:
For emergency exit from the rear seats when
the Child-Protection Door Lock System is
engaged, manually raise the door lock knob to
the unlocked position, open the window, and
open the door using the outside door handle.
DRIVER MEMORY SETTINGS — IF EQUIPPED
This feature allows the driver to save up to two
different memory profiles for easy recall
through a memory switch. Each memory profile
saves desired position settings for the following
features:
Driver seat
Easy Entry/Exit seat operation (on/off) (if
equipped)
Side mirrors
Power tilt and telescopic steering column (if
equipped)
A set of desired radio station presets
NOTE:
Your vehicle is equipped with two key fobs,
each can be linked to either memory position
1 or 2.
Be sure to program the radio presets prior to
programming the memory settings.
WARNING!
Avoid trapping anyone in a vehicle in a
collision. Remember that the rear doors can
only be opened from the outside with the
Child-Protection locks are engaged (locked).
20_LX_OM_EN_USC_t.book Page 28
Page 31 of 328

GETTING TO KNOW YOUR VEHICLE29
The memory settings switch is located on the
driver’s door trim panel. The switch consists of
three buttons:
The set (S) button, which is used to activate
the memory save function.
The (1) and (2) buttons which are used to
recall either of two pre-programmed memory
profiles.
Memory Settings Buttons
PROGRAMMING THE MEMORY FEATURE
To create a new memory profile, perform the
following:
NOTE:
Saving a new memory profile will erase the
selected profile from memory.
1. Place the vehicle’s ignition in the ON/RUN position (do not start the engine).
2. Adjust all memory profile settings to desired preferences (i.e., seat, side mirror, power tilt
and telescopic steering column [if
equipped], and radio station presets).
3. Push and release the set (S) button on the memory switch, and then push the desired
memory button (1 or 2) within five seconds.
The instrument cluster display will display
which memory position has been set.
NOTE:
Memory profiles can be set without the vehicle
in PARK, but the vehicle must be in PARK to
recall a memory profile.
LINKING AND UNLINKING THE REMOTE
K
EYLESS ENTRY KEY FOB TO MEMORY
Your key fobs can be programmed to recall one
of two saved memory profiles by pushing the
unlock button on the key fob.
NOTE:
Before programming your key fobs you must
select the “Personal Settings Linked To Key
Fob” feature through the Uconnect system
screen. Refer to “Uconnect Settings” in “Multi -
media” for further information.
To program your key fobs, perform the following:
1. Place the vehicle’s ignition in the OFF position.
2. Select a desired memory profile, 1 or 2.
3. Once the profile has been recalled, push and release the set (S) button on the
memory switch.
4. Within five seconds, push and release button (1) or (2) accordingly. “Memory
Profile Set” (1 or 2) will display in the
instrument cluster.
2
20_LX_OM_EN_USC_t.book Page 29
Page 32 of 328

30GETTING TO KNOW YOUR VEHICLE
5. Push and release the lock button on the key
fob within 10 seconds.
NOTE:
Your key fobs can be unlinked from your
memory settings by pushing the set (S) button,
and within 10 seconds, pushing the unlock
button on the key fob.
MEMORY POSITION RECALL
NOTE:
If a recall is attempted when the vehicle is not in
PARK, a message will be displayed in the instru -
ment cluster display.
To recall the memory settings for driver one or
two, push the desired memory button number
(1 or 2) or the unlock button on the key fob
linked to the desired memory position.
A recall can be canceled by pushing any of the
memory buttons during a recall (S, 1, or 2), or by
pushing any of the seat adjustment switches.
When a recall is canceled, the driver's seat and
power tilt and telescopic steering column (if
equipped) stop moving. A delay of one second
will occur before another recall can be selected.
SEATS
Seats are a part of the Occupant Restraint
System of the vehicle.
MANUAL ADJUSTMENT (REAR SEATS)
Folding Rear Seat
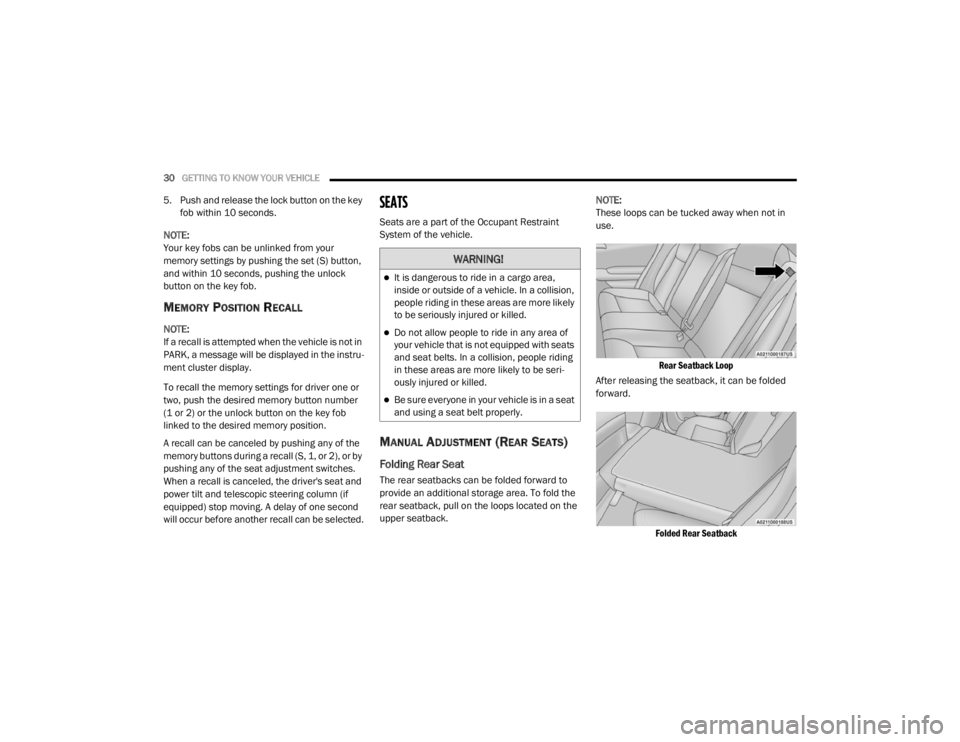
The rear seatbacks can be folded forward to
provide an additional storage area. To fold the
rear seatback, pull on the loops located on the
upper seatback. NOTE:
These loops can be tucked away when not in
use.
Rear Seatback Loop
After releasing the seatback, it can be folded
forward.
Folded Rear Seatback
WARNING!
It is dangerous to ride in a cargo area,
inside or outside of a vehicle. In a collision,
people riding in these areas are more likely
to be seriously injured or killed.
Do not allow people to ride in any area of
your vehicle that is not equipped with seats
and seat belts. In a collision, people riding
in these areas are more likely to be seri -
ously injured or killed.
Be sure everyone in your vehicle is in a seat
and using a seat belt properly.
20_LX_OM_EN_USC_t.book Page 30
Page 35 of 328

GETTING TO KNOW YOUR VEHICLE33
seat position is greater than or equal to
2.7 inches (67.7 mm) forward of the rear
stop. The seat will return to its previously set
position when you place the vehicle’s ignition
in the ACC or RUN position.
The Easy Entry/Easy Exit feature is disabled
when the driver seat position is less than
0.9 of an inch (22.7 mm) forward of the rear
stop. At this position, there is no benefit to
the driver by moving the seat for Easy Exit or
Easy Entry.
Each stored memory setting will have an
associated Easy Entry and Easy Exit position.
NOTE:
The Easy Entry/Exit feature is not enabled when
the vehicle is delivered from the factory. The
Easy Entry/Exit feature is enabled (or later
disabled) through the programmable features
in the Uconnect system. Refer to “Uconnect
Settings” in “Multimedia”.
HEATED SEATS — IF EQUIPPED
On some models, the front and rear seats may
be equipped with heaters located in the seat
cushions and seat backs.
Front Heated Seats
The front heated seat control buttons are
located within the climate or controls screen of
the touchscreen.
You can choose from HI, LO, or OFF heat
settings. The indicator arrows in touchscreen
buttons indicate the level of heat in use. Two
indicator arrows will illuminate for HI, and one for LO. Turning the heating elements off will
return the user to the radio screen.
Press the heated seat button once to turn
the HI setting on.
Press the heated seat button a second
time to turn the LO setting on.
Press the heated seat button a third time
to turn the heating elements off.
If the HI-level setting is selected, the system will
automatically switch to LO-level after
approximately 60 minutes of continuous
operation. At that time, the display will change
from HI to LO, indicating the change. The
LO-level setting will turn off automatically after
approximately 45 minutes.
NOTE:
Once a heat setting is selected, heat will be
felt within two to five minutes.
The engine must be running for the heated
seats to operate.
WARNING!
Persons who are unable to feel pain to the
skin because of advanced age, chronic
illness, diabetes, spinal cord injury, medica -
tion, alcohol use, exhaustion or other phys -
ical condition must exercise care when
using the seat heater. It may cause burns
even at low temperatures, especially if
used for long periods of time.
Do not place anything on the seat or seat -
back that insulates against heat, such as a
blanket or cushion. This may cause the seat
heater to overheat. Sitting in a seat that has
been overheated could cause serious
burns due to the increased surface
temperature of the seat.
2
20_LX_OM_EN_USC_t.book Page 33
Page 168 of 328

166STARTING AND OPERATING
TO SET A DESIRED ACC SPEED
When the vehicle reaches the speed desired,
push the SET (+) button or the SET (-) button
and release. The instrument cluster display will
display the set speed.
If the system is set when the vehicle speed is
below 20 mph (32 km/h), the set speed shall
be defaulted to 20 mph (32 km/h). If the
system is set when the vehicle speed is above
20 mph (32 km/h), the set speed shall be the
current speed of the vehicle.
NOTE:
ACC cannot be set if there is a stationary vehicle
in front of your vehicle in close proximity.
Remove your foot from the accelerator pedal. If
you do not, the vehicle may continue to
accelerate beyond the set speed. If this occurs:
The message “DRIVER OVERRIDE” will
display in the instrument cluster display.
The system will not be controlling the
distance between your vehicle and the
vehicle ahead. The vehicle speed will only be
determined by the position of the accelerator
pedal.
TO CANCEL
The following conditions cancel the system:
The brake pedal is applied.
The CANC button is pushed.
An Anti-Lock Brake System (ABS) event
occurs.
The gear selector is removed from the DRIVE
position.
The braking temperature exceeds normal
range (overheated).
The Electronic Stability Control/Traction
Control System (ESC/TCS) activates.
The vehicle parking brake is applied.
Driver seat belt is unbuckled at low speeds.
Driver door is opened at low speeds.
NOTE:
If your vehicle stays at standstill for longer than
two seconds, then the system will cancel and
the brake force will be ramped-out. The driver
will have to apply the brakes to keep the vehicle
at a standstill.
TO TURN OFF
The system will turn off and clear the set speed
in memory if:
The Adaptive Cruise Control (ACC) on/off
button is pushed.
The Normal (Fixed Speed) Cruise Control on/
off button is pushed.
The ignition is placed in the OFF position.
TO RESUME
If there is a set speed in memory push the RES
(resume) button and then remove your foot
from the accelerator pedal. The instrument
cluster display will display the last set speed.
NOTE:
ACC cannot be resumed if there is a stationary
vehicle in front of your vehicle in close proximity.
20_LX_OM_EN_USC_t.book Page 166
Page 297 of 328

MULTIMEDIA295
NOTE:
When "Driver Door" is programmed with 1st Press Of Key Fob Unlocks, only the driver's door will unlock with the first press of the key fob unlock
button. You must press the key fob unlock button twice to unlock the passengers’ doors. When "All Doors" is programmed for 1st Press Of Key Fob
Unlocks, all doors will unlock on the first press of the key fob unlock button.
If the vehicle is programmed 1st Press Of Key Fob Unlocks “All Doors,” all doors will unlock no matter which Passive Entry equipped door handle
is grasped. If 1st Press Of Key Fob Unlocks “Driver Door” is programmed, only the driver’s door will unlock when the driver’s door is grasped. With
Passive Entry, if 1st Press Of Key Fob Unlocks “Driver Door” is programmed, touching the handle more than once will result in only the driver’s door
opening. If “Driver Door” is programmed, once the driver door is opened, the interior door lock/unlock switch can be used to unlock all doors (or
use key fob).
Passive Entry — If Equipped On Off
NOTE:
The “Passive Entry” feature allows you to lock and unlock the vehicle’s door(s) without having to push the key fob lock or unlock buttons. To make
your selection, press the Passive Entry button on the touchscreen, until a check mark appears next to the setting, showing that the setting has been
selected. Personal Settings Linked To Key Fob — If Equipped On
Off
NOTE:
This feature provides automatic recall of all settings stored to a memory location (driver’s seat, exterior mirrors, steering column position and radio
station pre-sets) to enhance driver mobility when entering and exiting the vehicle.
The seat returns to the memorized seat location (if “Personal Settings Linked To Key Fob” is set to on) when the key fob is used to unlock the door.
Setting Name Selectable Options
9
20_LX_OM_EN_USC_t.book Page 295
Page 322 of 328

320 M
Maintenance Free Battery
............................. 238Maintenance Schedule........................ 231, 232Malfunction Indicator Light
(Check Engine)......................................... 88, 93Manual Park Release............................................. 225Service...................................................... 314Media Hub..................................................... 302Memory Feature (Memory Seats).................... 30Memory Seat................................................... 30Memory Seats And Radio................................ 30Methanol....................................................... 277Mirrors............................................................. 39Electric Powered......................................... 40Electric Remote........................................... 40Heated........................................................ 41Outside........................................................ 39Rearview............................................ 39, 201Vanity.......................................................... 42Modifications/AlterationsVehicle.......................................................... 9Monitor, Tire Pressure System....................... 109Mopar Parts................................................... 313MP3 Control.................................................. 302Multi-Function Control Lever............................ 42
N
New Vehicle Break-In Period......................... 150
O
Occupant Restraints..................................... 113Octane Rating, Gasoline (Fuel)............ 276, 281Oil Change Indicator........................................ 79Reset........................................................... 79Oil Filter, Change.......................................... 241Oil Filter, Selection........................................ 241Oil Pressure Light............................................. 87Oil, Engine............................................ 240, 281Capacity.................................................... 280Change Interval........................................ 240Checking................................................... 238Dipstick.................................................... 238Disposal................................................... 241Filter................................................ 241, 281Filter Disposal........................................... 241Identification Logo.................................... 240Materials Added To.................................. 241Pressure Warning Light............................... 87Recommendation............................ 240, 280Synthetic.................................................. 241Viscosity................................. 240, 241, 280Onboard Diagnostic System............................. 93
Operating Precautions.....................................93Operator ManualOwner's Manual....................................9, 314Outside Rearview Mirrors.................................39Overheating, Engine...................................... 225Owner’s Manual (Operator Manual)................... 9
P
Paddle Shift Mode........................................ 158Paddle Shifters............................................. 158Paint Care..................................................... 272Panic Alarm......................................................13Parking Brake............................................... 150ParkSense System, Rear............................... 177Passive Entry....................................................24Pets............................................................... 142Placard, Tire And Loading Information.......... 257PowerBrakes...................................................... 275Deck Lid Release.........................................62Distribution Center (Fuses)....................... 213Door Locks...................................................24Mirrors.........................................................40Outlet (Auxiliary Electrical Outlet).................74Seats...........................................................31Steering.................................................... 160Sunroof........................................................59Tilt/Telescoping Steering Column................38Windows......................................................57
20_LX_OM_EN_USC_t.book Page 320