2020 CHRYSLER 300 windshield wipers
[x] Cancel search: windshield wipersPage 5 of 328

3
EXTERIOR LIGHTS ................................................42 Multifunction Lever ...................................... 42
Headlight Switch .......................................... 42
Daytime Running Lights (DRLs) .................. 43
High/Low Beam Switch ............................... 43
Automatic High Beam — If Equipped ......... 43
Flash-To-Pass ............................................... 44
Automatic Headlights ................................. 44
Parking Lights ............................................. 44
Headlights On With Wipers ......................... 44
Adaptive Bi-Xenon High Intensity
Discharge Headlights — If Equipped........... 44 Headlight Time Delay .................................. 45
Lights-On Reminder .................................... 45
Fog Lights — If Equipped ............................. 45
Turn Signals ................................................ 46
Lane Change Assist — If Equipped ............. 46
INTERIOR LIGHTS ................................................46
Courtesy Lights ............................................ 46
WINDSHIELD WIPERS AND WASHERS .............48
Wiper Operation ........................................... 48
Rain Sensing Wipers — If Equipped ........... 49
CLIMATE CONTROLS ...........................................50
Automatic Climate Control Overview .......... 50
Climate Control Functions ........................... 55
Automatic Temperature Control (ATC) ....... 55
Operating Tips ............................................. 56 WINDOWS ............................................................ 57
Power Window Controls .............................. 57
Wind Buffeting ............................................ 59
PANORAMIC SUNROOF — IF EQUIPPED ........... 59
Opening Sunroof .......................................... 59
Closing Sunroof............................................ 60
Wind Buffeting ............................................ 60
Opening Power Shade ................................. 60
Closing Power Shade................................... 61
Pinch Protect Feature.................................. 61
Sunroof Maintenance.................................. 61
Ignition Off Operation .................................. 61
HOOD ..................................................................... 61
To Open The Hood ...................................... 61
To Close The Hood ....................................... 62
TRUNK.................................................................... 62
Opening ........................................................ 62
Closing .......................................................... 63
Trunk Safety ................................................. 63
Cargo Area Features ................................... 64
LOAD LEVELING SYSTEM — IF EQUIPPED ....... 65
GARAGE DOOR OPENER — IF EQUIPPED ........ 66 Before You Begin Programming
HomeLink® .................................................. 66 Canadian/Gate Operator Programming ..... 68
Using HomeLink®........................................ 69
Security......................................................... 69
Troubleshooting Tips ................................... 69
General Information .................................... 70 INTERNAL EQUIPMENT ........................................70
Storage ......................................................... 70
Cupholders .................................................. 72
Power Sunshade — If Equipped .................. 73
Electrical Power Outlets .............................. 74
Sunglasses Bin Door .................................. 75
GETTING TO KNOW YOUR
INSTRUMENT PANEL
INSTRUMENT CLUSTER .......................................76
Instrument Cluster Descriptions ................ 77
INSTRUMENT CLUSTER DISPLAY .......................78
Location And Controls ................................. 78
Engine Oil Life Reset .................................. 79
Instrument Cluster Display Selectable
Menu Items .................................................. 80 Battery Saver On/Battery Saver Mode
Message — Electrical Load Reduction
Actions — If Equipped ................................. 83
WARNING LIGHTS AND MESSAGES ..................84
Red Warning Lights ..................................... 85
Yellow Warning Lights ................................. 88
Yellow Indicator Lights ................................ 91
Green Indicator Lights ................................. 91
White Indicator Lights ................................. 92
Blue Indicator Lights ................................... 92
ONBOARD DIAGNOSTIC SYSTEM — OBD II ......93
Onboard Diagnostic System (OBD II)
Cybersecurity ............................................... 93
20_LX_OM_EN_USC_t.book Page 3
Page 50 of 328

48GETTING TO KNOW YOUR VEHICLE
(Continued)
Dimmer Controls
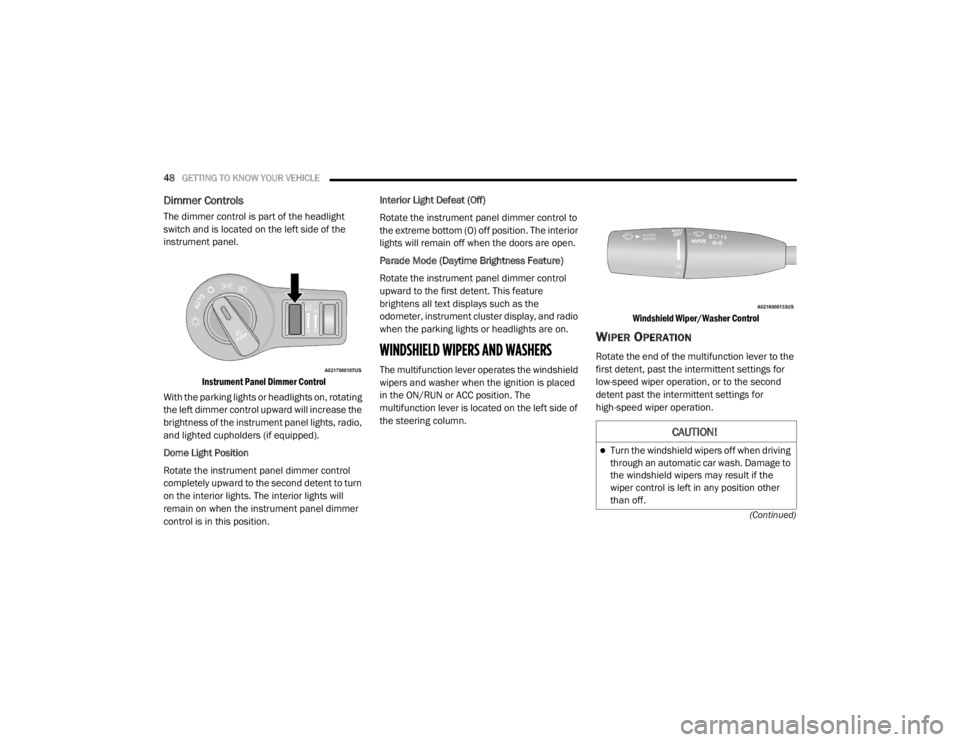
The dimmer control is part of the headlight
switch and is located on the left side of the
instrument panel.
Instrument Panel Dimmer Control
With the parking lights or headlights on, rotating
the left dimmer control upward will increase the
brightness of the instrument panel lights, radio,
and lighted cupholders (if equipped).
Dome Light Position
Rotate the instrument panel dimmer control
completely upward to the second detent to turn
on the interior lights. The interior lights will
remain on when the instrument panel dimmer
control is in this position. Interior Light Defeat (Off)
Rotate the instrument panel dimmer control to
the extreme bottom (O) off position. The interior
lights will remain off when the doors are open.
Parade Mode (Daytime Brightness Feature)
Rotate the instrument panel dimmer control
upward to the first detent. This feature
brightens all text displays such as the
odometer, instrument cluster display, and radio
when the parking lights or headlights are on.
WINDSHIELD WIPERS AND WASHERS
The multifunction lever operates the windshield
wipers and washer when the ignition is placed
in the ON/RUN or ACC position. The
multifunction lever is located on the left side of
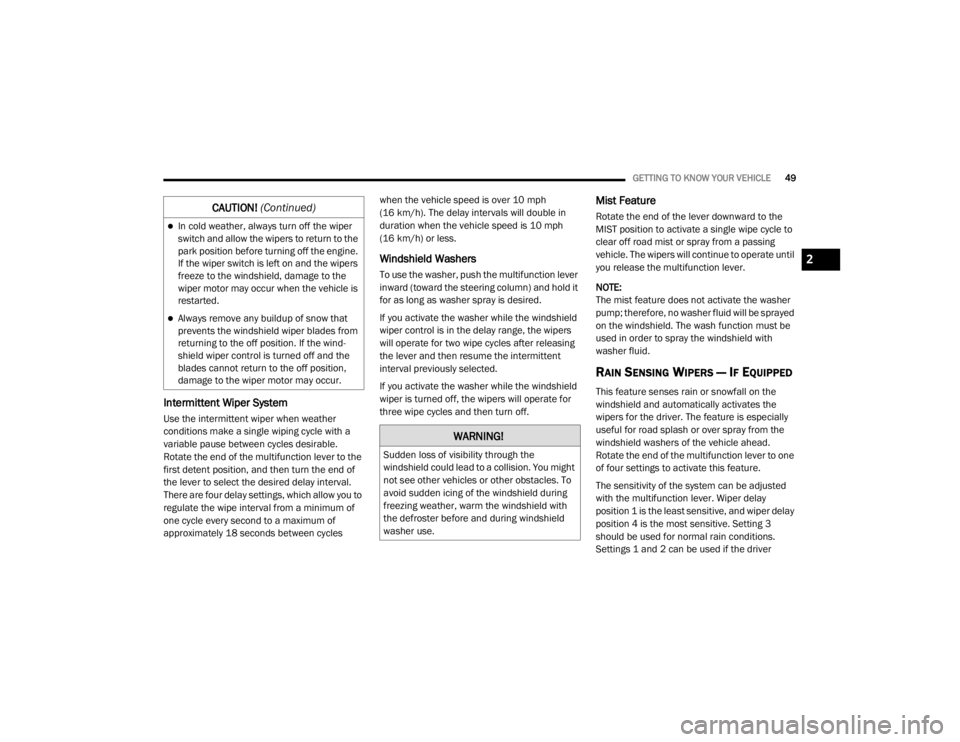
the steering column.
Windshield Wiper/Washer Control
WIPER OPERATION
Rotate the end of the multifunction lever to the
first detent, past the intermittent settings for
low-speed wiper operation, or to the second
detent past the intermittent settings for
high-speed wiper operation.
CAUTION!
Turn the windshield wipers off when driving
through an automatic car wash. Damage to
the windshield wipers may result if the
wiper control is left in any position other
than off.
20_LX_OM_EN_USC_t.book Page 48
Page 51 of 328

GETTING TO KNOW YOUR VEHICLE49
Intermittent Wiper System
Use the intermittent wiper when weather
conditions make a single wiping cycle with a
variable pause between cycles desirable.
Rotate the end of the multifunction lever to the
first detent position, and then turn the end of
the lever to select the desired delay interval.
There are four delay settings, which allow you to
regulate the wipe interval from a minimum of
one cycle every second to a maximum of
approximately 18 seconds between cycles when the vehicle speed is over 10 mph
(16 km/h). The delay intervals will double in
duration when the vehicle speed is 10 mph
(16 km/h) or less.
Windshield Washers
To use the washer, push the multifunction lever
inward (toward the steering column) and hold it
for as long as washer spray is desired.
If you activate the washer while the windshield
wiper control is in the delay range, the wipers
will operate for two wipe cycles after releasing
the lever and then resume the intermittent
interval previously selected.
If you activate the washer while the windshield
wiper is turned off, the wipers will operate for
three wipe cycles and then turn off.
Mist Feature
Rotate the end of the lever downward to the
MIST position to activate a single wipe cycle to
clear off road mist or spray from a passing
vehicle. The wipers will continue to operate until
you release the multifunction lever.
NOTE:
The mist feature does not activate the washer
pump; therefore, no washer fluid will be sprayed
on the windshield. The wash function must be
used in order to spray the windshield with
washer fluid.
RAIN SENSING WIPERS — IF EQUIPPED
This feature senses rain or snowfall on the
windshield and automatically activates the
wipers for the driver. The feature is especially
useful for road splash or over spray from the
windshield washers of the vehicle ahead.
Rotate the end of the multifunction lever to one
of four settings to activate this feature.
The sensitivity of the system can be adjusted
with the multifunction lever. Wiper delay
position 1 is the least sensitive, and wiper delay
position 4 is the most sensitive. Setting 3
should be used for normal rain conditions.
Settings 1 and 2 can be used if the driver
In cold weather, always turn off the wiper
switch and allow the wipers to return to the
park position before turning off the engine.
If the wiper switch is left on and the wipers
freeze to the windshield, damage to the
wiper motor may occur when the vehicle is
restarted.
Always remove any buildup of snow that
prevents the windshield wiper blades from
returning to the off position. If the wind
-
shield wiper control is turned off and the
blades cannot return to the off position,
damage to the wiper motor may occur.
CAUTION! (Continued)
WARNING!
Sudden loss of visibility through the
windshield could lead to a collision. You might
not see other vehicles or other obstacles. To
avoid sudden icing of the windshield during
freezing weather, warm the windshield with
the defroster before and during windshield
washer use.
2
20_LX_OM_EN_USC_t.book Page 49
Page 52 of 328

50GETTING TO KNOW YOUR VEHICLE
desires less wiper sensitivity. Setting 4 can be
used if the driver desires more sensitivity. The
rain sensing wipers will automatically change
between an intermittent wipe, slow wipe and a
fast wipe depending on the amount of moisture
that is sensed on the windshield. Place the
wiper switch in the OFF position when not using
the system.
The Rain Sensing feature can be turned on and
off using the Uconnect system, refer to
“Uconnect Settings” in “Multimedia” for further
information.
NOTE:
The Rain Sensing feature will not operate
when the wiper speed is in the low or high
position.
The Rain Sensing feature may not function
properly when ice or dried salt water is
present on the windshield.
Use of Rain-X or products containing wax or
silicone may reduce rain sensor perfor -
mance. The Rain Sensing system has protective
features for the wiper blades and arms. It will
not operate under the following conditions:
Low Temperature Wipe Inhibit
— The Rain
Sensing feature will not operate when the
ignition is placed in the ON/RUN position, the
vehicle is stationary and the outside
temperature is below 32°F (0°C), unless the
wiper control on the multifunction lever is
moved, the vehicle speed becomes greater
than 0 mph (0 km/h) or the outside tempera -
ture rises above freezing.
Neutral Wipe Inhibit — The Rain Sensing
feature will not operate when the ignition is
placed in the ON/RUN position, the auto -
matic transmission gear selector is in the
NEUTRAL position and the vehicle speed is
less than 3 mph (5 km/h), unless the wiper
control on the multifunction lever is moved or
the gear selector is moved out of the
NEUTRAL position.
Remote Start Mode Inhibit — On vehicles
equipped with Remote Starting system, Rain
Sensing wipers are not operational when the
vehicle is in the remote start mode. Once the
operator is in the vehicle and has placed the ignition switch in the ON/RUN position, rain
sensing wiper operation can resume, if it has
been selected, and no other inhibit condi
-
tions (mentioned previously) exist.
CLIMATE CONTROLS
The Climate Control system allows you to
regulate the temperature, air flow, and direction
of air circulating throughout the vehicle. The
controls are located on the touchscreen (if
equipped) and on the instrument panel below
the radio.
AUTOMATIC CLIMATE CONTROL
O
VERVIEW
Uconnect 4C/4C NAV Automatic Climate Controls
20_LX_OM_EN_USC_t.book Page 50
Page 103 of 328

SAFETY101
Disabling And Enabling HSA
This feature can be turned on or turned off. To
change the current setting, proceed as follows:
If disabling HSA using your instrument cluster
display, refer to “Instrument Cluster Display”
in “Getting To Know Your Instrument Panel”
for further information.
If disabling HSA using Uconnect Settings,
refer to “Uconnect Settings” in “Multimedia”
for further information.
For vehicles not equipped with an instrument
cluster display, perform the following steps:
1. Center the steering wheel (front wheels pointing straight forward).
2. Shift the transmission into PARK.
3. Apply the parking brake.
4. Start the engine.
5. Rotate the steering wheel slightly more than one-half turn to the left.
6. Push the “ESC OFF” button located in the lower switch bank below the climate control
four times within 20 seconds. The “ESC OFF
Indicator Light” should turn on and turn off
two times.
7. Rotate the steering wheel back to center and then an additional slightly more than
one-half turn to the right. 8. Turn the ignition to the OFF mode and then
back to ON. If the sequence was completed
properly, the “ESC OFF Indicator Light” will
blink several times to confirm HSA is
disabled.
9. Repeat these steps if you want to return this feature to its previous setting.
Rain Brake Support (RBS)
Rain Brake Support (RBS) may improve braking
performance in wet conditions. It will
periodically apply a small amount of brake
pressure to remove any water buildup on the
front brake rotors. It functions when the
windshield wipers are in LO or HI speed. When
RBS is active, there is no notification to the
driver and no driver interaction is required.
Ready Alert Braking (RAB)
Ready Alert Braking (RAB) may reduce the time
required to reach full braking during emergency
braking situations. It anticipates when an
emergency braking situation may occur by
monitoring how fast the throttle is released by
the driver. The Electronic Brake Controller (EBC)
will prepare the brake system for a panic stop.
WARNING!
If you use a trailer brake controller with your
trailer, the trailer brakes may be activated
and deactivated with the brake switch. If
so, there may not be enough brake pres -
sure to hold both the vehicle and the trailer
on a hill when the brake pedal is released.
In order to avoid rolling down an incline
while resuming acceleration, manually acti -
vate the trailer brake or apply more vehicle
brake pressure prior to releasing the brake
pedal.
HSA is not a parking brake. Always apply
the parking brake fully when exiting your
vehicle. Also, be certain to place the trans -
mission in PARK.
Failure to follow these warnings can result
in a collision or serious personal injury.
4
20_LX_OM_EN_USC_t.book Page 101
Page 245 of 328

SERVICING AND MAINTENANCE243
NOTE:
Use only manufacturer approved A/C system
PAG compressor oil, and refrigerants.
A/C Air Filter
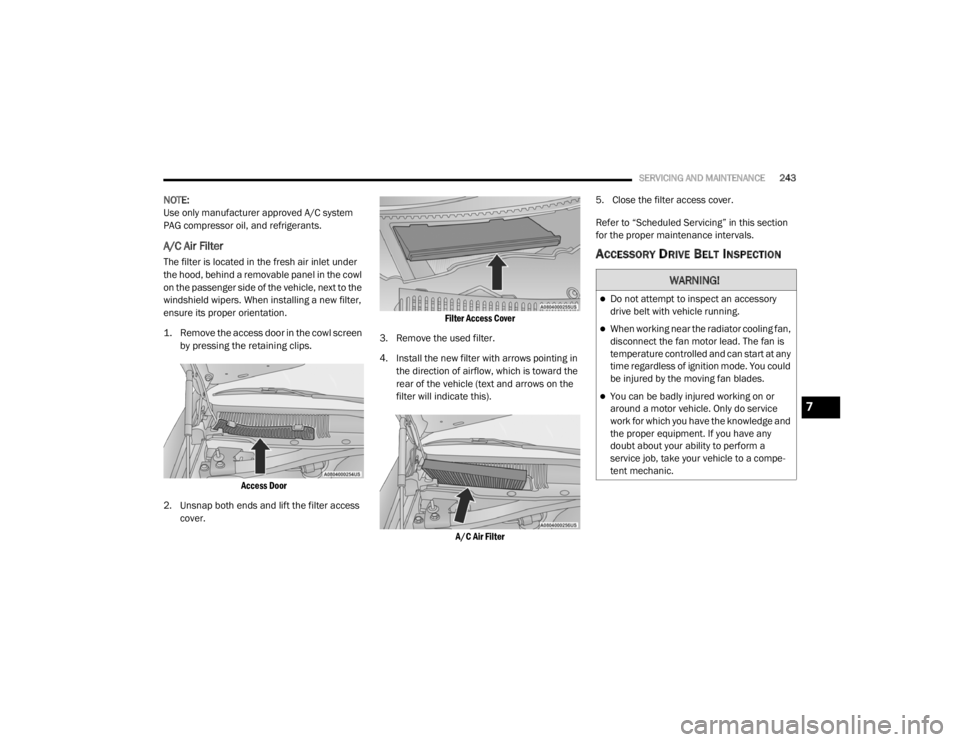
The filter is located in the fresh air inlet under
the hood, behind a removable panel in the cowl
on the passenger side of the vehicle, next to the
windshield wipers. When installing a new filter,
ensure its proper orientation.
1. Remove the access door in the cowl screen
by pressing the retaining clips.
Access Door
2. Unsnap both ends and lift the filter access cover.
Filter Access Cover
3. Remove the used filter.
4. Install the new filter with arrows pointing in the direction of airflow, which is toward the
rear of the vehicle (text and arrows on the
filter will indicate this).
A/C Air Filter
5. Close the filter access cover.
Refer to “Scheduled Servicing” in this section
for the proper maintenance intervals.ACCESSORY DRIVE BELT INSPECTION
WARNING!
Do not attempt to inspect an accessory
drive belt with vehicle running.
When working near the radiator cooling fan,
disconnect the fan motor lead. The fan is
temperature controlled and can start at any
time regardless of ignition mode. You could
be injured by the moving fan blades.
You can be badly injured working on or
around a motor vehicle. Only do service
work for which you have the knowledge and
the proper equipment. If you have any
doubt about your ability to perform a
service job, take your vehicle to a compe
-
tent mechanic.7
20_LX_OM_EN_USC_t.book Page 243
Page 246 of 328

244SERVICING AND MAINTENANCE
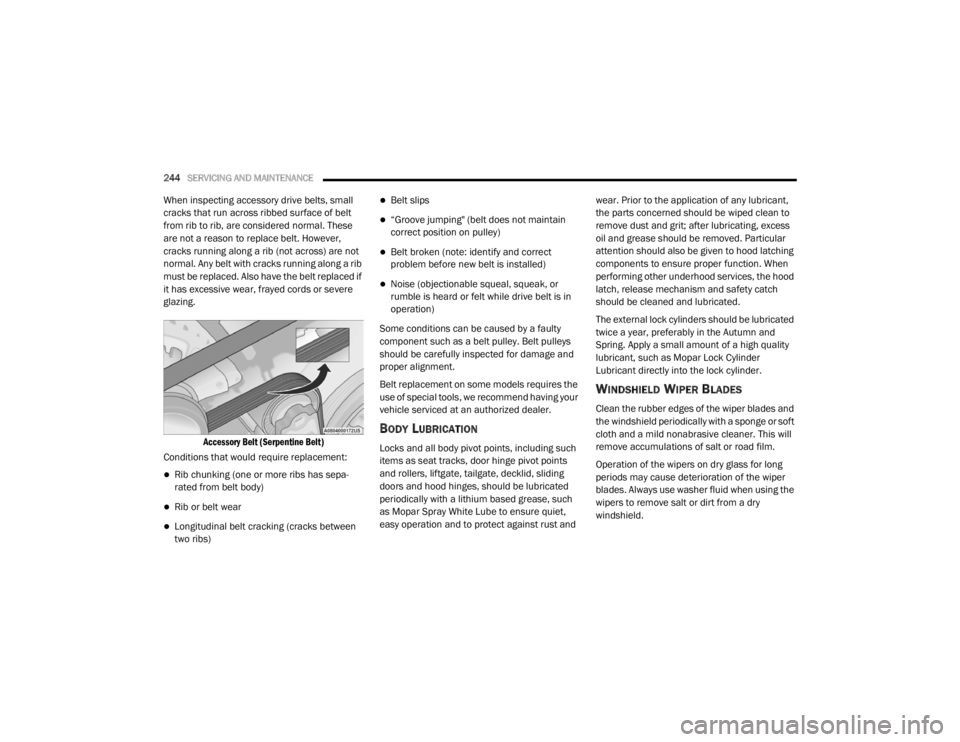
When inspecting accessory drive belts, small
cracks that run across ribbed surface of belt
from rib to rib, are considered normal. These
are not a reason to replace belt. However,
cracks running along a rib (not across) are not
normal. Any belt with cracks running along a rib
must be replaced. Also have the belt replaced if
it has excessive wear, frayed cords or severe
glazing.
Accessory Belt (Serpentine Belt)
Conditions that would require replacement:
Rib chunking (one or more ribs has sepa -
rated from belt body)
Rib or belt wear
Longitudinal belt cracking (cracks between
two ribs)
Belt slips
“Groove jumping" (belt does not maintain
correct position on pulley)
Belt broken (note: identify and correct
problem before new belt is installed)
Noise (objectionable squeal, squeak, or
rumble is heard or felt while drive belt is in
operation)
Some conditions can be caused by a faulty
component such as a belt pulley. Belt pulleys
should be carefully inspected for damage and
proper alignment.
Belt replacement on some models requires the
use of special tools, we recommend having your
vehicle serviced at an authorized dealer.
BODY LUBRICATION
Locks and all body pivot points, including such
items as seat tracks, door hinge pivot points
and rollers, liftgate, tailgate, decklid, sliding
doors and hood hinges, should be lubricated
periodically with a lithium based grease, such
as Mopar Spray White Lube to ensure quiet,
easy operation and to protect against rust and wear. Prior to the application of any lubricant,
the parts concerned should be wiped clean to
remove dust and grit; after lubricating, excess
oil and grease should be removed. Particular
attention should also be given to hood latching
components to ensure proper function. When
performing other underhood services, the hood
latch, release mechanism and safety catch
should be cleaned and lubricated.
The external lock cylinders should be lubricated
twice a year, preferably in the Autumn and
Spring. Apply a small amount of a high quality
lubricant, such as Mopar Lock Cylinder
Lubricant directly into the lock cylinder.
WINDSHIELD WIPER BLADES
Clean the rubber edges of the wiper blades and
the windshield periodically with a sponge or soft
cloth and a mild nonabrasive cleaner. This will
remove accumulations of salt or road film.
Operation of the wipers on dry glass for long
periods may cause deterioration of the wiper
blades. Always use washer fluid when using the
wipers to remove salt or dirt from a dry
windshield.
20_LX_OM_EN_USC_t.book Page 244
Page 295 of 328

MULTIMEDIA293
Lights
After pressing the Lights button on the touchscreen, the following settings will be available:Headlights With Wipers — If Equipped
OnOff
Rain Sensing Auto Wipers — If Equipped OnOff
NOTE:
When this feature is selected and the wipers are on, the system will automatically activate the windshield wipers if it senses moisture on the windshield.
Setting Name Selectable Options
Setting NameSelectable Options
Headlight Off Delay0 sec
30 sec
60 sec 90 sec
Headlight Illumination On Approach 0 sec
30 sec
60 sec 90 sec
Headlights With Wipers — If Equipped OnOff
Auto Dim High Beams — If Equipped OnOff
Daytime Running Lights — If Equipped OnOff
NOTE:
When the “Daytime Running Lights” feature is selected, the daytime running lights can be turned On or Off. This feature is only allowed by law in the
country of the vehicle purchase. Steering Directed Lights — If Equipped OnOff
Flash Lights With Lock OnOff
9
20_LX_OM_EN_USC_t.book Page 293