2020 AUDI TT COUPE infotainment
[x] Cancel search: infotainmentPage 155 of 280

8S1012721BB
Navigation
Online point of interest search (online Accessing destinations from your myAudi
search) account
Applies to: vehicles with navigation system and Audi connect
Infotainment
You can search for points of interest on the Inter-
net.
Requirement: the requirements for Audi connect
services must be met > page 142.
Opening the online search
> Press the LNAV/MAP] button repeatedly until
the Enter destination menu is displayed
=> page 149, fig. 136.
> Select: left control button > Online search. The
search area last set is displayed in the input
field.
Change search area
> Select and confirm: Search area > a search area
from the list.
Searching for an online destination in the
selected search area
> If necessary, enter a new city, state, or country.
> Enter the search term, such as hotel.
> Press the control knob.
> Select and confirm an online destination from
the list.
Searching for an online destination ina
specific category
> Select and confirm Select category.
> Select and confirm a category, such as Restau-
rants.
Find which search areas are available under
=> page 152.
You can search for online destinations using the
voice recognition system* > table on page 126.
@) Note
Read the information about Audi connect, and
be sure to note the connectivity costs section
=> page 142.
Applies to: vehicles with navigation system and Audi connect
Infotainment
Import destinations from your myAudi account
into the MMI.
Requirement: you must have created a myAudi
account at my.audi.com. You must have a vehicle
stored in your myAudi account and you must have
a destination stored.
> Press the [NAV/MAP] button repeatedly until
the Enter destination menu is displayed
=> page 149, fig. 136.
> Select: left control button > myAudi contacts.
> If necessary, enter your myAudi user data or
your myAudi PIN. The contacts stored in myAu-
di are displayed.
> Select and confirm a contact > desired destina-
tion.
> Select and confirm Start route guidance.
@) Tips
— You only need to enter the myAudi user data
one time.
— You can receive your myAudi PIN if you have
set up a myAudi account.
— For additional information, visit my.audi.
com.
Entering a destination using geo
coordinates
Applies to: vehicles with navigation system
> Press the [NAV/MAP] button repeatedly until
the Enter destination menu is displayed
=> page 149, fig. 136.
> Select: left control button > Geographical coor-
dinates.
> Select Latitude/Longitude.
> Turn the control knob to change the latitude/
longitude.
> Press the control knob to confirm your input.
> Select and confirm Start route guidance.
153
Page 156 of 280

Navigation
dding a stopover
Applies to: vehicles with navigation system
Tom I Nae}
Delete destination
SECM eee
Delete stopover
Fig. 138 Infotainment system: active route guidance with
stopover
You can enter an additional destination when
route guidance is active.
Requirement: route guidance must already be ac-
tive.
Opening a menu
> Press the LNAV/MAP] button repeatedly until
the Enter destination menu is displayed
=> page 149, fig. 136.
Entering a destination as a stopover
> Enter a destination in the input line @
=> page 149, fig. 136.
> Select and confirm a destination from the re-
sults list.
> Select and confirm Add as stopover.
Deleting a stopover
> Push the control knob up. Free text search and
active route guidance are displayed, or:
> Turn the control knob to the left until the active
route guidance is shown.
> Select and confirm Delete stopover under the
stopover (2). The stopover is deleted.
Cancel route guidance
Applies to: vehicles with navigation system
Requirement: route guidance must be active.
> Press the LNAV/MAP] button repeatedly until
the Enter destination menu is displayed
=> page 149, fig. 136.
D_ This function is not offered in Mexico.
154
> Turn the control knob to the left until the active
route guidance is shown.
> Select and confirm Delete destination
=> page 154, fig. 138. The destination is delet-
ed, or:
> Select: right control button > Cancel route
guidance
Additional options when entering a
Cir)
Applies to: vehicles with navigation system
> Press the right control button.
Depending on the selected function, the follow-
ing options may be available when entering a
destination:
Cancel route guidance: Requirement: route guid-
ance must be active. Route guidance is canceled.
For additional information, see > page 154.
Map settings: > page 160.
Navigation settings: > page 156.
Voice guidance: > page 157.
Route criteria: > page 156.
Show location on map: Requirement: you must
have selected a destination from the results list.
The destination entered is displayed on the map.
Parking at this location: Requirement: you must
have selected a destination from the results list.
All parking options near the selected location are
displayed in the Infotainment system.
POIs along the route: all points of interest in the
area around the vehicle will be displayed when
route guidance is active.
Delete: the selected entry is deleted. You can de-
lete individual entries or all entries (for example,
favorites or last destinations).
Audi connect at this location”): Requirement:
you must have selected a destination from the re-
sults list. Allows you to search for items in the vi-
cinity of the selected location, such as travel in-
formation.
Page 158 of 280

Navigation
Alternative routes
Applies to: vehicles with navigation system
Fig. 139 Infotainment system: alternative routes display
Requirement: a destination must be entered and
the route guidance must be started.
> Press the [NAV/MAP] button repeatedly until
the Enter destination menu is displayed
=> page 149, fig. 136.
> Select: right control button > Navigation set-
tings > Show alternative routes.
Three routes are displayed in the overview map
after you enter a destination.
If available, the following information will ap-
pear on the route suggestions:
— Route type (fast (@, fast alternative (2), eco-
nomic route @))
— Distance to the destination and the calculated
arrival time
— Traffic congestion along the route including
time
delays
The route that was calculated according to the
route criteria you selected is shown on the map.
The special properties of the route (such as ferry
connections) may be displayed (). Additional in-
formation about individual route criteria can be
found in > page 156.
Additional settings
Navigation settings
Applies to: vehicles with navigation system
> Press the LNAV/MAP] button repeatedly until
the Enter destination menu is displayed
> page 149, fig. 136.
> Select: right control button > Navigation set-
tings.
156
Depending on the selected function, the follow-
ing settings can be selected:
Show alternative routes
Up to three route suggestions and their proper-
ties are displayed on the overview map when the
function is switched on. > page 156.
Low fuel warning
A message is displayed if the fuel gauge goes be-
low the reserve marking when this function is
switched on (MW. After confirming this message, a
list of gas stations in the area is displayed. When
a gas station is selected, route guidance from the
current vehicle position is calculated.
Notification when nearby*
The notification when nearby is switched off at
the factory.
The MMI notifies you when you are approaching
selected points of interest when this function is
switched on MW. You can also have a Notification
tone.
Presentation mode
The Presentation mode helps you to effectively
plan a trip and follow the planned route without
moving the vehicle. You can use Select starting
point when you would like to calculate a route
starting
from a location other than the vehicle
position, for example. Start Presentation mode
to simulate route guidance.
leg]
Applies to: vehicles with navigation system
10] 16
> tak) ° [|
Fig. 140 Infotainment system: possible route criteria
RAH-8472| i
Page 163 of 280
8S1012721BB
Navigation
Satellite map
Applies to: vehicles with navigation system and Audi connect
Infotainment
bo} f=
S Figueroa St
W Washington Blvd 7
Los Angeles ee
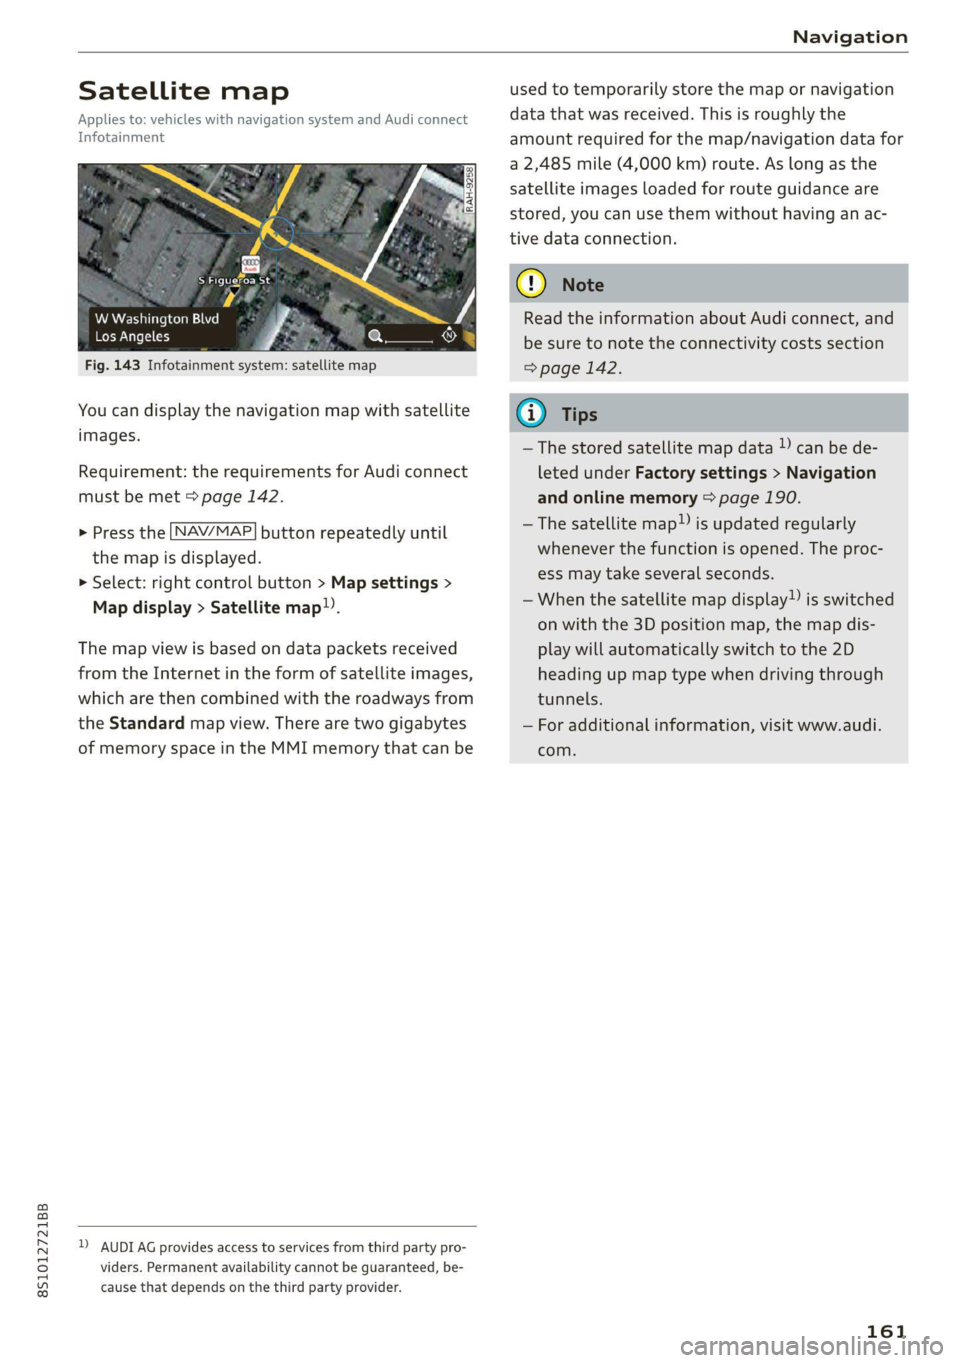
Fig. 143 Infotainment system: satellite map
You can display the navigation map with satellite
images.
Requirement: the requirements for Audi connect
must be met > page 142.
> Press the [NAV/MAP] button repeatedly until
the map is displayed.
> Select: right control button > Map settings >
Map display > Satellite map.
The map view is based on data packets received
from the Internet in the form of satellite images,
which are then combined with the roadways from
the Standard map view. There are two gigabytes
of memory space in the MMI memory that can be
D) AUDI AG provides access to services from third party pro-
viders. Permanent availability cannot be guaranteed, be-
cause that depends on the third party provider.
used to temporarily store the map or navigation
data that was received. This is roughly the
amount required for the map/navigation data for
a 2,485 mile (4,000 km) route. As long as the
satellite images loaded for route guidance are
stored, you can use them without having an ac-
tive data connection.
Q) Note
Read the information about Audi connect, and
be sure to note the connectivity costs section
=> page 142.
@ Tips
—The stored satellite map data )) can be de-
leted under Factory settings > Navigation
and online memory > page 190.
—The satellite map”) is updated regularly
whenever the function is opened. The proc-
ess may take several seconds.
—When the satellite map display”) is switched
on with the 3D position map, the map dis-
play will automatically switch to the 2D
heading up map type when driving through
tunnels.
— For additional information, visit www.audi.
com.
161
Page 164 of 280
Navigation
Accessing traffic information
(OPN Maelarreleeleurl dela)
Applies to: vehicles with navigation system and Audi connect Infotainment
a icon better route is available. —@
slay along the route:
Nogales St, Northbound
Northbound
eel
i) Northbound
cory
C)
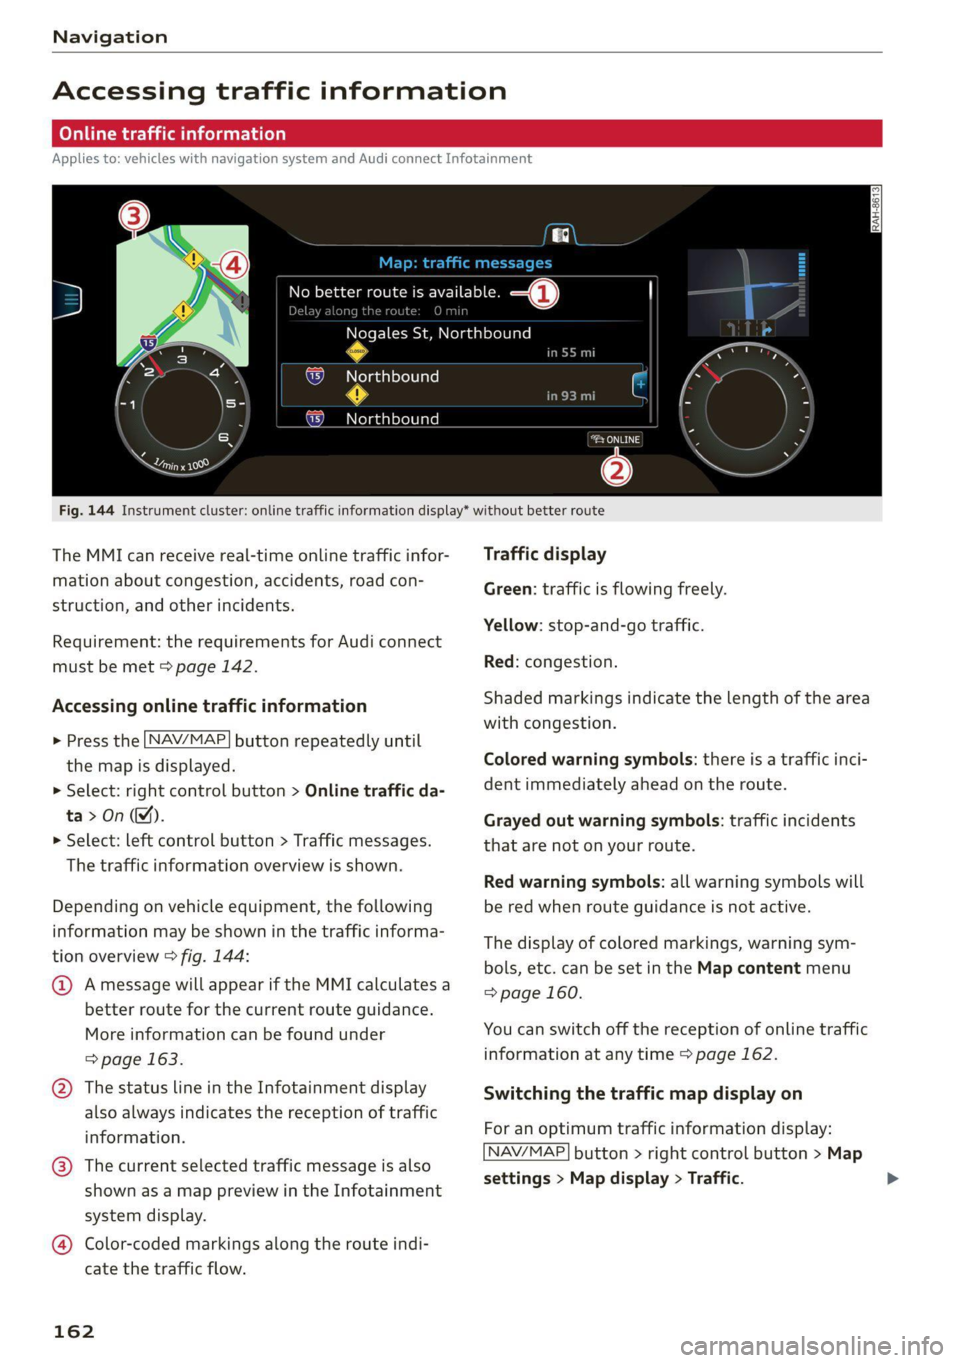
Fig. 144 Instrument cluster: online traffic information display* without better route
The MMI can receive real-time online traffic infor-
mation about congestion, accidents, road con-
struction, and other incidents.
Requirement: the requirements for Audi connect
must be met > page 142.
Accessing online traffic information
> Press the [NAV/MAP] button repeatedly until
the map is displayed.
> Select: right control button > Online traffic da-
ta>On(M).
> Select: left control button > Traffic messages.
The traffic information overview is shown.
Depending on vehicle equipment, the following
information may be shown in the traffic informa-
tion overview > fig. 144:
@ Amessage will appear if the MMI calculates a
better route for the current route guidance.
More
information can be found under
=> page 163.
@ The status line in the Infotainment display
also always indicates the reception of traffic
information.
@® The current selected traffic message is also
shown as a map preview in the Infotainment
system display.
@® Color-coded markings along the route indi-
cate the traffic flow.
162
Traffic display
Green: traffic is flowing freely.
Yellow: stop-and-go traffic.
Red: congestion.
Shaded markings indicate the length of the area
with congestion.
Colored warning symbols: there is a traffic inci-
dent immediately ahead on the route.
Grayed out warning symbols: traffic incidents
that are not on your route.
Red warning symbols: all warning symbols will
be red when route guidance is not active.
The display of colored markings, warning sym-
bols, etc. can be set in the Map content menu
=> page 160.
You can switch off the reception of online traffic
information at any time > page 162.
Switching the traffic map display on
For an optimum traffic information display:
NAV/MAP] button > right control button > Map
settings > Map display > Traffic.
Page 165 of 280
8S1012721BB
Navigation
You can also display the online traffic informa-
tion in the satellite map*») > page 161 or the
standard map > page 158, fig. 141
@ Note
Read the information about Audi connect, and
be sure to note the connectivity costs section
=> page 142.
G) Tips
— Having the Online traffic data function
switched on provides the most accurate re-
ports of traffic situations as well as traffic
forecasting. Your vehicle transmits and
processes its anonymous, encrypted posi-
tion information at regular intervals to the
traffic data provider. If you do not want to
use this, you can switch off the online traf-
fic information function at any time.
— The online traffic information network is
currently not available in all countries, and
the coverage is not nationwide. For addi-
tional information, visit www.audi.com.
Better route
Applies to: vehicles with Audi connect Infotainment naviga-
tion system
By receiving traffic information online, your MMI
calculates a better route if available and the pos-
sible time saved compared to the current route.
You can decide which route you would like to use.
Selecting a better route
Requirement: route guidance must be active and
online traffic information must be available
= page 162
2) AUDI AG provides access to services from third party pro-
viders. Permanent availability cannot be guaranteed, be-
cause that depends on the third party provider.
> Press the [NAV/MAP] button repeatedly until
the map is displayed.
If your MMI has calculated a better route than
the current route guidance, the message A better
route is available. appears for several seconds
along with the time that may be saved. A better
route is indicated in the map view by the symbol
® © page 158, fig. 141.
Apply better route
> Press the right control button in the map view,
or:
> Select: left control button > Traffic messages.
The better route with the calculated arrival
time is displayed.
> Select and confirm the better route, or:
> Select and confirm Details to display details
about the better route.
> You can zoom in or out on the map using the
MMI touch control pad.
Requirement: there must be more than one opti-
mized route calculated.
> Press the control knob to switch to the next
route in the detailed view.
> Closing the detailed view: press the [BACK
button.
After you have selected a better route, the route
will be recalculated.
163
Page 167 of 280
8S1012721BB
Radio
Radio
Opening the radio
@) =
CEVA PE
89.9 _WIBI-FM HD4
WIBI-FM HD6
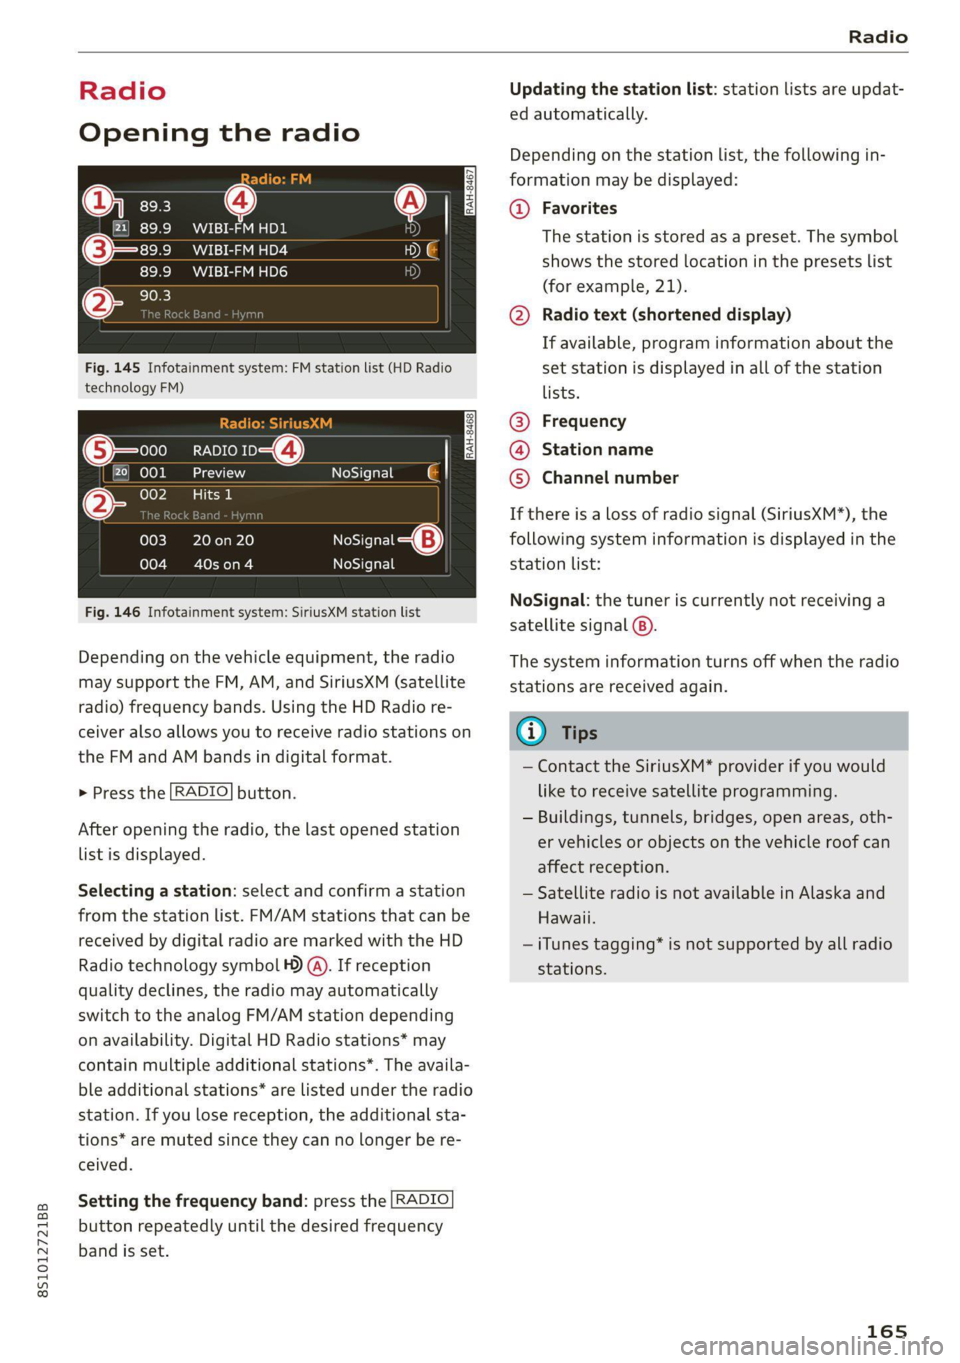
Fig. 145 Infotainment system: FM station list (HD Radio
technology FM)
RADIO 4)
ada
eee
NoSignal é |
20 on 20
terol aes
NoSignal
NoSignal
Fig. 146 Infotainment system: SiriusXM station list
Depending on the vehicle equipment, the radio
may support the FM, AM, and SiriusXM (satellite
radio) frequency bands. Using the HD Radio re-
ceiver also allows you to receive radio stations on
the FM and AM bands in digital format.
> Press the [RADIO] button.
After opening the radio, the last opened station
list is displayed.
Selecting a station: select and confirm a station
from the station list. FM/AM stations that can be
received by digital radio are marked with the HD
Radio
technology symbol 4) @). If reception
quality declines, the radio may automatically
switch to the analog FM/AM station depending
on availability. Digital HD Radio stations* may
contain multiple additional stations*. The availa-
ble additional stations* are listed under the radio
station. If you lose reception, the additional sta-
tions* are muted since they can no longer be re-
ceived.
Setting the frequency band: press the [RADIO
button
repeatedly until the desired frequency
band is set.
Updating the station list: station lists are updat-
ed automatically.
Depending on the station list, the following in-
formation may be displayed:
@ Favorites
The station is stored as a preset. The symbol
shows the stored location in the presets list
(for example, 21).
@ Radio text (shortened display)
If available, program information about the
set station is displayed in all of the station
lists.
@ Frequency
@® Station name
© Channel number
If there is a loss of radio signal (SiriusXM*), the
following system information is displayed in the
station list:
NoSignal: the tuner is currently not receiving a
satellite signal @).
The system information turns off when the radio
stations are received again.
@ Tips
— Contact the SiriusXM* provider if you would
like to receive satellite programming.
— Buildings, tunnels, bridges, open areas, oth-
er vehicles or objects on the vehicle roof can
affect reception.
— Satellite radio is not available in Alaska and
Hawaii.
— iTunes tagging* is not supported by all radio
stations.
165
Page 168 of 280
![AUDI TT COUPE 2020 Owners Manual Radio
Radio functions
ct-Me-y aati]
SYED ee
Nt) Be
WIBI-FM HD6
Fig. 147 Infotainment system: input field and results list
for free text search
Using the free text search, you can selec](/manual-img/6/57658/w960_57658-167.png "AUDI TT COUPE 2020 Owners Manual Radio
Radio functions
ct-Me-y aati]
SYED ee
Nt) Be
WIBI-FM HD6
Fig. 147 Infotainment system: input field and results list
for free text search
Using the free text search, you can selec")
Radio
Radio functions
ct-Me-y aati]
SYED ee
Nt) Be
WIBI-FM HD6
Fig. 147 Infotainment system: input field and results list
for free text search
Using the free text search, you can select the or-
der that the search terms are entered in the input
field. Search in all frequency bands for a station
name or program type, such as News.
— Opening the free text search: when in a station
list, keep turning the control knob to the left
until the free text search input field is dis-
played.
— Using the free text search: See > page 119.
You can also search for frequencies.
Stations from the presets list (3) are displayed in
the results list @. The symbol @) indicates which
station list you switched to based on the station
selection.
Additional options
> Select: [RADIO] button > right control button.
The following options are available depending on
the frequency band:
— Sound settings: see > page 193.
— Store as favorite: See > page 167.
— Delete all entries: all entries are deleted in the
Last stations view.
—Tag this song for iTunes*): connect your Apple
device to the Audi music interface* on your
MMI. Select and confirm Tag this song for
iTunes. The track that is currently playing is
stored on your Apple device. Synchronize your
Apple device with iTunes. The tagged track will
) In preparation at the time of printing.
166
display the next time you open your iTunes me-
dia center. If there is no Apple device connect-
ed, the tagged tracks are stored temporarily in
the MMI (maximum of 50 tracks). Once you
connect your Apple device to the Audi music in-
terface, the tags are stored on the device.
— Manual tuning: the frequency bars are dis-
played. Select and confirm the desired frequen-
vy.
— Seek: the radio tunes to the previous or next re-
ceivable station.
— Scan: all stations are played for several seconds
each.
— Radio settings: see > page 168.
> Select: [RADIO] button > left control button >a
frequency band (such as FM) > a station.
> Select: right control button > Radio text.
Browsing through radio text entries: turn the
control knob to the left or right.
Requirement: a radio text entry must be dis-
played and the station must be broadcasting a
phone number, a navigation destination, or a text
message number as RadioText Plus information.
If a location, a phone number or a text message
number is included with a radio text entry, the ra-
dio text will be shown with a colored border. You
have the following options:
Call*/Start route guidance*/Write text mes-
sage”:
— Select a radio text entry with RadioText Plus in-
formation and press the control knob.
— Select and confirm Call*/Start route guid-
ance*/Write text message”. press the |BACK
button to cancel.
@) Tips
The availability of radio text and RadioText
Plus depends on the radio station.